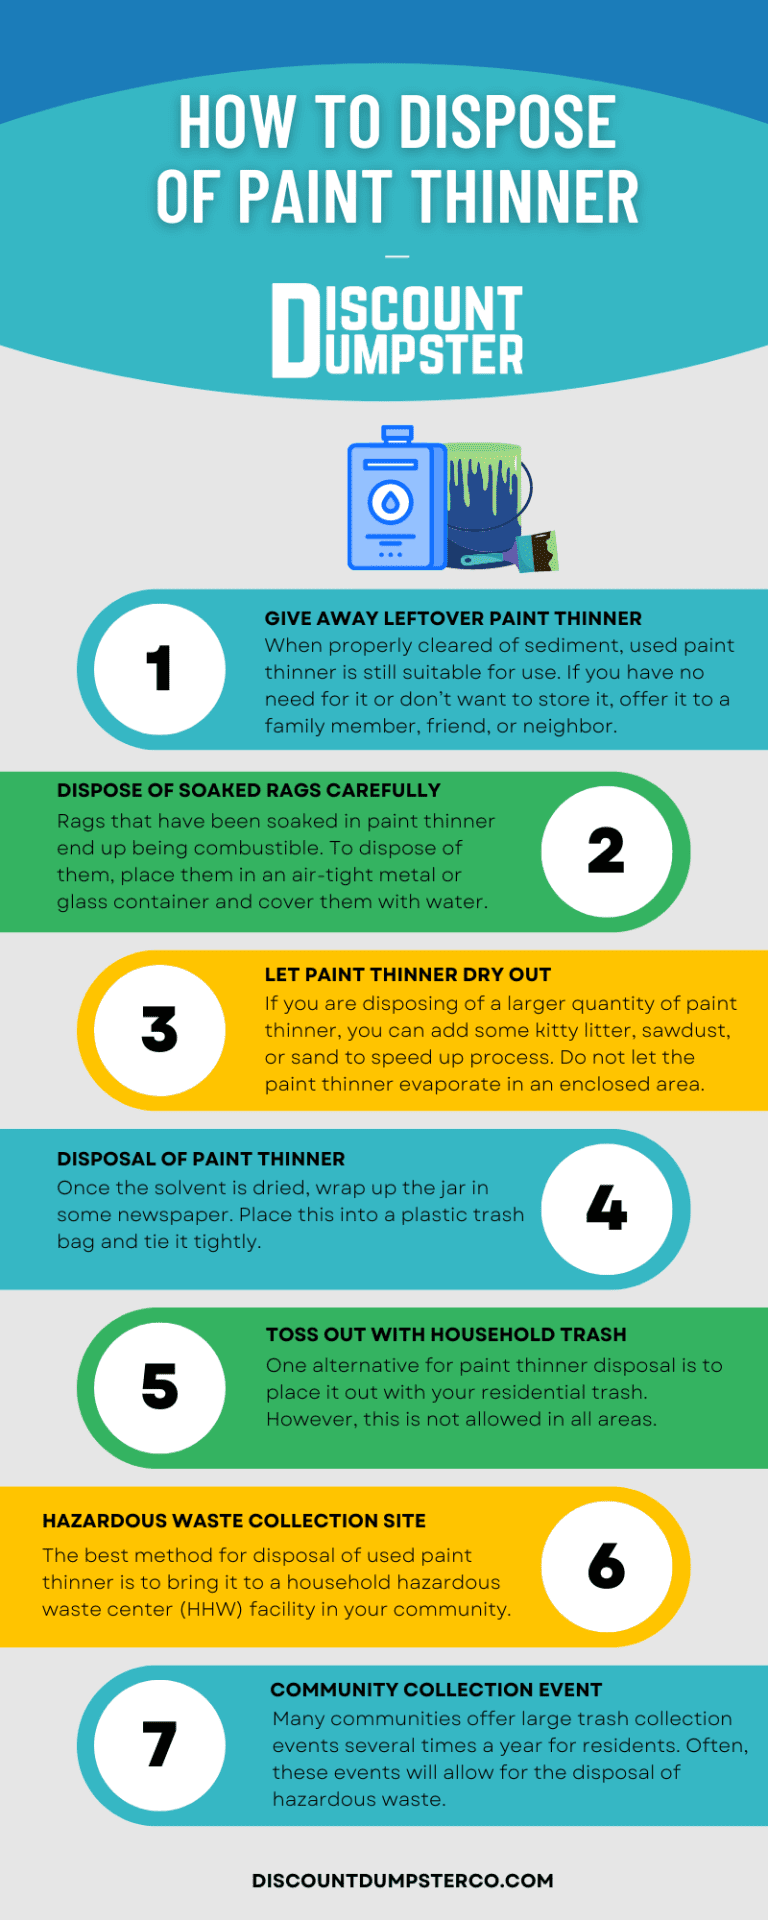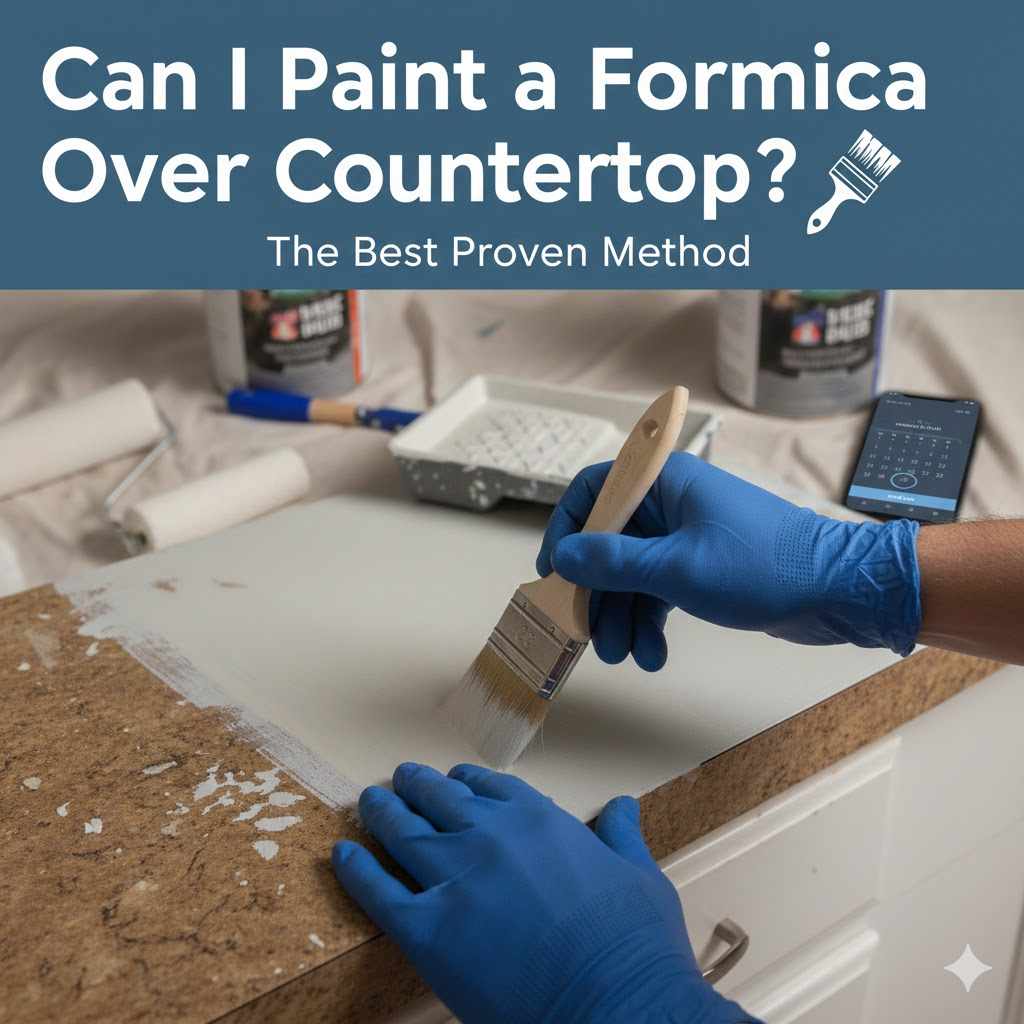
Can I Paint a Formica Countertop? The Best Proven Method
Yes, you can absolutely paint a Formica countertop! The key is proper preparation, including thorough cleaning, light sanding, and using a high-adhesion bonding primer. This proven method creates a durable, beautiful finish that completely transforms your kitchen or bathroom on a budget, giving old laminate a second life.
Hello, friend! Md Meraj here. If you’re standing in your kitchen or bathroom staring at dated, scratched, or just plain boring Formica countertops, you’re not alone. The thought of a full replacement can be overwhelming and expensive. But what if I told you there’s a simpler, budget-friendly way to get a fresh new look? You might be wondering, “Can I really paint these slick laminate surfaces and have them last?”
I’m here to tell you that with the right steps and a little patience, you absolutely can. Forget what you’ve heard about paint peeling or chipping. We’re going to walk through the proven method, step-by-step, to ensure your project is a huge success. Let’s get started!
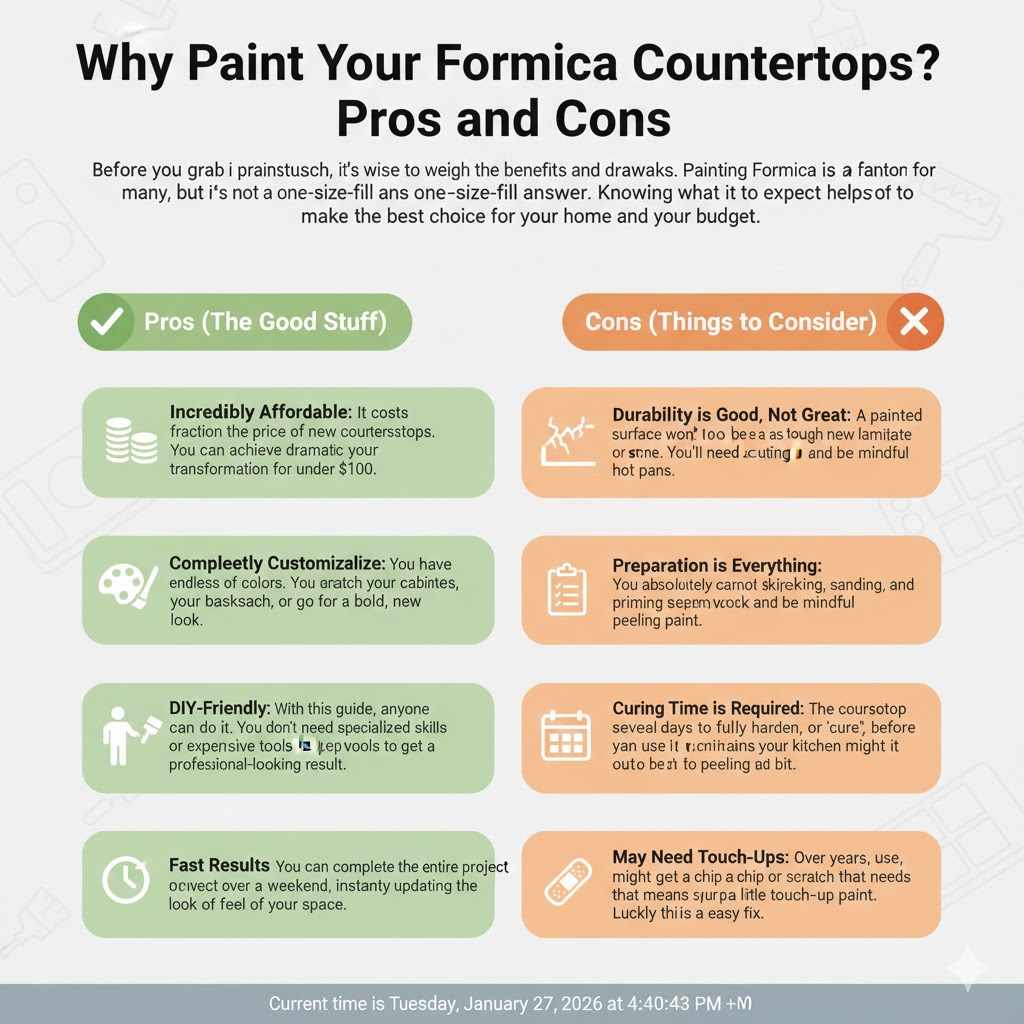
Why Paint Your Formica Countertops? Pros and Cons
Before you grab a paintbrush, it’s wise to weigh the benefits and drawbacks. Painting Formica is a fantastic solution for many, but it’s not a one-size-fits-all answer. Knowing what to expect helps you make the best choice for your home and your budget.
This simple project can breathe new life into a room without the cost and mess of a full renovation. It’s a game-changer for renters (with permission, of course!) or anyone wanting a big impact for a small price. Let’s break it down.
| Pros (The Good Stuff) | Cons (Things to Consider) |
|---|---|
| Incredibly Affordable: It costs a fraction of the price of new countertops. You can achieve a dramatic transformation for under $100. | Durability is Good, Not Great: A painted surface won’t be as tough as new laminate or stone. You’ll need to use cutting boards and be mindful of hot pans. |
| Completely Customizable: You have an endless choice of colors. You can match your cabinets, your backsplash, or go for a bold, new look. | Preparation is Everything: You absolutely cannot skip the cleaning, sanding, and priming steps. Rushing the prep work will lead to peeling paint. |
| DIY-Friendly: With this guide, anyone can do it. You don’t need specialized skills or expensive tools to get a professional-looking result. | Curing Time is Required: The countertop needs several days to fully harden, or “cure,” before you can use it normally. This means your kitchen might be out of commission for a bit. |
| Fast Results: You can complete the entire project over a weekend, instantly updating the look and feel of your space. | May Need Touch-Ups: Over years of use, you might get a chip or scratch that needs a little touch-up paint. Luckily, this is an easy fix. |
Gather Your Tools and Materials: The Foundation for Success
Having everything ready before you start makes the process smooth and enjoyable. Think of it like gathering your ingredients before you start cooking—it prevents last-minute panic! Here is a checklist of everything you’ll need for this project. The right supplies are just as important as the right technique.
Cleaning and Prep Supplies:
- Cleaner/Degreaser (like TSP substitute or a 50/50 mix of denatured alcohol and water)
- Clean cloths or rags
- Scrub sponge or scouring pad
- Painter’s tape
- Plastic sheeting or drop cloths
- Utility knife
- Safety glasses
- Gloves
- Respirator or mask (especially for sanding and priming)
Sanding and Painting Supplies:
- 120 to 150-grit sandpaper or sanding block
- Tack cloth or a vacuum with a brush attachment
- High-adhesion bonding primer (crucial for laminate surfaces)
- High-quality acrylic interior enamel paint (a durable cabinet or floor paint works well)
- Water-based polyurethane top coat (in your desired sheen: satin, semi-gloss, or gloss)
- High-quality paint brushes (for cutting in edges)
- High-density foam mini-rollers (for a super smooth finish)
- Paint tray and liners
The Step-by-Step Proven Method to Paint Formica
Alright, let’s get to the heart of the project. Follow these steps carefully, and I promise you’ll be proud of the results. The secret isn’t in fancy tools; it’s in being patient and methodical. Don’t rush, enjoy the process, and watch your countertops transform!
Step 1: Prepare Your Workspace
First things first, let’s protect the areas you don’t want painted. A little prep work here saves a lot of cleanup later.
- Clear Everything Off: Remove all appliances, utensil holders, and anything else from the countertops.
- Tape Everything: Using your painter’s tape, carefully mask off the edges where the countertop meets the wall, backsplash, and sink. Press the tape down firmly to create a clean seal.
- Cover Your Surroundings: Lay drop cloths or plastic sheeting over your floors and cabinets. You’d be surprised where paint splatters can end up!
- Ventilate: Open windows and doors to ensure good airflow. Good ventilation is key for your safety, especially when using primers and sealers. The Environmental Protection Agency (EPA) emphasizes the importance of proper ventilation during any home improvement project.
Step 2: A Deep, Thorough Cleaning
This is arguably the most important step. Paint and primer will not stick to grease, grime, or soap scum. Your countertops must be perfectly clean.
- Degrease the Surface: Mix your TSP substitute according to the package directions or use your chosen degreaser. Wearing gloves, scrub the entire countertop surface. Pay extra attention to the areas around the stove and sink where buildup is common.
- Rinse Well: After scrubbing, wipe the countertops down with a cloth dampened with clean water. You need to remove all the cleaning residue. Go over it a few times to be sure.
- Let it Dry Completely: Wait until the surface is 100% dry before moving on to the next step. Any moisture left behind can interfere with sanding and priming.
Step 3: Sand for Adhesion (This is Non-Negotiable!)
Formica is a non-porous, slick surface. Sanding creates thousands of microscopic scratches that give the primer something to “bite” into. We aren’t trying to remove the color or pattern, just dulling the finish.
- Scuff Up the Surface: Take your 120 or 150-grit sandpaper and lightly sand the entire countertop. Move in small, circular motions. You’re just trying to remove the glossy sheen. The surface should feel slightly rough and look dull when you’re done.
- Don’t Forget the Edges: Pay careful attention to the edges and the curved backsplash portion. Every square inch needs to be scuffed.
- Clean Up the Dust: This is very important. Use a vacuum with a soft brush attachment to remove all the sanding dust. Afterward, wipe the entire surface down with a tack cloth or a slightly damp microfiber cloth to pick up any remaining particles. A clean surface is critical for the primer.
Step 4: Prime, Prime, Prime!
If cleaning and sanding are the foundation, primer is the glue that holds everything together. Do not use a standard wall primer. You need a special bonding primer designed for glossy, hard-to-paint surfaces.
- Choose the Right Primer: Look for a product specifically labeled as a “bonding primer” or “adhesion primer.” Oil-based or shellac-based primers offer the best adhesion, but modern water-based bonding primers are also excellent and easier to clean up.
- Apply a Thin, Even Coat: Use a brush to “cut in” along the edges and backsplash. Then, use a high-density foam roller to apply a thin, even coat to the main surface. The foam roller will help you avoid brush strokes.
- Don’t Overwork It: Apply the primer and move on. Don’t go back and forth over the same spot too many times, as this can create texture.
- Let It Dry: Follow the manufacturer’s instructions for dry time. This can range from one hour to several hours. A second coat of primer is often a good idea for maximum adhesion and to ensure you have a solid, uniform base color. Lightly sand between coats with 220-grit sandpaper if the can recommends it.
Step 5: Applying the Paint for a Flawless Finish
Now for the fun part—seeing your new color come to life! Patience is still the name of the game here. Thin coats are your best friend.
- Choose Your Paint: A durable acrylic enamel is a great choice. Paints designed for cabinets, trim, or floors are often fortified for higher traffic and are more scuff-resistant.
- Apply the First Coat: Just like with the primer, use a brush for the edges and a high-density foam roller for the flat surfaces. Apply a thin, even coat. Don’t try to get full coverage in one go—it will look streaky at first, and that’s okay!
- Let It Dry: Check the paint can for the recommended recoat time. Let the first coat dry completely. Rushing this will cause the roller to pull up the first layer of paint.
- Apply a Second Coat (and maybe a Third): Apply your second coat in the same way. You should see much better coverage this time. If you’re going from a very dark color to a light one, you may even need a third thin coat. Always allow proper dry time between coats.
Step 6: Protect Your Work with a Top Coat
You’ve done all this work to make your countertops look beautiful; now it’s time to protect them. A top coat acts as a clear shield against scratches, stains, and daily wear and tear. This step is what gives your project longevity.
- Select a Sealer: A water-based polyurethane or polycrylic is the best choice. They are crystal clear, don’t yellow over time like oil-based products can, and have low odor. Choose a sheen that you like—satin provides a modern, low-reflection finish, while semi-gloss is easier to clean.
- Apply Thin Coats: Using a new, clean foam roller or a high-quality synthetic brush, apply a very thin coat of the top coat. Work in one direction. Don’t over-brush, as this can create bubbles.
- Apply Multiple Coats: For a durable kitchen countertop, I recommend applying at least three thin coats of top coat. Be sure to let each coat dry completely according to the manufacturer’s instructions before applying the next. A light sanding with 220-grit sandpaper between coats (after they are fully dry) can create an even smoother finish.
Step 7: The Most Important Step of All—Let It Cure!
This is different from drying. Paint is “dry” to the touch within a few hours, but it takes days, sometimes even weeks, to fully “cure” or harden to its maximum durability.
- Remove Painter’s Tape: Do this while the final coat is still slightly tacky (usually within an hour). This helps you get a crisp, clean line without peeling any of the new finish.
- Hands Off: Allow the countertop to cure for at least 3-7 days before placing anything heavy on it or performing any cleaning. Refer to your paint and top coat cans for specific cure times.
- Be Gentle: For the first month, treat your new countertops with extra care. Use trivets for hot pans, always use a cutting board, and wipe up spills promptly with a soft cloth and water.
Choosing the Right Products for the Job
The success of this project hinges on using materials specifically designed for it. Grabbing any old can of paint won’t work. Here’s a quick guide to what you should be looking for at the hardware store.
| Product Type | Recommended Choice | Why It’s the Best Option |
|---|---|---|
| Primer | High-Adhesion Bonding Primer (e.g., Zinsser B-I-N Shellac-Base or KILZ Adhesion) | These are specifically formulated to stick to slick, non-porous surfaces like laminate, glass, and tile, creating the perfect base for your paint. |
| Paint | Acrylic Enamel (often labeled for Cabinets & Trim or Floors & Porch) | This type of paint dries to a hard, durable finish that resists chipping, scratching, and scuffing better than standard wall paint. Trusted brands often offer self-leveling formulas for a smoother look. |
| Top Coat | Water-Based Polycrylic or Polyurethane | This adds a final layer of protection. Water-based options are crystal clear, non-yellowing, low-odor, and provide excellent durability for high-traffic surfaces. |
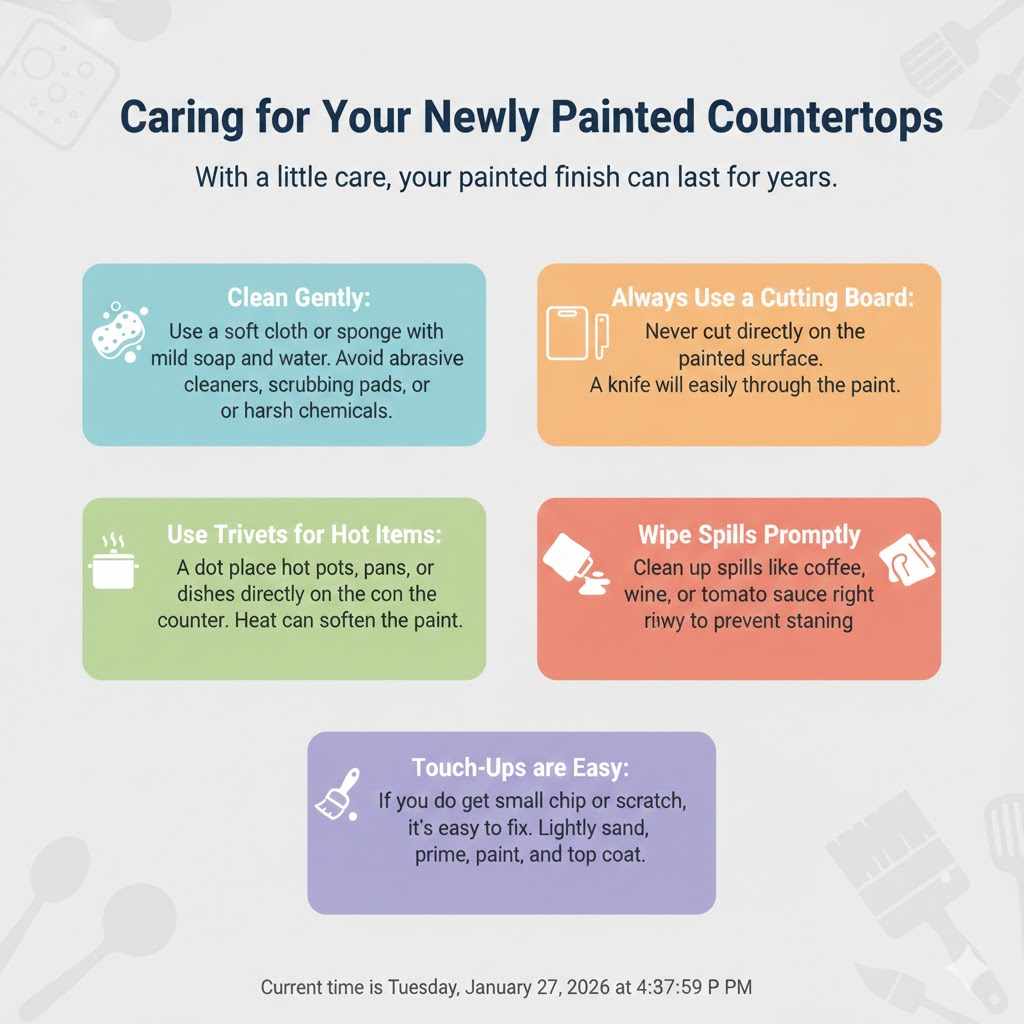
Caring for Your Newly Painted Countertops
Your beautiful new countertops are finished, but how do you keep them looking great? With a little care, your painted finish can last for years.
- Clean Gently: Use a soft cloth or sponge with mild soap and water. Avoid abrasive cleaners, scrubbing pads, or harsh chemicals like bleach or ammonia, as they can dull or damage the top coat.
- Always Use a Cutting Board: Never cut directly on the painted surface. A knife will easily slice through the paint and top coat.
- Use Trivets for Hot Items: Do not place hot pots, pans, or dishes directly on the counter. The heat can soften the paint and leave permanent marks.
- Wipe Spills Promptly: Clean up spills like coffee, wine, or tomato sauce right away to prevent staining.
- Touch-Ups are Easy: If you do get a small chip or scratch, it’s easy to fix. Lightly sand the small area, apply a dab of primer, then a little paint and top coat with a small artist’s brush.
Frequently Asked Questions (FAQ)
How long will a painted Formica countertop last?
With proper prep and care, a painted countertop can look great for 3-5 years, and sometimes even longer in a low-traffic area like a bathroom. The key factors are using a quality bonding primer, a durable top coat, and gentle daily use.
Is it safe to put food on a painted countertop?
Once the top coat is fully cured according to the manufacturer’s instructions, it is generally considered inert and safe for incidental contact. However, for a 100% food-safe surface, always use cutting boards, plates, and bowls for food preparation. It’s best not to let food sit directly on the painted surface.
Can I use a countertop painting kit instead?
Yes, you can. Countertop kits are a great all-in-one option because they come with all the necessary materials and instructions. They often include decorative flecks to mimic the look of stone. The process is very similar to the one described here, and they can provide excellent results.
What if my countertop has chips or deep scratches?
You can repair them before you start painting. Use a two-part epoxy putty or a laminate repair paste. Fill the chip or scratch, smooth it out so it’s level with the countertop surface, and let it cure completely. Then you can sand it smooth along with the rest of the countertop before priming.
How do I fix a scratch on my painted countertop later?
It’s an easy fix! Clean the scratched area well. Lightly sand just the scratch with very fine-grit (220+) sandpaper. Use a small artist’s brush to apply a thin layer of primer, let it dry, then apply a thin layer of your leftover paint color. Once that’s dry, apply a thin coat of your top coat over the spot.
Can I make my painted countertop look like granite or marble?
Absolutely! This is a popular and creative technique. After your base color is dry, you can use various colors of craft paint, sea sponges, and artist brushes to dab and blend colors to create a stone-like effect. There are many great video tutorials online for these faux finishes. Just be sure to protect your artistic work with several coats of a durable polyurethane top coat.
What’s the most common mistake people make?
By far, the most common mistake is skipping or rushing the prep work—specifically the cleaning and priming steps. People get excited to see the new color, but if you paint over even a thin layer of grease or fail to use a bonding primer, the paint is guaranteed to fail and peel over time. Take your time with the prep, and the final result will be a durable, beautiful finish.
Conclusion: A Project Worth Your Time
So, can you paint a Formica countertop? Not only can you, but you can achieve a finish that looks amazing and holds up to everyday life. It’s one of the most cost-effective ways to completely change the personality of a room. This project is about more than just saving money; it’s about the satisfaction of transforming your own space with your own two hands.
Remember the golden rules: clean thoroughly, sand to scuff, use a bonding primer, apply thin coats, and protect it with a quality top coat. If you follow these steps and give the surface plenty of time to cure, you will have a beautiful, durable countertop that you can be proud of for years to come. Take it one step at a time, trust the process, and get ready to fall in love with your kitchen or bathroom all over again.