Can I Paint Flat Over Semi Gloss: Proven, Easy Steps
Yes, you can absolutely paint flat paint over a semi-gloss finish, but you must prepare the surface first. Simply painting directly over it will cause the new paint to peel and chip. The key is to clean, lightly sand (de-gloss), and prime the semi-gloss surface to ensure the new flat paint has a strong, lasting bond.
Hello there! It’s Md Meraj, your friendly guide in the world of DIY. Today, we’re tackling a question I hear all the time: “Can I paint flat over semi-gloss?” Maybe you have trim that’s just too shiny or walls that show every fingerprint. You want that soft, modern look of flat paint, but the thought of dealing with that glossy surface feels intimidating.
I get it. It can seem like a painting puzzle. But I’m here to tell you it’s not only possible, but it’s a project you can handle with confidence. We’re going to walk through it together, step by step. Forget the confusing jargon. We’ll use simple methods to guarantee a beautiful, professional-looking finish that lasts. Let’s turn that shiny surface into the elegant, flat finish you’ve been dreaming of.
Why You Can’t Just Paint Directly Over Semi-Gloss
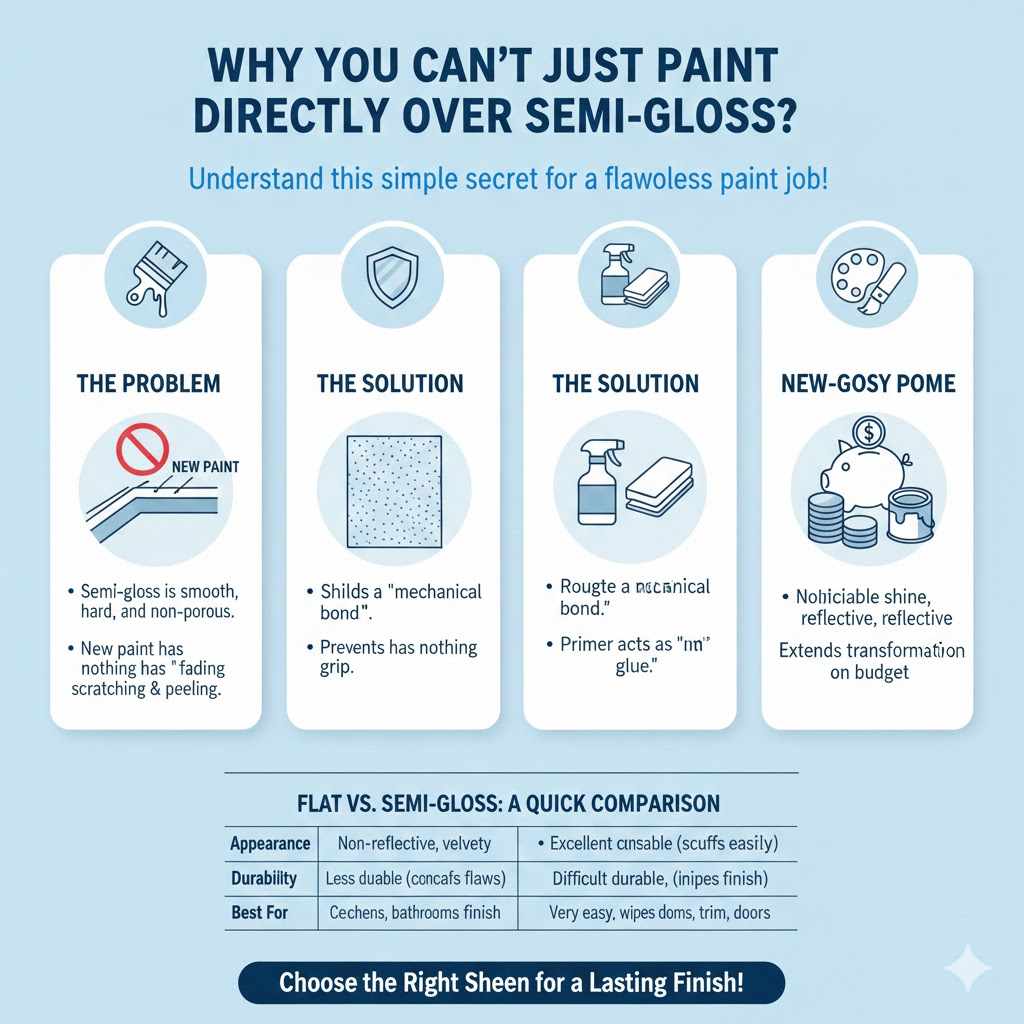
Before we grab our tools, let’s talk about the “why.” Understanding this simple secret is what separates a frustrating paint job from a flawless one. Semi-gloss paint has a high “sheen,” which means its surface is smooth, hard, and not very porous. Think of it like a smooth piece of plastic.
If you try to put flat paint (which needs a slightly rough surface to grip) right on top of it, the new paint has nothing to hold onto. It will just sit on the surface and can easily be scratched or peeled off. It’s like trying to stick a note on a greasy window—it just won’t work!
Our goal is simple: we need to break that smooth, slick barrier and give the new paint a surface it can really grab. This process is called “creating a mechanical bond,” and it’s the key to your project’s success.
Flat vs. Semi-Gloss: A Quick Comparison
Choosing the right paint sheen is about balancing looks and function. Here’s a quick look at why you might choose one over the other.
| Feature | Flat Paint | Semi-Gloss Paint |
|---|---|---|
| Appearance | Non-reflective, velvety, and smooth. | Noticeable shine and reflection. |
| Hiding Imperfections | Excellent. The lack of shine conceals bumps, dents, and texture. | Poor. The shine highlights every tiny flaw on the wall. |
| Durability | Less durable. Can be scuffed or damaged more easily. | Highly durable. Resistant to moisture, stains, and wear. |
| Washability | Difficult to clean. Rubbing can damage the finish (burnishing). | Very easy to clean. Can be wiped down repeatedly. |
| Best For | Ceilings, adult bedrooms, dining rooms, formal living rooms. | Kitchens, bathrooms, trim, doors, and kids’ rooms. |
Your Tools and Materials Checklist
Having everything ready before you start makes the whole process smoother and more enjoyable. Let’s gather our supplies. You don’t need fancy, expensive gear for this—just the right tools for the job.
- Cleaning Supplies: A bucket, warm water, mild detergent or a TSP substitute, sponges, and clean rags.
- Safety Gear: Goggles, a dust mask, and gloves are non-negotiable, especially for sanding and cleaning. Your safety always comes first.
- Drop Cloths or Plastic Sheeting: To protect your floors and furniture from dust and paint drips.
- Painter’s Tape: For creating clean, sharp lines along ceilings, baseboards, and window frames.
- Fine-Grit sandpaper (180-220 grit): A sanding sponge or a sheet of sandpaper will work perfectly.
- Tack Cloth or Damp Rag: To remove all the fine dust after sanding. This is a must-have!
- High-Quality Bonding Primer: This is your secret weapon. Choose a good quality latex or oil-based bonding primer.
- Flat Latex Paint: The color of your choice.
- Painting Tools: A good quality paintbrush for cutting in, a roller frame, and roller covers (a 3/8-inch nap is great for smooth walls).
- Paint Tray and Liners: To hold your paint and make cleanup a breeze.
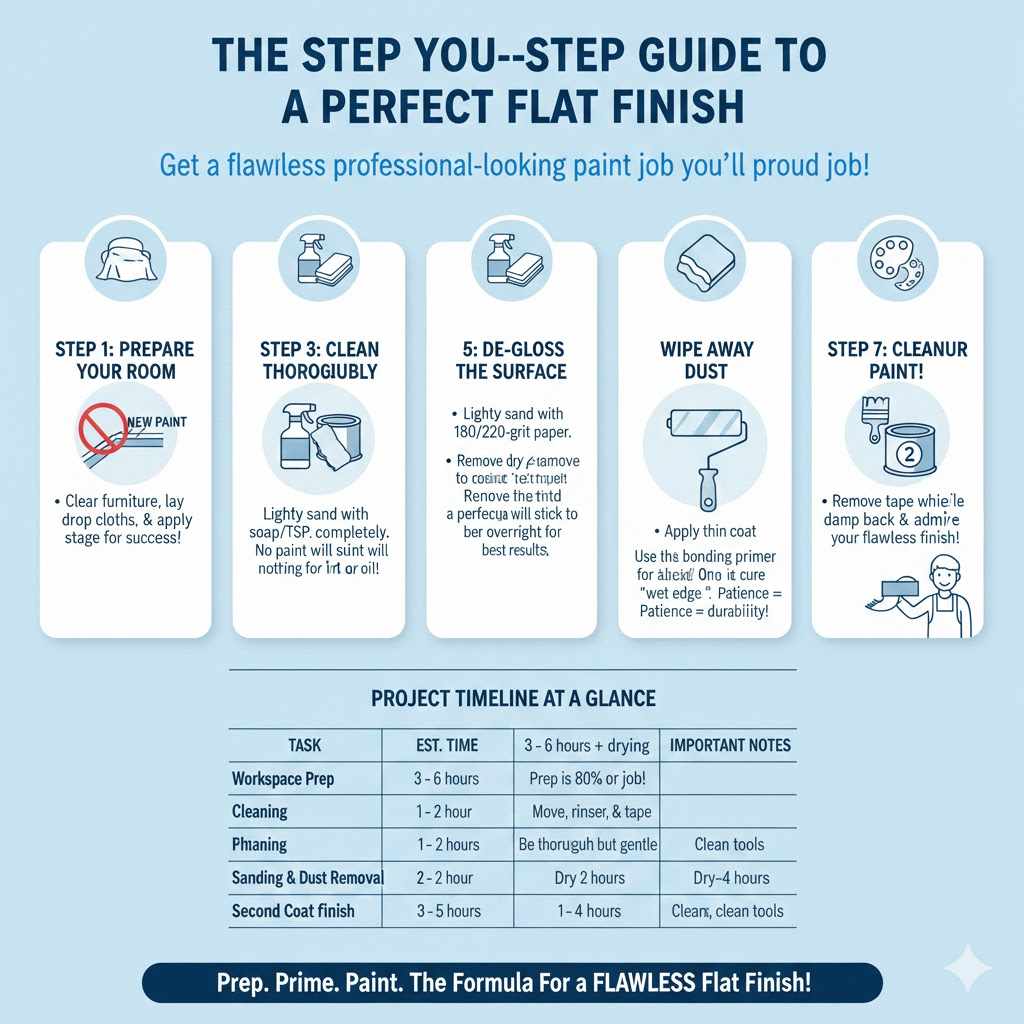
The Step-by-Step Guide to a Perfect Flat Finish
Alright, are you ready? We’re going to break this down into simple, manageable steps. Follow these, and you’ll get a finish you can be proud of. Take your time with the prep work—it’s about 80% of the job and guarantees great results!
Step 1: Prepare Your Room
A little prep work saves a lot of cleanup later. Think of this as setting your stage for success.
- Clear the Area: Move as much furniture as you can out of the room. For large items you can’t move, push them to the center and cover them completely with plastic sheeting.
- Lay Down Drop Cloths: Cover your entire floor with drop cloths. Even the neatest painters can have an accidental drip or two.
- Tape Everything Off: Apply painter’s tape along the edges of the trim, ceiling, and any fixtures you’re not painting. Press the edge of the tape down firmly to prevent paint from seeping underneath.
Step 2: Clean the Surface Thoroughly
This is a critical step that many people skip. Semi-gloss surfaces, especially in kitchens or on trim, collect grease, grime, and oils from our hands. Paint cannot stick to dirt or oil.
- Mix Your Cleaner: Fill a bucket with warm water and a small amount of mild dish soap. For tougher grime, especially in kitchens, a TSP (Trisodium Phosphate) substitute is excellent. It’s designed to cut through grease.
- Wash the Walls: Using a sponge, scrub the entire surface you plan to paint. Work from the bottom up to prevent streaking. Don’t be afraid to put a little elbow grease into it!
- Rinse Well: After washing, go back over the surface with a separate sponge and clean water. This removes any leftover soap residue, which can also interfere with paint adhesion.
- Let It Dry Completely: Allow the surface to air dry for at least 2-4 hours, or even overnight. It must be bone dry before you move to the next step.
Step 3: De-Gloss the Surface (The Gentle Sanding)
This is where the magic happens! We’re not trying to remove the old paint. We’re just scuffing up that shiny surface to give the new primer and paint something to grip. Remember, we need to create “tooth.”
- Gear Up for Safety: Put on your safety goggles and a dust mask. Paint dust isn’t good to breathe in. According to the Environmental Protection Agency (EPA), if your home was built before 1978, be cautious, as the paint could contain lead.
- Choose Your Sandpaper: Use a fine-grit sandpaper, like 180 or 220-grit. You don’t want anything too coarse, which can leave deep scratches that show through your final paint coat. A sanding sponge is great because it’s easy to hold and conforms to curves on trim.
- Sand Lightly: Apply light, even pressure. Move in a circular motion and cover the entire surface. You’ll know you’re done when the shine is gone and the surface looks dull and feels slightly rough. It should have a chalky appearance. You don’t need to sand down to the bare wood or drywall.
Pro Tip: Don’t press too hard! We’re scuffing, not stripping. Too much pressure can create grooves in the surface.
Step 4: Wipe Away Every Speck of Dust
Sanding creates a lot of fine dust. If you paint over this dust, you’ll end up with a gritty, bumpy finish. We want it perfectly smooth.
- Vacuum First: If you created a lot of dust, use a vacuum with a brush attachment to remove the bulk of it from the walls and baseboards.
- Use a Tack Cloth: A tack cloth is a special sticky cheesecloth designed to pick up fine dust. Lightly wipe it over the entire sanded surface. You’ll be amazed at how much dust it picks up.
- Or, Use a Damp Rag: If you don’t have a tack cloth, a slightly damp, lint-free cloth works well too. Make sure it’s just damp, not wet. Wring it out thoroughly.
- Final Check: Run your hand over the surface. It should feel clean, dull, and smooth. Let it dry completely if you used a damp rag.
Step 5: Apply a Quality Bonding Primer
Do not skip this step! Primer is the bridge between the old surface and your new paint. It solves three problems at once: it sticks to the prepared semi-gloss surface, blocks any potential stains from bleeding through, and gives your new flat paint the perfect, uniform base to adhere to.
For this job, a “bonding” primer is your best friend. Look for products that specifically say “bonding” or “for hard-to-stick surfaces” on the label. A good quality latex bonding primer, like those made by Benjamin Moore or Sherwin-Williams, is an excellent choice for most situations. It has great adhesion, low odor, and is easy to clean up.
- Cut In with a Brush: Start by using your paintbrush to apply primer along the edges of the painter’s tape (this is called “cutting in”). Paint a 2-3 inch band around the ceiling, corners, and trim.
- Roll the Primer On: Pour some primer into your paint tray. Lightly load your roller and apply the primer to the main surfaces in a “W” or “N” pattern. This helps distribute it evenly. Then, go back over the section with straight, overlapping strokes without adding more primer to smooth it out.
- Check for Even Coverage: You want one thin, even coat. Don’t worry if the old color shows through a little. The primer’s job is to bond, not to provide complete coverage.
- Let It Cure: This is important. Check the can for the recommended drying and recoat times. Allow the primer to dry completely—usually a few hours, but letting it cure overnight is even better for the strongest bond.
Step 6: It’s Finally Time to Paint!
This is the fun part where you see your vision come to life. Thanks to all your amazing prep work, this step will be smooth and rewarding.
- Stir Your Paint: Open your can of flat paint and stir it thoroughly with a paint stick. Make sure the color is consistent all the way through.
- Apply the First Coat: Just like you did with the primer, start by cutting in with your brush. Then, use your roller to apply the first coat of flat paint. Use the same “W” pattern for even coverage and maintain a “wet edge” to avoid lap marks. This means you should try to blend each new roller stroke into the previous one before it starts to dry.
- Don’t Overwork It: Apply a thin, even coat. Trying to apply the paint too thickly can lead to drips and an uneven texture. It’s much better to apply two thin coats than one thick one.
- Wait Patiently: Let the first coat dry completely. Again, check the paint can for the recommended recoat time. Rushing this can pull the first coat right off the wall. Patience is a virtue in painting!
- Apply the Second Coat: Once the first coat is dry, apply a second coat for a rich, uniform, and durable finish. This second coat will cover any thin spots and give you that beautiful, velvety look you’re after.
Step 7: The Cleanup and Grand Reveal
You’re almost there! A clean finish is just as important as a clean start.
- Remove the Tape: Remove the painter’s tape while the second coat of paint is still slightly damp (but not wet to the touch). Pull it off at a 45-degree angle to get a crisp, clean line. If you wait for the paint to fully cure, it can sometimes peel off with the tape.
- Clean Your Tools: If you used latex paint and primer, you can clean your brushes and rollers with soap and warm water. Proper cleaning will make them last for many projects to come.
- Let It Cure: Your walls will be dry to the touch in a few hours, but paint takes time to fully “cure” and harden. This can take anywhere from a few days to a few weeks. Be gentle with the surface during this time to avoid scuffs or scratches.
And that’s it! Step back and admire your work. You successfully transformed that shiny, outdated surface into a modern, sophisticated flat finish. You did it yourself, and you did it right.
Project Timeline At a Glance
Wondering how to plan your weekend? Here’s a realistic look at how long this project might take.
| Task | Estimated Time | Important Notes |
|---|---|---|
| Day 1: Prep and Prime | 3 – 6 hours + drying time | |
| Workspace Prep | 1 hour | Moving furniture, taping, and laying drop cloths. |
| Cleaning | 1 – 2 hours | Includes wash, rinse, and complete drying time. Don’t rush this! |
| Sanding & Dust Removal | 1 – 2 hours | Be thorough but gentle. This is key to adhesion. |
| Priming | 1 hour | Let the primer dry and cure for as long as the can recommends (overnight is best). |
| Day 2: Painting | 3 – 5 hours | |
| First Coat of Paint | 1 – 2 hours | Let it dry for at least 2-4 hours, or as specified on the can. |
| Second Coat of Paint | 1 – 2 hours | This is for the final, perfect finish. |
| Cleanup | 1 hour | Remove tape, clean tools, and tidy up the space. |
Frequently Asked Questions (FAQ)
Do I absolutely have to sand the semi-gloss paint?
Yes, I strongly recommend it. Sanding is the most reliable way to de-gloss the surface and guarantee your new paint will stick for the long term. While some “no-sand” primers exist, physically scuffing the surface provides a superior mechanical bond that you can trust. It’s a little extra work that pays off hugely in durability.
What happens if I just paint flat over semi-gloss without prepping?
If you skip the cleaning, sanding, and priming steps, the new flat paint will have no way to grip the slick semi-gloss surface. Within a short time, you’ll see peeling, bubbling, and chipping. A slight scratch from a fingernail could be enough to peel a whole section of paint away. All your hard work would be wasted.
Can I use a liquid de-glosser or “liquid sandpaper” instead?
Yes, liquid de-glossers are a chemical alternative to sanding. You wipe them on, they chemically dull the surface, and then you can prime and paint. They can be a good option for intricately detailed areas like crown molding where sanding is difficult. However, they can have strong fumes, so ensure you have excellent ventilation by opening windows and using a fan. For large, flat surfaces like walls, I find light sanding to be quicker and more effective.
What is the best kind of primer to use for this project?
A high-quality acrylic (latex) “bonding” primer is your best bet. These primers are specifically formulated to stick to slick, glossy, and hard-to-paint surfaces. They are flexible, dry quickly, have low odor, and clean up with water. Look for labels that mention “bonding,” “for glossy surfaces,” or “stain-blocking.”
How many coats of flat paint will I need?
You should always plan for two coats of flat paint. The first coat provides the initial coverage, and the second coat ensures a completely uniform, deep, and flawless color. Trying to get it all done in one thick coat often leads to drips, roller marks, and an uneven finish.
Does this same process work for trim and doors?
Absolutely! The process is exactly the same for trim, doors, and cabinets. Since these are high-touch areas, the prep work is even more critical. Be extra thorough with your cleaning and sanding to ensure the paint job can withstand daily wear and tear. You’ll be so happy with the durable result.
How long should I wait between applying coats of paint?
Always follow the manufacturer’s instructions on the paint can. This is called the “recoat time.” For most latex paints, this is typically between 2 to 4 hours. Painting the second coat too soon can cause the first coat to lift and create a messy texture. Patience is key to a professional finish!
Conclusion: You’ve Got This!
See? Painting flat over semi-gloss isn’t some impossible task reserved for professionals. It’s all about a simple, proven process: clean, scuff, prime, and paint. By taking the time to prepare the surface correctly, you’re not just painting a wall—you’re creating a durable, beautiful finish that will last for years to come.
Remember, the time you invest in preparation is what truly creates that flawless, professional look. You’re giving that new flat paint the perfect foundation to grab onto. So roll up your sleeves, put on some music, and have fun transforming your space. With these easy steps, you can feel confident and proud of the incredible result you’ve achieved all on your own.
Happy painting!