Can Trex Be Glued Together: The Best Proven Fix
Yes, Trex composite decking can be glued, but it requires a very specific type of adhesive—standard wood glue or construction adhesive will fail. The best proven fix involves using advanced polymer adhesive, such as specialized polyurethane or structural epoxy, combined with mechanical fasteners for optimum durability and safety. Preparation is key to ensuring a long-lasting, weather-resistant bond for your outdoor project.
Working with composite decking, especially brands like Trex, is a common experience for DIY enthusiasts today. These boards are incredibly durable, resisting rot and insects, which makes them perfect for decks and railings. But when you need to join two pieces permanently—maybe for a seam, a corner cap, or a custom trim piece—a simple question comes up: Can Trex be glued together? Many homeowners get frustrated when standard glues, the type they use on plywood or pine, simply peel away from the smooth plastic surface of the Trex board. If you’ve struggled with slippery joints or failed repairs, don’t worry. I’m here to simplify the process. We will walk through exactly why Trex is tricky to glue, and then I’ll show you the industry-proven, high-strength solution that will keep your project looking great for years. Let’s build your confidence and get this done right!
Why Standard Glues Fail on Trex Composite Decking
As a woodworking mentor, I often see beginners assume that if a glue works on wood, it must work on composite decking. This couldn’t be further from the truth! Trex is not wood; it is a blend of recycled wood fibers and recycled plastic film, primarily polyethylene. This unique composition gives it incredible weather resistance but makes bonding difficult.
Here are the three main reasons why typical adhesives won’t work on Trex:
- Low Surface Energy (LSE) Plastic: The high plastic content (polyethylene) gives Trex a low surface energy. Think of it like a freshly waxed car—water beads up and rolls off easily. Adhesives struggle to “wet out” or penetrate this slick surface, leading to a weak, superficial bond.
- Dimensional Movement: Trex and other composites expand and contract significantly with temperature changes. A rigid glue, like epoxy meant for metal, will crack and break under this constant stress (expansion and contraction).
- Moisture and UV Resistance: Any adhesive used outdoors must withstand sun and rain. Standard interior glues break down rapidly when exposed to the elements.
Understanding these challenges helps us select the right “fix.” We need a glue that is flexible, extremely strong on plastic, and completely waterproof.
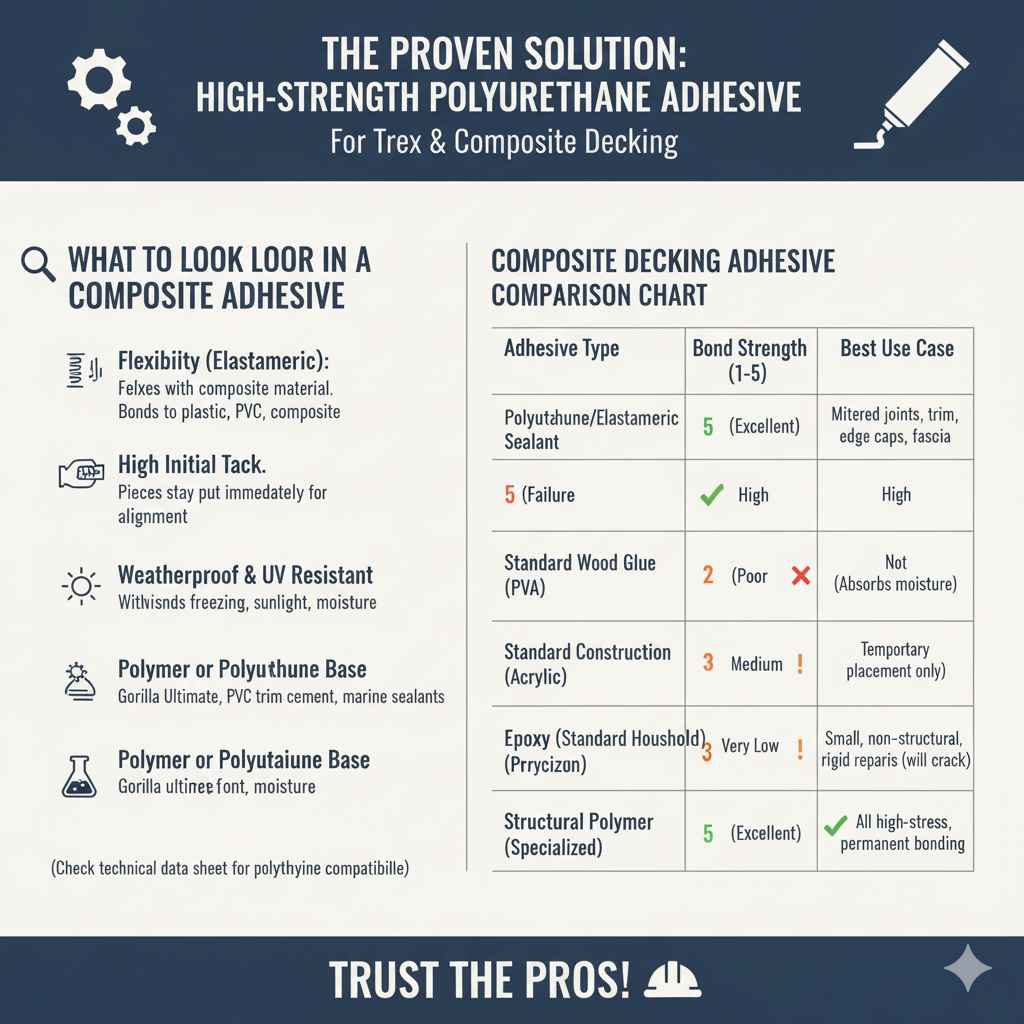
The Proven Solution: High-Strength Polyurethane Adhesive
If you genuinely need to glue Trex, especially for decorative purposes or mitered edge caps, the hands-down best solution is a high-strength, flexible structural adhesive, often based on advanced elastomeric polymers or specialized polyurethane. This is the “proven fix” used by professional deck builders when mechanical fasteners aren’t visible or possible.
What to Look For in a Composite Adhesive
When selecting your glue, do not just grab the first tube labeled “construction adhesive.” Look for specific product features:
- Flexibility (Elastomeric): It must flex with the composite material. Look for adhesives that specifically mention bonding to plastic, PVC, or composite materials.
- High Initial Tack: This ensures the pieces stay put immediately, which is crucial for quick alignment before clamping or adding screws.
- Weatherproof and UV Resistant: The bond must withstand freezing temperatures, direct sunlight, and constant moisture.
- Polymer or Polyurethane Base: Products like Gorilla Ultimate Construction Adhesive, specific PVC trim cement (if compatible with polyethylene), or specialized high-grade marine sealants often provide the necessary strength and flexibility. (Note: Always check the product’s technical data sheet for compatibility with polyethylene plastic.)
Composite Decking Adhesive Comparison Chart
Here’s a quick guide to common adhesives and how they perform on Trex and similar composites:
| Adhesive Type | Bond Strength on Trex (Score 1–5) | Flexibility | Best Use Case |
|---|---|---|---|
| Polyurethane/Elastomeric Sealant | 5 (Excellent) | High | Mitered joints, trim, edge caps, fascia |
| Standard Wood Glue (PVA) | 1 (Failure) | Low | Not Recommended (Absorbs moisture) |
| Standard Construction (Acrylic) | 2 (Poor) | Medium | Temporary placement only |
| Epoxy (Standard Household) | 3 (Fair) | Very Low | Small, non-structural, rigid repairs (will crack under movement) |
| Structural Polymer (Specialized) | 5 (Excellent) | High | All high-stress, permanent bonding |
Step-by-Step Guide: Gluing Trex for a Permanent Bond
Achieving a reliable bond requires precision and preparation—gluing composite isn’t as simple as applying glue and walking away. Follow these steps carefully for the best results, remembering that safety comes first! Gather your materials and take your time.
Required Tools and Materials
- High-Strength Polyurethane or Structural Polymer Adhesive (Do not substitute!)
- Two-Part Cleaner/Degreaser (Isopropyl alcohol or dedicated plastic cleaner)
- Clean, lint-free towels or rags
- Applicator gun (if using caulk tubes)
- Bar clamps or specialty quick clamps
- Temporary mechanical fasteners (e.g., small finish screws or nails)
- Safety gloves and eye protection (essential when working with chemicals!)
Preparation: The Key to Success
Ninety percent of a successful glue joint is preparation. Skipping these steps guarantees failure, especially on low-surface-energy plastics.
- Surface Cleaning: Trex surfaces must be perfectly clean. Use a cleaner like rubbing alcohol (isopropyl) to wipe down both mating surfaces. This removes any release agents from manufacturing, dust, or oils from handling. Allow the alcohol to fully evaporate.
- Light Abrasion (Optional but Recommended): Lightly sand the bonding surface with 80-grit sandpaper. You are not trying to create a smooth finish; you are roughing up the plastic surface slightly. This microscopic texture gives the adhesive something to mechanically grip onto.
- Test Fit and Temperature Check: Ensure your pieces fit perfectly (e.g., a well-cut 45-degree miter). Check the temperature. Most high-performance adhesives work best between 50°F and 90°F. If it’s too cold, the glue won’t cure properly.
Applying the Adhesive and Clamping
Now we move to the bonding stage. Work efficiently, as many polyurethane adhesives have a limited “open time” (the time you have to adjust the pieces before curing begins).
Step 1: Apply the Adhesive
Apply the adhesive in a continuous bead down the center of one mating surface. Important Tip: Do not spread the glue too close to the edges. When you press the pieces together, you want a small amount of squeeze-out, but you don’t want the glue to seep out excessively and make a mess.
Step 2: Join and Secure
Press the Trex pieces together firmly, wiggling them slightly to ensure the adhesive spreads completely across the joint. Since Trex moves so much, gluing alone is never enough for structural integrity. For lasting durability, you must add temporary mechanical fasteners to hold the pieces tightly while the glue cures.
Md Meraj’s Mentor Tip: Think of the glue as the seal and the screws as the structural skeleton. Use temporary finish screws, or if structurally sound, small brad nails (often called “pin nails”) to secure the pieces while the glue sets. These fasteners hold the material tight during the curing process, preventing the natural dimensional movement of Trex from breaking the bond prematurely.
Step 3: Clamping
Use bar clamps or spring clamps along the length of the joint. You want firm, even pressure. Do not over-tighten, as you could squeeze out all the adhesive, starving the joint of necessary bonding material. The goal is contact, not distortion.
Step 4: Clean Up and Curing
Immediately wipe away any squeezed-out adhesive using a clean rag and mineral spirits (or the manufacturer’s recommended solvent). Once cured, many structural adhesives are impossible to remove. Allow the adhesive to cure fully according to the manufacturer’s instructions, which may be 24 to 72 hours, depending on humidity and temperature. Do not put the joint under stress until the full cure time has passed.
Bonding Trex to Other Materials
Often, you are gluing Trex not just to itself, but to materials like pressure-treated lumber, concrete, or metal posts. This requires a slight adjustment in your approach, but the core principle (using a flexible, structural polymer adhesive) remains the same.
Gluing Trex to Different Substrates
| Substrate Material | Preparation Required | Best Adhesive Type | Key Concern |
|---|---|---|---|
| Pressure-Treated Wood | Ensure wood is dry and free of excessive preservative chemicals. Sand lightly. | Structural Polyurethane or Elastomeric Polymer | Moisture variation and high movement in the wood. Glue must permit movement. |
| Concrete or Stone | Clean thoroughly. Remove all dust. Ensure surface is completely dry (no lingering moisture). | Specialized Construction Polymer (e.g., SikaFlex or similar) | Dust interferes with adhesion. Extreme rigidity of concrete vs. flexibility of Trex. |
| Metal (Aluminum/Steel) | Clean thoroughly with acetone or alcohol. Lightly abrade surface for grip. | High-Strength Structural Epoxy or Urethane specifically rated for plastic/metal. | Oxidation/Rust. Must ensure the metal is sealed and clean before bonding. |
When working with pressure-treated lumber, ensure you are using fasteners rated for ACQ wood preservatives, as standard screws will corrode quickly. This is crucial for the longevity of your project and overall deck safety, as advised by reliable construction resources like the Deck Construction Guide.
The Crucial Role of Mechanical Fasteners in Composite Decking
I cannot stress this enough: While we use advanced glues to create seals and cosmetically perfect joints (like mitered corners), glue alone should never be relied upon for structural joints in composite decking.
Trex moves too much and is too slick for any glue to handle the sheer force or structural loads (like someone stepping on a board) without mechanical help. The industry standard, and my recommendation for any permanent Trex installation, is always to use proper fasteners.
- Decking Boards: Use hidden fastening systems (clips, screws through the edge) or color-matched deck screws.
- Railing Corners or Posts: Use screws, bolts, or lag screws rated for composite materials.
- Fascia and Trim: This is where glue shines alongside fasteners. Use the structural adhesive to create a seamless look on mitered corners, but back them up with specialized Trex trim screws (like Cortex or similar plugs) or small finish nails to prevent the joint from opening due to thermal movement.
Using a combination approach—glue for the seal and bond, screws for the strength—is the definitive “best proven fix” for joining Trex in any lasting outdoor application.
Safety First: Handling Composites and Adhesives
Working with Trex and chemical adhesives requires proper safety measures. Remember, the goal is always a great final product and a safe workshop experience.
When cutting Trex, wear adequate dust inhalation protection. Unlike natural wood dust, composite dust contains plastic particles, which can be harmful to your lungs. Always consult the OSHA guidelines for proper respiratory protection when generating significant dust.
When using chemical adhesives:
- Work in a well-ventilated area—especially with solvent-based polyurethane products.
- Wear chemical-resistant gloves to protect your skin. Many adhesives can cause irritation.
- Wear safety glasses or goggles.
- Keep solvents and rags away from heat sources, as they may be flammable.
Common Beginner Mistakes and How to Avoid Them
Even with the right glue, there are small errors that can ruin your bond. Steer clear of these common pitfalls:
- Using Too Little Surface Cleaner: If you see residue or oil prints after cleaning, the bond will weaken. Use fresh towels and plenty of rubbing alcohol to ensure the plastic is squeaky clean.
- Ignoring Cure Time: Rushing the cure time is tempting, but hazardous to the bond. If you stress the joint before the glue reaches its full strength (which can take days), the thermal movement of the Trex can break the nascent bond.
- Applying Glue Too Thickly: A very thick layer of glue might look strong, but it can lead to inconsistent curing and reduced bond strength. A thin, even bead that spreads to fully coat the joining surface is ideal.
- Forgetting About Dimensional Movement: Remember that an 8-foot Trex board might grow or shrink by up to a quarter inch between a cold winter day and a hot August afternoon. If your glue is too rigid, or if you failed to back it up with a fastener meant for composite (which often allows slight movement), the joint will fail.
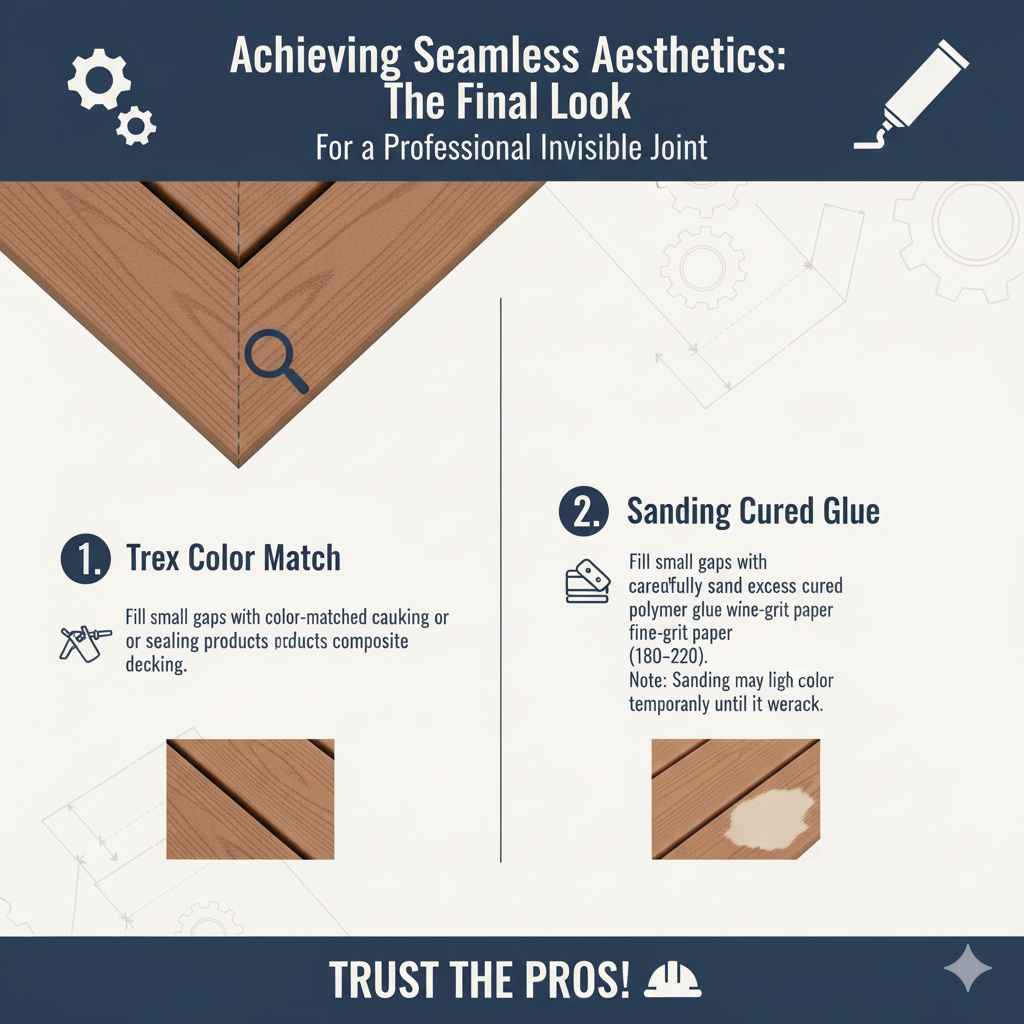
Achieving Seamless Aesthetics: The Final Look
The main reason woodworkers want to glue Trex is to achieve a professional, seamless aesthetic, especially on staircase miter joints, railing corners, or skirting panels. When done correctly, the combination of structural glue and discreet fasteners makes the joint visually disappear.
To finish the job:
1. Trex Color Match: If you have any small gaps or imperfections visible after the glue has cured, look for color-matched caulking or sealing products designed for composite decking. These are excellent for filling small hairline gaps and making the joint truly invisible.
2. Sanding Cured Glue: If excess cured polymer glue needs to be removed, sand carefully with a fine-grit paper (180–220). Remember that sanding Trex slightly changes the surface texture; it often lightens the color in that immediate spot until it ages and weathers back to the original shade.
Frequently Asked Questions (FAQ)
Q1: Can I use super glue (cyanoacrylate) on Trex?
A: Super glue is generally very brittle and rigid. While it might hold plastic for a short period, it will quickly fail on Trex because the material expands and contracts so much with temperature changes. It is not suitable for durable outdoor applications.
Q2: Do I need to clamp the Trex boards after applying the glue?
A: Yes, absolutely. Clamping maintains firm contact between the two surfaces and ensures the adhesive spreads evenly and cures correctly. More importantly, you must use temporary mechanical fasteners (screws or nails) alongside the clamp and the glue to prevent the joint from opening as the material moves.
Q3: How long does the specialized glue take to cure?
A: Cure times vary greatly depending on the specific product, temperature, and humidity. Most high-strength construction or polymer adhesives require at least 24 hours to handle minor stress and up to 7 days to reach their full, ultimate strength. Always check the manufacturer’s directions.
Q4: Is there a specific Trex product that functions as a glue?
A: Trex itself does not sell a designated brand-name glue. They rely on high-quality, third-party structural construction adhesives widely available on the market. They emphasize that any product must be flexible and rated for outdoor composite applications.
Q5: Can I butt-join two long Trex boards using only glue?
A: No. Butt joints in composite decking must always be located over a joist support and must be secured to that joist using mechanical fasteners (screws). If you rely on glue alone for a structural seam, it will eventually break apart due to the constant movement and load stress.
Q6: What should I use to clean the board before gluing?
A: Use isopropyl alcohol (rubbing alcohol) or a dedicated plastic cleaner/degreaser. This removes oils, dirt, and manufacturing residues. Avoid cleaners that leave behind any soap or wax film, as these will severely inhibit the glue’s ability to bond.