Can You Drill Through Lvl Beams? Essential Guide
Yes, you can drill through LVL beams, but only with caution and strict adherence to specific guidelines to maintain structural integrity. Always consult a structural engineer or building professional before making any penetrations, as improper drilling can compromise the beam’s load-bearing capacity and safety. This guide will walk you through the essential considerations and techniques for safely drilling into LVL beams.
Working with engineered wood like Laminated Veneer Lumber (LVL) can sometimes leave DIYers feeling a bit uncertain, especially when it comes to modifications. A common question that pops up is about drilling holes through these sturdy beams. You see a wire that needs to run through, or maybe a vent pipe, and the LVL beam is right in the way. It’s a perfectly normal thought to wonder if you can just drill a hole and be done with it. But here’s the thing: LVL beams are specifically designed and engineered to support significant weight.
Unlike a solid wood beam, their strength comes from a carefully balanced construction. Making a mistake when drilling can have serious consequences for your home’s structure. But don’t worry! With the right knowledge and a careful approach, it’s often possible to make necessary holes while keeping the beam strong. This guide will break down exactly what you need to know, step by step, so you can feel confident and safe.
Understanding LVL Beams: Why They’re Different
Before we even think about drilling, let’s get to know LVL beams a little better. LVL stands for Laminated Veneer Lumber. Think of it as a super-plywood, but exclusively designed for structural support. Instead of random wood scraps, LVL is made from thin sheets of high-quality wood veneer, all laid parallel to each other and bonded together with strong adhesives under heat and pressure.
This unique construction method offers several advantages:
- Consistent Strength: Because the wood grain is aligned in the same direction, LVL beams are incredibly strong and predictable. They are also less prone to warping, twisting, or shrinking than solid lumber.
- Engineered for Loads: LVL is specifically manufactured to handle heavy loads, making it a popular choice for headers over doorways and windows, as well as for main structural beams in homes.
- Uniformity: Each LVL beam is practically identical, which makes design and construction much more straightforward for builders.
The reason understanding LVL is crucial when you want to drill through one is precisely because of its engineered nature. These beams rely on the full cross-section of their material to carry loads. Any alteration, especially drilling holes, can disrupt this load-bearing capacity if not done correctly. This is why the rules for drilling into LVL are much stricter than for a standard piece of lumber.
The Golden Rules of Drilling into LVL Beams
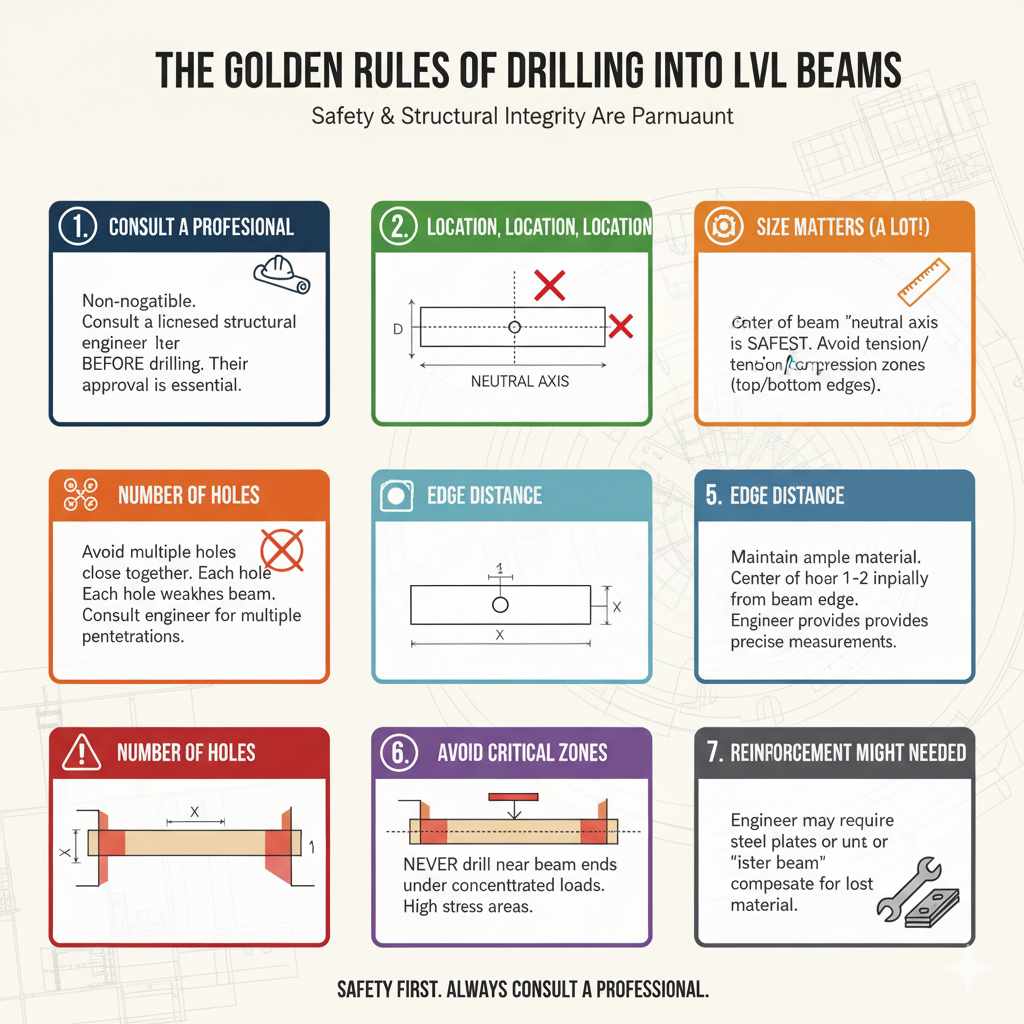
When it comes to modifying an LVL beam, there’s no room for guesswork. Safety and structural integrity are paramount. Here are the fundamental principles you absolutely must follow:
- Consult a Professional: This is non-negotiable. Before making any cuts or drilling any holes, you must consult a licensed structural engineer or a qualified building professional. They can assess your specific situation, the beam’s role in the structure, and determine if and how a penetration can be made safely. Their stamp of approval is essential. For guidance on engineering principles, resources like the Forest Products Laboratory (FPL) offer valuable technical information on wood engineering.
- Location, Location, Location: Where you place a hole matters immensely. Holes are generally best placed away from the center of the beam, particularly away from the tension and compression zones. The neutral axis (the theoretical line running through the center of the beam where there’s no stress) is often the safest place for a small penetration, but even here, size and number are critical.
- Size Matters (A Lot!): The diameter of your hole should be as small as possible for the passing item. The general rule of thumb is that the diameter of the hole should not exceed 1/4 of the beam’s depth. For example, on a 7.25-inch deep LVL beam, the hole diameter should ideally not be more than about 1.8 inches. Small holes are far less impactful than large ones.
- Number of Holes: Avoid drilling multiple holes, especially if they are close together. Each hole weakens the beam. If you need multiple penetrations, discuss a different strategy with your engineer, such as rerouting utilities or using a different beam.
- Edge Distance: Ensure there’s ample material left between the edge of the hole and the edge of the beam. A general guideline is to keep the center of the hole at least 1 to 2 inches from the edge of the beam, but your engineer will provide precise measurements.
- Avoid Critical Zones: Never drill holes too close to the ends of the beam or in areas where the beam is supporting concentrated loads. These areas are under immense stress and even a small hole can cause failure.
- Reinforcement Might Be Needed: In some cases, an engineer might approve a hole but require reinforcement around it. This could involve adding steel plates or a sister beam (attaching another beam alongside the existing one) to compensate for the lost material.
- Use the Right Tools: For clean, accurate holes, using appropriate drill bits is crucial.
Tools and Materials You’ll Need
Gathering the right tools before you start will make the process smoother and safer. Always prioritize quality and safety gear.
Essential Tools:
- Safety Glasses: Protect your eyes from sawdust and debris.
- Work Gloves: Keep your hands safe and improve grip.
- Dust Mask or Respirator: Protect your lungs from fine wood dust.
- Measuring Tape: For accurate marking of hole placement.
- Pencil or Marker: To mark the exact center of your hole.
- Drill: A powerful corded drill is often recommended for its consistent power for drilling through dense materials like LVL. A good quality cordless drill can also work if it has sufficient torque.
- Appropriate Drill Bit:
- Spade Bit or Auger Bit: Good for wood, but can be a bit aggressive and may cause tear-out.
- Forstner Bit: Creates very clean, flat-bottomed holes and is excellent for more controlled drilling. This is often the preferred choice for precise work.
- Hole Saw: Can be used for larger diameter holes, but ensure it’s designed for wood and has a pilot bit for accuracy.
- Clamp: To secure the beam if you’re working on temporary supports, or to hold a template in place.
- Center Punch: To create a small indentation for the drill bit to start in, preventing it from wandering.
Materials:
- LVL Beam: The beam you intend to drill.
- Approved Plans/Permits: Documentation from your structural engineer.
Step-by-Step Guide to Drilling Through LVL Beams
Once you have professional approval and all your tools ready, you can proceed with the drilling. Remember, this is a guide based on common practices; your engineer’s specific instructions override any general advice given here.
Step 1: Obtain Professional Approval and Mark the Location
Ensure you have written approval from a structural engineer or building professional detailing the exact size, location, and number of holes permitted. Transfer these precise measurements onto the LVL beam clearly with a pencil or marker. Double-check every measurement!
Step 2: Assess the Beam’s Support
If the LVL beam is currently in place and bearing its full load, it’s often advisable to provide temporary support below it before drilling. This reduces the stress on the beam during the modification. Consult your engineer on the best method for temporary bracing. If the beam is not yet installed or is part of a scenario where temporary support is not feasible, extreme caution and precise drilling are even more critical.
Step 3: Prepare Your Drill and Bit
Select the appropriate drill bit based on the size and type of hole required. A Forstner bit is excellent for clean entry and exit. Ensure the bit is sharp and the correct diameter as specified by your engineer. Attach the bit securely to your drill.
Step 4: Create a Starting Indentation
Use a center punch to create a small mark exactly where you intend to drill. This little divot will act as a guide for your drill bit and prevent it from slipping across the surface of the LVL.
Step 5: Position and Start Drilling
Hold the drill perpendicular to the beam’s surface to ensure a straight hole. Start the drill at a slow speed to allow the bit to bite into the wood without skipping. Once the bit has started to make a good indentation, you can gradually increase the speed.
Step 6: Maintain Consistent Pressure and Speed
Drill through the LVL beam with steady, consistent pressure. For thick LVL beams, drilling can take time. Avoid forcing the drill; let the bit do the work. If you are using a corded drill, you will have consistent power. If using a cordless drill, keep an eye on battery levels and torque settings.
Step 7: Watch for Breakthrough
As you approach the other side of the beam, reduce the drill speed and pressure. This helps prevent tear-out on the exit side, leaving a cleaner hole. A piece of sacrificial wood clamped to the exit side can also help minimize splintering.
Step 8: Clear the Hole and Check
Once the hole is complete, slowly withdraw the drill bit. Use a gloved hand or a brush to clear away any sawdust from the hole. Inspect the hole for cleanliness and ensure it meets the required dimensions. Check the surrounding area of the LVL for any signs of cracking or damage.
Step 9: Remove Temporary Supports (If Used)
After confirming the integrity of the drilled hole and the beam, carefully remove any temporary supports, following the engineer’s recommended procedure.
When NOT to Drill Through LVL Beams
While drilling might seem like the easiest solution, there are situations where it’s simply not an option. Recognizing these limitations is as important as knowing how to drill safely.
- Excessive Hole Size: If the required hole diameter would exceed 1/4 of the beam’s depth, it’s generally not advisable. The larger the hole relative to the beam size, the more significant the reduction in strength.
- Multiple Large Holes: Drilling several large holes, even if each individual hole is within acceptable size limits, can cumulatively weaken the beam too much.
- Proximity to Ends or Supports: Drilling too close to the ends of an LVL beam, or too close to where it is supported by a post or wall, is extremely risky. These areas are under high stress.
- High-Stress Areas: Beams that are subjected to significant bending forces or concentrated loads are not good candidates for drilling unless specifically approved and potentially reinforced by an engineer.
- Uncertainty About the Beam’s Role: If you are unsure about the exact structural purpose and load-bearing capacity of the LVL beam, do not attempt to drill through it. Your home’s safety could be at risk.
- Lack of Professional Approval: If you cannot get a clear go-ahead and specific instructions from a qualified structural engineer, then drilling is off the table.
In any of these scenarios, you’ll need to work with your engineer to find alternative solutions. This might include rerouting electrical wires, plumbing, or HVAC ducts, using surface-mounted conduits or raceways, or exploring different structural members altogether.
Alternatives to Drilling for Utilities
Sometimes, drilling just isn’t the best or safest option. Fortunately, for running utilities like electrical wires, plumbing, or HVAC vents, there are often practical alternatives that don’t involve compromising your LVL beams.
1. Surface Mounting
This is often the simplest and safest solution. Electrical conduit, wire molding, or flexible ductwork can be easily secured to the surface of the LVL beam using appropriate clips or brackets. This keeps the beam intact and is readily accessible for future maintenance.
2. Routing Around the Beam
Can the wire, pipe, or duct be routed above, below, or to the side of the LVL beam instead of through it? Often, a simple reroute can achieve the same goal without any structural modifications. This might require a bit more planning for the overall layout but preserves the beam’s integrity.
3. Utilizing Adjacent Joists or Studs
If the LVL beam is part of a larger framing system, consider if the utility can be run through other, less critical structural members like floor joists or wall studs. Ensure these alternative paths also comply with building codes and don’t create their own structural issues.
4. Installing a Smaller Beam or Header
In some renovation scenarios, if an LVL beam is creating an obstruction for multiple utilities, a design might be adjusted to use a smaller beam or a different type of header that has pre-engineered pathways or a larger allowable penetration area. This is a more significant structural change and requires professional design.
5. Using Flexible Materials
For electrical wiring, flexible metallic conduit (FMC) or non-metallic sheathed cable (NM cable, commonly known as Romex) can sometimes be routed in ways that minimize the need for drilling through bulk framing.
When considering alternatives, always document your plan and, if necessary, get it reviewed by your engineer. Safety and compliance with local building codes are the top priorities.
Tables for Quick Reference
To help you keep the key information about drilling LVL beams handy, here are a couple of reference tables.
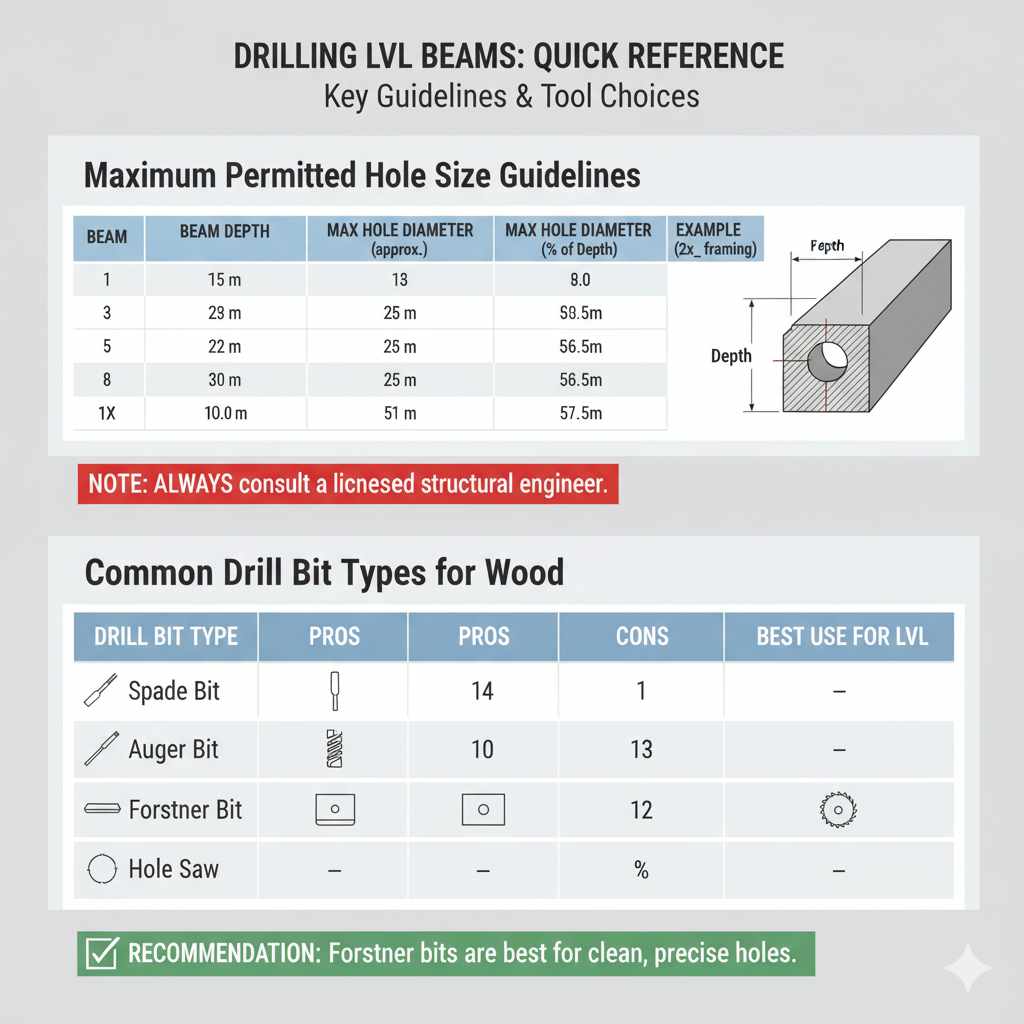
Table 1: Maximum Permitted Hole Size Guidelines
| Beam Depth | Maximum Hole Diameter (approx.) | Maximum Hole Diameter (as % of Depth) |
|---|---|---|
| 3.5 inches (e.g., for 2×4 framing) | 0.875 inches (7/8″) | 25% |
| 5.5 inches (e.g., for 2×6 framing) | 1.375 inches (1-3/8″) | 25% |
| 7.25 inches (e.g., for 2×8 framing) | 1.8125 inches (approx. 1-13/16″) | 25% |
| 9.25 inches (e.g., for 2×10 framing) | 2.3125 inches (approx. 2-5/16″) | 25% |
| 11.25 inches (e.g., for 2×12 framing) | 2.8125 inches (approx. 2-13/16″) | 25% |
Note: These are general guidelines only. ALWAYS adhere to the specific limits provided by a licensed structural engineer for your project.
Table 2: Common Drill Bit Types for Wood
| Drill Bit Type | Pros | Cons | Best Use Case for LVL Modification |
|---|---|---|---|
| Spade Bit | Quickly removes wood, inexpensive. | Can splinter, rougher hole, aggressive. | Less ideal due to potential for tear-out. |
| Auger Bit | Self-feeding, good for deep holes, pulls chips out. | Can be aggressive, requires significant torque. | Suitable for larger, less precise holes if approved, but can cause splintering. |
| Forstner Bit | Very clean, flat-bottomed holes, precise. | Slower drilling, requires good quality, can be expensive. | Highly recommended for clean, controlled holes with minimal tear-out. |
| Hole Saw | Creates clean large diameter holes. | Can be difficult to control precisely, requires pilot bit, may not be suitable for very small approved holes. | Use for larger, round openings if specifically approved and the size is appropriate. |
Recommendation: For precision and a clean finish on modified LVL beams, Forstner bits are generally the top choice when drilling is permitted.
Frequently Asked Questions (FAQ)
Q1: What is LVL?
LVL stands for Laminated Veneer Lumber. It’s an engineered wood product made by bonding together thin wood veneers in a parallel grain structure, making it very strong and dimensionally stable.