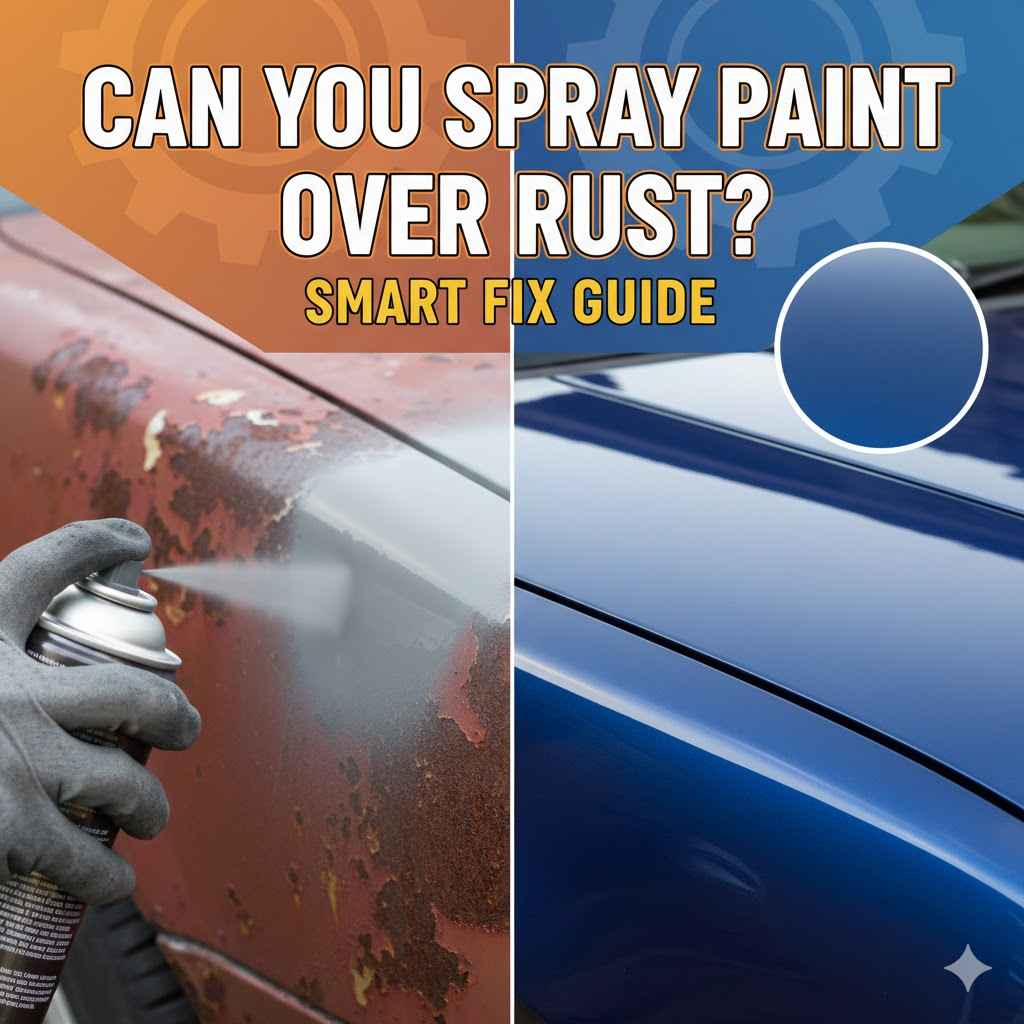
Can You Spray Paint Over Rust? Smart Fix Guide
Thinking about spray painting over rust can feel a bit tricky for beginners. You might wonder if the paint will stick or if the rust will just come back. It’s a common question, and for good reason!
But don’t worry, it’s totally doable with the right steps. This guide will show you exactly how to get a smooth, lasting finish. Let’s get started and learn how Can You Spray Paint Over Rust?
Smart Fix Guide can help you tackle this common problem.
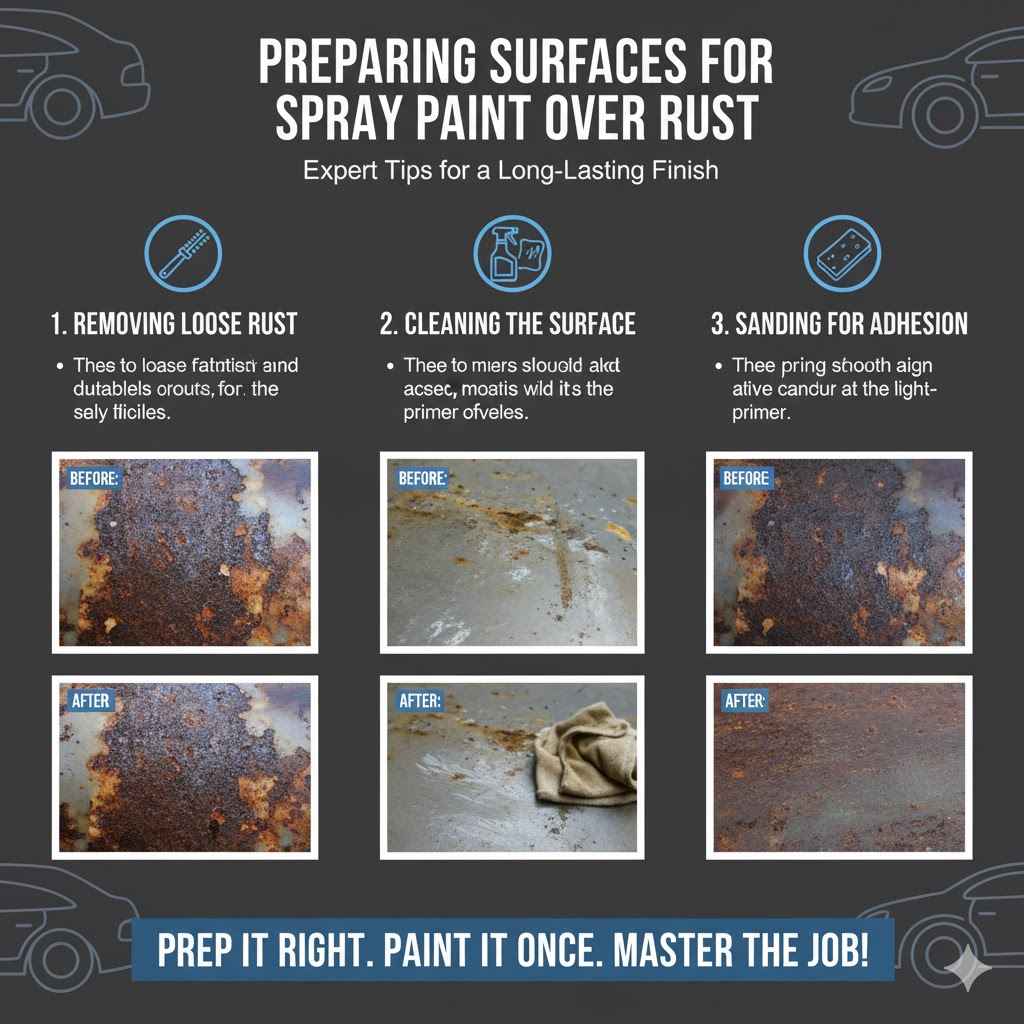
Preparing Surfaces For Spray Paint Over Rust
Getting a surface ready is super important before you spray paint over rust. A good preparation job makes all the difference in how your paint job looks and how long it lasts. You want to make sure the paint has a solid base to stick to.
If you skip these steps, you might end up with peeling paint or rust showing through later. This section covers what you need to do to get that rusty spot ready for a fresh coat.
Removing Loose Rust
The first step in preparing your rusty surface is to get rid of all the loose stuff. This means anything flaky, powdery, or easily scraped off. You don’t want any of that under your new paint.
If you paint over loose rust, the paint will just lift off with it eventually, taking your nice new paint job with it. It’s like trying to build a house on sand; it won’t be stable.
You can use a few tools for this. A wire brush is a great go-to. You can get these by hand or attach them to a drill for faster work.
For tougher bits, you might need a scraper or even sandpaper. The goal is to get down to a solid, hard rust layer or even bare metal if possible. It doesn’t have to be perfectly smooth, but it must be free of anything that’s flaking away.
Imagine cleaning a dirty plate before you put food on it; you want a clean surface for the paint to cling to.
A common mistake is to just paint over the rust without removing the loose bits. This always leads to problems later. Take your time here.
It might seem like a lot of work, but this step is the foundation for a good paint job. Think of it as creating a strong base for your artwork. The better the base, the better the final picture.
Cleaning the Surface
Once you’ve scraped and brushed away the loose rust, you need to clean the surface really well. Even after brushing, there’s usually dust and grease left behind. Paint won’t stick properly to a dirty or oily surface.
This is true for any painting project, but it’s extra important when dealing with rust. You want to make sure the new paint can bond directly to the metal.
A good way to clean is by using a degreaser or mineral spirits. You can find these at most hardware stores. Apply the cleaner to a clean cloth and wipe down the entire area.
Make sure you get into any nooks or crannies where dirt might be hiding. After wiping with the cleaner, it’s a good idea to wipe it down again with a clean cloth dampened with water to remove any cleaner residue. Then, let the surface dry completely.
Any water left can cause new rust to form very quickly.
Some people think a quick wipe with a damp cloth is enough. But that really doesn’t remove grease or fine dust. Grease acts like a barrier, stopping the paint from making a strong connection.
Think about how water beads up on a greasy surface; paint will do the same thing. So, don’t skip the thorough cleaning. It’s a small step that has a huge impact on the final result.
Sanding for Adhesion
After cleaning and drying, it’s time for some sanding. This isn’t about removing the rust anymore; it’s about creating a surface that the primer and paint can grab onto. Think of it like giving the metal a very light “tooth” so the paint has something to stick to.
If the surface is too smooth, the paint might just slide off over time.
You want to use a medium-grit sandpaper, something like 100 or 150 grit. You don’t need anything too rough. The goal is just to scuff up the surface lightly.
Sand the entire area you plan to paint, not just the rusty spots. This ensures a uniform surface for the primer. After sanding, wipe the area down again with a tack cloth or a clean, damp cloth to remove all the dust.
This is critical. Sanding creates dust, and paint will not stick to dust.
This step helps prevent rust from coming back through the paint. By creating a slightly rough surface, you help the protective layers of primer and paint adhere better. A smooth, polished surface might look good, but it doesn’t offer the best grip for paint.
So, a little bit of gentle sanding is key to a long-lasting paint job. It’s about making sure your paint job is stuck on tight.
Choosing the Right Products for Painting Over Rust
Selecting the correct products is vital when you plan to spray paint over rust. Using the wrong kind of paint or primer can lead to your efforts being wasted. The paint might not stick, or the rust might break through the coating quickly.
This part will guide you through picking the best items to ensure your project is a success.
Rust-Inhibiting Primers
When you are painting over rust, a special type of primer is your best friend. It’s called a rust-inhibiting primer. This isn’t your average primer.
It has special ingredients that help to stop rust from forming and spreading. It also creates a great surface for your topcoat of paint to stick to.
These primers work in a couple of ways. Some contain chemicals that chemically convert the rust into a stable, paintable surface. Others have pigments that act as a barrier, preventing moisture and air from reaching the metal and causing more rust.
This dual action is what makes them so effective for rusty items. Think of it as a shield for your metal.
It’s really important to choose a primer that’s made for metal and specifically for rusty surfaces. Some primers are just for wood or drywall and won’t do the job here. Always read the label on the can to make sure it’s suitable for your project.
Using a good quality rust-inhibiting primer is one of the most important steps in ensuring your painted finish lasts a long time and stays looking good.
A common mistake is using a regular spray primer when painting over rust. This is like putting a band-aid on a deeper wound. The rust can continue to grow underneath the primer and eventually push through the paint.
For example, if you’re painting an old metal chair that has some rust spots, using a generic primer might cause the rust to reappear within weeks. A dedicated rust-inhibiting primer, however, would create a barrier that prevents this.
Benefits of Rust-Inhibiting Primers
- Corrosion Prevention: These primers contain chemicals that stop rust from spreading and forming. They create a barrier that protects the metal from moisture and oxygen, which are needed for rust to grow. This is their main job and why they are essential for rusty surfaces.
- Improved Adhesion: They are designed to stick well to metal surfaces, even those with light rust. This ensures that your topcoat of paint will adhere firmly. Without good adhesion, the paint can peel or chip away.
- Surface Smoothing: Many rust-inhibiting primers also help to fill in minor imperfections and smooth out the surface. This leads to a more uniform and professional-looking finish once you apply the topcoat.
- Extended Durability: By preventing rust and ensuring good paint adhesion, these primers significantly extend the life of your painted item. Your paint job will look better for longer, saving you time and effort in the future.
Choosing the Right Topcoat Paint
Once you’ve applied the primer, you need to select the right topcoat paint. This is the color you’ll see. For spray painting over rust, you want a paint that’s durable and designed to adhere well to metal.
Not all spray paints are created equal, especially when you’re dealing with a surface that was once rusty.
Look for spray paints that are labeled for metal or all-purpose use. Some paints are specifically formulated to be used directly on rust, often called “direct-to-metal” or DTM paints. These can sometimes be used without a separate primer, but it’s usually still a good idea to use a rust-inhibiting primer for the best results, especially if the rust was significant.
Consider the finish you want, too. Glossy finishes can be easier to clean and may offer a bit more protection against the elements. Matte finishes can hide imperfections better.
For most outdoor items or things that will be handled a lot, a durable enamel or acrylic-based spray paint is a good choice. These types of paints are generally more resistant to chipping, scratching, and fading.
A common mistake is using a regular interior latex spray paint on an outdoor metal item. This type of paint isn’t built to withstand weather changes like sun, rain, and temperature fluctuations. It will likely fade, peel, and not protect the metal from rust returning.
Always check the product description to ensure it’s suitable for the intended environment and material.
Paint Types and Their Properties
There are several types of spray paints you might encounter, each with its own advantages for painting over rust. Understanding these differences helps you pick the best one for your specific project. Not all spray paints perform the same, especially on challenging surfaces.
- Enamel Paints: These are very popular for metal surfaces. They dry to a hard, durable finish that resists chipping and scratching. Enamel paints often have good adhesion and provide a protective layer. They are available in oil-based and water-based formulas. Oil-based enamels are generally tougher but take longer to dry and require mineral spirits for cleanup. Water-based enamels dry faster and are easier to clean up.
- Acrylic Paints: Acrylic spray paints are another good option. They dry quickly and are quite durable, offering good resistance to weathering and fading. Many acrylic paints are water-based, making cleanup simple. They adhere well to properly primed metal surfaces and are a good choice for decorative items or furniture.
- Direct-to-Metal (DTM) Paints: As mentioned, these paints are specifically formulated to be applied directly to metal, often without a separate primer. They contain rust inhibitors and excellent adhesion properties. While convenient, they may not offer the same level of rust prevention as a dedicated primer followed by a high-quality topcoat. They are best suited for light rust or surfaces where you want to save a step.
- Epoxy Paints: For extreme durability and resistance to chemicals, moisture, and abrasion, epoxy paints are a top choice. They often come in two-part systems that you mix before use, requiring careful application and specific safety precautions. These are generally overkill for simple DIY projects but are excellent for heavy-duty applications like machinery or industrial equipment.
When choosing, think about where the item will be used. A garden bench exposed to rain needs a more robust paint than a picture frame that will stay indoors. For example, painting a metal mailbox with an acrylic enamel will provide better protection against outdoor elements than a standard craft spray paint.
The key is to match the paint’s durability and protective qualities to the item’s exposure.
The Spray Painting Process Over Rust
Now that you’ve prepared the surface and chosen your products, it’s time to get painting. This section walks you through the actual spray painting steps. Following these instructions carefully will help you achieve a smooth, even, and lasting finish.
It’s all about patience and technique.
Applying Primer
After all the prep work, the very next step is applying your rust-inhibiting primer. This is where you lay down the foundation for your paint job. Remember, good prep makes for good paint, but a good primer makes for good adhesion and rust protection.
Shake the primer can very well for at least one to two minutes. This mixes the rust inhibitors and pigments evenly. Hold the can about 8-12 inches away from the surface.
Use smooth, even strokes, moving the can back and forth. Overlap each stroke slightly to avoid missing spots and to create a consistent layer. Don’t try to cover the entire surface with one thick coat.
Instead, apply several thin coats. This prevents drips and runs, which are much harder to fix later.
Let each coat dry according to the manufacturer’s instructions before applying the next. This is usually about 10-20 minutes. You might need two or three thin coats of primer for good coverage and protection.
Make sure to cover all the areas where rust was present, and extend the primer slightly beyond those areas. This ensures the rust is completely sealed.
A common mistake here is spraying too close to the surface. This can cause paint to pool and drip. Also, not shaking the can enough means the rust-inhibiting agents won’t be evenly distributed.
If you see any drips, you can gently sand them down once the primer is dry and then apply another light coat. Think of primer as building a strong, protective skin for your metal item.
For instance, imagine you’re painting an old metal watering can. After cleaning and sanding, you’ll spray on thin, even coats of primer, ensuring you get into the spout and handle areas. You’d let each coat dry before applying the next.
This layered approach is what gives you that robust protection against future rust.
Applying the Topcoat
Once your primer is completely dry and you’re happy with it, it’s time to apply the topcoat paint. This is the color layer that you’ll see. Just like with the primer, thin, even coats are key to a professional-looking finish.
Again, shake the paint can thoroughly for at least one to two minutes. Hold the can the same distance away, about 8-12 inches. Use steady, sweeping motions.
Start spraying before the object and stop spraying after the object. This helps avoid getting too much paint in one spot and prevents “fisheyes” or uneven spray patterns. Overlap each pass by about 50% to ensure full coverage.
Apply the paint in multiple thin coats rather than one thick one. This is the most important rule for spray painting. Thin coats dry faster, reduce the risk of drips and runs, and build up a more durable finish.
You might need anywhere from two to four coats, depending on the paint color and how well the primer is covered.
Allow adequate drying time between coats, as recommended on the paint can. This is usually around 10-20 minutes, but can vary. Rushing this step can lead to the paint not curing properly or even lifting the previous coat.
Make sure the surface is completely dry and cured before you put the item into use or expose it to harsh conditions.
A common error is applying the paint too thickly, leading to drips. Another mistake is not waiting long enough between coats. If you try to spray the second coat onto a wet first coat, you can end up with a messy, wrinkled finish.
Patience is your greatest tool here. Think of it as adding layers of color, each one building on the last for a rich, smooth result.
Consider painting a bicycle frame. After priming, you’d apply light coats of your chosen color. You’d spray, move on, then come back for another light pass.
You would continue this until the frame has a uniform, opaque color. This method ensures a smooth, hard finish that can withstand everyday use and weather.
Drying and Curing Times
The drying and curing times are crucial parts of the spray painting process, especially when painting over rust. Many people rush these steps, which can ruin an otherwise good paint job. It’s important to understand the difference between dry to touch and fully cured.
“Dry to touch” means the surface no longer feels wet or sticky when you lightly brush it. This usually happens relatively quickly, often within 30 minutes to a couple of hours, depending on the paint type and environmental conditions. This is when you can apply the next thin coat of paint or primer.
However, being dry to touch does not mean the paint is fully hardened.
“Fully cured” means the paint has reached its maximum hardness and durability. This process can take much longer, sometimes days or even weeks. During the curing period, the paint is still vulnerable to scratches, dings, and chemical exposure.
It’s best to handle the painted item gently and avoid putting it into heavy use until it is fully cured.
Environmental factors like temperature and humidity play a big role. Painting in cool, humid conditions will slow down both drying and curing. Painting in warm, dry conditions will speed things up.
Always check the paint can for specific recommended drying and curing times. These are guidelines provided by the manufacturer for optimal results.
A frequent mistake is assuming that once the paint is dry to touch, it’s ready for anything. If you put a freshly painted item back outside too soon, for example, rain can damage the soft surface. Or if you stack painted items too soon, they can stick together, causing the paint to peel.
Patience here ensures your paint job is as durable as possible.
For example, if you spray paint a metal patio chair, you might be able to touch it after a few hours. But it might take a week or more for the paint to fully cure. During that week, it’s best to keep it in a sheltered spot, away from heavy rain or direct sunlight, and avoid rubbing against it.
This careful waiting period guarantees the paint will hold up against the elements.
Common Issues and How to Fix Them
Even with careful preparation and application, you might run into some snags when spray painting over rust. Knowing how to fix common problems can save your project. This section looks at frequent issues and provides simple solutions to get your paint job back on track.
Dealing with Drips and Runs
Drips and runs are perhaps the most common spray painting problem. They happen when too much paint is applied at once, or when the can is held too close to the surface. They create unsightly bulges and trails of paint.
If you catch a drip while the paint is still wet, you can often fix it immediately. Use a clean brush that’s slightly dampened with the correct thinner (check your paint can) to gently feather out the edge of the drip. Alternatively, you can use a clean, lint-free cloth to carefully wick away the excess paint.
Be gentle so you don’t remove too much paint or create a noticeable thin spot.
If the paint has already started to dry, you’ll need to let it harden completely. Once it’s dry, carefully sand down the raised area of the drip using fine-grit sandpaper (around 220 grit or higher). The goal is to make the surface smooth and even with the rest of the paint.
After sanding, wipe away all the dust with a tack cloth or a slightly damp cloth.
Then, you’ll need to reapply a very thin coat of primer (if you sanded down to it) or topcoat paint over the repaired area. Blend the edges of the new paint into the surrounding area to make the repair invisible. This often requires multiple light coats to match the thickness and sheen of the original paint.
Patience is key to making these repairs look seamless.
A common mistake is to try to wipe away a wet drip with your finger or a dry rag, which usually just smudges it and makes it worse. Another error is sanding too aggressively and removing too much paint. Always err on the side of caution, sanding lightly and checking your progress frequently.
Think of it as carefully smoothing out a wrinkle in your work.
For instance, if you notice a drip on a painted metal fence post, let it dry. Then, gently sand it smooth. After cleaning, apply a very light touch-up coat of paint, feathering the edges outwards.
You might need two or three tiny coats to make the repair blend in completely.
Addressing Uneven Coverage
Uneven coverage, or holidays, means there are spots where the paint is thin or missing entirely. This can happen if you don’t overlap your spray strokes enough, move too quickly, or if the can isn’t producing a consistent spray. It makes the surface look patchy.
The fix is usually straightforward: apply more thin coats of paint. Ensure you’re holding the can at the correct distance and using smooth, overlapping strokes. Don’t try to cover a thin spot with one heavy blast of paint, as this will likely lead to drips.
Instead, apply light, even coats over the entire surface, paying attention to the thinner areas. You may need to do this until the coverage is uniform.
If the unevenness is significant or if you’ve missed spots (holidays) that are very noticeable, you might need to lightly sand the entire area down once it’s dry. Then, reapply primer if you sanded through the topcoat, followed by multiple thin coats of your topcoat paint. The key is to build up coverage gradually.
A common error is to keep spraying from one angle to try and fix thin spots, which often results in an uneven texture. Another mistake is to stop spraying mid-object, creating a distinct line where the spray pattern starts or stops. Always start and end your spray strokes off the edge of the object.
This creates a much smoother, more consistent finish.
Imagine you’re painting a metal garden planter. If you notice some areas are lighter than others after the first coat, you simply apply another light, even coat. You continue adding these light coats until the color is uniform across the entire planter.
It’s about building up a smooth layer, like adding thin washes of color in a watercolor painting.
Rust Bleed-Through
Rust bleed-through happens when rust from underneath the paint starts to appear on the surface, creating orange or brown spots. This is a frustrating problem, but it usually means the initial rust protection wasn’t strong enough or the surface wasn’t properly prepared.
If you see rust bleed-through, you’ll need to address it. The first step is to stop the rust from spreading further. You may need to lightly sand the affected area again to expose the rust.
Then, clean the spot thoroughly. Apply a rust-inhibiting primer specifically designed for this purpose directly to the affected area. Make sure this primer is fully dry.
After the primer has cured, you’ll need to reapply your topcoat paint over the repaired area. You might need to feather the new paint out beyond the repair area to make it blend in. It’s often necessary to apply multiple thin coats of topcoat to fully conceal the repair and ensure the rust is completely sealed.
Sometimes, using a stain-blocking primer can help, but a dedicated rust-inhibiting primer is usually best.
The most common cause of rust bleed-through is not using a good quality rust-inhibiting primer, or not applying enough coats of primer. Another cause is not removing all the loose rust during the preparation phase. If there’s still active rust underneath, it will eventually break through any paint layer.
For example, if you painted an old metal toolbox and notice rust spots reappearing, you’ll need to spot-treat it. Sand the rusty area, clean it, apply a specialized rust-inhibiting primer, let it dry, and then reapply your topcoat. This ensures the rust is contained and your paint job looks fresh again.
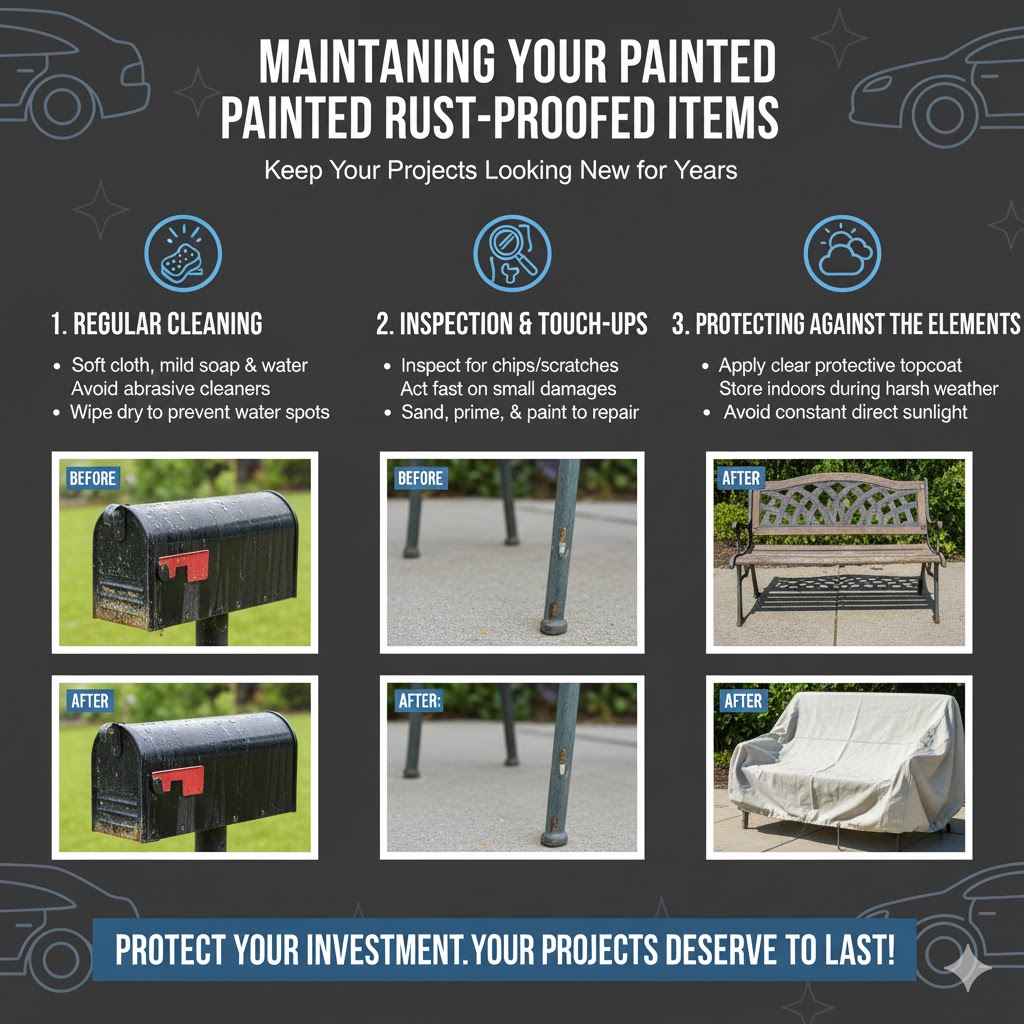
Maintaining Your Painted Rust-Proofed Items
Once you’ve successfully spray painted over rust and achieved a great finish, you want it to last. Proper maintenance will help protect your work from future damage and keep it looking good for years to come. It’s about ongoing care.
Regular Cleaning
Keeping your painted items clean is the first line of defense against the elements and potential rust. Dirt, dust, and grime can trap moisture against the painted surface. Over time, this moisture can find its way to tiny imperfections in the paint, leading to corrosion.
Use a soft cloth or sponge with mild soap and water to clean your painted items regularly. Avoid abrasive cleaners or scrub brushes, as these can scratch the paint and expose the metal underneath. For outdoor items like furniture or mailboxes, a quick rinse with a hose can often be enough to remove loose dirt.
If you live in an area with salty air or harsh weather, cleaning might need to be more frequent.
Wipe the item dry with a clean cloth after washing. This prevents water spots and removes any lingering moisture that could cause issues. Think of it like washing your car; regular cleaning keeps it looking good and protects the paint job.
This simple step helps maintain the integrity of your painted surface and prevents small issues from becoming big problems.
A common oversight is not cleaning outdoor items often enough, especially in coastal or humid regions. This neglect allows salt or moisture to sit on the paint, gradually weakening it. Consistent, gentle cleaning is far more effective than letting dirt build up and then trying to scrub it off later with harsh methods.
For example, cleaning a painted metal outdoor chair every few weeks with soap and water, then drying it off, will help preserve the paint. This routine prevents the buildup of environmental contaminants that could eventually lead to rust forming again.
Inspection and Touch-Ups
Regularly inspect your painted items for any signs of damage. Look for scratches, chips, or areas where the paint might be peeling. Even a small nick in the paint can be an entry point for moisture and rust.
If you find any damage, it’s important to address it as soon as possible. Minor scratches can sometimes be buffed out with a polishing compound designed for painted surfaces. However, if you see any sign of rust or a chip that goes down to the metal, it’s best to touch it up.
To touch up, you’ll likely need to lightly sand the damaged area, clean it thoroughly, and then apply a small amount of rust-inhibiting primer. Once the primer is dry, carefully apply a matching topcoat paint. Use thin coats and try to blend the repair into the surrounding area.
Having some leftover spray paint from your original project can be very handy for these touch-ups.
Don’t wait for small damages to become large problems. A tiny chip that exposes metal can quickly develop into a rust spot that spreads. Acting fast on these small issues will save you a lot more work and effort down the line.
It’s about being proactive in maintaining your paint job.
A mistake people often make is ignoring small paint chips, thinking they’re not a big deal. But that tiny spot of exposed metal is an invitation for rust. By touching up these minor damages promptly, you prevent the need for larger, more difficult repairs later on.
It’s like fixing a small leak in your roof before it causes major water damage.
For instance, if a painted metal bike frame gets a scratch, you’d clean the area, apply a little primer, then a thin coat of the original paint color. This quick fix stops rust before it starts and keeps the bike looking great.
Protecting Against the Elements
The environment your painted item is in plays a big role in how well your paint job lasts. Items kept outdoors will naturally face more wear and tear than those kept inside.
For outdoor items, consider using a clear protective topcoat spray after your color coat has dried. These clear coats add an extra layer of protection against UV rays (which cause fading), moisture, and general abrasion. They can significantly extend the life and appearance of your paint job.
Make sure the clear coat you choose is compatible with your base paint.
If possible, store valuable or frequently used painted items indoors during harsh weather seasons. For example, bringing metal patio furniture inside during the winter months can dramatically reduce its exposure to snow, ice, and extreme cold, all of which can be tough on paint.
Even simple things like positioning items to avoid constant direct sunlight can help. Prolonged exposure to intense sun can break down paint over time. By taking these steps, you are actively preserving your hard work and ensuring your painted items look their best for longer.
A common oversight is thinking that once an item is painted, it’s invincible. Paint offers protection, but it’s not an impenetrable shield. Items left unprotected during harsh weather or constant sun exposure will show wear much faster.
Actively protecting them is key to long-term durability.
For example, painting a metal bird feeder and then spraying a UV-resistant clear coat on top will help it withstand sun exposure and rain for much longer, keeping its color vibrant and preventing rust.
Frequently Asked Questions
Question: Do I need to remove all the rust before spray painting?
Answer: You need to remove all loose and flaky rust. For solid rust, a good rust-inhibiting primer can often convert and seal it, but removing as much as possible first leads to the best results.
Question: Can I spray paint directly over rust without primer?
Answer: While some special paints are labeled “direct-to-metal,” it’s strongly recommended to use a rust-inhibiting primer. Primer provides essential protection against rust and ensures better adhesion for your topcoat.
Question: How many coats of spray paint do I need?
Answer: For both primer and topcoat, apply multiple thin coats. Typically, two to three coats of primer and two to four coats of topcoat are needed for good coverage and durability.
Question: What if I see rust coming through after painting?
Answer: This means the rust wasn’t fully treated. You’ll need to lightly sand the area, reapply a rust-inhibiting primer, let it dry, and then reapply your topcoat to seal it properly.
Question: How long does spray paint over rust usually last?
Answer: With proper preparation, the right products, and good maintenance, a spray-painted rust-proofed surface can last for several years. However, factors like exposure to harsh weather can affect its lifespan.
Summary
You absolutely can spray paint over rust with the right approach. By preparing your surface thoroughly, using rust-inhibiting primers and suitable topcoat paints, and applying them in thin, even coats, you can achieve a durable and attractive finish. Regular cleaning and prompt touch-ups will keep your painted items looking great for years.
Enjoy your refreshed and protected items.