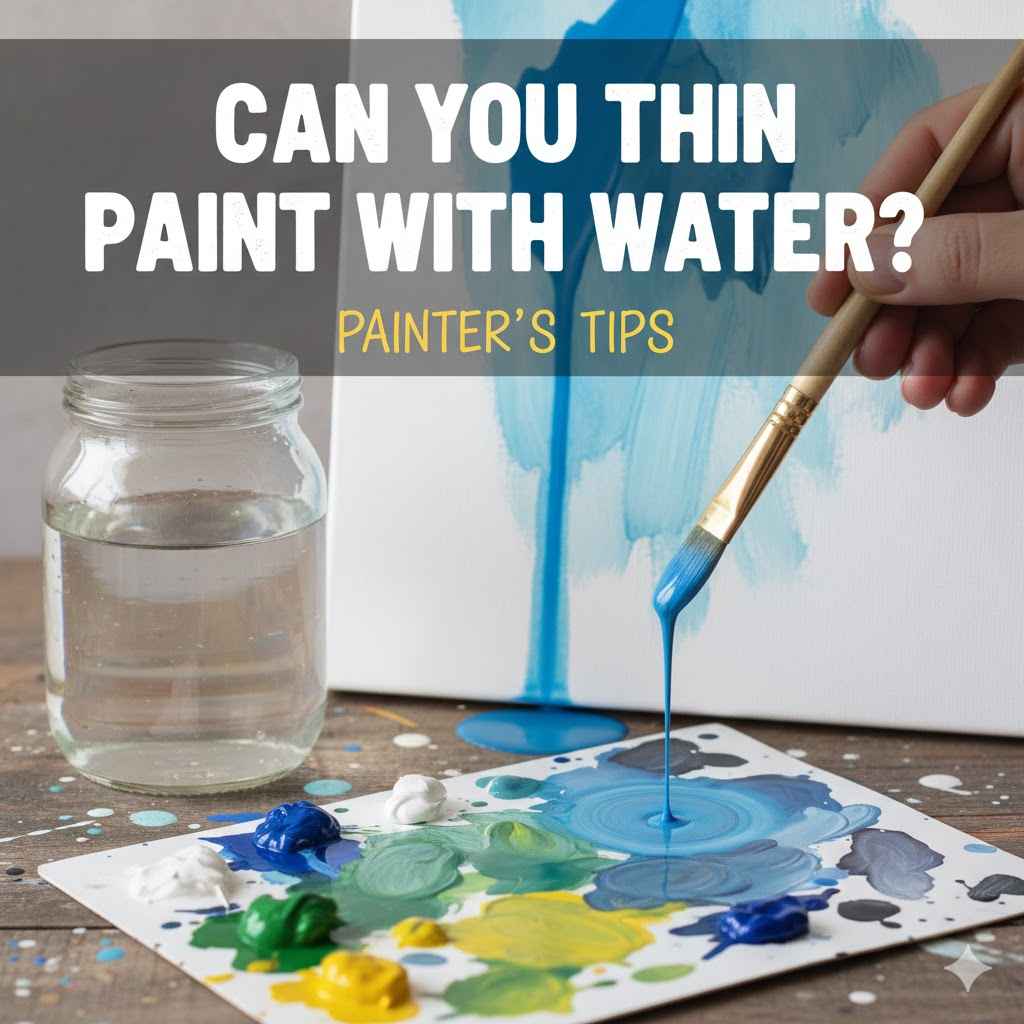
Can You Thin Paint With Water? Painter’s Tips
Many people wonder, Can You Thin Paint With Water? Painter’s Tips are often sought by those just starting with DIY projects or art. It seems like a simple question, but getting it wrong can lead to a streaky mess or paint that just won’t stick.
Don’t worry if this seems tricky; we’ll break it down simply, step by step. You’ll learn exactly when and how to add water to your paint for great results every time. Let’s see what you need to know.
When Can You Thin Paint With Water
Knowing when to add water to your paint is key for a smooth finish. Not all paints are the same, and some just don’t mix well with water. This section will help you figure out which paints are friendly to water and why.
We will also touch on the types of paint that need different thinning agents. Getting this right means your paint will go on easily and look its best.
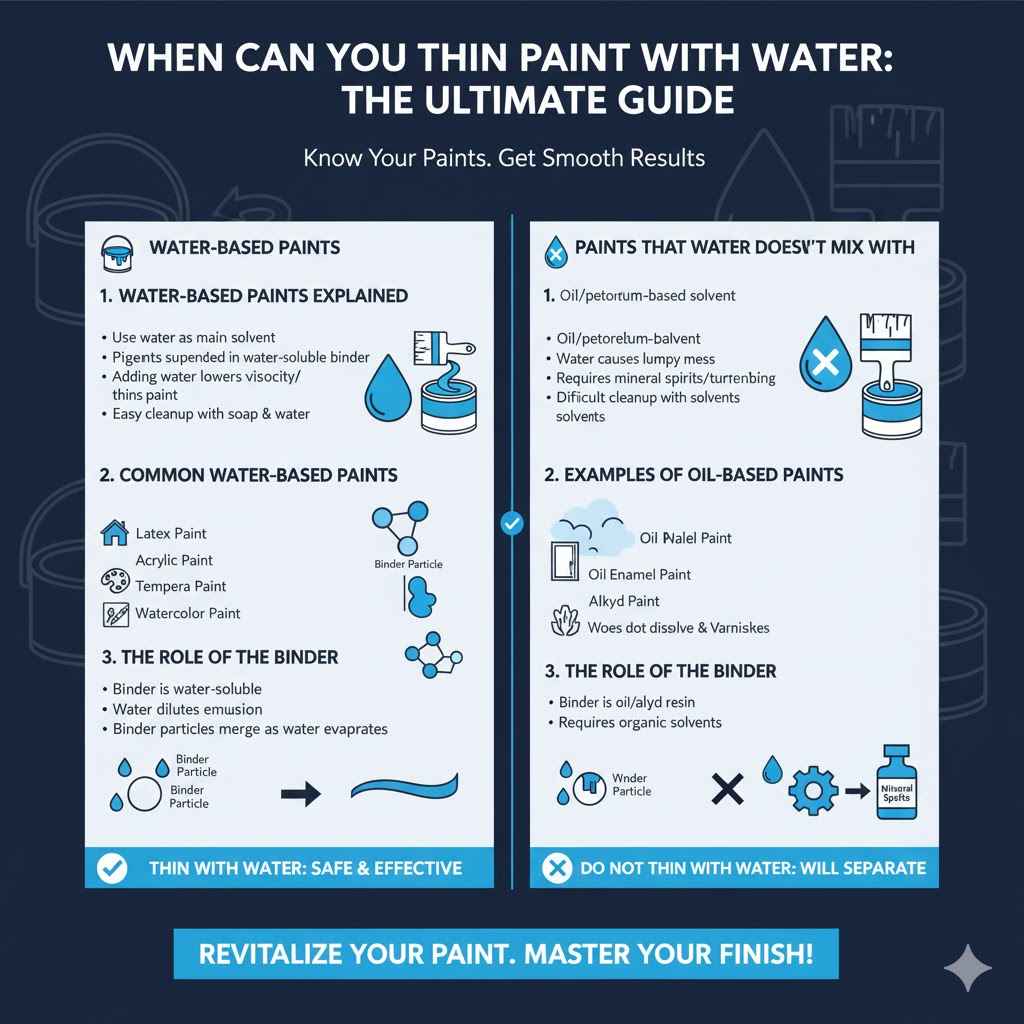
Water-Based Paints Explained
Water-based paints are the most common type you’ll find. Think of latex paint, acrylic paint, and tempera paint. These paints use water as their main solvent, meaning the water helps them spread and dry.
Because water is already a big part of them, adding a little more water can make them thinner and easier to work with.
The pigments in these paints are suspended in a liquid binder that is also water-soluble. When you add water, you are essentially reducing the concentration of the binder and pigments. This makes the paint flow more freely from your brush or roller.
It’s like diluting juice; the flavor gets lighter, but it’s still juice.
It’s important to remember that these paints are designed to be thinned with water. This is their intended use, making them very versatile for different applications. Whether you’re painting a wall, a piece of furniture, or a canvas, understanding this core property is your first step.
Here are some common water-based paints:
- Latex Paint: Often used for house painting, both inside and out. It’s durable and cleans up easily with soap and water.
- Acrylic Paint: Popular with artists for its vibrant colors and quick drying time. It can be used on canvas, wood, fabric, and more.
- Tempera Paint: A classic choice for children’s art projects. It’s non-toxic and washes off easily, making it great for young artists.
- Watercolor Paint: Used by artists for delicate washes and transparent effects. It is designed to be thinned with water for its characteristic look.
Paints That Water Doesn’t Mix With
Some paints absolutely do not get along with water. These are typically oil-based paints. They use oil or a petroleum-based solvent as their base, not water.
Trying to thin them with water will just result in a lumpy, unusable mess. The oil and water will separate, and you won’t get a smooth application.
Oil-based paints, like oil enamel or alkyd paints, require special thinners. These thinners are usually mineral spirits or turpentine. They are designed to break down the oil in the paint, allowing it to become thinner and flow better.
Using the wrong thinner can damage the paint and your project.
You can usually tell if a paint is oil-based by reading the label on the can. It will often specify what kind of cleaner to use for brushes and tools, such as “mineral spirits” or “paint thinner.” If it says anything other than soap and water, it’s likely not a water-based paint.
Examples of paints that water cannot thin include:
- Oil Enamel Paint: Known for its hard, durable finish, often used for trim, doors, and cabinets.
- Alkyd Paint: A type of synthetic oil-based paint that offers good adhesion and a smooth finish, suitable for metal and wood.
- Some Stains and Varnishes: Many wood stains and varnishes are oil-based and require specific solvents for thinning and cleanup.
The Role of the Binder
The binder is a crucial ingredient in paint. It’s what holds the pigment particles together and makes the paint stick to the surface. In water-based paints, the binder is water-soluble.
This means that when you add water, it can loosen up the binder, allowing the paint to spread more thinly.
For example, in acrylic paint, the binder is an acrylic polymer emulsion. This emulsion is dispersed in water. When water is added, it dilutes the emulsion, making the paint flow easier.
As the water evaporates, the binder particles merge and form a continuous film, trapping the pigment and creating the paint layer.
In oil-based paints, the binder is an oil or alkyd resin. These binders do not dissolve in water. They require organic solvents like mineral spirits to become thinner and to allow for proper adhesion and film formation.
Water would simply bead up and not mix with the oil binder.
The type of binder directly determines what you can use to thin the paint. It’s the fundamental difference that separates water-thinnable paints from solvent-thinnable paints.
How Much Water Can You Add
Adding water to paint is like adding seasoning to food; a little can go a long way, but too much can ruin the dish. For painters, adding too much water can weaken the paint’s ability to stick and cover surfaces. You want just enough to make it easier to apply, not so much that it becomes transparent or flaky.
The exact amount of water you can add depends on the type of paint and what you are painting. For example, you might add more water for a thin wash of watercolor than for painting a wall with latex paint. Always start with a small amount and add more only if needed.
A good rule of thumb is to add water gradually. Stir well after each addition. Watch how the paint’s consistency changes.
Stop when you reach the desired flow. Too much water can compromise the paint’s integrity.
General Guidelines for Thinning
For most common water-based paints like latex and acrylic, you typically don’t need to add much water. A good starting point is usually between 5% to 10% water by volume. This means for every gallon of paint, you might add about 6 to 12 fluid ounces of water.
Adding more than 10-15% water can start to weaken the paint’s film strength. This means it might not be as durable or as opaque as intended. It could lead to chipping, peeling, or a faded look over time.
You want the paint to adhere well to the surface.
For artistic acrylics or watercolors, the amount of water can be much higher. Artists might use 50% or even more water to create transparent washes. However, this is a deliberate artistic choice and not typical for general painting jobs like walls.
Always check the paint can for specific recommendations from the manufacturer. They often provide guidance on thinning ratios. This ensures you get the best performance from their product.
Here are some typical thinning percentages:
- Latex Paint for Walls: 5-10% water. This helps with flow and leveling but maintains good coverage.
- Acrylic Paint for Brushing: 5-10% water. This makes it easier to apply without losing body.
- Watercolor: Can be thinned up to 90% water for washes. The goal is transparency.
- Airbrush Acrylics: Often formulated to be thinner, but may still require a small amount of water or a specific airbrush medium.
Consequences of Adding Too Much Water
When you add too much water to paint, several problems can occur. The most common issue is reduced coverage. The paint becomes more transparent, meaning you might need more coats to achieve the desired color and opacity.
This can be frustrating and time-consuming.
Another significant consequence is weakened adhesion. The binder in the paint is diluted too much. This can prevent it from properly bonding with the surface.
Over time, the paint might start to chip, peel, or crack, especially in areas with a lot of wear and tear. This is especially true for house paints.
The finish can also be affected. You might notice brush strokes more prominently, or the paint could have a duller appearance than intended. For gloss or semi-gloss paints, adding too much water can reduce the sheen.
It disrupts the way the paint film dries and forms its surface.
In summary, over-thinning compromises the paint’s ability to perform its main job: to protect and beautify surfaces. It’s better to apply paint in its recommended consistency and do an extra coat if needed, rather than risk a poor-quality finish.
Here are potential issues from over-thinning:
- Poor Coverage: The paint becomes see-through. You’ll see the old color or primer underneath.
- Weak Adhesion: The paint doesn’t stick well. It might peel off later.
- Reduced Durability: The paint layer becomes less tough. It can scratch or scuff easily.
- Loss of Sheen: Glossy paints might look flat. The desired shine disappears.
- Uneven Finish: You might see streaks or patchy areas. The surface won’t look smooth.
Testing Your Thinned Paint
Before you start painting your project, it’s always a smart idea to test how your thinned paint behaves. This simple step can save you a lot of trouble and ensure you’re happy with the result. You can use a scrap piece of the same material you plan to paint, or even a piece of cardboard or paper.
Apply a small amount of the thinned paint to your test surface. Let it dry completely. Observe how it looks.
Check the coverage, the color, and the sheen. Does it cover well? Is the color what you expected?
Does it have the right finish?
Try applying it with the same tool you’ll use for your main project, whether it’s a brush, roller, or sprayer. This will give you the most accurate idea of how it will perform. If it’s too thick, add a tiny bit more water and test again.
If it seems too thin or streaky, you might have added too much water, or the paint might not be suitable for thinning further.
This testing process is crucial for any painting job, from simple touch-ups to large-scale renovations. It ensures you achieve the professional look you’re aiming for and avoid costly mistakes.
Steps for testing thinned paint:
- Prepare a test surface. Use a piece of scrap material similar to your project.
- Apply the thinned paint to the test surface. Use your chosen application tool.
- Let the paint dry completely. This is important for seeing the final result.
- Examine the dried paint. Check for coverage, color, and finish.
- Adjust thinning as needed. Add tiny amounts of water if still too thick, or consider starting over if too thin.
Painter’s Tips for Thinning Paint
Beyond just knowing when and how much water to add, there are practical tips that can make the whole process smoother. These small tricks come from experience and can help you avoid common pitfalls. They ensure your paint application is consistent and produces beautiful results, whether you’re a seasoned pro or a weekend warrior.
Using the right tools and techniques is just as important as the paint itself. We’ll share some expert advice that will help you get the most out of your thinning efforts. Think of these as the secrets to a professional-looking finish, achieved with simple adjustments.
Choosing the Right Water
When thinning paint with water, it’s important to use clean water. Tap water is usually fine for most general painting tasks. However, if your tap water has a lot of minerals or impurities, it could potentially affect the paint’s consistency or color.
This is less common but can happen.
For most latex and acrylic paints, regular tap water is perfectly adequate. The small amount of minerals present in most tap water will not significantly impact the paint’s performance for typical applications like interior walls or basic craft projects.
If you are working with very high-quality artist acrylics, watercolors, or if you are in an area with known hard water issues, you might consider using distilled water. Distilled water is pure and free from minerals and other impurities. This can ensure a more consistent and predictable result, especially when subtle color variations or precise control over drying times are important.
The key is to avoid using water that contains any contaminants like dirt, oil, or chemicals. Always use a clean container and a clean stirring tool when mixing water into your paint.
Types of water for thinning:
- Tap Water: Generally suitable for most water-based paints like latex and acrylic for general use.
- Distilled Water: Recommended for artist-grade paints or areas with hard water for maximum purity and consistency.
- Filtered Water: A good middle ground if you’re concerned about tap water impurities but don’t have distilled water readily available.
Tools for Mixing
Having the right tools makes mixing water into paint much easier and more effective. You’ll need a clean container to mix the paint and water in. This could be a plastic bucket, a paint tray, or even a clean disposable cup, depending on the amount of paint you’re working with.
A stirring stick is essential. A wooden paint stirrer, a plastic spatula, or even a sturdy dowel rod will work. You want something that allows you to mix thoroughly without introducing too much air into the paint, which can create bubbles.
For smaller amounts of paint, like in craft projects, a plastic knife or even a clean brush can be used.
If you are thinning a large amount of paint, like for a whole room, a drill with a paint-mixing attachment is a very efficient tool. It ensures the paint is mixed consistently and quickly. For smaller projects, manual stirring is perfectly fine.
Remember to always use clean tools. Any residue from previous projects or dirt can contaminate your paint and affect the finish.
Essential mixing tools:
- Clean Container: A bucket, tray, or cup to hold the paint and water.
- Stirring Stick: Wood, plastic, or a specialized paint mixer for thorough blending.
- Measuring Tools: Cups or jugs to measure water accurately for consistent thinning.
Application Techniques with Thinned Paint
How you apply thinned paint can significantly impact the final look. Thinned paint flows differently, and your technique should adapt to this. If you’re using a brush, you might find that lighter, more sweeping strokes work best.
This helps to avoid creating lines or ridges.
For rolling, a thinner paint can create a smoother, more even finish. However, be careful not to overload the roller, as thinned paint can drip more easily. A slightly shorter nap roller might be beneficial to avoid picking up too much paint.
If you’re airbrushing, thinning paint is often a necessary step to achieve a fine mist. The goal here is to get the paint to atomize properly through the airbrush nozzle without clogging it. This usually involves thinning the paint to a milky consistency.
For techniques like washing or staining, where you want the thinned paint to spread thinly and evenly, a larger brush or a roller with less pressure might be ideal. Always work in one direction for the most consistent results.
Consider the surface too. A porous surface might absorb thinned paint differently than a smooth, sealed surface. Adjust your application pressure and speed accordingly.
Application tips for thinned paint:
- Brushing: Use lighter, more consistent strokes. Work in one direction to avoid visible brush marks.
- Rolling: Avoid overloading the roller. A smooth, even application is key to prevent drips and runs.
- Spraying: Ensure the paint is thinned to the manufacturer’s or sprayer’s specifications. Practice on a test surface first.
When Not to Thin Paint
There are times when thinning paint is simply not a good idea. If the paint can already has the perfect consistency for your project, adding water might only make it worse. You want to maintain the paint’s intended properties, like its opacity and durability.
Another reason not to thin is if the paint is old or has started to go bad. If it has a strange smell, lumps, or has separated significantly, adding water won’t fix it. It’s better to discard old paint and use a fresh can.
Also, if the paint is specifically designed to be applied at a certain thickness, thinning it can alter its performance. For example, some high-build coatings or specialty primers might require their full, unthinned consistency to work correctly.
Always refer to the paint manufacturer’s instructions. They provide the best guidance on whether thinning is recommended and, if so, how much. Trusting these guidelines will lead to better results.
Situations where thinning is not advised:
- When the paint has ideal consistency: If it’s already flowing well, don’t tamper with it.
- For older or degraded paint: Thinning won’t improve compromised paint.
- For specific high-performance coatings: Some paints need their full strength.
Case Studies and Examples
Let’s look at how thinning paint with water plays out in real-life situations. These examples show the practical application of our tips and the results you can expect.
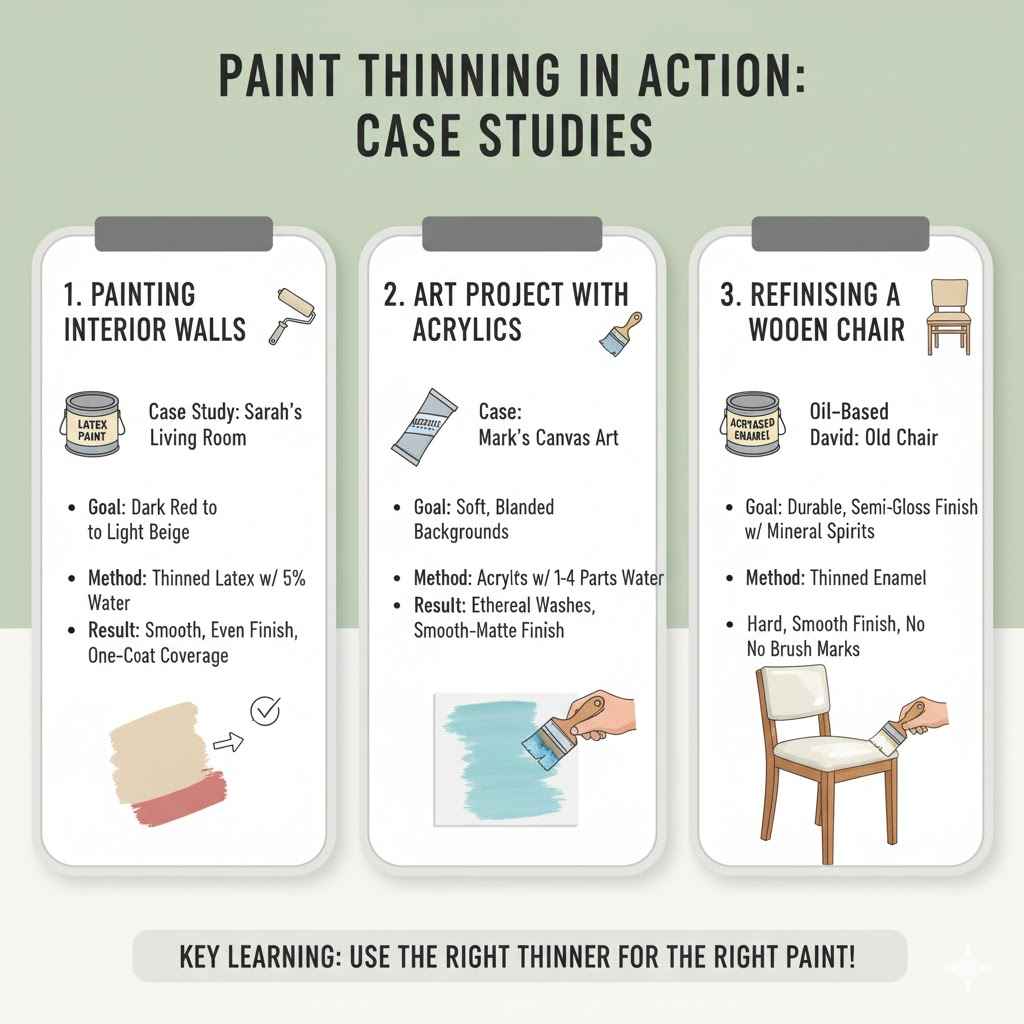
Example 1 Painting Interior Walls
Sarah wanted to repaint her living room. The old color was a dark red, and she wanted to cover it with a lighter beige. She bought a good quality latex paint.
The paint was a little thick in the can, which is normal.
She decided to thin the paint slightly. She poured about a gallon of paint into a larger bucket. Then, she added about 6 ounces of water, which is roughly 5% of the total volume.
She stirred it thoroughly with a paint stirrer for several minutes until the water was completely blended.
She tested the thinned paint on a small, inconspicuous spot on the wall first. The paint flowed much better from her roller. It covered the dark red with one coat, which surprised her!
The finish was smooth and even, without any drips or streaks. If she had added too much water, the paint might have been too transparent, requiring a second coat.
The result was a beautifully updated living room with a consistent, durable finish, all thanks to a small, careful amount of thinning.
Example 2 Art Project with Acrylics
Mark was working on a canvas painting using acrylics. He wanted to create a soft background with subtle color blending. The acrylics in the tube were quite thick and vibrant.
To achieve the soft, diffused look he wanted, Mark mixed his acrylics with a significant amount of water. For some areas, he mixed one part paint with one part water. For very thin, transparent washes of color, he used even more water, perhaps three or four parts water to one part paint.
He used a large, soft brush to apply these thinned mixtures. The water allowed the paint to spread thinly across the canvas, creating delicate layers of color. As the water evaporated, the acrylic binder held the pigments in place, forming a smooth, matte finish.
This technique would be impossible with unthinned acrylics.
The final painting had the ethereal quality Mark was aiming for, showcasing how thinning paint dramatically changes its properties and creative potential.
Example 3 Refinishing an Old Wooden Chair
David found an old wooden chair that needed some love. He wanted to give it a fresh coat of semi-gloss paint. He chose an oil-based enamel paint for its durability.
The oil-based paint was very thick. David knew that water wouldn’t work here. He read the can and saw it recommended mineral spirits for thinning.
He purchased a can of mineral spirits.
He poured some paint into a smaller container and added a small amount of mineral spirits, about 2-3 ounces per quart of paint. He stirred it well. The paint became smoother and easier to brush on.
He carefully applied thin coats to the chair, letting each coat dry before applying the next.
The mineral spirits helped the paint spread evenly without leaving obvious brush marks. The semi-gloss finish came out beautifully smooth and hard, protecting the wood. This shows how using the correct thinner, not water, is vital for certain paint types.
Frequently Asked Questions
Question: Can I thin interior latex paint with tap water?
Answer: Yes, you can generally thin interior latex paint with tap water. For most applications, tap water is perfectly fine. Just make sure it’s clean and add it gradually, stirring well, usually no more than 10% of the paint’s volume.
Question: What happens if I thin acrylic paint too much?
Answer: If you thin acrylic paint too much, it can lose its binding properties. This means the paint might not stick well to the surface and could become brittle or chalky when dry. You might also see a significant loss in opacity, making the paint very transparent.
Question: Can I use hot water to thin paint?
Answer: It is best to use cool or room temperature water to thin paint. Hot water can sometimes affect the chemical properties of the paint, potentially altering its drying time or performance. Cool or room temperature water is the safest choice.
Question: How do I know if a paint is water-based?
Answer: You can usually tell if a paint is water-based by reading the label on the can. It will often mention “latex” or “acrylic” and specify that brushes can be cleaned with soap and water. If it lists mineral spirits or turpentine for cleanup, it’s likely oil-based.
Question: Is it okay to mix different brands of water-based paint if I thin them?
Answer: It’s generally not recommended to mix different brands or types of water-based paints, even if you thin them. They may have different binders, pigments, or additives that can react negatively, leading to poor performance, inconsistent drying, or an undesirable finish.
Summary
You can thin water-based paints like latex and acrylic with water. Always check the paint can for specific instructions. Add water gradually, stirring well, and test on a scrap surface first.
Too much water can weaken the paint. Use clean water and tools for the best results. Enjoy your painting!