Deck Wood Railing Ideas: Must=Have Designs
Explore a variety of deck wood railing ideas to enhance your outdoor space. From classic picket designs to modern horizontal boards and intricate privacy screens, find durable, stylish, and beginner-friendly options that boost curb appeal and safety for your deck.
Hey there, DIY friends! Md Meraj here, your woodworking mentor. Ever look at your deck and feel like something’s missing? Often, that missing piece is a beautiful, sturdy wood railing. Choosing the right railing can seem tricky, but it’s a fantastic way to add personality and safety to your outdoor haven. Don’t worry, we’ll walk through some must-have deck wood railing ideas that are perfect for beginners. Get ready to transform your deck!
Popular Deck Wood Railing Ideas for Every Homeowner
Your deck railing is more than just a safety feature; it’s a blank canvas for style! It’s the first thing guests often notice, framing your view and setting the tone for your entire backyard. For beginners, the key is to find designs that are both achievable and impressive. We’ll explore some fantastic options that blend ease of construction with stunning aesthetics.
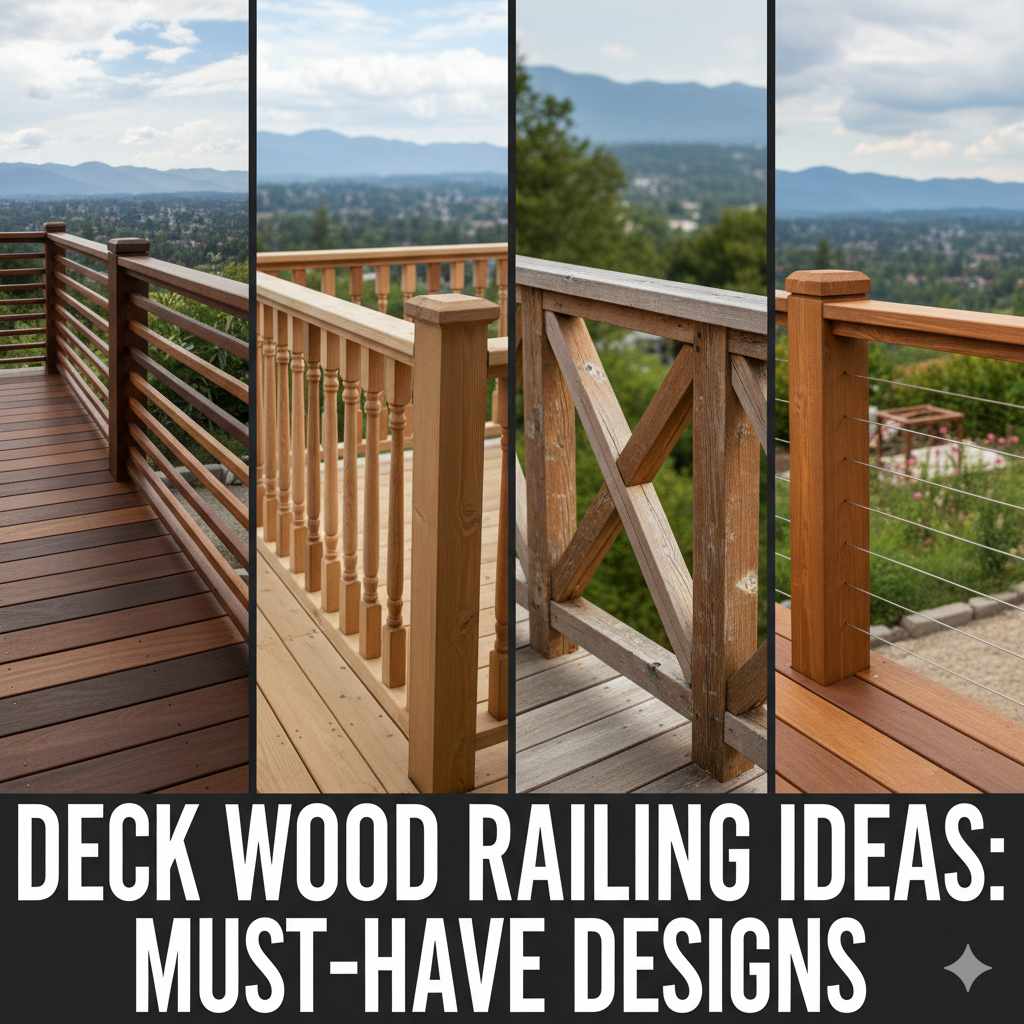
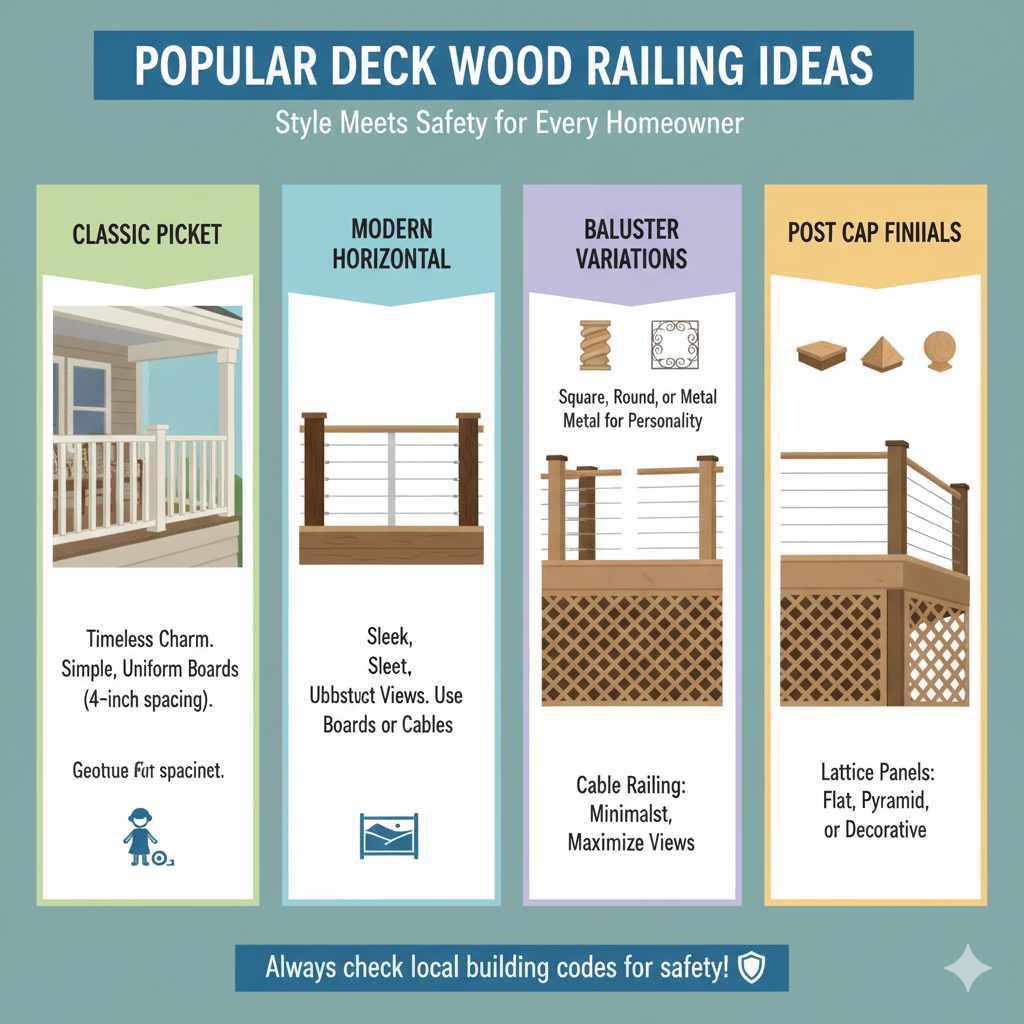
1. The Classic Picket Railing: Timeless Elegance
You can’t go wrong with a classic picket railing. It’s a tried-and-true design that offers timeless charm and excellent safety. Think of those cozy, inviting porches you’ve seen – a picket railing is likely the star!
Why it’s a great beginner choice:
- Simplicity: The design is straightforward, focusing on repetitive, uniform pieces.
- Material Availability: Standard lumber sizes are widely available and affordable.
- Versatility: Works with almost any home architectural style, from traditional to subtly modern.
- Safety: When spaced correctly (typically no more than 4 inches apart), pickets provide a secure barrier, preventing small children and pets from slipping through.
Design Variations:
- Traditional Spindles: The most common look, with evenly spaced vertical boards.
- Tapered Pickets: For a slightly more refined look, you can taper the tops of the pickets.
- Decorative Top Rails: Adding a slightly thicker, contoured top rail can elevate the design.
When selecting wood, pressure-treated pine is a popular and affordable choice for its durability against the elements. Cedar and redwood offer natural beauty and resistance to rot and insects, though they can be a bit pricier. Remember to always follow local building codes for proper spacing and height requirements. For detailed guidance on building codes, you can refer to resources like the International Code Council (ICC).
2. Horizontal Board Railings: Modern and Airy
If you’re leaning towards a more contemporary feel, horizontal plank railings are a fantastic choice. They offer a clean, uncluttered look that can make your deck feel more open and expansive.
Key features:
- Sleek Appearance: The clean lines create a modern aesthetic.
- Unobstructed Views: Horizontal boards offer a less visually restrictive view compared to vertical pickets.
- DIY-Friendly: Attaching horizontal boards is generally a straightforward process.
Considerations for horizontal designs:
- Board Spacing: While aesthetically pleasing, ensure gaps between boards don’t exceed recommended safety standards, especially if you have children or pets. A common guideline is to keep openings less than 4 inches.
- Wood Choice: Similar to pickets, pressure-treated lumber, cedar, or redwood are good options. Consider the thickness of the boards for structural integrity.
- Post Spacing: The distance between your railing posts becomes even more critical with horizontal boards to prevent sagging.
Horizontal railings can be achieved in a few ways. You can use wider boards laid flat, or thinner boards stacked closely together. Some homeowners opt for a combination, using a wider top rail over narrower deck boards. This design pairs beautifully with modern homes, minimalist architecture, and spaces with stunning natural surroundings.
3. Baluster and Spindle Variations: Adding Personality
Beyond the basic picket, there’s a whole world of balusters and spindles to explore. These are the vertical elements that fill the space between your top and bottom rails.
Popular Baluster Styles:
- Square Balusters: Simple, clean, and very common. They offer a modern twist on the classic picket.
- Round Balusters: These can be smooth and simple or feature decorative turned elements for a more traditional look.
- Decorative Metal Balusters: Available in cast aluminum, wrought iron, or steel, these offer incredible visual impact and durability. Styles range from simple scrolls to intricate patterns. While often more expensive, they significantly upgrade the railing’s appearance.
- Cable Railing: This involves thin stainless steel cables stretched horizontally between posts. It provides an incredibly open, minimalist look perfect for maximizing views. Installation is more specialized, so it might be an option for a more experienced DIYer or when working with a contractor. Decks.com has excellent resources on cable railing systems.
- Glass Panels: For a truly luxurious and modern aesthetic, glass panels offer unparalleled views and a sophisticated finish. These require specialized hardware for mounting and sealing, making them a more advanced project.
When choosing balusters, always check that they meet the required spacing regulations in your area. For a DIY project, square or simple round wooden balusters are the most beginner-friendly. Metal balusters can be attached with specialized brackets or sometimes screwed directly into the rails, depending on the design.
4. Lattice Panels: Ambiance and Privacy
Lattice panels, often made from wood or vinyl, can add a charming design element to your deck railings. They are typically used in sections, often below the main railing, or as part of a privacy screen.
Uses for Lattice:
- Under-Deck Skirting: To hide the underside of your deck, providing a clean look and preventing pests.
- Privacy Screens: By installing lattice panels between railing posts, you can create semi-private nooks on your deck.
- Decorative Accents: Smaller lattice panels can be incorporated into the design of the railing itself, adding a touch of visual interest.
Things to note:
- Lattice can be purchased in various patterns (diamond, square) and wood types.
- For a beginner, attaching pre-made lattice panels to a simple wood frame is a manageable task.
- Ensure the lattice is securely fastened to withstand wind and use.
5. Post Cap Finials: The Crowning Glory
Don’t forget the tops of your railing posts! Adding decorative post caps or finials can be a simple yet effective way to enhance the overall look of your deck wood railing.
Types of Post Caps:
- Flat Caps: Simple, flat pieces of wood that protect the top of the post from weather.
- Pyramid Caps: A classic choice that slopes down from the center.
- Hipped Caps: Similar to pyramid caps but with a slightly different slope.
- Decorative Finials: These are ornamental pieces, often carved wood or metal, that sit atop the post cap or directly on the post. Examples include balls, acorns, or custom shapes.
You can buy pre-made post caps at most home improvement stores, or for a truly custom touch, you can carve your own finials if you have some basic carving tools and practice. Attaching them is usually as simple as using wood glue and a few screws.
Choosing the Right Wood for Your Deck Railing
The material you choose will impact the look, durability, and cost of your deck railing. Understanding the pros and cons of common wood types can help you make the best decision.
Wood Types at a Glance
| Wood Type | Pros | Cons | Best For |
|---|---|---|---|
| Pressure-Treated Pine | Affordable, readily available, resistant to rot and insects. | Can warp or crack if not maintained, appearance can be less refined, needs regular sealing. | Budget-conscious projects, general use, those willing to do regular maintenance. |
| Cedar | Naturally resistant to rot and insects, lightweight, beautiful natural color, aromatic. | More expensive than pine, can dent or scratch easily, requires sealing to maintain color. | Those seeking natural beauty, moderate budgets, projects where weight is a factor. |
| Redwood | Excellent natural resistance to rot and insects, very stable, beautiful rich color, durable. | Most expensive of the common softwoods, availability can be limited in some regions. | High-end projects, maximizing longevity and natural beauty, coastal areas. |
| Tropical Hardwoods (Ipe, Teak) | Extremely dense and durable, naturally resistant to rot, insects, and weather. Exotic beauty. | Very expensive, heavy, requires specialized tools for cutting and drilling, can be difficult to source sustainably. | Luxury projects, extreme durability requirements, experienced woodworkers. |
For beginners, pressure-treated pine or cedar are usually the most accessible and manageable choices. They offer a good balance of cost, durability, and ease of working with. Always ensure your wood is rated for ground contact if it will be touching the deck structure or joists.
Essential Tools and Materials for Building Your Railing
Gathering your tools and materials before you start is crucial for a smooth and successful project. Here’s a checklist to get you prepared.
Tools You’ll Need:
- Measuring Tape: For accurate measurements.
- Pencil: For marking cuts and drill points.
- Safety Glasses: Protect your eyes – always!
- Work Gloves: To protect your hands.
- Circular Saw or Miter Saw: Essential for cutting wood to size. A miter saw offers more precise angle cuts.
- Drill/Driver: For pre-drilling holes and driving screws. Cordless is best for mobility.
- Level: To ensure posts and railings are plumb and level.
- Sanding Block or Orbital Sander: For smoothing edges and surfaces.
- Clamps: Useful for holding pieces in place while you work.
- Post Hole Digger (if setting new posts): For digging holes for deck footings.
Materials You’ll Need:
- Decking Lumber: For your top rail, bottom rail, and balusters/pickets.
- Deck Posts: Typically 4×4 or 6×6 lumber, depending on design and local codes.
- Railing Screws: Exterior-grade screws designed for decks.
- Carriage Bolts and Washers (if needed for post connections).
- Post Anchors (if not setting posts in concrete).
- Concrete Mix (if setting posts in concrete).
- Wood Glue (exterior-grade).
- Wood Stain or Sealer (optional but recommended).
Always double-check your local building codes before purchasing materials, as they dictate dimensions, spacing, and structural requirements. The U.S. Department of Housing and Urban Development (HUD) offers information on building code requirements that can be a good starting point.
Step-by-Step: Building a Simple Picket Railing (Beginner-Friendly)
Let’s walk through building a basic, yet beautiful, picket railing. This guide focuses on simplicity and safety for those new to deck building.
Step 1: Plan and Measure
Measure the sections of your deck where you’ll install the railing. Determine the height of your railing (often 36 inches or 42 inches above the deck surface, check local codes). Decide on the spacing between your posts. For most decks, posts are placed every 4 to 6 feet.
Step 2: Install or Prepare Your Posts
If you don’t have existing posts, you’ll need to install new ones. This usually involves digging holes below the frost line, setting the posts in concrete, and ensuring they are plumb (perfectly vertical) using a level. If you have existing posts, ensure they are sturdy and at the correct height. Trim them if necessary.
Safety Tip: When digging post holes, call 811 (in the US) before you dig to locate underground utility lines.
Step 3: Attach the Top and Bottom Rails
Cut your top and bottom rail pieces to length. These are typically 2×4 or 2×6 boards. Attach the bottom rail between the posts, a few inches above the deck surface. Then, attach the top rail. Ensure both rails are level and securely fastened to the posts using exterior-grade screws. Pre-drilling pilot holes will prevent the wood from splitting.
Pro Tip: Use a spacer block to ensure consistent spacing between the bottom rail and the deck. For the top rail, consider using a slightly wider board (e.g., a 2×6) for a more robust feel.
Step 4: Cut and Install the Pickets
Cut your pickets to the desired length. Remember to account for the height of the top and bottom rails. If your railing is 36 inches tall and your top rail is 3.5 inches high and bottom rail is 1.5 inches high, your pickets would be cut to 31 inches (36 – 3.5 – 1.5 = 31). Mark their positions on the top and bottom rails. As mentioned, the spacing between pickets should generally not exceed 4 inches to meet safety standards.
Use a spacer tool for consistent spacing. Attach each picket to the top and bottom rails with two screws per rail. Ensure they are as plumb as possible as you attach them. You can temporarily tack a picket in place with a nail to check its alignment before screwing.
Step 5: Sand and Finish
Once everything is assembled, lightly sand all surfaces and edges to remove any splinters or rough spots. Pay special attention to the top rail, as this is where hands will often rest. Apply a high-quality exterior wood stain or sealer to protect your railing from UV rays, moisture, and mildew. Follow the manufacturer’s instructions for application and drying times.
Regular maintenance, including cleaning and re-application of stain or sealer every 1-3 years, will keep your railing looking great and lasting for years to come.
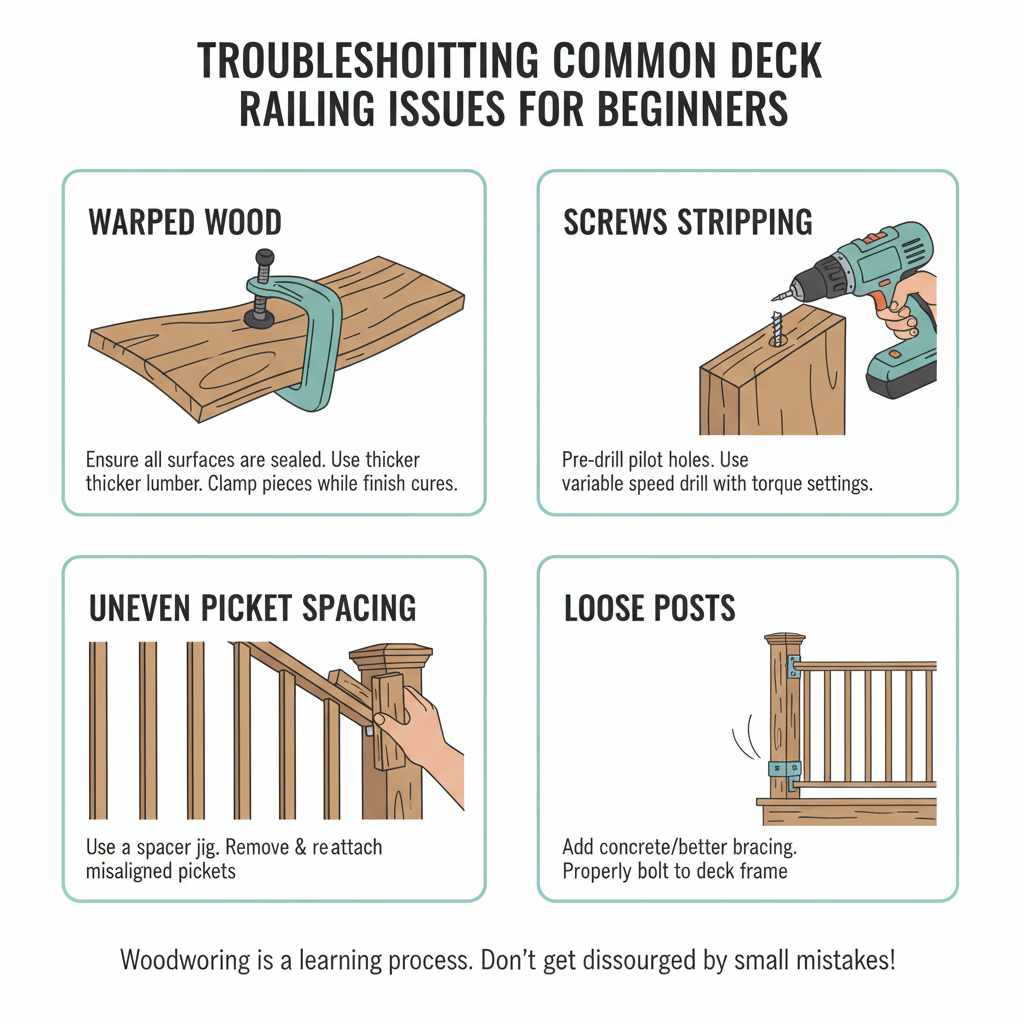
Troubleshooting Common Deck Railing Issues for Beginners
Even with the best preparations, you might run into a few hiccups. Here’s how to tackle them:
- Warped Wood: If you notice wood starting to warp, it’s usually due to uneven moisture exposure. Ensure all surfaces are sealed, and consider using thicker lumber for structural elements like rails. Sometimes, slight warping can be corrected by firmly clamping the pieces while the finish cures.
- Screws Stripping: This happens when the screw hole is too large or the screw is driven in too fast. Always pre-drill pilot holes slightly smaller than your screw diameter. Use a drill with variable speed and torque settings.
- Uneven Picket Spacing: A simple spacer jig made from a scrap piece of wood with the desired gap marked can be a lifesaver. If a few pickets are off, it’s often easier to remove and re-attach them accurately than to try and force them into place.
- Loose Posts: If a post feels wobbly, it likely needs to be secured more firmly. This might mean adding more concrete, using better bracing, or ensuring the post is properly bolted to the deck frame.
Remember, woodworking is a learning process. Don’t get discouraged by small mistakes. They are opportunities to learn and improve!
Frequently Asked Questions (FAQ) About Deck Wood Railing Ideas
Q1: What is the safest wood railing design for children and pets?
A1: The safest designs are those that prevent small bodies from fitting through any gaps. Vertical pickets spaced no more than 4 inches apart, or horizontal railings with minimal spacing, provide the best safety barrier. Avoid widely spaced horizontal boards.
Q2: How tall should my deck railing be?
A2: Local building codes typically specify the required railing height, which is often between 36 and 42 inches from the deck surface. Always check your local regulations.