DIY Heat Shield for Wood Stove: 1-Inch Air Gap Rule (NFPA 211)
A DIY wood stove heat shield only reduces clearance when it is noncombustible, sits at least 1 inch off the wall on noncombustible spacers, and stays open for air to flow behind it. Under NFPA 211, as reproduced by the Maine State Fire Marshal, 24 gauge sheet metal built that way can cut an unlisted stove’s 36 inch wall clearance to 12 inches. This guide covers qualifying materials, build steps, and the mistakes that cancel the protection.
Fire safety note: read before you cut anything
Follow your stove manual first. A listed stove is installed to the clearances on its own label and in its manual, and those override every number on this page. Local building and fire codes can be stricter than NFPA 211, so check with your building or fire official before you install. If you are unsure about any step, hire a certified installer. This is general information, not a substitute for your manual, your code, or an inspection.
How a DIY Wood Stove Heat Shield Works and Why the Air Gap Matters
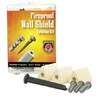 |
Best Ceramic Spacer Kit Pick Meeco’s Red Devil 5700 Wall Shield Spacing Kit ($19.99) A kit of 10 ceramic spacers with wall plugs and screws, made to hold a wall shield off the wall. Spacers of noncombustible material are what NFPA 211 requires behind a ventilated shield, so this covers the spacer step in the build below.
|
As an Amazon Associate we earn from qualifying purchases.
A heat shield does two jobs. The noncombustible panel blocks the radiant heat coming off the stove, and the open space behind it lets room air rise between the panel and the wall and carry heat away before the wall absorbs it. The second job is why the numbers differ so much between designs. In Table 2 of the Maine State Fire Marshal and Office of Energy Resources installation standards, the one masonry row built with no ventilated air space earns a 33 percent reduction, while the ventilated version earns 66 percent.
This page is the build guide. If you are still deciding which panel product qualifies, our guide to fire resistant wall panels for wood stoves compares the materials row by row, and this one shows how to turn a qualifying material into a mounted shield.
A ventilated shield of 24 gauge sheet metal can cut an unlisted stove’s required wall clearance from 36 inches to 12 inches, and a ceiling clearance from 36 to 18 inches. Source: Maine State Fire Marshal and Office of Energy Resources, Recommended Standards for the Installation of Woodburning Stoves (cites NFPA 211, 1996 edition), Table 2
What NFPA 211 Lets a Heat Shield Do: Real Clearance Numbers
For an unlisted radiant wood stove, Table 1 of the Maine standards calls for 36 inches to an unprotected combustible wall or ceiling. Stoves may sit closer only if the combustible surface is protected as Table 2 describes. The rows most relevant to a DIY build are below, with the 36 inch figures the standards print.
| Protection applied to the combustible surface | Wall reduction | 36 in. wall becomes | Ceiling reduction | 36 in. ceiling becomes |
|---|---|---|---|---|
| 3 1/2 in. thick masonry wall, no ventilated air space | 33% | 24 in. | none listed | none listed |
| 1/2 in. noncombustible insulation board over 1 in. glass fiber or mineral wool batts, no ventilated air space | 50% | 18 in. | 33% | 24 in. |
| 0.024 in. (24 gauge) sheet metal, ventilated air space | 66% | 12 in. | 50% | 18 in. |
| 1/2 in. thick noncombustible insulation board, ventilated air space | 66% | 12 in. | 50% | 18 in. |
| 3 1/2 in. thick masonry wall, ventilated air space | 66% | 12 in. | none listed | none listed |
| 24 gauge sheet metal with ventilated air space over a second 24 gauge sheet with ventilated air space | 66% | 12 in. | 50% | 18 in. |
Two details are easy to miss. Masonry earns no ceiling credit in this table, so a masonry shield does nothing for a close ceiling. And the percentages work for any starting clearance through the formula in the standards: minimum clearance equals the unprotected clearance times (1 minus the reduction divided by 100). A stove that needs 24 inches unprotected goes to about 8 inches with a 66 percent system (24 x 0.34), and a stove that needs 18 inches goes to about 6 inches. Use that math only where your stove manual allows a reduction.
Four limits come with every row. There must be at least 1 inch between the stove and the shield. The stove can never sit closer to the wall surface than the table allows. The reduction never applies in front of the loading or ash door. And every ventilated system needs at least 1 inch between itself and the combustible wall or ceiling.
Best Materials for a DIY Wood Stove Heat Shield
| Material | What the sources say | Catch |
|---|---|---|
| 24 gauge (0.024 in.) sheet metal | Named in Table 2 at 66% wall and 50% ceiling reduction when spaced off the wall with a ventilated air space | The table names 24 gauge sheet metal only. Ask your inspector before using another metal |
| 1/2 in. noncombustible insulation board | Named in Table 2: 66% ventilated, 50% over batts without a ventilated space | Insulation in a reduction system must have a thermal conductivity of 1.0 Btu-in per sq ft per hour per degree F or less |
| Cement board, 1/2 in. (for example Durock) | USG says it is UL-listed for use with UL-listed solid fuel room heaters and fireplace stoves | Its 2004 bulletin shows it furred out from the framing. Reduction depends on your stove’s listing |
| Brick or stone, 3 1/2 in. thick | Masonry rows: 33% with no gap, 66% with a ventilated air space | Thin veneer is not 3 1/2 in. masonry |
| Tile, plaster, paint, drywall | Not rows in Table 2 | Decoration only. Tile goes over a qualifying shield, as USG notes for its board |
On cement board, the USG Durock technical bulletin TB28 (September 2004) says Durock is listed by Underwriters Laboratories for use with UL-listed solid fuel room heaters and fireplace stoves, and that as a wall shield it reduces the manufacturer-specified clearance, with a 12 inch minimum between stove and wall. That bulletin states a reduction of one-half. Figures in manufacturer literature can differ between editions, so use the number in your stove’s manual and the board’s current listing rather than a percentage from a forum post. The same bulletin says the board can also be used as a plain decorative finish with no clearance reduction (see also finishing cement board).
Corrugated Steel and Other Metals
Searchers often ask about galvanized corrugated steel for a wall shield. The Maine standards call only solid masonry or corrugated steel walls noncombustible, which describes a whole wall, not a panel on studs. The reduction rows name 0.024 inch (24 gauge) sheet metal. They do not name corrugated panels, aluminum, or other metals, so if you want to use one, confirm with your building official that its gauge and mounting qualify.
Tools and Materials Checklist
- Tape measure and a straight edge for layout
- Metal snips for 24 gauge sheet metal, or a carbide-tip knife or circular saw with a carbide-tip blade for cement board
- Drill and driver for mounting holes and fasteners
- Noncombustible spacers or furring, plus fasteners long enough to reach the framing
- Stud finder, level, rasp, and an infrared thermometer for the first-fire check
- Safety glasses, work gloves, and a dust mask when cutting cement board
How to Build and Mount the Shield Step by Step
The sequence below combines the NFPA 211 notes in the Maine standards with the mounting layout in the USG bulletin. Where your stove manual or the panel maker says something different, follow them.
- Find your starting clearance: For a listed stove, read the clearance on its label and in its manual. For an unlisted radiant stove, Table 1 of the Maine standards calls for 36 inches to an unprotected combustible wall.
- Pick a qualifying shield and do the math: Choose one of the rows in the table above and apply the formula: reduced clearance equals the unprotected clearance times (1 minus the reduction divided by 100). Use the stove manual instead if it allows a reduction.
- Size the shield: Extend the protection far enough in each direction that the reduced clearance covers the same area the unprotected clearance would have covered. Keep the full unprotected clearance in front of the loading and ash doors.
- Cut the panel: Cut 24 gauge sheet metal with metal snips. For cement board, score and cut with a carbide-tip knife or a circular saw with a carbide-tip blade, then smooth the edges with a rasp, as the USG bulletin describes.
- Mount noncombustible spacers: Fasten spacers or furring of noncombustible material that hold the panel at least 1 inch off the wall, and keep every spacer out from directly behind the stove and its connector. USG’s cement board method uses cement board furring strips, 4 inches wide, applied vertically at 16 inches on center, with fasteners no more than 8 inches apart and at least 3/4 inch into the framing.
- Leave the top and bottom open: USG’s drawings set the shield 1 to 3 inches below the ceiling and 1 to 2 inches above the floor so room air can enter low and exit high behind the panel.
- Measure the gap everywhere: Check the finished space behind the panel at several points, not just at the spacers. NFPA 211 calls for at least 1 inch between a ventilated reduction system and the combustible wall.
- Check the stove-to-shield distance: Keep at least 1 inch between the stove and the shield, and never place the stove closer to the wall surface than the clearance table allows.
- Run a small first fire and get it inspected: Burn a small fire first and scan the wall around the shield with an infrared thermometer. A spot that reads hotter than its surroundings usually points to a gap that has closed there. Treat this as a screening check only, and ask your building official to inspect the finished install.
Mistakes That Cancel the Protection
- Mounting the panel flat. Without the ventilated air space, a 66 percent design falls back toward the 33 percent masonry row or to nothing.
- Closing the top or bottom. Trapped air heats up instead of moving, so leave both edges open.
- Using wood, plastic, or rubber spacers. NFPA 211 requires spacers and ties of noncombustible material.
- Putting a spacer behind the stove or its connector. The notes in Table 2 say none may sit directly there.
- Counting tile or paint as protection. Neither is a row in the table.
- Reducing the clearance in front of the doors. The reduction never applies there.
- Treating covered studs as a noncombustible wall. The Maine standards say a wood-studded wall stays combustible when covered with noncombustible material.
- Forgetting the pipe. The connector has its own clearances, covered in our wood stove pipe installation guide.
“Merely covering a wood studded wall with a non-combustible material does not constitute a non-combustible wall.”
Stove Manual, Local Code, and When to Hire a Pro
NFPA 211 is a model standard, and the 1996 edition cited by Maine is not necessarily the one your town enforces. A listed stove is installed to its own label and manual, and some manuals allow a reduction with a specified shield, some require their own factory shield, and some allow none. The Maine standards also say certain communities have ordinances for wood burning equipment and advise checking with your local fire department or building inspector before installing, and talking to your insurance company about any restrictions.
If any part of this is unclear, such as a stove with no label, a wall of unknown construction, or a ceiling close to the stove, bring in a certified installer, for example a CSIA-certified chimney sweep or an NFI-certified specialist. For the rest of the setup, see our guides to insulating around a wood stove and how to vent a wood burner, plus the warning signs a wood burner is running too hot. More related guides are collected in Wood Burning Solutions.
Frequently Asked Questions
What can be used as a heat shield for a wood stove?
The Maine standards, which reproduce NFPA 211, list 24 gauge sheet metal, 1/2 inch thick noncombustible insulation board, and 3 1/2 inch thick masonry as clearance reduction materials. Each earns its full reduction only when held at least 1 inch off the combustible wall with air able to flow behind it. Tile, paint, and drywall are not rows in the table.
How far should a heat shield be from the wall?
At least 1 inch. NFPA 211, as reproduced in the Maine standards, requires at least 1 inch between a ventilated clearance reduction system and the combustible wall or ceiling, held by spacers and ties made of noncombustible material. Measure the finished gap at several points, because the spacer height on the package is not the same as the gap you end up with.
Can I use cement board as a wood stove heat shield?
Only as part of a correct installation. USG says its Durock cement board is listed by UL for use with UL-listed solid fuel room heaters and fireplace stoves, and its bulletin shows the board furred out from the wall framing. Screwed flat to bare studs it is just a surface layer. Use the clearance printed in your stove manual and the board’s current listing.
How much does a heat shield reduce wood stove clearance?
For an unlisted radiant stove, the Maine standards allow a 66 percent reduction on walls and 50 percent on ceilings for 24 gauge sheet metal with a ventilated air space. A 36 inch wall clearance becomes 12 inches and a 36 inch ceiling clearance becomes 18 inches. Masonry without a ventilated air space earns only 33 percent. A listed stove follows its own manual.
Does a wall heat shield change the stovepipe clearance?
No, the stovepipe has its own clearance. The Maine standards call for a connector clearance of at least three times the connector diameter, which is 18 inches for a 6 inch pipe, and allow it to be reduced only as their Figure 1 describes. Listed double-wall pipe follows its own instructions. Our stove pipe guide covers the connector in detail.
Bottom Line on a DIY Wood Stove Heat Shield
Pick the shield by its row in the NFPA 211 table or your stove manual, hold it a measured 1 inch off the wall on noncombustible spacers, and leave the top and bottom open. Treat tile and paint as decoration, keep full clearance in front of the doors, and confirm everything with your stove manual and your building official before you rely on it.
Sponsored / affiliate links. As an Amazon Associate I earn from qualifying purchases. I may earn additional commission from eligible campaigns.