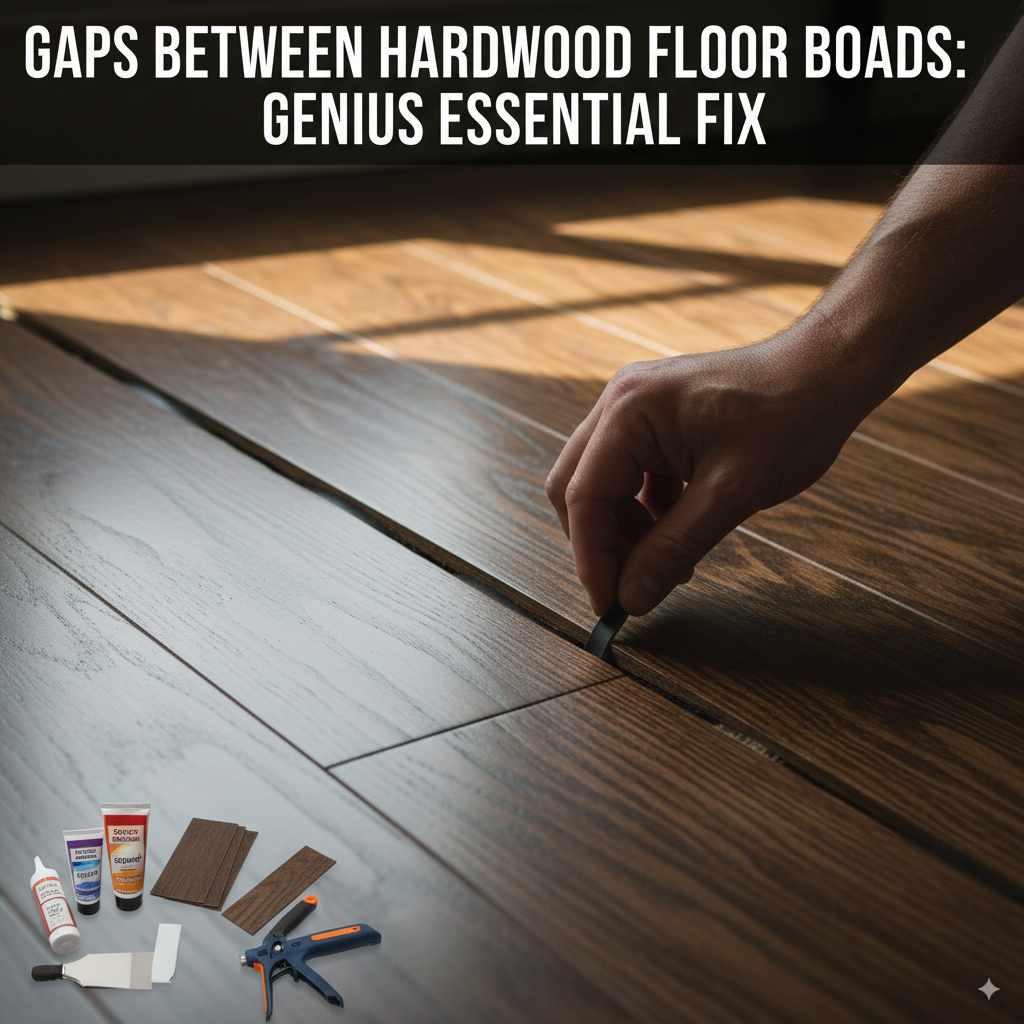
Gaps Between Hardwood Floor Boards: Genius Essential Fix
Gaps between hardwood floor boards are common and easily fixed! This guide offers simple, beginner-friendly methods to fill those unsightly gaps, restoring your floor’s beauty and preventing further issues with everyday tools and materials. Learn how to make your hardwood floors look great again!
Are you noticing those little spaces growing between your beautiful hardwood floor planks? It’s a common sight as wood naturally expands and contracts with changes in humidity and temperature. These gaps can be more than just an eyesore; they can gather dust, dirt, and even become trip hazards. Don’t worry, though! As your guide to making woodworking simple and rewarding, I’m here to show you that fixing these gaps is totally achievable for any DIYer. We’ll walk through some easy, effective techniques that use readily available materials and tools. Get ready to restore the smooth, polished look of your hardwood floors with confidence!
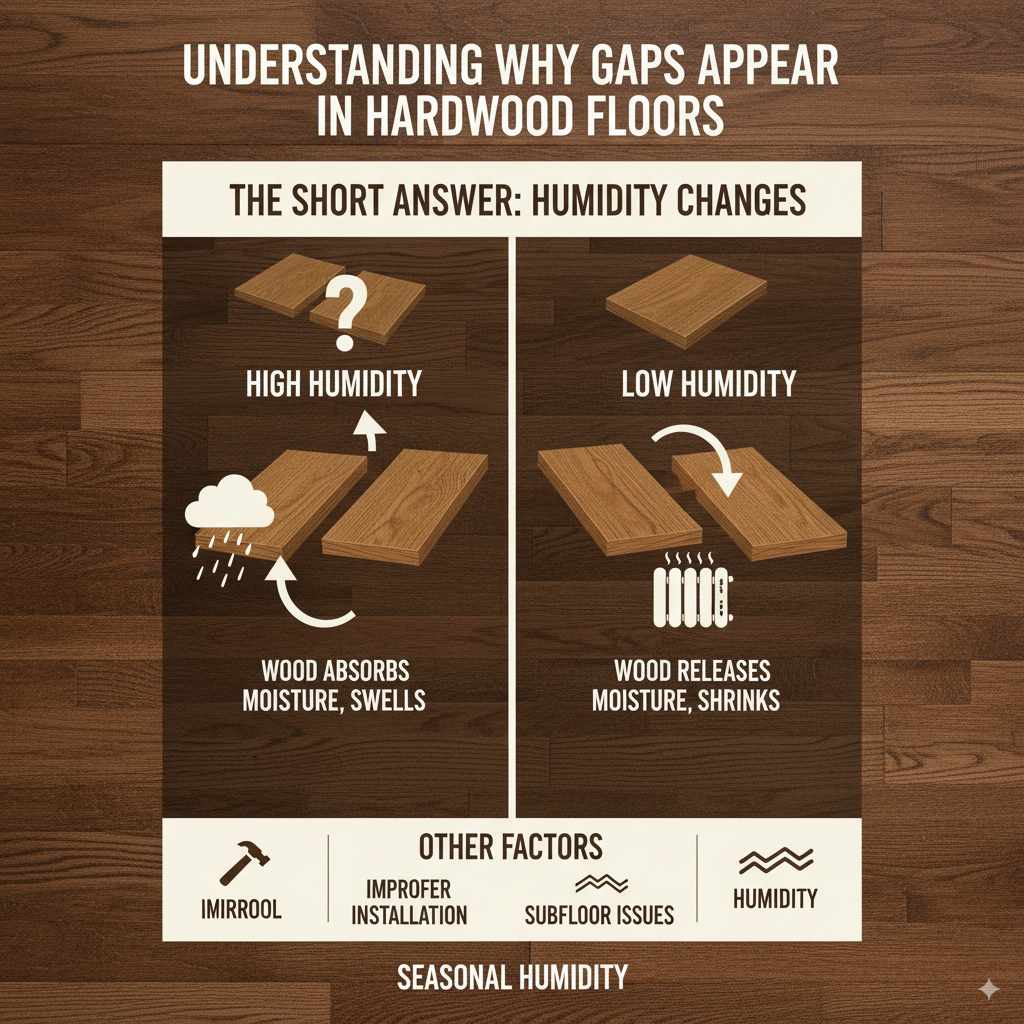
Understanding Why Gaps Appear in Hardwood Floors
Hardwood floors are a natural product, and like all natural materials, they are affected by their environment. The primary culprit behind gaps between floorboards is the wood’s reaction to moisture and humidity levels in your home. Wood is a hygroscopic material, meaning it absorbs and releases moisture from the air. When humidity is high, wood planks absorb moisture and swell, pushing against each other. Conversely, when the air is dry (especially in winter with heating systems running), the wood releases moisture and shrinks, creating those telltale gaps.
Other factors can contribute to gaps, although they are less common for typical homeowners to encounter. Improper installation, such as boards not being nailed down securely or expansion gaps at the walls being too small or non-existent, can lead to issues over time. Subfloor issues, like sagging or unevenness, can also cause stress on the hardwood planks, leading to gaps. However, for the most part, seasonal humidity changes are the main reason you’ll see these spaces appear and disappear throughout the year.
The Impact of Gaps: More Than Just Aesthetics
While a gap might seem like a minor cosmetic flaw, it can lead to several problems if left unaddressed:
- Dirt and Debris Accumulation: Gaps are perfect little traps for dust, crumbs, pet hair, and other small particles. This makes cleaning more difficult and can make your floors look less pristine.
- Pest Infestations: Small insects like ants or even tiny rodents can find refuge in these gaps, potentially leading to minor infestations.
- Drafts and Air Leaks: In some cases, larger gaps can contribute to minor drafts, especially on lower floors or in basements, affecting your home’s energy efficiency.
- Potential for Damage: Over time, loose boards can contribute to squeaking sounds, and if the gaps are significant, you might even start to see splintering at the edges of the boards.
The good news is that most of these issues can be prevented or resolved with a simple repair. Let’s dive into how you can tackle those gaps.
Essential Tools and Materials for Fixing Floorboard Gaps
Before you start, gather your supplies. Having everything ready will make the process smoother and more enjoyable. For the common fixes we’ll cover, you won’t need specialized professional tools. Here’s what you’ll likely need:
For Simple Gap Filling (Wood Filler/Putty)
- Wood Filler or Wood Putty: Choose a color that closely matches your floorboards. They come in various wood tones, or you can opt for a paintable/stainable version.
- Putty Knife or Scraper: A flexible metal putty knife is ideal for applying and smoothing the filler.
- Damp Cloth: For wiping away excess filler.
- Fine-Grit Sandpaper (e.g., 120-220 grit): To smooth out any slightly raised filler once dry.
- Vacuum Cleaner: To clean up dust.
- Gloves: To keep your hands clean.
For More Robust Filling (Caulking/Wood Epoxy)
-
- Wood Floor Caulk: Specifically designed for filling gaps in wood floors, it remains flexible.
- Caulking Gun: If using standard caulk tubes.
- Putty Knife or Caulk Smoothing Tool: For leveling.
li.Damp Cloth: For cleanup.
- Mineral Spirits: For cleaning up uncured caulk if needed (check product instructions).
- Wood Epoxy Kit: For larger or more structurally unsound gaps, this provides a very durable fill. Usually comes with two parts to mix.
- Mixing Stick/Surface: For epoxy.
- Gloves and Safety Glasses: Especially important when working with epoxies.
Genius Fix 1: Filling Small Gaps with Wood Filler or Putty
This is the go-to method for small, hairline to 1/8-inch gaps. It’s quick, easy, and uses materials you might already have around the house.
Step-by-Step Guide:
- Clean the Gaps: First, thoroughly clean out the gaps. Use a vacuum cleaner with a crevice tool to remove all dust, dirt, and debris. A small brush or even a toothpick can help dislodge stubborn particles. A clean surface ensures the filler adheres properly.
- Choose Your Filler: Select a wood filler or putty that matches your floor’s color as closely as possible. If you can’t find an exact match, consider a stainable filler so you can adjust the color after it dries. Some manufacturers offer a range of wood tones.
- Apply the Filler: Using your putty knife, scoop a small amount of filler. Press it firmly into the gap, slightly overfilling if necessary so you can sand it flush later. Work the filler into the entire length of the gap. For wider gaps, you might need to apply it in layers, allowing each layer to dry according to the product instructions.
- Smooth and Level: Before the filler dries completely, use your putty knife at a slight angle to scrape away any excess filler sitting on the surface of the wood. The goal is to make it as flush as possible with the surrounding floor.
- Let it Dry: Allow the wood filler to dry completely. Drying times vary by product, so check the manufacturer’s instructions. This can take anywhere from 30 minutes to several hours.
- Sand (if needed): Once dry, if there are any slightly raised areas or imperfections, gently sand them smooth with fine-grit sandpaper. Be careful not to sand the surrounding wood. Always sand in the direction of the wood grain.
- Clean Up: Vacuum up any sanding dust. Wipe the area with a slightly damp cloth to remove any lingering dust.
- Color Match (if necessary): If you used a stainable filler, now is the time to carefully apply stain to match your floor. Test the stain on a spare piece of wood or an inconspicuous area first.
This method is excellent for cosmetic improvements and preventing dust buildup in minor openings. For a more in-depth look at wood fillers and their applications, resources like the U.S. Forest Products Laboratory’s guidance on wood adhesives can offer valuable insights into material properties.
Genius Fix 2: Using Wood Floor Caulk for Flexible Fills
Hardwood floors naturally expand and contract. For gaps that might fluctuate more in size or if you want a fill that has a bit of flexibility, wood floor caulk is an excellent choice. It’s designed to adhere well to wood and maintain some pliability.</
Step-by-Step Guide:
- Prepare the Gap: Just like with wood filler, start by thoroughly cleaning the gap. Ensure no dust, debris, or old finish is present. This is crucial for the caulk to adhere properly. You can use a small vacuum, a brush, or even a flathead screwdriver to scrape out any loose bits.
- Select the Right Caulk: Purchase wood floor caulk. This is different from standard acrylic latex caulk; it’s formulated to bond to wood and remain flexible. It comes in various wood tones, so choose one that best matches your flooring.
- Prepare Your Caulking Gun: If you’re using a tube, insert it into your caulking gun. Cut the tip of the tube at a 45-degree angle to create a bead size that fits the gap. Puncture the inner seal if your gun requires it.
- Apply the Caulk: Apply a steady, consistent bead of caulk directly into the gap. Aim to fill the gap without excessive overapplication on the surface of the wood. Maintain even pressure on the caulking gun as you move along the length of the gap.
- Smooth the Caulk: Immediately after applying, use a damp cloth, a putty knife, or a caulk smoothing tool to gently press and level the caulk. The goal is to create a smooth, flush surface that blends with the surrounding wood. Remove excess caulk from the surface of the wood with the damp cloth.
- Clean Up Wet Caulk: If you get caulk on the wood surface, wipe it away immediately with a damp cloth. For more stubborn uncured caulk, you might need a small amount of mineral spirits, but always check the caulk manufacturer’s instructions before using solvents. This step is much easier done while the caulk is still wet.
- Allow to Cure: Let the caulk cure completely according to the manufacturer’s instructions. This can take several hours to a full day. Avoid walking on the floor or placing heavy objects on the repaired area during this time.
Wood floor caulk is particularly useful for gaps that might be near walls or in areas prone to slight movement. It provides a durable, flexible fill that won’t crack or pull away as easily as rigid fillers might with fluctuating humidity.
Genius Fix 3: The Wood Epoxy Method for Deeper or Wider Gaps
For gaps that are wider (over 1/4 inch) or particularly deep, or if you want a super-durable fill that can stand up to significant wear and tear, a wood epoxy is the best solution. Epoxy is a two-part material that cures into a hard, structural filler.
Recommended Scenario:
- Wider gaps (e.g., 1/4 inch or more).
- Gaps where stability is a concern.
- Areas with high foot traffic or potential for impact.
Step-by-Step Guide:
- Thoroughly Clean the Cavity: This epoxy method requires a very clean surface for optimal adhesion. Vacuum out all loose debris. For deeper gaps, you might need to use compressed air to blow out any dust lodged deep within. Ensure the wood in the gap is dry.
- Get Your Epoxy Mix Ready: Purchase a two-part wood epoxy specifically designed for flooring or general wood repair. Follow the manufacturer’s instructions precisely for mixing. This usually involves mixing equal parts of resin and hardener on a disposable surface with a mixing stick. Mix only what you can use within the product’s working time (pot life), as it begins to harden once mixed.
- Apply the Epoxy: Use a putty knife, a small spatula, or even a gloved finger to press the mixed epoxy firmly into the gap. Ensure it fills the entire void. For very deep gaps, you might need to apply it in layers, allowing it to become partially firm between applications for better stability, though many epoxies can be applied in one go.
- Level for a Smooth Finish: While the epoxy is still pliable, use your tool to level the surface, removing any excess and making it as flush as possible with the surrounding floorboards. Aim for a smooth transition.
- Allow to Cure: This is the most critical step. Epoxies require a specific cure time, which can range from a few hours to 24 hours or more, depending on the product and temperature. Do not disturb the area during this time. For optimal hardness, some epoxies benefit from a gradual return to normal temperature after initial curing.
- Sand and Finish: Once fully cured, the epoxy will be very hard. You can sand it smooth using progressively finer grits of sandpaper (e.g., starting with 80-120 grit and moving to 180-220 grit). Sand carefully, keeping the sandpaper flat to avoid creating low spots. If the epoxy filled the gap perfectly and is already smooth, sanding might only be needed to blend transitions.
- Match the Color: If your epoxy is clear or a universal color, you will need to stain it to match your floor. Test your stain first. Once stained, you may need to apply a clear topcoat (like polyurethane) to protect the repair and match the sheen of your floor.
Wood epoxy is a fantastic, long-lasting solution for more severe gaps. For best results in terms of durability and appearance, ensure your chosen product is suitable for hardwood floors and follow all safety precautions, including wearing safety glasses and gloves.
When to Call a Professional
While many floorboard gaps are DIY-friendly, there are times when it’s best to bring in a professional. Consider this:
- Widespread Issues: If you have gaps across a large portion of your floor, it might indicate a more significant underlying problem, such as moisture damage to subflooring or improper installation techniques.
- Squeaky Floors: Major squeaks are often related to loose boards or subfloor issues that filler alone can’t fix.
- Significant Cupping or Warping: If boards are noticeably cupped (edges higher than the center) or warped, these are signs of deeper moisture issues or structural problems.
- Concerns About Subfloor: If you suspect your subfloor is damaged, uneven, or has persistent moisture problems, a professional can assess and repair it correctly.
- Valuable or Antique Floors: For very old, valuable, or intricately finished floors, it’s often wise to consult a professional to avoid accidental damage.
A flooring professional can diagnose the root cause of widespread gap issues and offer solutions like board re-nailing, subfloor repair, or even complete floor refinishing if necessary. For an overview of professional flooring services, you can look into resources provided by organizations like the National Wood Flooring Association (NWFA), which offers extensive information on best practices and professional standards.
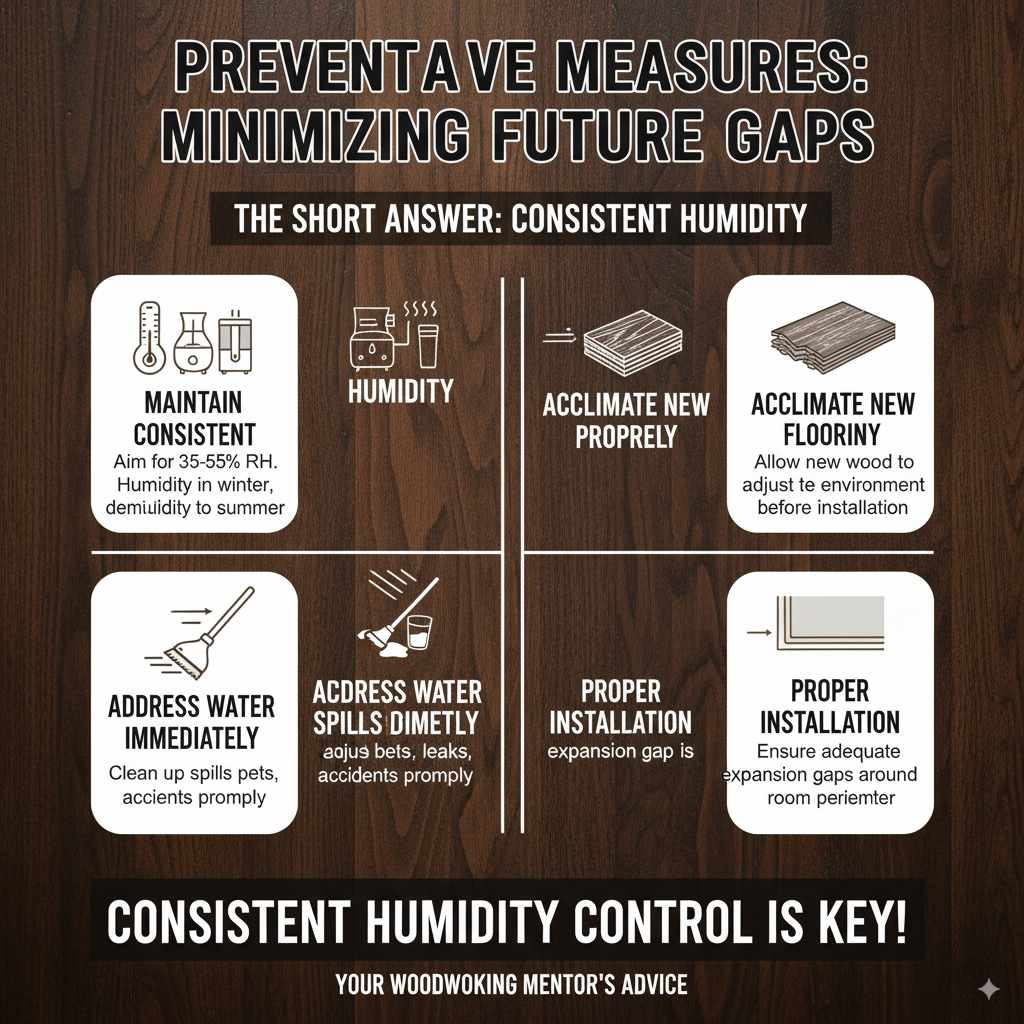
Preventative Measures: Minimizing Future Gaps
The best way to deal with gaps is to prevent them from widening or reappearing. Here are some tips:
- Maintain Consistent Humidity: This is the most effective preventative measure. Aim for a consistent indoor humidity level year-round, ideally between 35% and 55%. Use a humidifier in dry winter months and a dehumidifier in humid summer months. A hygrometer can help you monitor levels accurately.
- Acclimate New Flooring Properly: If you’re installing new hardwood, ensure it’s acclimated to your home’s environment for several days before installation.
- Address Water Spills Immediately: Clean up any water spills from pets, leaks, or accidents promptly to prevent excess moisture from being absorbed by the wood.
- Proper Installation: Though usually done by professionals, ensuring there’s an adequate expansion gap around the perimeter of the room (covered by baseboards or trim) is crucial for the wood to expand and contract freely without buckling or creating gaps elsewhere.
Consistent humidity control will significantly reduce the natural expansion and contraction cycles of your wood flooring, thus minimizing the appearance and worsening of gaps.
Frequently Asked Questions (FAQs)
Q1: How big of a gap can I fill with wood filler?
A: For standard wood filler or putty, it’s best suited for gaps up to about 1/8 inch wide. For wider gaps, they might shrink significantly or not adhere well. For larger openings, wood caulk or epoxy is a better choice.
Q2: Will these fixes make my floor look like new?
A: These fixes will significantly improve the appearance by filling unsightly gaps and preventing dirt accumulation. However, the repaired areas might be noticeable upon close inspection, especially if the color match isn’t perfect. For a truly “like new” finish on the entire floor, sanding and refinishing would be required.
Q3: Can I paint or stain over the filled gaps?
A: If you use a stainable wood filler or wood epoxy, you can usually stain them to match your floor. Once stained and dry, you may need to apply a clear topcoat (like polyurethane) to match the sheen and protect the repair. Standard, pre-colored wood fillers or caulks may not accept stain. Always test on a scrap piece first.
Q4: How often should I check my floor for gaps?
A: It’s a good idea to visually inspect your floors at least every few months, and especially when seasonal changes in humidity occur (e.g., going from summer to winter). This allows you to catch new gaps or address expanding ones early.