How Do You Get Gorilla Glue Off Of Plastic: Proven Safe Ways
To get Gorilla Glue off plastic safely, first try scraping or peeling the cured glue with a plastic scraper. If that fails, apply a small amount of acetone (nail polish remover) to a cotton ball, hold it on the glue for a few minutes to soften it, then gently wipe and scrape it away. Always test acetone on a hidden spot first.
Hello, fellow makers and DIY enthusiasts! It’s Md Meraj here. We’ve all been there. You’re in the middle of a project, and a drop of powerful Gorilla Glue lands where it shouldn’t—right on a plastic surface. It’s frustrating! That strong bond you love is now your biggest problem. But don’t worry, it’s a common hiccup in the workshop. Accidents happen, and fixing them is part of the craft. Together, we will walk through some simple, safe, and proven ways to clean up that stubborn glue. Let’s get your project back on track and looking great.
Before You Begin: Safety is Your Most Important Tool
Before we touch any glue or cleaners, let’s talk about safety. Working smart means working safely. Even a small cleanup job deserves our full attention to safety, especially when we might use chemicals. A few simple steps can protect you from any trouble.
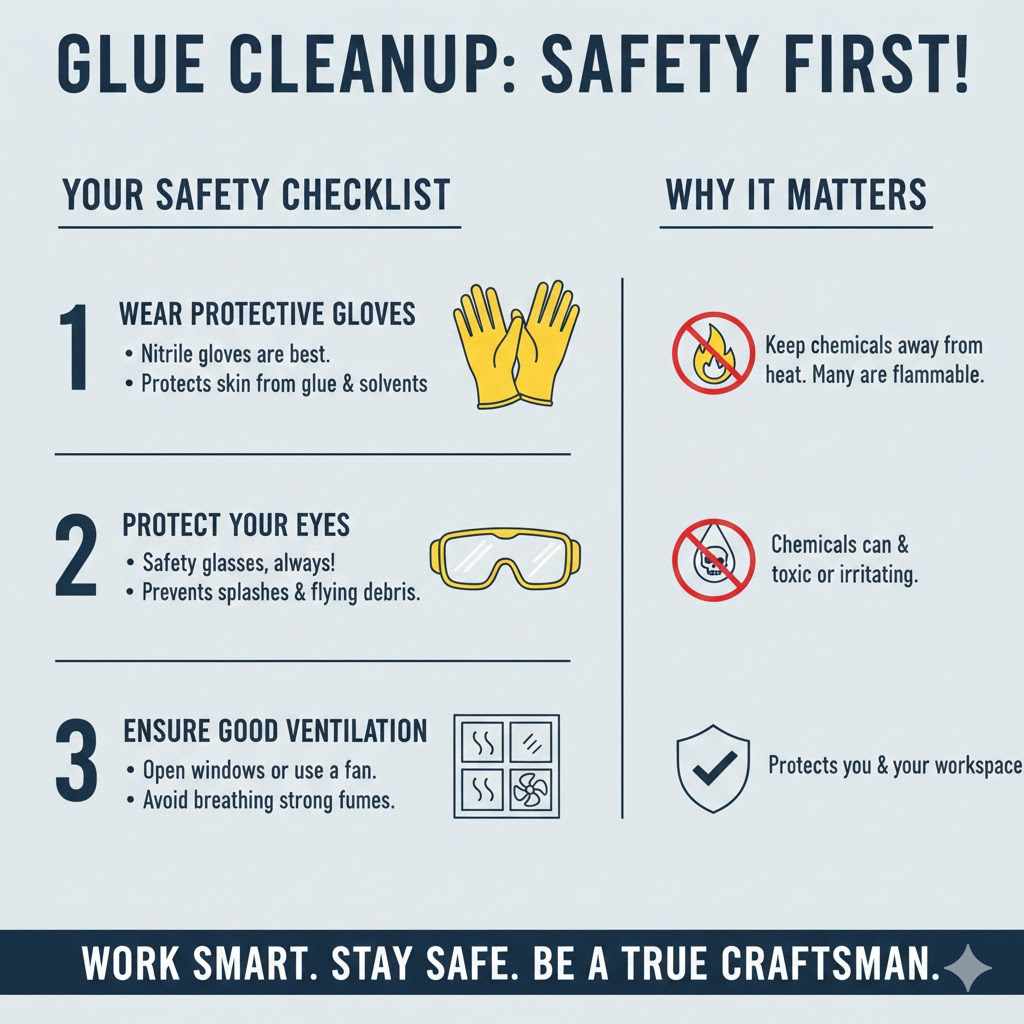
Here’s a quick checklist to keep you safe and sound:
- Wear Protective Gloves: Nitrile gloves are your best friend here. They will protect your skin from both the glue and any solvents like acetone, which can be very drying and irritating.
- Protect Your Eyes: Always wear safety glasses. You don’t want a stray fleck of dried glue or a splash of cleaner getting in your eyes. It’s a simple step that prevents a world of hurt.
- Ensure Good Ventilation: If you need to use solvents like acetone, make sure your workspace is well-ventilated. Open a window or turn on a fan. The fumes can be strong, and breathing them in isn’t good for you.
- Keep Chemicals Away from Heat: Solvents are often flammable. Keep them far away from any open flames, sparks, or sources of high heat.
Taking these small precautions shows true craftsmanship. It means you respect your tools, your materials, and most importantly, yourself. Now that we’re prepared, let’s look at what we’re up against.
Understanding the Enemy: Cured vs. Uncured Gorilla Glue
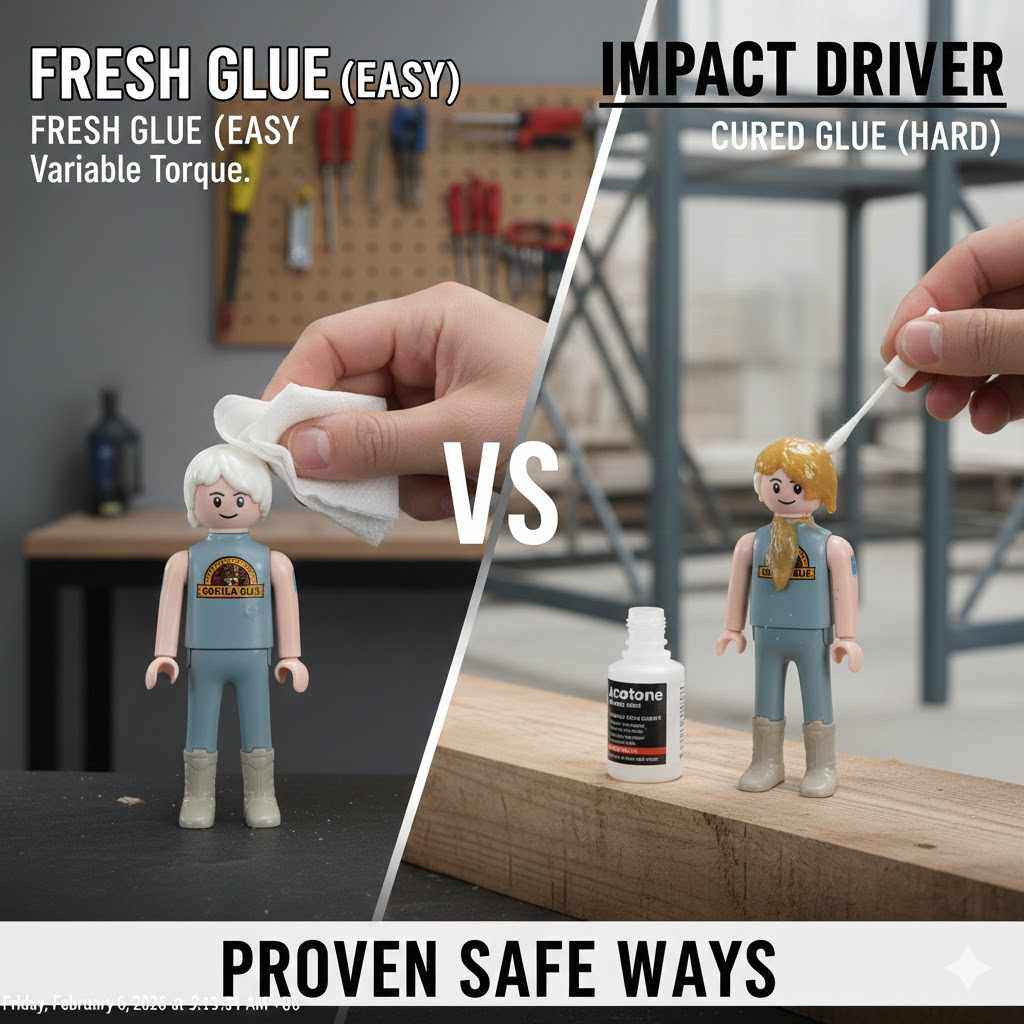
The first step in removing Gorilla Glue is to figure out if it’s still wet or if it has fully hardened. Your approach will be completely different depending on its state. Uncured glue is much easier to handle than the rock-solid bond of cured glue.
Uncured Gorilla Glue: This is glue that is still wet or tacky. You’ve likely just spilled it. At this stage, it hasn’t formed its permanent bond. Time is on your side, so act quickly!
Cured Gorilla Glue: This is glue that has completely dried. Gorilla Glue is a moisture-activated polyurethane adhesive, meaning it hardens by reacting with moisture in the air. Once cured, it expands and creates an incredibly tough, rigid bond. This requires a bit more muscle and patience to remove.
Here is a simple table to help you see the difference:
| Glue State | Appearance | Best Removal Approach | Difficulty Level |
|---|---|---|---|
| Uncured (Wet) | Gooey, sticky, or tacky to the touch. | Wipe away immediately with a dry cloth or a cloth dampened with a solvent. | Easy |
| Cured (Dry) | Hard, often foamy or expanded, and rigid. | Mechanical (scraping/sanding) or chemical (softening with solvents) methods. | Moderate to Difficult |
If your glue spill is fresh, count yourself lucky. Grab a dry cloth and wipe up as much as you can immediately. For any sticky residue, a cloth lightly dampened with acetone or isopropyl alcohol can often clean it right up. Just be sure to test the solvent on a hidden part of the plastic first!
If you’re facing a hard, cured lump of glue, don’t despair. The next sections are for you.
Your Toolkit: Gathering the Right Supplies
Having the right tools ready makes any job easier. Before you start, gather these simple items from around your home or workshop. You may not need all of them, but it’s good to be prepared for whatever works best on your specific plastic surface.
- Safety Gear: Safety glasses and nitrile gloves.
- Soft Cloths: Several clean, dry cloths or paper towels.
- Plastic Scraper or Putty Knife: A plastic tool is key to avoid scratching the surface. An old credit card or gift card works great too!
- Cotton Balls or Swabs: Perfect for applying solvents precisely.
- Acetone: The most effective solvent. 100% pure acetone works best, but fingernail polish remover containing acetone is a good substitute.
- Isopropyl Alcohol (Rubbing Alcohol): A gentler alternative to acetone that can sometimes work on less stubborn spots.
- Vegetable or Mineral Oil: A very gentle option for delicate surfaces.
- Fine-Grit Sandpaper: For the very last resort, something like 220-grit or higher can sand away residue on durable, non-cosmetic plastics.
- Soap and Water: For the final cleanup.
With your tools and safety gear ready, let’s get to work on removing that stubborn glue.
Method 1: The Mechanical Approach for Fully Cured Glue
This method is all about physical force—careful, patient physical force. It’s the safest first step for any type of plastic because it doesn’t involve chemicals that could cause damage. It works best on hard, durable plastics where a little scraping won’t cause visible harm.
When to Use This Method
Use the mechanical method when:
- The Gorilla Glue is fully cured and rock-hard.
- You are working on a sturdy plastic surface that isn’t easily scratched.
- You want to avoid using chemical solvents.
- The glue spill is raised and has a clear edge to work on.
Step-by-Step Instructions
- Get a Good Grip: Place the plastic item on a stable, non-slip surface. You want to be able to apply firm, steady pressure without the item sliding around.
- Start Scraping Gently: Take your plastic scraper, putty knife, or old gift card. Hold it at a low angle to the plastic surface. Try to get the edge of the scraper right under the edge of the glue blob.
- Apply Steady Pressure: Push gently but firmly. The goal is to chip the glue away or pop it off in one piece. Don’t try to force it all at once. Work around the edges, slowly lifting them. Patience is key here. Avoid using metal tools like screwdrivers or sharp knives, as they will almost certainly gouge the plastic.
- Chisel Away Small Bits: If the glue doesn’t pop off, try to chisel away small bits at a time. Work from the outside of the spill toward the center. You might find that once you get a small piece to break off, the rest starts to crumble more easily.
- Sand if Necessary (Use as a Last Resort): If a thin layer of glue residue remains, you can very gently sand it away with fine-grit sandpaper (220-grit or higher). Use light, circular motions. Be aware that this will likely dull the finish of the plastic, so this is only recommended for functional parts, not cosmetic surfaces.
- Clean the Area: Once the glue is gone, wipe the surface with a damp cloth and a little mild soap to remove any dust or small particles. Dry it thoroughly.
If scraping and sanding don’t get the job done, or if you’re worried about scratching the plastic, it’s time to move on to a method that dissolves the glue’s bond.
Method 2: The Solvent Solution for Uncured or Stubborn Glue
When mechanical force isn’t enough, we can turn to chemistry. Solvents work by breaking down the chemical structure of the polyurethane glue, softening it enough to be wiped away. Acetone is the go-to solvent for this job, but it requires extreme care when used on plastic.
A Critical Warning About Solvents and Plastic
This is the most important step: Acetone and other strong solvents can melt, warp, cloud, or discolor many types of plastic. Before you apply it to your glue spill, you absolutely must perform a spot test.
Find a hidden area on your plastic item—the bottom, the inside, or a small corner that no one will see. Apply a tiny amount of acetone with a cotton swab and wait a few minutes. If the plastic becomes soft, sticky, or changes color, do not proceed! Your plastic is not compatible with acetone. If nothing happens, you’re safe to move forward. For more detailed information on handling chemicals safely, you can refer to resources like the CDC’s guide on Chemical Safety.
Step-by-Step Instructions
- Prepare Your Solvent: Put on your gloves and safety glasses. Ensure your area is well-ventilated. Pour a small amount of acetone into a small glass or ceramic bowl. Do not use a plastic bowl, as the acetone may dissolve it.
- Apply the Acetone: Dip a cotton ball or swab into the acetone. You want it damp, not dripping wet. Press the damp cotton directly onto the Gorilla Glue spill.
- Let It Soak: Hold the cotton ball on the glue for 2-5 minutes. The goal is to keep the glue saturated with acetone, allowing the solvent time to penetrate and break down the adhesive. You may need to re-apply acetone to the cotton ball to keep it damp.
- Begin Wiping and Scraping: After a few minutes, the glue should begin to feel rubbery or gummy. Use a clean cloth to wipe at it. You can also use your plastic scraper to gently nudge the softened glue off the surface. It should come away much more easily now.
- Repeat as Needed: For thick layers of glue, you may need to repeat the process of soaking and scraping a few times. Be patient and work in layers.
- Final Cleanup: Once all the glue is removed, immediately clean the area with a cloth dampened with soap and water. This will remove any remaining acetone and stop its chemical action. Rinse with a clean, damp cloth and dry the surface completely.
Method 3: The Gentle Method Using Oil and Heat
If you’re working with delicate or clear plastic, or if your spot test with acetone failed, this gentler method is your best bet. It uses common household items and is much less likely to cause damage. The idea is that oil can get underneath the glue and loosen its grip, while gentle heat makes the glue more pliable.
Best for Delicate Plastics
This method is ideal for:
- Clear plastics like acrylic or polycarbonate that could be clouded by solvents.
- Painted or decorative plastics where you want to preserve the finish.
- Any plastic where a solvent test showed a negative reaction.
Step-by-Step Instructions
- Apply a Generous Amount of Oil: Pour a bit of mineral oil, vegetable oil, or even WD-40 directly onto the glue spill. Make sure the entire glue spot is covered.
- Let the Oil Penetrate: Give the oil plenty of time to work. Let it sit for at least an hour. The longer it sits, the better it can seep into the tiny cracks between the glue and the plastic, weakening the bond.
- Introduce Gentle Heat: Use a hairdryer on its lowest heat setting. Hold it several inches away from the surface and wave it back and forth over the oily glue spot for a minute or two. The goal is just to warm the glue, not melt the plastic. The heat will soften the glue and make it more flexible.
- Start Scraping: While the glue is warm and oily, use your plastic scraper to begin working at the edges. It should be much softer now and may peel away more easily.
- Wipe and Re-Apply: Use a cloth to wipe away any softened glue that comes off. If the glue is still stuck, don’t be discouraged. Apply more oil, let it sit again, and repeat the gentle heating and scraping process.
- Clean Thoroughly: Once the glue is gone, you’ll have an oily residue. Clean the surface well with a cloth and a mixture of warm water and dish soap to cut through the grease. Rinse and dry the plastic.
Know Your Plastic: Why It Matters
Not all plastics are created equal. Some are tough and resistant to chemicals, while others are incredibly sensitive. Knowing what kind of plastic you’re working with can save you from a costly mistake. Most plastic products have a small recycling symbol with a number inside. This is the Resin Identification Code, and it tells you what type of plastic it is.
Here’s a quick guide to some common plastics and how they typically react to acetone. You can find more comprehensive information at resources like the Plastics Industry Association.
| Plastic Code (RIC) | Plastic Name | Common Uses | Reaction to Acetone |
|---|---|---|---|
| #1 (PETE) | Polyethylene Terephthalate | Soda bottles, food jars | Fair resistance, but can become cloudy. Use with caution. |
| #2 (HDPE) | High-Density Polyethylene | Milk jugs, shampoo bottles | Excellent resistance. Generally safe. |
| #3 (PVC) | Polyvinyl Chloride | Pipes, window frames | Poor resistance. Will likely dissolve or warp. Avoid. |
| #5 (PP) | Polypropylene | Car parts, food containers | Excellent resistance. Generally safe. |
| #6 (PS) | Polystyrene | Disposable cups, foam packaging | No resistance. Will melt on contact. Avoid at all costs. |
When in doubt, always perform a spot test! It’s the only way to know for sure how your specific item will react.
Common Mistakes to Avoid at All Costs
In our haste to fix a problem, it’s easy to make things worse. Here are a few common pitfalls to avoid when removing Gorilla Glue from plastic:
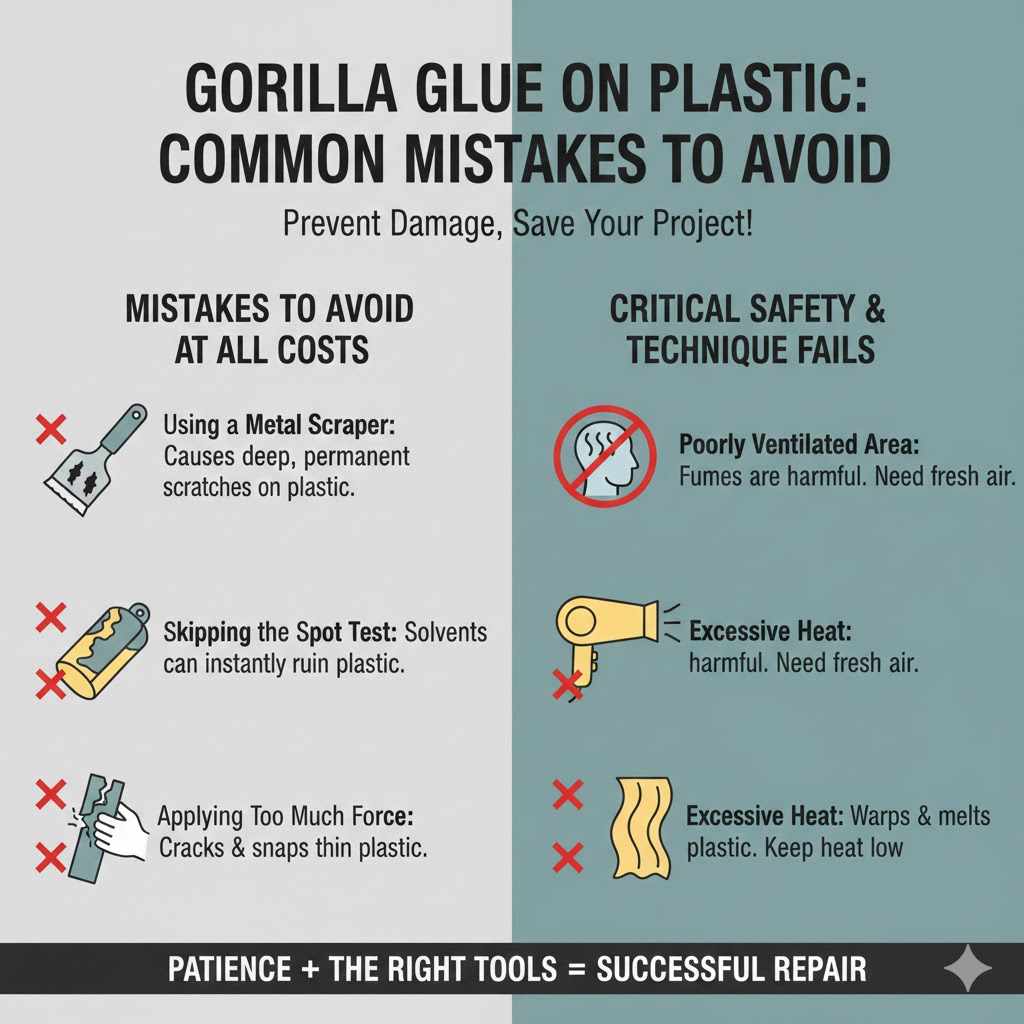
- Using a Metal Scraper: Resist the urge to grab a razor blade or metal screwdriver. They are too hard and will leave deep, permanent scratches on almost any plastic surface. Stick to plastic tools.
- Skipping the Spot Test: I know I’ve said it a few times, but it’s that important. Applying a solvent without testing can instantly ruin your plastic item, turning a small glue spot into a large melted mess.
- Applying Too Much Force: Trying to brute-force the glue off can crack or snap the plastic, especially if it’s thin. Patience and gentle, steady pressure are more effective.
- Working in a Poorly Ventilated Area: The fumes from solvents are no joke. Always ensure you have fresh air to protect your health.
- Using Excessive Heat: A little warmth from a hairdryer can help, but too much heat will warp or melt the plastic itself. Keep the heat low and the dryer moving.
Frequently Asked Questions (FAQ)
Can I use vinegar to remove Gorilla Glue from plastic?
Vinegar is not effective at dissolving cured polyurethane adhesives like Gorilla Glue. While it’s a great household cleaner, its acidic properties are not strong enough to break down this type of glue. You are better off using one of the methods described above.
Will rubbing alcohol work on Gorilla Glue?
Isopropyl (rubbing) alcohol can sometimes work, especially on uncured or semi-cured glue. It is much gentler than acetone and less likely to damage plastics. You can try using it as a first-step solvent, but it may not be strong enough for fully cured, stubborn spots.
How long does Gorilla Glue take to cure?
Gorilla Glue typically takes 1–2 hours to set and achieves full strength in about 24 hours. The curing process is dependent on the amount of moisture in the air. The faster you act on a spill, the easier it will be to clean up.
Is there a special product designed to remove Gorilla Glue?
While some companies make specialty adhesive removers, most are citrus- or soy-based and are designed for sticker residue, not for high-strength polyurethane glues. Acetone remains the most widely available and effective chemical for breaking down cured Gorilla Glue, but it must be used with care.
Can I use a razor blade on plastic if I’m very careful?
It’s highly discouraged. Even with extreme care, the sharp, hard edge of a metal razor is almost guaranteed to slice into the softer plastic surface, leaving a permanent scratch that is often more noticeable than the original glue spot.
What if the plastic surface is painted?
Be extra cautious with painted plastic. Solvents like acetone will likely strip the paint right off along with the glue. The oil and heat method is your safest bet. If you must use a solvent, accept that you will likely need to touch up the paint afterward.
Why did the acetone melt my plastic?
Acetone is a powerful solvent that dissolves many types of polymers, which are the building blocks of plastics. Plastics like polystyrene (PS) and polyvinyl chloride (PVC) are particularly vulnerable and will break down on contact. This is why the spot test is a non-negotiable step before using acetone on any plastic surface.
Conclusion: You’ve Got This!
There you have it—a complete guide to tackling one of the most common workshop frustrations. Removing cured Gorilla Glue from plastic might seem impossible at first, but it’s entirely manageable with the right approach and a little bit of patience. Remember the golden rules: work safely, identify your plastic, always test your chosen method on a hidden spot, and start with the gentlest technique first.
Whether you choose to carefully scrape, dissolve with a solvent, or gently persuade it with oil and heat, you now have the knowledge to fix the problem without making it worse. Mistakes and spills are simply part of the journey of creating and repairing things. By learning how to fix them, you become a more skilled and confident craftsperson. Now, you can get back to your project with the pride of a job well done. Happy building!