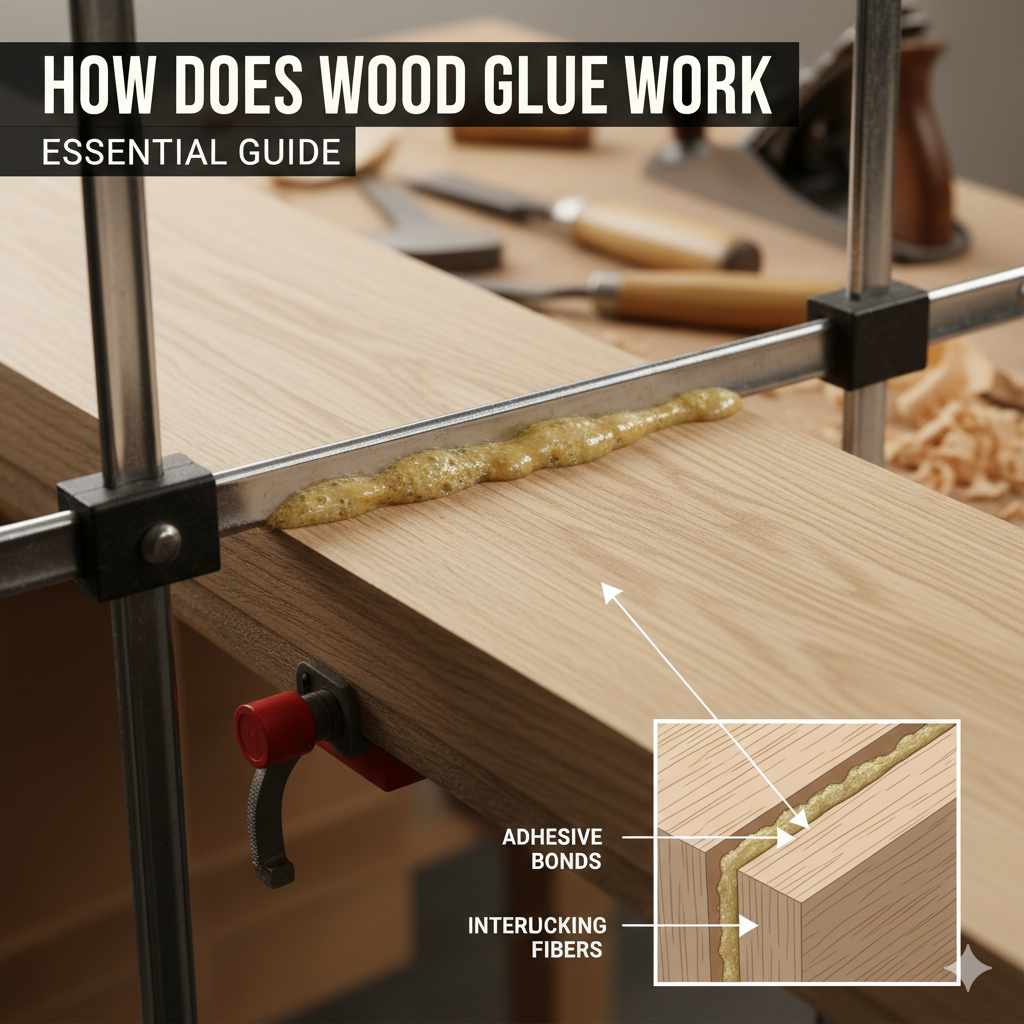
How Does Wood Glue Work: Essential Guide
Wood glue works by creating a strong bond between wood fibers through absorption, evaporation, and interlocking. It penetrates porous wood surfaces, then dries and hardens, forming a nearly unbreakable connection that’s often stronger than the wood itself. This guide demystifies the science behind it, empowering you to choose and use the right glue for lasting woodworking projects.
Ever wondered what makes wood glue hold pieces of wood together so tenaciously? As a woodworker, I’ve relied on wood glue for countless projects, from simple repairs to intricate furniture. It’s a staple in any workshop, but understanding how it works can make a big difference in the strength and durability of your creations. Sometimes, joints don’t hold as expected, and it can be puzzling. With a little knowledge, you can master this essential skill and build with confidence.
In this guide, we’ll explore the simple science behind wood glue. We’ll break down the process step-by-step, making it easy to understand even if you’re new to woodworking. You’ll learn what happens when that creamy liquid meets wood, how it dries, and what makes it so incredibly strong. By the end, you’ll have a clear picture of how to get the best results from your wood glue.
The Simple Science: How Wood Glue Creates a Strong Bond
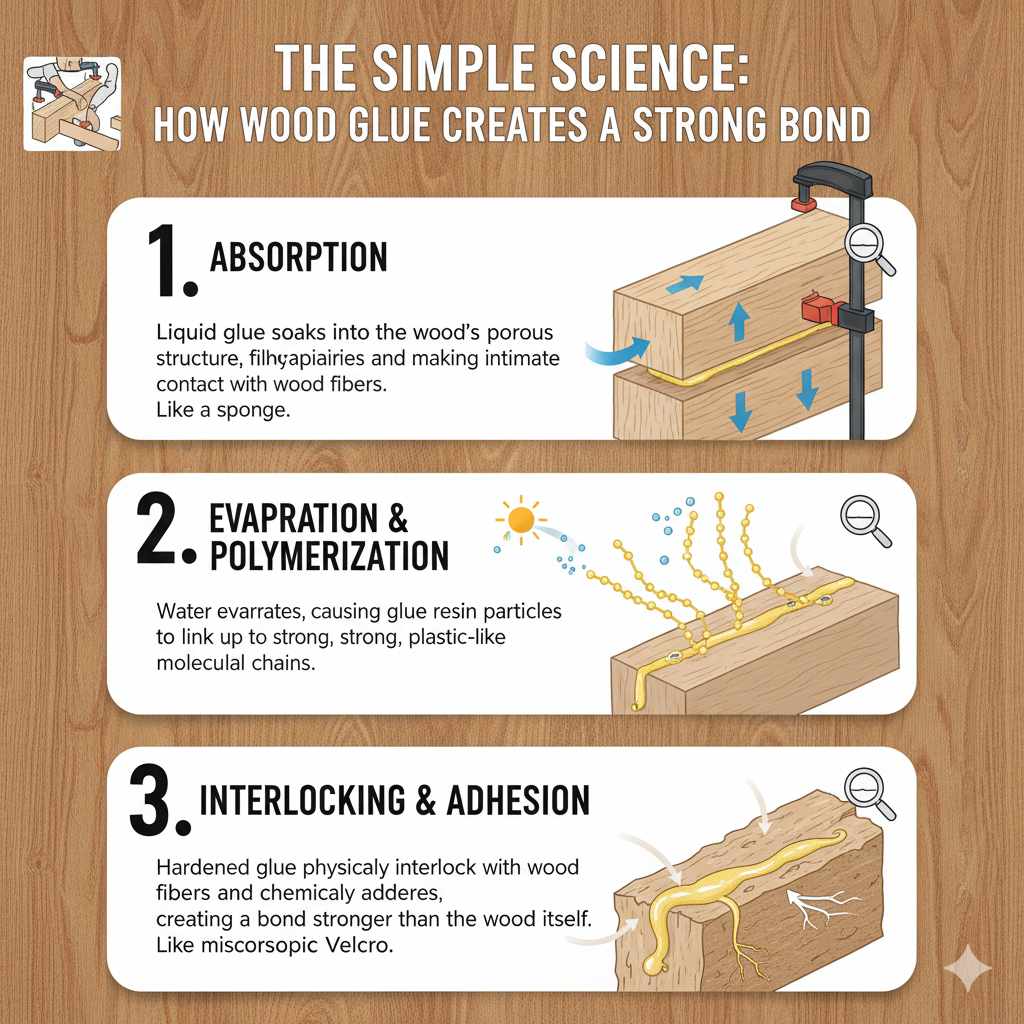
At its heart, wood glue is all about physics and chemistry working together. Think of it like a super-powered, temporary liquid that solidifies into a permanent, incredibly strong bond once it dries. The magic happens in a few key stages:
1. Absorption: The First Step to Bonding
When you apply wood glue to a wooden surface, the first thing that happens is penetration. Wood, by its nature, is a porous material. It has tiny spaces and capillaries within its structure, like a miniature sponge. The liquid wood glue is formulated to take advantage of this. The water (or other liquid solvent, depending on the type of glue) in the glue soaks into these pores. This is crucial because it allows the glue to get into the wood, not just sit on top. The wood fibers themselves also absorb some of the other components of the glue.
Imagine painting a piece of very dry bread. The paint (glue) sinks into the bread (wood). This initial absorption is what sets the stage for a strong bond, ensuring the glue makes intimate contact with the wood fibers.
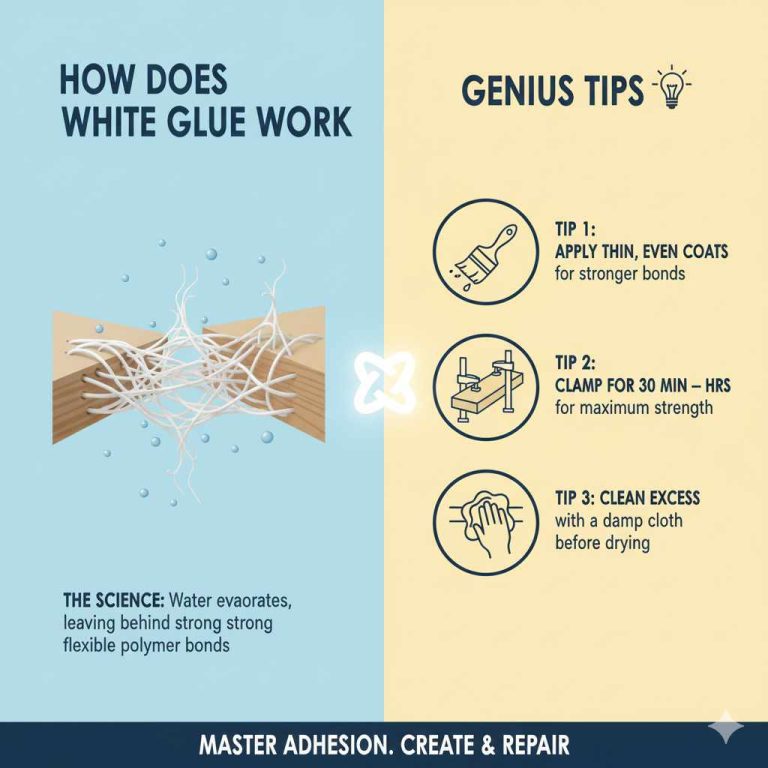
2. Evaporation and Polymerization: The Drying Process
This is where the transformation happens. As the water within the glue begins to evaporate into the air, it leaves behind the solid components of the glue. For most common wood glues, like PVA (Polyvinyl Acetate) glues (think Elmer’s Wood Glue or Titebond Original), this evaporation process is key. As the water leaves, the resin particles in the glue begin to get closer and closer together.
Once these particles are close enough, they begin to link up and form longer chains. This process is called polymerization. These chains create a strong, solid, plastic-like film. This solidified glue is what holds the wood pieces together. It’s like the glue molecules are all holding hands, creating a strong, flexible network.
The time it takes for this to happen can vary depending on the glue type, humidity, temperature, and how much glue you’ve applied. More air circulation and warmer temperatures generally speed up drying. You can learn more about factors affecting drying times on the Forest Products Laboratory’s section on wood adhesives (note: this is a PDF document).
3. Interlocking and Adhesion: Locking It In
The bond isn’t just about the glue drying; it’s about how it interacts with the wood. As the glue penetrates the wood’s pores, it creates microscopic “legs” or “roots” that extend into the wood. When the glue hardens, these hardened glue parts physically interlock with the natural wood fibers. This mechanical interlocking, combined with the chemical adhesion between the glue molecules and the wood molecules, creates an incredibly strong bond. In many cases, a well-glued joint is actually stronger than the wood itself!
Think of it like microscopic Velcro. Parts of the hardened glue hook into the wood’s surface and internal structure, making it very difficult to pull apart.
Types of Wood Glue and What They’re Best For
Not all wood glues are created equal. While the basic principle of absorption, drying, and interlocking remains the same, different formulations offer unique advantages for specific tasks. Understanding these differences will help you pick the right glue for your project.
1. PVA Glues (Polyvinyl Acetate)
These are the most common and widely used wood glues for general woodworking. They are water-based, easy to clean up, and generally non-toxic when dry. They come in different formulations:
- Type I: Water-resistant. Offers some protection against moisture but isn’t waterproof. Good for indoor projects that might occasionally face dampness.
- Type II: Waterproof. As the name suggests, this glue can withstand prolonged exposure to water and humidity. Ideal for outdoor furniture, cutting boards, or any project that might get wet.
- Type III: Water-resistant (often for food contact). Some Type II or specific formulations can meet FDA requirements for indirect food contact, making them suitable for things like cutting boards. Always check the label for specific claims.
Pros: Easy to use, easy cleanup with water, inexpensive, widely available, low toxicity, good shelf life.
Cons: Not suitable for all conditions (e.g., extreme temperatures, prolonged submersion unless waterproof), can weaken if exposed to certain solvents.
2. Polyurethane Glues
These glues are a bit different. They are moisture-curing, meaning they react with the moisture present in the air and the wood to cure. They are excellent for a wide range of materials, including wood, plastic, metal, and ceramics, and they create a very strong, waterproof bond.
Pros: Very strong, waterproof, bonds dissimilar materials, expands slightly to fill gaps, good for outdoor use.
Cons: Can be messy, requires moisture on at least one surface to cure properly, can foam up and create a mess if too much is used, cleanup can be difficult (often requires solvents), can stain skin if not wiped off quickly.
3. Cyanoacrylate Adhesives (Super Glue)
While not traditionally thought of as “wood glue,” cyanoacrylates are excellent for quick repairs and small, precise bondings. They cure almost instantly on contact with the surface and provide a rigid, strong bond.
Pros: Extremely fast curing, very strong for small areas, good for detailed work or quick fixes.
Cons: Brittle, not good for joints under stress or impact, difficult to clean up, can be expensive for larger projects, not waterproof, can bond skin instantly.
4. Epoxy Adhesives
Epoxies are two-part adhesives that, when mixed, undergo a chemical reaction to become extremely hard and waterproof. They are incredibly strong and can fill gaps well, making them suitable for structural repairs, laminating, and bonding materials that are difficult to glue.
Pros: Extremely strong, waterproof, fills gaps well, bonds a wide variety of materials, good for structural repairs.
Cons: Requires careful mixing, longer cure times for full strength, can be expensive, cleanup requires solvents, can be messy, some have strong fumes.
Here’s a quick comparison table for common wood glues:
| Glue Type | Typical Use | Water Resistance | Cleanup Method | Cure Time | Gap Filling |
|---|---|---|---|---|---|
| PVA (Standard) | Indoor furniture, crafts, general repairs | Low | Water | 30 mins – 24 hrs | Poor |
| PVA (Waterproof/Resistant) | Outdoor furniture, decks, cutting boards | High | Water | 30 mins – 24 hrs | Poor |
| Polyurethane | Outdoor projects, dissimilar materials, structural bonds | Excellent (Waterproof) | Solvents (mineral spirits), difficult once cured | 1-8 hours (full cure 24 hrs+) | Fair (expands) |
| Cyanoacrylate | Small repairs, precise bonding, quick fixes | Poor | Acetone (can damage surfaces) | Seconds to minutes | Very Poor |
| Epoxy | Structural repairs, laminating, difficult materials | Excellent (Waterproof) | Solvents (alcohol, acetone) | Several hours to days | Excellent |
Step-by-Step: The Art of Applying Wood Glue Effectively
Knowing how wood glue works is one thing, but applying it correctly is where the real strength comes from. Follow these steps for a perfect glue joint every time. This process is based on using common PVA wood glues, which are the go-to for most beginner projects.
Step 1: Prepare Your Surfaces
This is critical! Your wood pieces need to fit together perfectly before you apply any glue. Any gaps or misalignments at this stage will result in a weak joint.
- Ensure the surfaces to be glued are clean, dry, and free from sawdust, oil, or any debris.
- Make sure the edges or surfaces meet flush. If you’re cutting new pieces, ensure they are square and fit snugly. A dry fit (assembling without glue) is highly recommended.
- For very oily woods like teak or rosewood, you might need to wipe the surfaces down with a solvent like denatured alcohol to ensure good adhesion, but for most common woods like pine, oak, or maple, a clean, dry surface is sufficient.
Step 2: Apply the Glue Evenly
The goal is to get a consistent, thin layer of glue on one or both surfaces. Too little glue means not enough contact. Too much glue creates a mess and can actually weaken the joint by preventing fibers from interlocking properly.
- For a strong, traditional wood glue joint, manufacturers often recommend applying glue to both surfaces being joined (e.g., both edges of a board you’re gluing edge-to-edge).
- For end-grain joints (gluing the end of a board to another surface), glue is often soaked up too quickly. Applying glue to both the end grain and the mating surface, or even applying a thin coat of glue to the end grain first and letting it soak in for a minute before applying a second coat, can help.
- Use a brush, roller, or the glue bottle’s applicator tip to spread a thin, even layer. You should see a slight sheen of glue across the entire surface.
- Avoid “beading” the glue – where it piles up in thick lines – as this can interfere with the joint closure and cure.
Pro Tip: For large surfaces, a small foam roller or a dedicated glue applicator can help spread glue quickly and evenly.
Step 3: Assemble the Pieces
Once the glue is applied, bring the pieces together immediately. Wood glues have an open time, which is the window during which the glue is still wet enough to form a good bond. Don’t wait too long!
- Fit the pieces together precisely as you want them to be.
- If the joint requires it, give a slight wiggle or twist as you bring them together. This helps spread the glue into a thinner, more uniform layer and ensures maximum contact.
- For joints like tenons in mortises, ensure they slide in smoothly.
Step 4: Clamp the Joint
Clamping is essential to hold the pieces tightly together while the glue dries. It ensures that the wood surfaces remain in uniform contact and prevents the joint from shifting. This is where the glue’s absorption and polymerization can truly work their magic.
- Use clamps that are appropriate for the size and type of project. Bar clamps, pipe clamps, C-clamps, and strap clamps are common.
- Place clamping pads (scraps of wood or cardboard) between the clamps and your project to prevent marring the wood surface.
- Tighten the clamps just enough to bring the pieces snugly together. You should see a small, thin bead of glue squeeze out around the joint. This “squeeze-out” is a good indicator that you’ve used enough glue and that the joint is tight.
- If you don’t see any squeeze-out, the joint might be too dry or not clamped tightly enough.
- Wipe away the excess glue squeeze-out with a damp cloth while it’s still wet. Dried glue can be difficult to remove and may interfere with finishing later. A slightly damp, not soaking wet, cloth is best.
Important Note on Clamping Pressure: Too much clamping pressure can squeeze too much glue out, weakening the joint. Too little pressure won’t create proper contact. Aim for firm, but not excessive, pressure.
Step 5: Let it Cure
Patience is key! Although glue might feel dry to the touch in an hour or two, it needs much longer to reach its full strength. Read the manufacturer’s instructions for specific cure times.
- Allow the clamped pieces to sit undisturbed for the recommended time. For most PVA glues, this means at least 30 minutes to an hour for handling, but 12-24 hours for full cure.
- Avoid stressing or putting any weight on the joint during the curing process.
- Depending on ambient temperature and humidity, cure times can vary. Colder, more humid conditions will slow down the drying process.
Step 6: Clean Up
Once the glue has cured and you’ve removed the clamps, you might have some dried glue residue. Clean this up carefully.
- For PVA glues, dried glue can often be scraped off with a sharp chisel or sandpaper. Be careful not to gouge the wood.
- If you used polyurethane glue, you might need a solvent like mineral spirits for cleanup before it fully cures. Once cured, it’s very difficult to remove.
- For epoxy, hardened epoxy can often be chipped or scraped off.
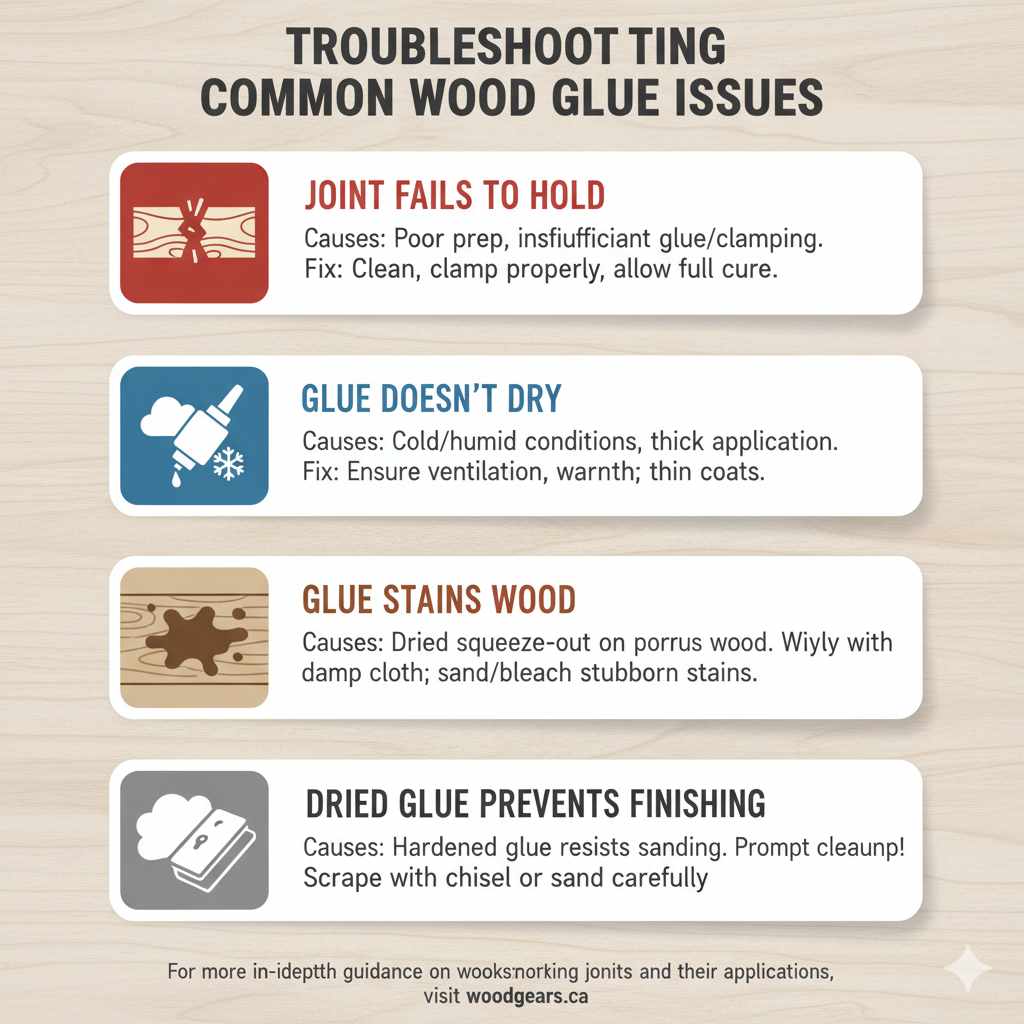
Troubleshooting Common Wood Glue Issues
Even with the best intentions, sometimes things don’t go perfectly. Here are a few common issues and how to avoid or fix them:
- Joint Fails to Hold: This is usually due to poor surface preparation (dirty, oily, or not flat), insufficient glue, too much glue (preventing fiber interlocking), insufficient clamping pressure, or premature stress on the joint before it’s fully cured.
- Glue Doesn’t Dry: This can happen in very cold or humid conditions, or if the glue was applied too thickly. Ensure adequate ventilation and temperature. Sometimes, a thick layer of PVA glue in a non-porous material won’t dry properly. Polyurethane glues need moisture to cure; if the air is extremely dry, they might cure slowly.
- Glue Stains Wood: This often happens when a lot of glue squeeze-out is left to dry on the surface, especially on porous woods. Always wipe away excess glue promptly with a damp cloth. For stubborn dried stains, you may need to lightly sand or use a wood bleach.
- Dried Glue Prevents Sanding/Finishing: Dried glue creates a hard spot on the wood that can resist sanding and take finishes differently. This is why prompt cleanup is so important. If you miss some, carefully scrape it away with a sharp chisel or block plane, or sand it down gently.
For more in-depth guidance on woodworking joints and their applications, resources like WoodworkingHandBook.com offer excellent visual guides and explanations.
Frequently Asked Questions (FAQ)
Q1: What is the strongest type of wood glue?
For general woodworking, PVA glues (like Titebond III) offer excellent strength, often exceeding the strength of the wood itself. For extreme durability, waterproof applications, or bonding dissimilar materials, polyurethane glues and epoxies are often considered even stronger and more resilient.
Q2: How long does wood glue take to dry?
Most common PVA wood glues are safe to handle in about 30-60 minutes, but they need 12-24 hours to cure fully and reach maximum strength. Polyurethane glues can start curing in about an hour with moisture, while epoxies can take anywhere from several hours to a few days to reach full strength, depending on the formulation and temperature.
Q3: Can wood glue bond other materials besides wood?
Standard PVA wood glues are primarily designed for wood.