How Long Does It Take to Effortlessly Straighten Warped Wood
Straightening warped wood usually takes 24 hours to a few days. Use simple moisture methods for overnight fixes on mild warps, or clamp and dry for up to a week on tougher cases. You’ll get flat boards fast with these beginner steps.
Hey there, friend. Have you ever grabbed a board for your DIY shelf, only to see it’s twisted or cupped? It’s a common headache in woodworking that can stop your project cold. But don’t sweat it—warped wood happens to everyone, often from uneven moisture or quick drying. The good news? You can fix it at home without pro tools or big costs. I’ll guide you through easy, safe ways to straighten it, with clear steps and real times. By the end, you’ll feel ready to tackle any warp and get back to building with confidence.
What Causes Wood to Warp?
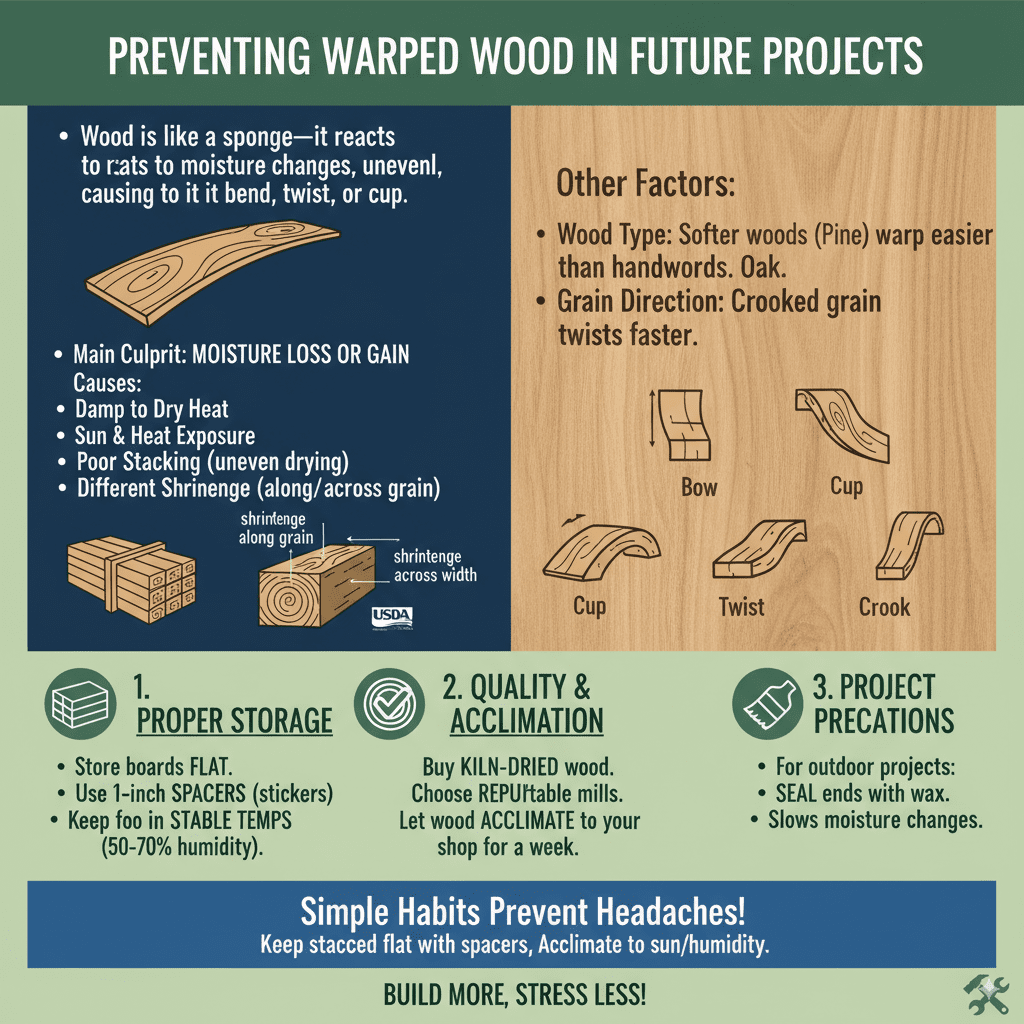
Wood is alive in a way—it breathes and moves with moisture in the air. When that moisture changes unevenly, your board can bend, twist, or cup. Think of it like a sponge: one side dries faster, shrinks more, and pulls the wood out of shape.
The main culprit is moisture loss or gain. If you store wood in a damp garage then bring it inside to dry heat, it warps. Heat, sun, or poor stacking during drying at the mill can cause it too. According to experts at the USDA Forest Products Laboratory, warping comes from different shrinkage in the wood’s directions—along the grain, across the width, or through the thickness.
Other factors play in, like the wood type. Softer woods like pine warp easier than hard oaks. Grain direction matters too—if it’s not straight, twists happen fast. But understanding this helps you prevent it next time. Keep wood stacked flat with spacers, away from direct sun or heaters, and let it acclimate to your shop’s humidity for a week before use. Simple habits like that save headaches.
Now that you know why it warps, let’s spot the types. This makes fixing easier.
Understanding the Types of Wood Warping
Warps aren’t all the same. Spotting the type tells you the best fix and how long it’ll take. Here are the main ones beginners face.
- Cupping: The board bends across its width, like a shallow “U.” Often from one side drying faster.
- Bowing: It curves along the length, like a gentle arch. Common in long boards from end-to-end moisture shifts.
- Crooking: Similar to bowing but at the ends, making corners poke out.
- Twisting: The ends rotate in opposite directions, like a propeller. This one’s tricky but fixable.
To check, lay the board flat on a level surface. Use a straightedge or string along the edges. Shine a light underneath to see gaps. For twists, use “winding sticks”—two straight boards held at ends to check alignment. Knowing your warp type guides your method. Mild cups fix quick; bad twists need more time.
Tools and Materials for Straightening Warped Wood
You don’t need a fancy workshop to fix warps. Most tools are cheap or already in your garage. Start with basics and build from there. Here’s a simple list to get you set.
| Item | Purpose | Why It’s Beginner-Friendly | Cost Estimate |
|---|---|---|---|
| Damp cloth or spray bottle | Wets the wood evenly for moisture method | No special skills; just like misting plants | $1-5 |
| Clamps (bar or C-clamps, 4-6 pieces) | Holds wood flat while drying | Easy to use; adjustable pressure | $10-20 each |
| Iron (household clothes iron) | Applies heat with steam for quick fixes | You probably have one; simple on/off | $10-30 |
| Flat surface (plywood sheet or workbench) | Base to press wood against | Stable and reusable for many projects | $0-20 |
| Weights (bricks or sandbags) | Adds pressure without clamps | Free if you have them around | $0-5 |
| Straightedge or level | Checks flatness before and after | Quick visual guide | $5-10 |
Pick what fits your warp. For small pieces, cloth and clamps do it. Bigger boards? Add weights. Safety first: Wear gloves when clamping to avoid pinches, and work in a ventilated spot if using steam. These tools keep things affordable—under $50 total for starters.
With your kit ready, let’s dive into the how-to. I’ll cover three easy methods, from quickest to most reliable. Each includes time estimates based on real tests.
Method 1: The Moisture Absorption Technique (Quickest for Mild Warps)
This is my go-to for beginners. It uses water to swell the dry side back into balance. No heat or machines needed. Great for cupped or bowed boards under 1-inch thick. It works because wood expands when wet, pushing the warp out.
- Prep the board: Lay it on a flat surface, convex (bulged) side up. Identify the dry side—it’s the one that’s shrunk and pulled tight.
- Dampen evenly: Mist or wipe the entire dry side with a cloth soaked in water, like applying a light coat of stain. Don’t soak it—aim for damp, not dripping. For thicker wood, use a bit more water.
- Flip and wait: Turn the board so the wet side is down against the flat surface. This lets it swell against resistance.
- Add gentle pressure: Place weights or light clamps across the board to hold it flat. Don’t overtighten—let the wood move a little.
- Let it sit: Leave it overnight, about 8-24 hours. Check in the morning; most mild warps flatten by then.
- Re-acclimate: Once flat, stack it with spacers in your shop for 1-2 weeks to match room humidity. This locks in the fix.
How long total? 24 hours for the main step, plus a week to stabilize. I’ve fixed pine shelves this way in one night—super reassuring for first-timers. If it doesn’t fully flatten, repeat the dampening. Pro tip: Do this in shade to avoid sun drying too fast.
Method 2: Iron and Steam Method (Fast for Small Pieces)
Got a warped cutting board or thin panel? This heat-and-moisture combo straightens it quick, like ironing wrinkles from a shirt. It’s hands-on and fun, but watch the heat to avoid scorching.
Why it works: Steam softens fibers, and iron heat helps them set flat. Ideal for pieces under 12 inches wide.
- Set up safely: Work on a heat-safe surface like an old towel over your bench. Plug in the iron to steam setting.
- Wet the warp: Cover the convex side with a damp towel—wring it out so it’s moist, not soaking.
- Iron steadily: Glide the iron over the towel in slow passes, 10-15 seconds per spot. Let steam rise and penetrate. Flip the board if needed for both sides.
- Check progress: Lift the towel every few minutes to see if it’s flattening. Re-wet if dry.
- Clamp while warm: Once softer, place it flat and clamp or weight it down.
- Cool and dry: Let it cool under pressure for 2-4 hours, then remove clamps and air-dry for 24 hours.
Time here? 30 minutes active, plus 24 hours drying. Total under a day for small warps. I love this for kitchen fixes—turns a wonky board into a beauty fast. Just unplug the iron when done, and never leave it unattended. If your wood’s oily like teak, test a corner first.
Method 3: Clamping and Drying (Best for Severe Twists or Bows)
For stubborn warps like twists in 2x4s, clamps provide steady force while moisture evens things out. It’s reliable but takes patience. Perfect if the first methods fall short.
- Assess and wet: Place the board on a flat plywood sheet. Wet the convex side thoroughly with wet cloths to swell it.
- Position cauls: Use straight wood scraps (cauls) along the edges to spread clamp pressure evenly and avoid dents.
- Clamp firmly: Apply clamps every 6-8 inches, tightening gradually from center out. Aim to force it flat—use a straightedge to check.
- Add weights if needed: Stack bricks on top for extra push on bows.
- Wait it out: Leave clamped for 48-72 hours, or up to a week for bad cases. Check daily and loosen if it fights back too much.
- Release and stabilize: Remove clamps slowly. If it springs back a bit, re-clamp. Then acclimate for 1-2 weeks.
Expect 3-7 days total. This method saved a twisted oak beam for my deck—worth the wait. Safety note: Wear eye protection when tightening clamps, as wood can snap. For big pieces, get a buddy’s help.
Comparing the Methods: Which One for You?
Not sure which to pick? Here’s a quick table to match your warp, time, and effort. It helps you choose based on what you have on hand.
| Method | Suitability | Time to Flatten | Pros | Cons |
|---|---|---|---|---|
| Moisture Absorption | Mild cups/bows, thin boards | 24 hours + 1 week acclimate | Cheap, no tools needed, natural fix | May need repeats for severe warps |
| Iron and Steam | Small pieces, quick jobs | 1 day total | Fast active time, household items | Risk of burns; not for thick wood |
| Clamping and Drying | Severe twists/bows, any size | 3-7 days + acclimate | Strong hold, long-lasting results | Takes space and patience |
This chart shows moisture wins for speed on easy warps, while clamping shines for tough ones. Remember, always acclimate after—it’s key to keeping it straight.
Safety Tips and Common Mistakes to Avoid
Straightening wood is safe and fun, but a few slip-ups can happen. Let’s keep you protected.
- Gloves and goggles: Clamp edges can pinch fingers; protect your eyes from flying splinters.
- Even moisture: Uneven wetting causes new warps—mist lightly and uniform.
- Don’t rush drying: Fast heat without clamps leads to cracks. Let it slow-dry.
- Check clamps: Over-tighten and wood splits; start loose and build pressure.
- Ventilate: Steam methods need fresh air to avoid humidity buildup.
A big mistake? Skipping acclimation. It seems boring, but it prevents re-warping in your project. I learned that the hard way on a table top—flat one day, cupped the next! Test small first if your wood’s exotic.
For more on wood movement, check the Popular Woodworking guide. It explains the science simply.
Preventing Warped Wood in Future Projects
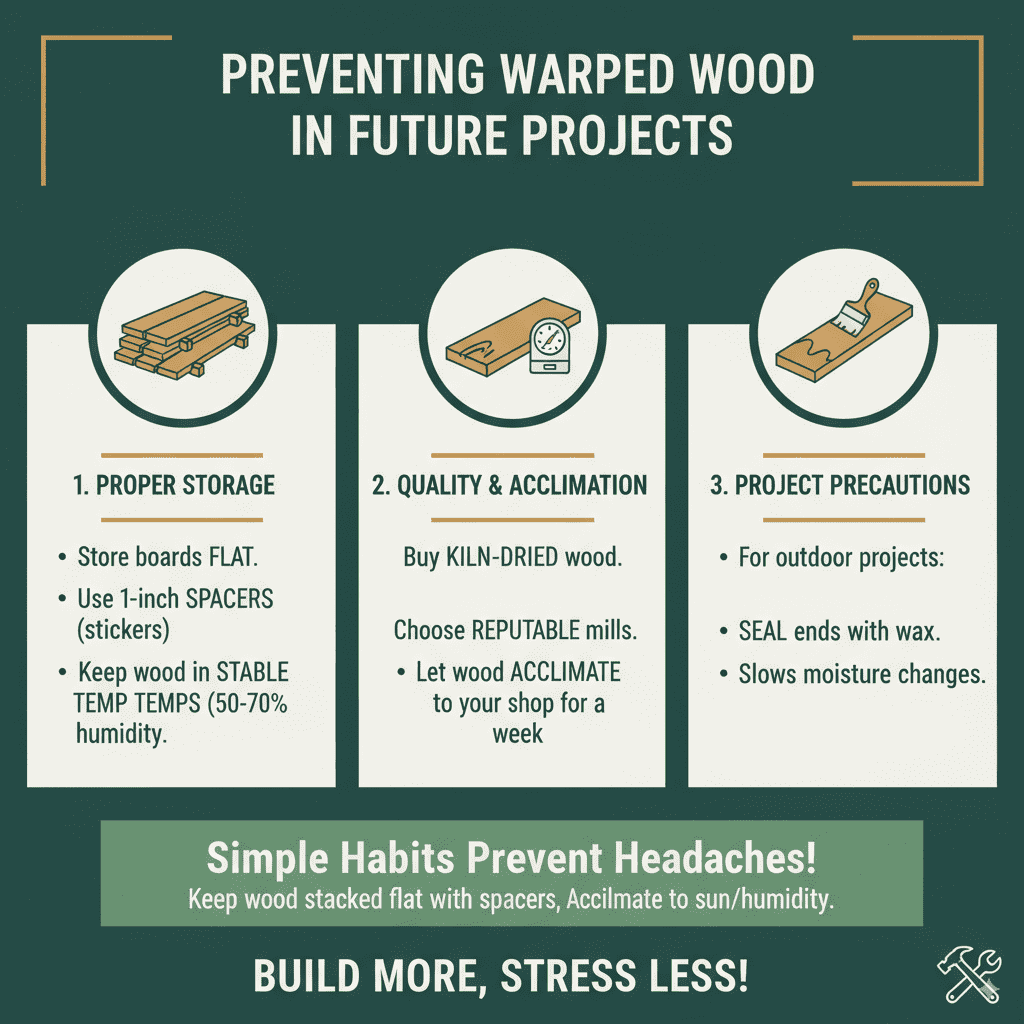
Fixing is great, but stopping warps saves time. Store boards flat, stickered with 1-inch spacers every foot. Keep in stable temps—50-70% humidity is ideal. Buy kiln-dried wood from reputable mills, and let it sit in your space a week before cutting.
For outdoor projects, seal ends with wax to slow moisture changes. These tricks make your wood stay true longer. You’ll build more, stress less.
Frequently Asked Questions
How long does it really take to straighten badly warped wood?
For severe cases, plan on 3-7 days with clamping, plus a week to acclimate. Mild ones? Just overnight. Patience pays off for lasting flatness.
Can I straighten wood without any tools?
Yes! The moisture method uses just a cloth and flat surface. Add weights from around the house for better results. It’s the easiest start for newbies.
What if the wood warps again after fixing?
It might if you skip acclimation. Store properly and seal it in your project. Wood moves, but good habits keep it minimal.
Is it safe to use heat on all woods?
Stick to low heat for softwoods like pine. Avoid on resins-heavy woods like cedar—they scorch easy. Always test a small area.
Does wood thickness affect the time?
Thicker boards take longer—up to twice as much. Dampen more for 2-inch pieces, and clamp strong. Thin ones fix in hours.
Can I fix warped plywood?
Plywood warps less but if it does, use the iron method gently. Clamping works too, but don’t over-wet layers. Results vary by glue type.
What’s the best wood to avoid warping?
Quarter-sawn hardwoods like oak resist best. Avoid plain-sawn pine for precision work—it’s prone but cheap and fixable.
Wrapping It Up: Get Straightening and Start Building
There you have it, friend—your roadmap to straightening warped wood without the fuss. Whether it’s an overnight moisture fix or a few days of clamping, these steps make it doable for anyone. Remember, every woodworker faces warps; it’s how you handle them that builds skill and joy in your projects. Grab that board, follow along, and watch it flatten. Soon, you’ll have sturdy shelves, tables, or whatever dream you’re crafting. You’ve got this—happy woodworking!