How to Attach Wood to Granite: The Adhesive That Actually Bonds
Standard wood glue will not hold wood to granite. Wood glue is formulated to soak into porous wood fiber on both sides of a joint, and granite is dense, non-porous stone with nothing for the glue to grip onto. The fix is a construction-grade silicone adhesive or a two-part epoxy rated for stone-to-wood bonding, plus the right surface prep and, for anything load-bearing, a mechanical fastener as backup.
This comes up more often than you’d think: a wood cutting-board insert set into a granite counter, a wood edge or trim ledge along a granite backsplash, a wood bracket mounted to a granite hearth surround, or a custom wood-topped vanity meeting a granite base. Below is exactly which adhesive to use, how to prep the granite so the bond actually holds, and when to reach for screws instead of (or in addition to) glue.
Why Wood Glue Doesn’t Work on Granite
PVA wood glue (Titebond, Gorilla Wood Glue, and similar) bonds by soaking into the open cell structure of wood fiber and hardening inside those pores — it’s a mechanical grip as much as a chemical one, and it needs a porous surface on both sides of the joint to work. Granite is quartz, feldspar, and mica compressed into a dense, essentially non-porous slab. There’s no fiber for the glue to penetrate, so it just sits on top of the polished or honed surface as a thin film. It may hold for a few days under no load, then let go with a light knock — this is the single most common reason a wood-to-granite repair fails.
There’s a second problem even a stronger adhesive has to account for: wood and granite move differently. Wood expands and contracts across the grain as humidity changes through the year; granite is essentially dimensionally stable and doesn’t move at all. An adhesive that cures rock-hard with zero flex can crack at the glue line as the wood shifts, even if the initial bond was strong. That’s why the choice between silicone and epoxy below isn’t just about raw strength — it’s about which one matches how the joint will actually behave over time.
Best Construction Adhesive for Wood-to-Stone
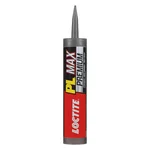 |
Loctite PL Premium Max Construction Adhesive – $12.98 A polyurethane construction adhesive rated for wood, stone, concrete, and metal — a solid middle ground between rigid epoxy and flexible silicone for a wood-to-granite joint.
|
Silicone vs. Epoxy: Which One to Use
Both silicone adhesive and two-part epoxy bond well to granite, but they behave differently once cured, and that difference matters more than the label on the tube.
Construction-grade silicone (or a polyurethane construction adhesive like the pick above) stays slightly flexible after it cures. That flex is what lets it absorb the wood’s seasonal expansion and contraction without the bond line cracking. It’s the better choice for anything with real exposed surface area — a wood edge along a granite counter, a trim strip, a backsplash ledge — where movement over the seasons is a given.
Two-part epoxy cures rigid and reaches a higher raw tensile strength, which makes it the better call for a small, fully-supported joint that won’t flex much anyway — a cutting-board insert dropped into a tight-fitting granite cutout, for example, or a small decorative wood accent that’s fully backed by the stone underneath it. Mix only what you can apply within the product’s stated working time, and don’t substitute a five-minute hobby epoxy — those aren’t formulated for a structural stone bond.
Surface Preparation (Don’t Skip This)
Adhesive bond strength on granite depends almost entirely on how clean and dry the surface is at the moment you apply it — more so than with wood-to-wood joints, since there’s no porous surface to help compensate for a slightly dirty bond line.
- Clean the granite with isopropyl alcohol or a dedicated stone cleaner — not a soap-based cleaner, which can leave a residue film that weakens adhesion.
- Let the surface dry completely. Any trapped moisture under the adhesive can prevent a full cure or create a weak spot.
- Wipe away dust immediately before applying adhesive; granite dust from cutting or drilling settles fast and will sit between the adhesive and the stone if you don’t do this last.
- Lightly sand the wood surface that will contact the granite (fine-grit) to open the grain slightly and give the adhesive more surface texture to grip.
- Dry-fit the wood piece first. Adjustments are much easier before adhesive is in the joint.
Step-by-Step: Bonding Wood to Granite
- Dry-fit the wood piece against the granite and confirm the fit before any adhesive touches either surface.
- Clean both surfaces per the prep steps above and let them dry fully.
- For silicone/construction adhesive: run a continuous bead in a zigzag or serpentine pattern across the wood’s back surface, leaving a small margin at the edges so it doesn’t squeeze out messily. For epoxy: mix per the product’s ratio and working time, then spread an even layer with a putty knife or notched trowel.
- Press the wood firmly onto the granite in its final position and apply even clamping pressure. Use a padded clamp or a scrap wood caul between the clamp and the wood face to avoid denting it.
- Wipe away any adhesive that squeezes out at the seam right away, before it skins over — it’s far easier to remove wet than cured.
- Let the adhesive cure fully before putting any load or weight on the joint. Check the specific product’s label for its cure time — silicone and polyurethane adhesives typically need roughly a day to handle light use and several days to reach full strength; two-part epoxies vary more by brand, so follow the manufacturer’s stated cure window rather than a generic number.
When to Use Screws or Brackets Instead
Adhesive alone is fine for trim, decorative accents, and anything that isn’t carrying real weight. For a load-bearing application — a wood shelf bracket mounted to a granite fireplace surround, a wood ledge meant to be leaned or sat on — don’t rely on adhesive by itself. Driving a standard wood screw straight into solid granite will not work and risks cracking the stone; granite has to be pre-drilled with a diamond or masonry bit and fitted with a masonry anchor (a sleeve or expansion anchor rated for stone) before a screw can bite into anything. A bracket system anchored this way, backed up with a bead of construction adhesive along the contact surface, gives you both the mechanical hold and the gap-filling bond — belt and suspenders for anything that has to support real weight. If you’re sizing screws or anchors for the wood side of that bracket, our wood load capacity calculator is worth checking before you commit to a fastener size.
Common Mistakes to Avoid
- Reaching for wood glue or super glue (CA glue). Neither is formulated to bond to non-porous stone, and both are the most common reason a first attempt fails within days.
- Skipping surface prep because the granite “looks clean.” A light film of cooking residue, dust, or cleaner buildup that’s invisible to the eye is enough to weaken the bond.
- Driving a screw straight into granite without a masonry anchor. This is a common way to crack or chip the stone, not just strip the fastener.
- Loading the joint before the adhesive has fully cured. A joint that feels solid after an hour can still fail under real weight if it hasn’t reached full cure — check the product’s stated cure time, not just its set time.
- Using a fully rigid adhesive on a large exposed wood surface. If the wood piece has enough surface area to expand and contract noticeably with humidity, an inflexible epoxy bond line is more likely to crack over time than a construction-grade silicone one.
Frequently Asked Questions
Can you use wood glue to attach wood to granite?
No. Wood glue is designed to soak into porous wood fiber, and granite is dense, non-porous stone with nothing for the glue to penetrate. Use a construction-grade silicone adhesive or a two-part epoxy rated for stone-to-wood bonding instead.
What is the best adhesive for attaching wood to granite?
A construction-grade silicone or polyurethane adhesive (like Loctite PL Premium) for anything with exposed surface area that will move with humidity, or a two-part epoxy rated for stone for a small, fully-supported joint that needs maximum rigid strength.
Can you screw wood directly into granite?
Not directly — a standard screw driven into solid granite will not bite into the stone and risks cracking it. The granite has to be pre-drilled with a diamond or masonry bit and fitted with a masonry anchor before a screw can hold, and that’s typically combined with adhesive for a load-bearing joint.
How long does adhesive need to cure before the wood-to-granite joint can hold weight?
It depends on the specific product — check the manufacturer’s label rather than assuming. Silicone and polyurethane construction adhesives commonly need roughly a day before they can handle light contact and several days to reach full cured strength; two-part epoxies vary by brand and formulation, so follow that product’s stated working and cure times.
Conclusion
Wood glue is the wrong tool for a wood-to-granite joint — a construction-grade silicone adhesive or a stone-rated two-part epoxy is what actually bonds to non-porous stone, and the right choice between the two comes down to whether the joint needs to flex with the wood or stay rigid. Clean, dry surface prep matters as much as the adhesive itself, and for anything load-bearing, back the bond up with a properly anchored screw or bracket rather than relying on adhesive alone.
Sponsored / affiliate links. As an Amazon Associate I earn from qualifying purchases. I may earn additional commission from eligible campaigns.