How To Board Up Sliding Glass Doors: Proven Solutions
Bolded Quick Summary: Boarding up sliding glass doors with plywood is a straightforward process that enhances security and protection during emergencies like storms or break-ins. This guide offers clear, step-by-step instructions, focusing on safety, precise measurements, and secure attachment methods for effective reinforcement.
Protecting Your Home: How to Board Up Sliding Glass Doors with Plywood
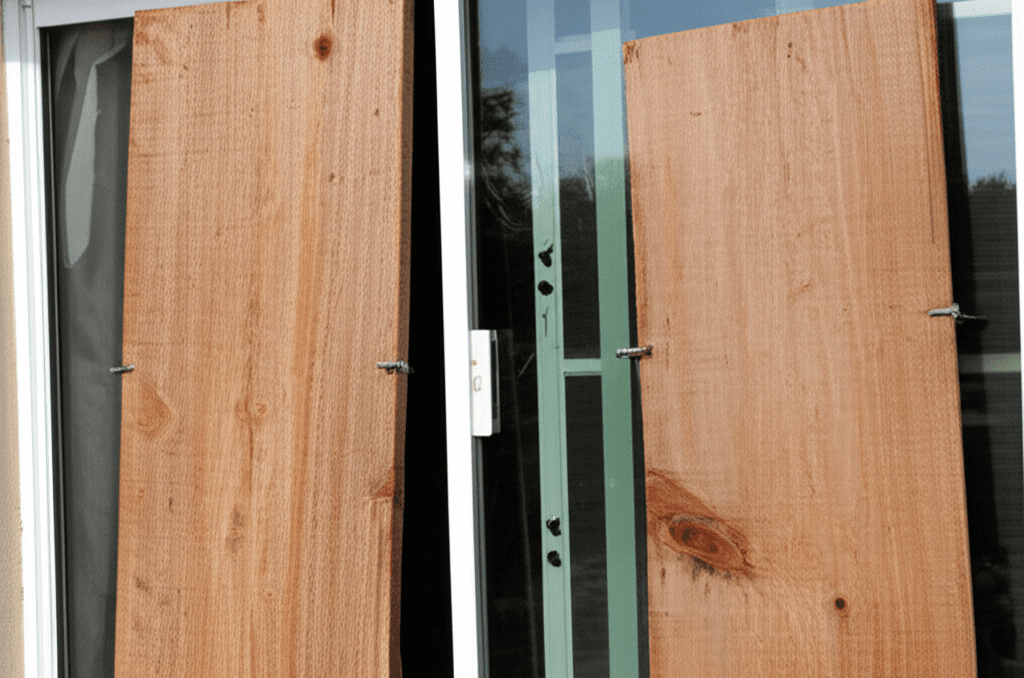
Dealing with sliding glass doors can sometimes feel a bit daunting, especially when you need to secure them quickly. Whether it’s a strong storm rolling in or you’re aiming to boost your home’s security, knowing how to properly board up these large glass panels is a skill that brings great peace of mind. Many folks worry about making mistakes or not getting the boarding tight enough, leaving their home vulnerable. Don’t you worry! This guide is here to walk you through it, step by step. We’ll use simple language and focus on making this task manageable and effective. You’ll learn exactly what you need and how to do it right, so you can feel confident that your home is well-protected.
Why Board Up Sliding Glass Doors?
Sliding glass doors, while lovely for letting in light and offering views, are often a common point of vulnerability for homes. Their large glass surfaces can be susceptible to breakage from impacts, whether from severe weather events like high winds and flying debris or from forced entry attempts. Properly boarding them up acts as a critical barrier, preventing shattering and significantly reducing the risk of damage to your home’s interior and its contents. It’s a proactive step that adds a robust layer of security and protection, offering invaluable peace of mind when it matters most.
Essential Tools and Materials
Getting the right gear makes any project smoother and safer. For boarding up your sliding glass doors, here’s what you’ll want to have on hand:
- Plywood: 1/2-inch or 5/8-inch thick exterior-grade plywood is ideal. You’ll need enough to cover the entire glass area, plus a little extra for overlap. Measure your door carefully!
- Measuring Tape: For accurate measurements of your door frame.
- Pencil: To mark your measurements on the plywood.
- Circular Saw or Handsaw: To cut the plywood to size. A circular saw will be faster and give cleaner cuts.
- Drill/Driver: With appropriate bits for pilot holes and driving screws.
- Exterior-Grade Screws: 1 5/8-inch to 2-inch screws are good for attaching the plywood securely.
- Safety Glasses: Always wear these when cutting or drilling.
- Work Gloves: To protect your hands.
- Screwdriver Bits: Phillips or square drive, depending on your screws.
- Optional: Furring Strips (1x2s or 1x3s): These can be helpful for creating a more secure frame around the plywood for extra strength, especially in severe weather.
- Optional: Caulk or Weather Stripping: For a tighter seal around the edges after installation.
Step-by-Step Guide: How to Board Up Sliding Glass Doors with Plywood
Taking the time to do this correctly means your doors will be well-protected. Let’s break it down:
Step 1: Measure Your Sliding Glass Door
This is the most crucial step. Accuracy here ensures a snug fit and maximum protection. Measure the height and width of the glass portion of your sliding door. It’s often best to measure the opening more than just the glass itself to account for the frame. Measure both horizontally and vertically in a couple of spots to ensure your measurements are precise. Add about 2-4 inches to both the height and width measurements. This extra bit allows the plywood to overlap the door frame, giving you a solid surface to screw into. A good overlap is key for a secure fit.
Step 2: Cut the Plywood
Once you have your measurements, transfer them to your sheet of plywood. Use your pencil to draw the cutting lines. Remember, you added a few extra inches to your measurements for overlap. Carefully cut the plywood to size using your circular saw or handsaw. Always cut on a stable surface and follow the lines you marked. If you’re using a circular saw, ensure you have a fresh blade for the cleanest cut. Safety first – wear your safety glasses and gloves during this step!
Step 3: Prepare the Door Frame
Before you attach the plywood, take a moment to clear the area around your sliding glass door. Remove any curtains, blinds, or decorations that might get in the way. You want a clear path to work and to ensure the plywood can sit flush against the frame. If you plan to use furring strips for extra support, this is also the time to cut them to size, matching the perimeter of your plywood cut-out.
Step 4: Position and Mark the Plywood
Carefully lift the cut plywood panel and position it against the outside of your sliding glass door. Align the edges so that the overlap is distributed evenly around the door frame. Once it’s positioned correctly, use your pencil to lightly mark where the screws will go. Aim for marks about 4-6 inches apart along all four edges of the plywood, ensuring you hit the sturdy door frame. If you are using furring strips, position them around the inside edge of your plywood to create a frame that will be attached to the wall studs around the door, not directly to the door frame itself. This method provides superior strength.
Step 5: Drill Pilot Holes
Using your drill, create pilot holes at each of the marks you made on the plywood. These holes should be slightly smaller than the diameter of your screws. Pilot holes prevent the wood from splitting when you drive the screws in, making the process much smoother and strengthening the attachment. Make sure the pilot holes go through the plywood and slightly into the door frame or wall studs. If you are attaching to vinyl or aluminum frames, screws might not be the best option. In such cases, specialized brackets or heavy-duty tape might be needed. However, for most standard wooden door frames or for attaching via furring strips to wall studs, screws are effective.
Step 6: Attach the Plywood
Now comes the satisfying part! Start by driving screws into the pilot holes, working from the center outwards. Make sure the screws are driven straight and snug, but don’t overtighten them, as this can strip the wood. If you’re using furring strips attached to wall studs around the door, drive your screws through the furring strips and into the studs. This method is generally more secure, especially for storm preparedness. Ensure all edges are pulled in tightly against the frame.
Step 7: Add Extra Support (Optional but Recommended for Severe Weather)
For maximum protection against high winds and impacts, consider adding extra support. This could involve:
- Using Furring Strips: As mentioned, attaching 1×2 or 1×3 furring strips around the perimeter of the plywood, then screwing those into the wall studs surrounding the door opening, provides significantly more strength. This creates a robust frame that can withstand greater forces. You can find studs using a stud finder before you start marking and drilling.
- Adding More Screws: Especially in high-stress areas, add extra screws closer together.
- Diagonal Bracing: For extreme situations, a diagonal brace across the plywood can offer added rigidity.
For anyone preparing for severe weather, understanding how to locate wall studs is a valuable skill. Resources like those on Energy.gov’s weather striking section can offer insights into home sealing and structural considerations that complement robust boarding methods.
Step 8: Seal the Edges (Optional)
Once the plywood is securely attached, you can apply caulk or weather stripping around the edges where the plywood meets the frame. This helps to create a tighter seal, preventing water or wind from getting behind the boarding. This step is particularly useful if you’re preparing for a storm.
Alternative Methods and Considerations
While plywood is the go-to for its strength and availability, other materials and methods can be considered, depending on your needs and the situation.
1. Polycarbonate Panels
Polycarbonate is a strong, clear plastic that can be an excellent alternative to plywood if you need to maintain some visibility or want a more “finished” look that doesn’t completely block out light. It’s impact-resistant and can be just as effective, if not more so, against certain types of impacts than standard plywood. Installation is similar, typically requiring screws and potentially special washers to prevent the material from cracking under pressure.
2. Specialized Storm Shutters
For regions prone to hurricanes or severe storms, purpose-built storm shutters are often the most reliable solution. These are engineered to withstand extreme weather conditions and are designed for quick deployment. They come in various types, including roll-down, accordion, and panel shutters, each with its own installation and usage requirements. While often a more significant investment, they offer superior protection and convenience for frequent severe weather.
3. Temporary Bracing Systems
In situations where you can’t permanently alter the door frame or need a quick, temporary solution, specialized temporary bracing systems exist. These often involve adjustable metal poles or strong straps that brace the glass from the interior. They might not offer the same level of protection as a securely bolted plywood sheet but can be a useful option for short-term or less severe threats.
Considerations for Different Door Types:
It’s important to note the material of your sliding door frame. While this guide focuses on typical installations where screws can be driven into a wooden frame or adjacent wall studs, some sliding doors have aluminum or vinyl frames. These materials are less forgiving with screws. For aluminum or vinyl frames, you might need to resort to specialized clamping systems or heavy-duty adhesives and tapes designed for extreme conditions. Always check the manufacturer’s recommendations if you have non-standard framing.
When to Board Up Your Sliding Doors
Knowing when to act is as important as knowing how. Here are common scenarios where boarding up is advisable:
- Incoming Storms: When hurricane warnings, severe thunderstorm watches, or gale warnings are issued, boarding up vulnerable areas like sliding glass doors is a critical preparedness step.
- Approaching Severe Weather: Even if official warnings aren’t in place, if you anticipate very high winds, hail, or heavy debris, taking a proactive approach can prevent damage.
- Security Concerns: If you are going away for an extended period or are concerned about potential break-ins, boarding up can serve as a deterrent and a physical barrier.
- Home Renovations: Sometimes during major renovations, you might need to protect openings from dust, debris, or temporary security gaps.
Safety Tips for Boarding Up
Your safety is paramount throughout this process. Here are some vital tips:
- Always Wear Safety Gear: Safety glasses are non-negotiable when cutting or drilling. Gloves protect your hands from splinters and sharp edges.
- Work with a Buddy: Especially when handling large sheets of plywood, having an extra pair of hands makes the job much easier and safer.
- Secure Ladders: If you need to use a ladder to reach higher parts of the door, ensure it’s on stable ground and properly secured.
- Be Mindful of Power Tools: Read the manuals for your tools. Keep cords out of the way and avoid working in wet conditions if using electric tools.
- Proper Fastener Spacing: Ensure screws are spaced correctly to provide support without over-stressing the plywood or frame.
- Know Your Limits: If you’re unsure about any step or feel uncomfortable, it’s always best to seek professional help.
Frequently Asked Questions (FAQ)
What is the best thickness for plywood when boarding up doors?
For most residential applications, 1/2-inch or 5/8-inch thick exterior-grade plywood is recommended. It provides a good balance of strength, weight, and ease of handling.
Do I board up from the inside or outside?
Boarding up from the outside is generally more effective for protecting against the elements and impacts. It creates a direct barrier against wind and projectiles. However, accessibility and security concerns might sometimes necessitate interior boarding.
Can I use screws directly into a metal sliding door frame?
It’s generally not advisable to screw directly into aluminum or vinyl door frames, as these materials can be easily damaged or stripped. For such frames, consider using clamping systems, specialized brackets, or strong, weather-resistant tapes designed for temporary structural adhesion.
How many screws do I need?
You should aim to place screws about every 4-6 inches along all edges of the plywood panel. This spacing ensures the plywood is held securely and evenly against the frame or wall studs.
Is plywood the only option?
No, while plywood is common and effective, alternatives like polycarbonate panels or purpose-built storm shutters can also be used. These may offer different benefits, such as transparency or greater storm resistance.
Should I pre-drill holes in the plywood?
Yes, pre-drilling pilot holes in the plywood before screwing is highly recommended. This prevents the wood from splitting, makes driving screws easier, and ensures a stronger, more secure attachment.
Measuring Plywood Thickness for Strength
The thickness of the plywood you choose directly impacts its strength and resistance to impact. Here’s a quick look at common thicknesses and their suitability:
| Plywood Thickness | Typical Use Case | Strength Rating | Ease of Handling |
|---|---|---|---|
| 1/4 inch | Temporary shelving, crafts | Low | Very Easy |
| 3/8 inch | Sheathing for walls (lighter areas), temporary coverings | Medium | Easy |
| 1/2 inch | Subflooring, structural sheathing, excellent for boarding doors | High | Moderate |
| 5/8 inch | Roof decking, heavier structural applications, maximum protection for doors | Very High | Slightly More Difficult |
For boarding up sliding glass doors, especially in areas prone to strong winds or impacts, 1/2-inch is a good standard, and 5/8-inch offers even greater security. Always opt for exterior-grade plywood, as it is manufactured with water-resistant glues and is designed to withstand exposure to the elements better than interior grades.
Comparing Plywood Thickness for Door Protection
Choosing the right plywood thickness is crucial for effective protection. Let’s compare the common options:
| Plywood Thickness | Protection Level | Weight/Handling | Cost | Best For |
|---|---|---|---|---|
| 1/2 inch | Good to Very Good | Manageable | Moderate | Standard storm prep, general security |
| 5/8 inch | Excellent | Heavier, might need two people | Slightly Higher | Hurricane preparedness, areas with high risk of debris impact |
For most situations where you need to board up sliding glass doors, 1/2-inch plywood offers a solid defense. If you live in an area that experiences very severe weather, such as high winds or flying debris from storms, upgrading to 5/8-inch plywood is a worthwhile investment for enhanced protection. Ensure the plywood is rated for exterior use to resist moisture and warping.
Conclusion
Boarding up your sliding glass doors with plywood is a practical and effective way to safeguard your home against the elements and unwelcome intrusions. By following these straightforward steps – from accurate measuring and careful cutting to secure fastening – you can confidently reinforce these vulnerable entry points. Remember, preparation is key, and taking the time to do it right provides invaluable peace of mind. Whether you’re facing an upcoming storm or simply want to enhance your home’s security, this skill empowers you to protect what matters most. Keep these steps handy, and never hesitate to reinforce your home’s defenses!