How to Decorate Living Room Wood Paneling: Genius Ideas
Decorating a living room with wood paneling adds warmth and character. This guide offers easy, stylish ways to update your paneled space, from painting and staining to adding accent pieces and strategic lighting. Transform your wood-paneled room into a modern, inviting haven with these practical tips.
Transform Your Living Room with Beautiful Wood Paneling
Wood paneling in a living room can sometimes feel a bit dated or overwhelming. Many homeowners look at their paneled walls and wonder, “How do I make this look good?” It’s a common hurdle, but one with incredibly rewarding solutions! You don’t have to tear down those beautiful wooden walls to achieve a fresh, modern look. With a few smart decorating tricks, you can embrace the warmth and texture of wood paneling and turn your living room into a cozy, stylish centerpiece.
We’ll walk through simple, effective strategies that require minimal fuss and can dramatically change the feel of your room. Whether you’re looking to lighten things up, add a touch of elegance, or simply make the space feel more current, these ideas will guide you. Get ready to see your wood-paneled living room in a whole new, beautiful light!
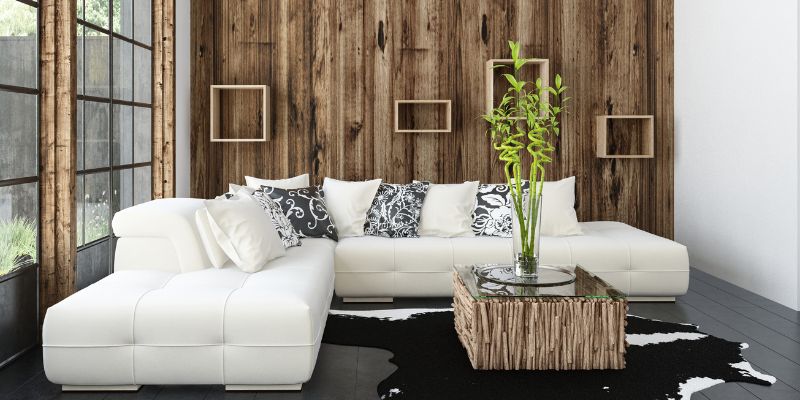
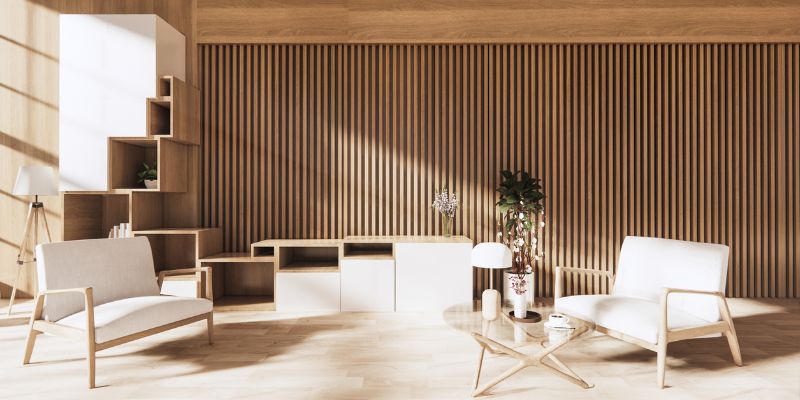
Embrace the Natural Beauty: Keep the Wood
Sometimes, the best approach is to work with what you have! Wood paneling, especially if it’s good quality, offers a rich texture and natural warmth that’s hard to replicate. Instead of covering it up, let’s explore how to highlight its best features.
Enhancing the Existing Wood
You don’t always need to make drastic changes. A little bit of care can go a long way in making existing wood paneling shine.
- Clean and Condition: Start by giving your panels a good cleaning. Use a wood cleaner specifically designed for your type of wood finish. For older paneling, a wood conditioner can restore its luster. Always test in an inconspicuous spot first!
- Light Sanding and Re-staining/Sealing: If the finish is dull or uneven, a light sanding with fine-grit sandpaper (220 grit or higher) can prepare the surface for a fresh coat of stain or a clear sealant. This is a great way to subtly change the hue or simply refresh the look without completely altering the wood’s character.
- Highlighting Wood Grain: Use a clear, satin, or matte finish to really bring out the natural beauty of the wood grain. Avoid high-gloss finishes unless you’re going for a very specific modern look, as they can sometimes highlight imperfections.
Adding Complementary Textures and Colors
The key to decorating with wood paneling is to balance its texture and color with other elements in the room.
- Soft Fabrics: Pair wood paneling with soft, plush fabrics in your upholstery, curtains, and throw pillows. Think velvet, chenille, or chunky knits. These textures contrast beautifully with the hard surface of the wood.
- Natural Fibers: Incorporate elements like jute rugs, rattan baskets, or linen drapes. These natural textures echo the wood and create a cohesive, organic feel.
- Color Palette: Choose a color palette that complements the wood tone. Warmer wood tones often look great with creams, beiges, olive greens, and deep blues. Cooler wood tones can be enhanced by grays, whites, and muted pastels.
The Power of Paint: A Fresh Canvas
Painting wood paneling is one of the most transformative things you can do. It instantly modernizes the space and opens up a world of color possibilities. Don’t be afraid to paint wood paneling; it can achieve stunning results!
Choosing the Right Paint and Finish
Preparation is crucial here. The right paint and finish will ensure durability and a beautiful look.
- Preparation Steps:
- Clean Thoroughly: Wash the panels to remove any dust, grease, or grime. A degreasing cleaner is often best.
- Repair Imperfections: Fill any holes or cracks with wood filler and sand smooth once dry.
- Light Sanding: Sand the entire surface lightly with 120-180 grit sandpaper. This helps the primer and paint adhere better. Wipe down with a tack cloth or damp cloth to remove dust.
- Prime: Use a high-quality stain-blocking primer. This is essential to prevent tannins from the wood from bleeding through your paint color, especially with darker woods. Apply one or two coats, allowing each to dry completely.
- Paint Selection:
- Sheen: A satin or eggshell finish is often recommended. It’s durable, washable, and offers a subtle sheen that doesn’t show imperfections as much as a gloss finish. A matte finish can look very sophisticated but may be harder to clean.
- Color: White, off-white, or light gray are popular choices for a bright, airy feel. Deep colors like navy blue, charcoal gray, or even black can create a dramatic, cozy atmosphere.
- Application: Use a high-quality paint roller with a suitable nap (usually 3/8″ or 1/2″) for smooth surfaces like paneling. You may need a good angled brush for the grooves between the panels. Apply two or three thin coats of paint for even coverage, allowing adequate drying time between coats.
Painting Techniques for Accent Walls
Not all paneling needs to be painted. Consider a strategic accent wall.
- Subtle Color Blocking: Paint the majority of your paneled walls a neutral color (like a soft white or light gray) and then paint one feature wall in a complementary darker shade or a bold accent color.
- Highlighting Architectural Features: If your paneling has unique lines or patterns, consider painting the grooves a slightly different shade than the raised panels for added dimension.
Styling and Decorating Around Wood Paneling
Once your paneling is prepped, painted, or enhanced, it’s time to focus on the decor. The right furniture, art, and lighting can make all the difference.
Furniture Considerations
Choose furniture that complements the style and color of your paneling.
| Paneling Style | Recommended Furniture Styles | Color & Material Suggestions |
|---|---|---|
| Natural, Warm Wood | Mid-century Modern, Scandinavian, Boho | Light-colored upholstery (cream, beige), natural wood accents (light oak, walnut), rattan, woven textures. |
| Painted (Neutral Tones) | Modern, Farmhouse, Transitional | Mix of textures – soft velvets, crisp linens. Pops of color through accent chairs or pillows. Metallic finishes (brushed brass, matte black). |
| Painted (Dark/Bold Colors) | Contemporary, Glam, Moody | Sleek, minimalist furniture. Jewel tones (emerald green, sapphire blue) or metallics. White or light gray elements to balance the darkness. |
Accessorizing for Impact
Your accessories are the finishing touches that bring personality to the room.
- Art Placement: Hang art at eye level (typically centered about 57-60 inches from the floor). For paneled walls, consider larger pieces or gallery walls to break up the expanse of wood. Abstract art, landscapes, or black and white photography often work well.
- Mirrors: A well-placed mirror can reflect light and make the room feel larger and brighter, especially if your paneling is dark. Consider an ornate mirror to add a touch of elegance or a simple, modern frame for a cleaner look.
- Lighting: Layer your lighting.
- Ambient: Overhead lighting or a stylish floor lamp.
- Task: Reading lamps near seating areas.
- Accent: Picture lights above artwork or subtle spotlights to highlight the paneling itself. Warm-toned bulbs (around 2700K) create a cozy atmosphere.
- Textiles: Incorporate rugs, throw pillows, and blankets to add color, pattern, and softness. A plush rug can anchor a seating area and absorb sound, making the room feel more intimate.
Creative Ways to Decorate Wood Paneling
Beyond painting and general styling, there are more specific techniques to make your wood-paneled living room a showstopper.
Adding Contrast and Dimension
Play with contrast to make the paneling stand out or blend in harmoniously.
- Accent Colors: Use accent colors in your decor that specifically complement your wood tone. For example, with darker mahogany panels, consider deep greens, blues, or even rich burgundies. With lighter pine or birch, you might lean towards pastels, grays, or crisp whites.
- Geometric Patterns: Introduce furniture or rugs with geometric patterns. These can provide a modern counterpoint to the organic lines of the wood grain.
- Metal Accents: Brass, gold, or matte black metallic accents in lamps, picture frames, or decorative objects can add a touch of sophistication and break up large wooden surfaces.
Strategic Lighting Techniques
Lighting is your best friend when working with wood paneling.
- Wall Sconces: Installing wall sconces on paneled walls can add a sophisticated ambiance and highlight the texture of the wood. Their upward or downward light can create dramatic shadow play. Ensure you consult with a professional electrician for safe installation.
- Uplighting: Floor lamps that cast light upwards can illuminate the height of the walls and draw the eye to the paneling’s surface.
- Recessed Lighting: While less direct, well-placed recessed lighting can provide overall brightness and keep the focus on the room’s features, including the paneling.
The ‘Less is More’ Approach
Sometimes, letting the wood speak for itself is the most elegant solution.
- Minimalist Decor: If your paneling is already a strong feature, opt for a minimalist approach with clean-lined furniture and a neutral color palette. This allows the wood to be the star without the room feeling too busy.
- Focus on One Area: If you have a fireplace or a specific architectural feature within the paneled wall, focus your decorating efforts on drawing attention to it. Use a statement piece of art or a unique lighting fixture.
DIY Projects to Complement Paneling
Get hands-on with some simple projects that will enhance your paneled living room.
Creating Floating Shelves
Floating shelves offer a sleek look that pairs well with wood paneling.
What you’ll need:
- Lumber for the shelf and bracket (e.g., 1×8 or 1×10 pine or poplar)
- Wood screws
- Wood glue
- Wall anchors (if mounting into drywall without hitting studs)
- Drill/driver
- Measuring tape
- Level
- Sandpaper
- Stain or paint (optional)
- Router (optional, for creating a groove for the bracket)
- Floating shelf hardware (metal rods or specialized brackets)
Steps:
- Measure and Cut: Cut your shelf material to the desired length and depth. You can opt for a simple slab or router a groove on the back for the mounting bracket.
- Assemble (If Needed): If creating a hollow shelf to slide over brackets, assemble a top, bottom, and three sides, leaving the back open.
- Sand and Finish: Sand all surfaces smooth, starting with coarser grit and moving to finer grit. Apply stain or paint as desired and let dry completely.
- Install Hardware: Mount the floating shelf hardware securely to the wall, ensuring it’s level and anchored into studs or using appropriate heavy-duty drywall anchors. Check manufacturer recommendations for weight limits. This Old House has great tips on secure mounting.
- Attach Shelf: Slide the finished shelf onto the hardware. Ensure it’s flush against the wall and secure if necessary (some systems have small set screws).
Building a Simple Contrast Frame
Frame a window or a piece of art with contrasting wood or paint.
What you’ll need:
- Lumber for the frame (e.g., 1×4 or 1×6 in a contrasting wood or painted finish)
- Miter saw or hand saw with miter box
- Wood glue
- Brad nailer or small finishing nails
- Sandpaper
- Paint or stain
- Measuring tape
Steps:
- Measure: Measure the opening or area you want to frame precisely.
- Cut Frame Pieces: Cut four pieces of lumber using a miter saw or saw and miter box to create 45-degree angle cuts for each corner. Ensure your measurements are exact to create a snug fit.
- Assemble Frame: Apply wood glue to the mitered edges and assemble the frame pieces. Use a brad nailer or finishing nails to secure the corners while the glue dries.
- Finish: Sand the frame smooth and apply your chosen paint or stain color that contrasts with the paneling.
- Install: Attach the finished frame around the window, door frame, or artwork using small finishing nails or construction adhesive.
Common Questions About Decorating Wood Paneling
Let’s tackle some frequent concerns homeowners have when working with wood paneling.
Q1: Is it okay to paint over wood paneling?
A: Absolutely! Painting over wood paneling is a popular and effective way to update a room. The key is proper preparation, including cleaning, light sanding, and using a good quality stain-blocking primer. This ensures your paint adheres well and prevents the wood’s natural tannins from showing through. Many people find it completely revives their living space.
Q2: What style of furniture works best with wood paneling?
A: The best furniture style depends on the type of wood and its finish. For natural, warm wood tones, mid-century modern, Scandinavian, or bohemian styles often complement the organic feel with light-colored upholstery and natural materials. If the paneling is painted a neutral color, modern, farmhouse, or transitional styles work well. For bold, dark painted paneling, sleek, contemporary, or even minimalist furniture choices create a striking contrast.
Q3: How can I make a room with dark wood paneling feel brighter?
A: To brighten a room with dark wood paneling, focus on strategic lighting and color choices. Use multiple light sources like floor lamps, table lamps, and wall sconces with warm bulbs. Hang mirrors to reflect light. Choose lighter-colored furniture and decor – think creams, whites, light grays, and soft pastels. Incorporating plants and sheer curtains can also enhance the natural light. Painting the paneling a lighter color is also a highly effective option.
Q4: Should I fill the grooves between the wood panels before painting?
A: Generally, no. Leaving the grooves is part of the characteristic look of wood paneling, and painting over them generally maintains that visual detail. If you want a completely smooth, flat wall appearance, you could fill the grooves, but this is a very labor-intensive process and usually not necessary or desired for a typical update. Focus on good primer and paint application to cover the surfaces effectively.
Q5: What kind of flooring complements wood paneling?
A: Flooring that complements wood paneling often echoes the natural, warm aesthetic. Hardwood floors in a similar or complementary wood tone (e.g., lighter oak floors with medium-toned walls) create a cohesive look. Alternatively, consider neutral-colored carpeting or large area rugs to add softness and contrast. Tile or luxury vinyl planks in muted tones or stone-like patterns can also work well, especially in transitional or modern designs.
Q6: Are there ways to update paneling without painting or staining?
A: Yes, there are! You can enhance the existing finish with a good cleaning and conditioning treatment. Adding new hardware for doors or cabinets within the paneled wall can offer a subtle update. You can also strategically place large-scale art, mirrors, or install decorative lighting like sconces to draw the eye and add style. Another approach is to add contrasting elements like floating shelves or decorative molding around the paneled sections.
Q7: How do I choose art for wood-paneled walls?
A: When choosing art for wood-paneled walls, consider the overall style and color of the paneling. For natural wood, art with earthy tones, landscapes, or abstract pieces with organic shapes can blend well. For painted paneling, especially lighter colors, you have more flexibility. Bold, graphic art, black and white photography, or colorful pieces can create striking accents. Ensure your art is hung at eye level, and consider larger pieces or gallery walls to command attention and break up the expanse of the wood.
Conclusion: Your Wood-Paneled Living Room, Reimagined
Decorating a living room with wood paneling doesn’t have to be a challenge. Whether you choose to embrace its natural charm, give it a fresh coat of paint, or use strategic styling and lighting, there are countless ways to make your paneled space both beautiful and inviting. Remember, the goal is to create a room that feels comfortable, personal, and reflects your style. By following these tips, from careful preparation and priming to selecting the right furniture and accessories, you can transform any wood-paneled living room into a stylish sanctuary. Don’t be afraid to experiment and enjoy the process of bringing your vision to life!