How To Germinate Oak Acorns At Home (Step-By-Step Guide)
Germinating oak acorns at home involves careful collection, stratification (a cold period), and planting in suitable soil. Success hinges on using fresh acorns, providing the right moisture and temperature, and being patient through the germination process.
Understanding Oak Acorn Germination
So, what actually happens when an acorn decides to sprout? It’s a natural process that trees have been doing for ages. An acorn is essentially a seed, packed with everything a tiny new oak tree needs to get started.
It has a protective shell, called the pericarp, and inside is the embryo. This embryo holds the potential for roots and a shoot.
For germination to start, the acorn needs a few key things. First, it needs the right temperature. Most oak species need a period of cold.
This tells the acorn that winter has passed and it’s safe to start growing. This cold period is super important. Without it, the acorn might not even try to sprout when you plant it.
Next, it needs moisture. Think of it like a dry sponge. It needs to soak up water to wake up the embryo.
Too much water can be bad, though. It can cause the acorn to rot. So, finding that perfect balance is key.
Air is also needed for the developing roots and shoot.
When all these conditions are met, the acorn will start to swell. Then, a tiny root, called a radicle, will push out first. This root grows downwards into the soil, anchoring the new tree and searching for water and food.
Shortly after, a shoot will emerge, pushing upwards towards the light. This is your brand new oak sprout!
My First Oak Tree Adventure
I remember the first time I really tried to grow an oak. It was a crisp autumn day, and I was walking through a local park. The ground was covered in acorns from a big oak tree.
I felt this urge to try and grow one. I picked up a handful, stuffing them into my pocket. I didn’t really know what I was doing, though.
I just thought I should plant them.
I got home and grabbed some old pots. I filled them with dirt from the garden and just pushed the acorns in. Then I watered them.
And I waited. Weeks went by. Nothing happened.
I felt a bit disappointed. I thought maybe those acorns just wouldn’t grow. It turns out I missed a crucial step: that cold period they need.
It was a good lesson.
That experience taught me that nature has its own timeline and needs. It’s not just about planting a seed; it’s about understanding what that seed needs to feel it’s the right time to grow. It made me realize that with a little knowledge, I could actually make it happen.
That was the spark that led me to learn more about germinating acorns properly.
When to Collect Your Acorns
Best Time: Fall is the prime time. Look for acorns when they are starting to fall naturally. This is usually from late September through November, depending on your region.
What to Look For: Choose acorns that are plump and firm. Avoid any with cracks, holes, or signs of mold. A healthy acorn is a good start.
Parent Tree Health: Ideally, collect acorns from healthy, mature oak trees. Strong parent trees often produce stronger acorns.
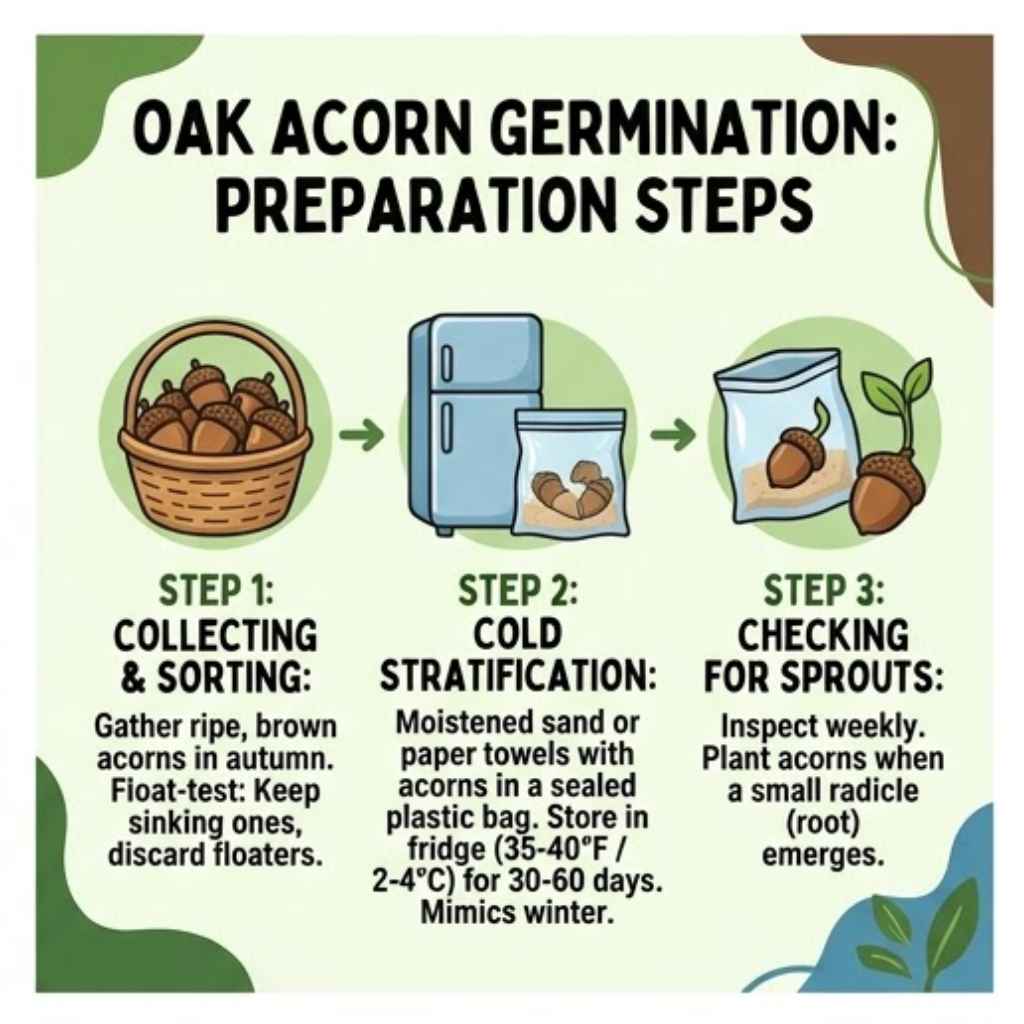
Step 1: Collecting Your Acorns
This is the fun part! Head outside when the weather starts to cool down in the fall. Oak trees, depending on the type, will start dropping acorns.
You want to look for acorns that have already fallen. Don’t pull them off the tree. The ones on the ground are usually ready.
When you find them, give them a quick inspection. You want acorns that are full and hard. Gently press one with your fingernail.
If it feels soft or you can easily poke through the shell, it’s probably not good. Also, look for any tiny holes. These can mean insects have been feasting inside, and that acorn won’t grow.
A good test is the float test. Fill a bowl with water. Drop your collected acorns in.
The ones that float are usually bad. They might be hollow, dried out, or damaged. The ones that sink to the bottom are your best bet.
They are likely viable and have a good chance of germinating.
You don’t need hundreds of acorns, but collecting more than you plan to plant is wise. Not all of them will be good, and some might not sprout even if they look perfect. Aim to collect a good variety.
Different species of oaks have different acorn shapes and sizes.
Acorn Quality Check (The Float Test)
- Fill a bowl with cool water.
- Gently place your collected acorns into the water.
- Wait a few minutes.
- Sinkers: These acorns are heavy and full. They are good candidates for germination.
- Floaters: These acorns are likely hollow, dried out, or damaged. They are usually not viable.
- Discard the floating acorns. Keep the ones that sink.
Step 2: The Cold Treatment (Stratification)
This is the step I missed at first! Most oak trees need a cold period to break dormancy. This mimics winter.
It signals to the acorn that it’s time to wake up and grow. This process is called stratification. For most acorns, you’ll need about 1 to 3 months of cold.
Here’s how to do it. Get a resealable plastic bag or a small container. Put some damp (not soaking wet) sphagnum moss or peat moss inside.
You can also use damp paper towels. Gently place your good acorns in the bag or container with the moss. Make sure the moss is moist, like a wrung-out sponge.
Seal the bag or close the container. Now, put it in your refrigerator. The crisper drawer is usually a good spot.
You want a temperature that stays consistently between 35°F and 41°F (1°C and 5°C). This is cold enough to trigger germination but not so cold that it freezes the acorns.
Check on them every week or two. You want to make sure the moss stays damp. If it looks dry, add a little more water.
You might see a tiny white root starting to emerge from some acorns. That’s a good sign! It means they are ready or almost ready to be planted.
Be patient during this stage. Some acorns might sprout faster than others. If you see mold starting to grow, remove the affected acorns and the moldy moss immediately.
You can then
Stratification Essentials
Goal: To mimic winter and prepare the acorn to sprout.
Duration: 1 to 3 months for most common oak types.
Medium: Damp sphagnum moss, peat moss, or paper towels.
Location: Refrigerator (crisper drawer is ideal).
Temperature: 35°F – 41°F (1°C – 5°C).
Maintenance: Check moisture weekly; remove any moldy acorns.
Step 3: Planting Your Acorns
Once your acorns have had their cold nap and some might even be showing a little root, it’s time to plant them! You can use small pots, seed trays, or even recycled containers like yogurt cups. Just make sure they have drainage holes at the bottom.
Water needs to escape.
The best soil to use is a good quality potting mix. You can also mix in some perlite or vermiculite. This helps with drainage and aeration, which is important for young roots.
Avoid using heavy garden soil, as it can become too compacted and prevent growth.
Fill your pots with the potting mix. Leave about an inch of space at the top. Now, gently plant your acorns.
The rule of thumb is to plant them about 1 inch deep. If you see a root already, point that root downwards into the soil. Then, cover the acorn lightly with soil.
After planting, water the soil thoroughly. You want it to be moist, but not waterlogged. The soil should feel like a damp sponge.
Place the pots in a location where they will get bright, indirect light. A sunny windowsill is often perfect. Avoid direct, harsh sunlight, which can scorch young seedlings.
Keep the soil consistently moist. This is very important. Don’t let it dry out completely.
But also, don’t let it become soggy. You might need to water them every few days, depending on how warm it is and how fast the soil dries. A gentle spray from a watering can or misting bottle works well.
Planting Tips
Containers: Use pots with drainage holes. Yogurt cups or small plastic containers work too.
Soil: Use a light potting mix. Add perlite for better drainage if needed.
Depth: Plant acorns about 1 inch deep.
Root Direction: If a root is showing, plant it facing downwards.
Watering: Water gently after planting until the soil is evenly moist.
Location: Bright, indirect light is best.
Step 4: Waiting for Sprouts
This is where patience really comes into play. Germination times can vary a lot. Some acorns might sprout in as little as a week or two after planting.
Others might take several weeks, or even a couple of months. Some might never sprout at all.
Keep a close eye on your pots. You’re looking for that first sign of green. It might be a tiny stem pushing through the soil.
Once you see a sprout, you know you’re on the right track! Congratulations, you’ve got a baby oak tree!
Continue to keep the soil consistently moist. As the seedling grows, it will need more light. If you notice the stem becoming long and spindly, it might be stretching for more light.
You can move it to a slightly brighter spot, but still avoid harsh, direct sun.
Most oak seedlings can stay in their small pots for their first year. As they grow, they’ll develop a stronger root system. You might notice tiny leaves starting to unfurl.
This is a sign of healthy growth. Don’t be alarmed if the growth seems slow at first. Oak trees are known for their slow start.
In real homes, people often use these small pots. They keep them on a sunny windowsill or in a bright corner of a room. The goal is to keep the environment stable.
Avoid sudden temperature changes or letting the soil dry out completely. Your little oak needs consistent care during this delicate stage.
Real-World Oak Tree Scenarios
Let’s think about where you might find acorns and what makes them sprout in nature. In the wild, acorns fall in the autumn. They land on the forest floor.
They are then covered by leaves, pine needles, and other debris. This natural cover helps protect them.
The cold of winter comes. The acorns sit there, dormant. The moisture from rain and snow keeps them from drying out.
The leaf litter acts like insulation. It keeps the temperature more stable. When spring arrives, the rising temperatures and increased moisture signal the acorns to start growing.
Squirrels and other animals play a role too. They bury acorns for later. Many of these forgotten acorns end up germinating in the spring.
This is how oak forests spread. The animals are unintentional gardeners!
The soil type matters. Natural forest soil is rich in organic matter. It drains well but also holds moisture.
This is ideal for acorn germination. When we try to grow them at home, we aim to mimic these conditions. Good potting soil is our best bet for recreating that healthy environment.
Natural Germination Factors
Seasonal Cycle: Acorns rely on autumn collection and winter dormancy.
Protection: Fallen leaves and debris shield acorns from extreme temperatures.
Moisture: Winter snow and spring rains provide essential water.
Soil Nutrients: Rich, organic forest soil supports seedling growth.
Animal Activity: Squirrels and other creatures help disperse and bury acorns.
What This Means for Your Home Garden
So, what does all this tell us about growing acorns at home? It means we need to replicate nature’s steps as closely as possible. The stratification period is non-negotiable for many oak species.
Skipping it is like asking a bear to wake up in December.
When you see that first sprout, it’s a tiny miracle. But it’s still very fragile. It needs consistent care.
Think of it like a baby. It needs the right conditions to thrive. Too much sun too soon can burn it.
Letting it dry out can kill it.
Don’t expect giant oak trees overnight. Growing an oak from an acorn is a long-term project. These trees grow slowly but steadily.
The first year is all about establishing a strong root system. The visible growth above ground might seem modest.
If you’re planting them in pots, you’ll eventually need to transplant them. When the seedling outgrows its pot, usually after a year or two, it’s time for a bigger home. This could be a larger container or directly into the ground if you have a suitable spot.
Knowing when to worry is important. If your acorn never sprouts after a few months, it might have been non-viable or the conditions weren’t quite right. If a sprout appears but then wilts or turns yellow, check the moisture levels and light.
Sometimes, pests can be an issue, though less common indoors.
Simple Checks for Your Sprout
Here are a few things to check regularly to make sure your baby oak is happy:
- Soil Moisture: Stick your finger about an inch into the soil. If it feels dry, it’s time to water. If it feels wet, wait a bit longer.
- Light: Is the sprout reaching too tall and thin? It might need more light. Is it getting scorched? It might need less direct sun.
- Pest Watch: Look for any tiny bugs or white fuzzy spots. Address them quickly if you see any.
- Root Check (Carefully): If you’re repotting, look at the roots. Are they white and healthy, or brown and mushy? Healthy roots are a great sign.
Tips for Success
Here are some tips that can really help your acorn germination journey:
Use Fresh Acorns: Acorns collected in the fall of the current year are best. Older acorns lose viability quickly.
Species Matters: Some oak species are easier to germinate than others. White oaks and red oaks are generally good choices for beginners.
Don’t Overwater: This is a common mistake. Too much water can lead to rot and fungal issues. Aim for consistently moist, not soggy, soil.
Be Patient: Germination can take time. Don’t give up if you don’t see results right away. Keep providing the right conditions.
Consider Outdoor Sowing: If you have a safe spot in your yard, sowing acorns directly into the ground in the fall can be very successful. Nature takes care of the stratification for you.
Quick Scan: Acorn Planting Success Factors
Factor | Importance | Action
Acorn Freshness | High | Collect in fall, check for plumpness
Stratification | High | 1-3 months cold, damp medium
Soil Drainage | Medium | Use potting mix, ensure holes
Moisture | High | Consistently moist, not soggy
Light | Medium | Bright, indirect light
Patience | Very High | Germination takes time
Frequently Asked Questions About Germinating Oak Acorns
Do I have to stratify all oak acorns?
For most common oak species found in North America, yes, stratification (a cold period) is essential. This process mimics the winter dormancy they need to break before they can sprout. Some species from warmer climates might not require it, but if you’re unsure, it’s always safer to stratify.
How long does it take for an acorn to sprout after planting?
This varies greatly. Some acorns might sprout within a week or two of planting after stratification. Others can take several weeks, or even a couple of months.
It depends on the oak species, the freshness of the acorn, and the environmental conditions.
What if my acorn sprouts a root but no shoot?
This is very common and a great sign! The root is the first thing to emerge. Just plant it in soil with the root pointing down.
The shoot will typically emerge from the top of the acorn soon after, pushing upwards towards the light. Keep the soil moist and provide indirect light.
Can I plant acorns directly in the ground outside?
Yes, absolutely! In fact, this is how acorns germinate naturally. If you collect acorns in the fall, you can sow them directly into a prepared patch of soil in your garden.
The ground will provide the natural cold stratification they need over winter. Just make sure the spot is safe from animals that might eat them.
What’s the best type of soil for germinating acorns?
A light, well-draining potting mix is ideal. You can buy seed-starting mixes or general potting soils. Adding a bit of perlite or vermiculite can improve drainage further.
Avoid heavy garden soil, as it can compact easily and hinder root development.
Why did my acorns rot instead of sprout?
Rotting usually happens because of too much moisture and poor air circulation. Acorns need to be kept damp but not waterlogged. Ensure your containers have drainage holes.
If you’re stratifying, make sure the moss is only damp, not soaking wet. Remove any moldy acorns immediately.
Final Thoughts on Growing Oak Trees
Growing an oak tree from an acorn is a wonderful way to connect with nature. It teaches patience and the beauty of slow, steady growth. With a little understanding and care, you can bring this ancient process into your own home.
Enjoy watching your tiny acorn transform!