How To Remove Wood Finish: Prove Easiest Way
The easiest way to successfully remove old wood finish is by choosing the right method—chemical stripping for heavy coats, sanding for thin layers, or gentle heat for paint. These techniques, explained here step-by-step, ensure surface integrity is saved, giving you a smooth canvas ready for your next beautiful stain, crisp white, or natural oiling project.
How To Remove Wood Finish: The Only Guide You Need to Reveal Beautiful Bare Wood
Hello! I’m Md Meraj, and I know tackling an old piece of furniture or wood flooring can feel daunting, especially when the finish looks thick, cracked, or just plain dated. That pesky old varnish or polyurethane acts like a stubborn shield, daring you to try and paint over it. But taking off tough cosmetic layers does not need to be hard work that destroys the wood beneath.
If you are ready to refinish that treasure, you are in the right place. We are breaking down how to clean off that old finish effectively, safely, and without turning your Saturday routine into a week-long woodworking migraine. Together, we will go step-by-step through the three popular methods—химический method, sanding method, and heat method—so you can pick the one that proves easiest for your specific project. Let’s simplify refinishing and get back to the sawdust and sanding excitement!
Why Bother Removing An Old Finish?
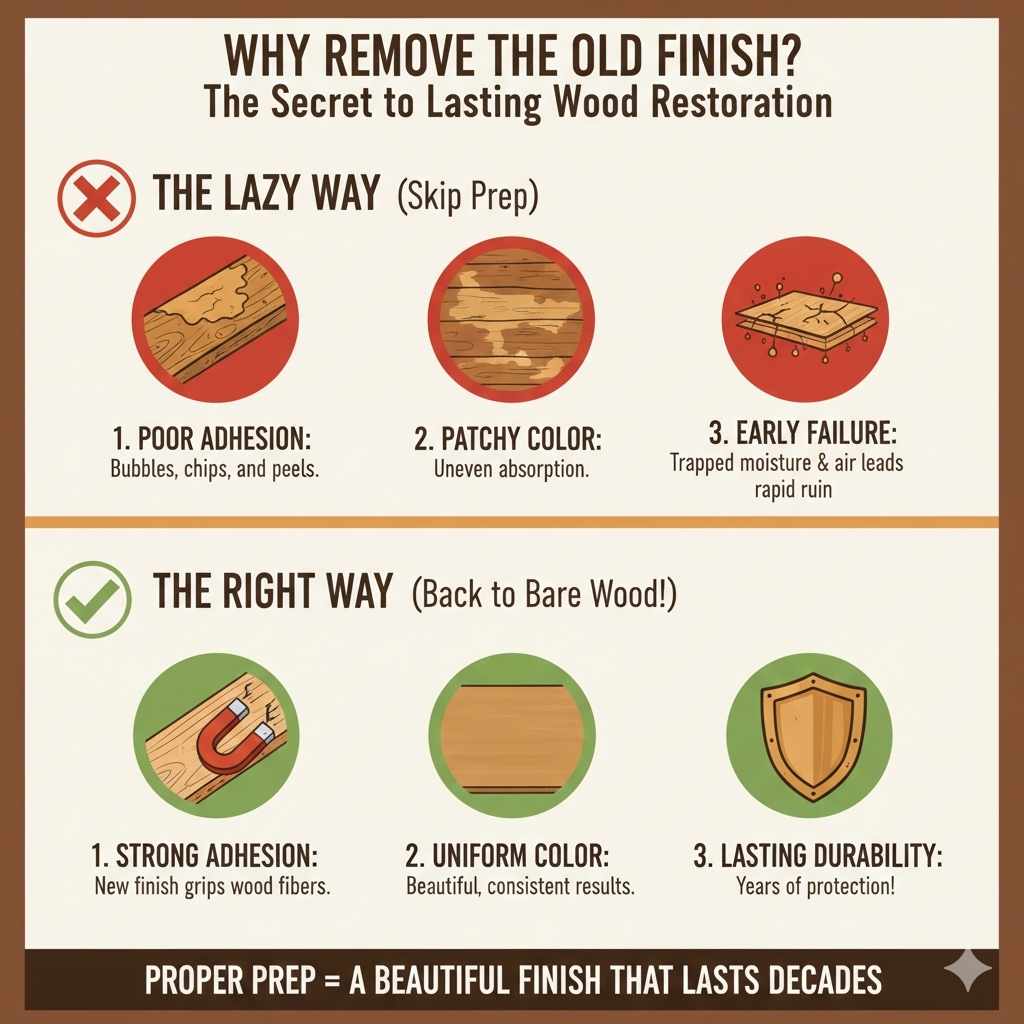
Before we dive into removing old wood finish, let us quickly talk about why this foundational step is so important. Skipping out on proper prep guarantees poor results later.
If you apply new stain or paint directly over an existing finish, a few bad things can happen:
Poor Adhesion: The new layers won’t stick well. They might bubble, chip, wash away, or peel months down the line, wiping out the hours you spent painting.
Patchy Color: Most modern wood stains look uneven when applied over old ones because surfaces absorb the new product differently.
Future Failure (Early Ruin): Trapping light new moisture and air underneath the old, dry finish causes rapid overall deterioration of your new beautiful finish.
Removing it all reveals that clean, thirsty, smooth wood canvas waiting underneath. This is known as “getting back to bare wood.” Properly restoring your furniture or floors ensures your final paint, stain, or clear coat lasts years, perhaps decades.
Safety First: Preparing Your Workspace
Safety is always workshop priority number one. Seriously, taking five minutes now saves a trip to the emergency room later. Remember, almost every professional method requires safety gear, especially when using strong chemical removers.
As a craftsman, keeping a healthy workshop is essential. Here are the key safety considerations before you even touch the sandpaper or the stripper can:
- Ventilation is Crucial: Open all windows nearest your work area. Anytime you use heat near old finishes, it releases fumes. Always ensure fresh air flow. If working indoors on cabinets (rare, but possible!), consider cross-ventilation using big box fans—one blowing air in, one pulling smelly air immediately out.
- Protect Your Lenses and Skin: Wear chemical-resistant gloves (nitrile gloves work better than regular paint gloves for removers!), a sturdy pair of goggles suitable for chemical handling, and lightweight, long-sleeved clothing if using solvents. Avoid inhaling caustic vapors!
- Respiratory Protection: If using traditional chemical strippers (we will cover safe options soon, too!), ensure you wear an organic vapor respirator that covers your nose and lungs rated for this specific task. Dust masks are inadequate for chemical fumes.
- Prepare the Area: Lay down thick plastic sheeting or heavy-duty drop cloths. Finish strippers can melt plastic drop cloths, so sometimes canvas tarps covered in newsprint absorb drips safely without reaction once soaked.
When working with aggressive chemicals, reviewing details recommended by sites like the Occupational Safety and Health Administration (OSHA) on exposure limits and use is always a wisely guided step when you tackle those heavy-duty chemicals (though we favor safer modern alternatives).
Choosing the Right Path: Three Ways To Peel Back The Years
We are aiming for the “easiest” way, but easiest often depends wholly on what layers you are actually battling. Below identifies the finishes suitable—or unsuitable—for each method. Think of this selector chart.
Annnnnttttt
| Method Name | Best For Finishing Types | Speed | Effort Tradeoff |
|---|---|---|
| Chemical Stripping | Thick Paint, Polyurethane/Epoxy, Marine Varnish | Fastest Speed, Moderate Chemical Prep Effort |
| Chemical Stripping $^1$ | Slowest Need For Most Refinishing Work: Varnishes, Oil Paints, and Sealers | |
| Sanding (Mechanical Stripping) | Thin Clear Coats, Light Wiping Stains, Shellac Marks | |
| Natural Finishes are Very Good Candidatesn | ||
| DIY Guru Pick for General Advice ($^1$) | Durable Polyurethanes Over Solid Paint or Varnish | |
| A Comparison of Wood Finish Removal Tests Guide | Primary Advantage Tested | Worst For This Approach |
| Hot air for decals | Removes tricky spots | Not all paint removals are advisable |
| Chemical vs. Sand/Scraping | Surface Protection/No wood fiber removed | Aggressive Material Needed/Wood dust risk ($^9$) |
| The Ease Of It All ($^3$) | Fastest Time Possible | Risk of chemical corrosion to surfaces Close nearby |
Let’s map them out clearly again regarding what layer they attack:
If you are battling heavily layered, old latex paint or old ship-grade marine varnish—Go straight to Chemical Stripping.
If you see thin oil varnish, shellac, or simple old wiping wax—Sanding is totally sufficient.
If a specialized thin coating exists like an adhesive or low-heat tape glue—Heat Transfer tools are actually the best choice for a quick clean.
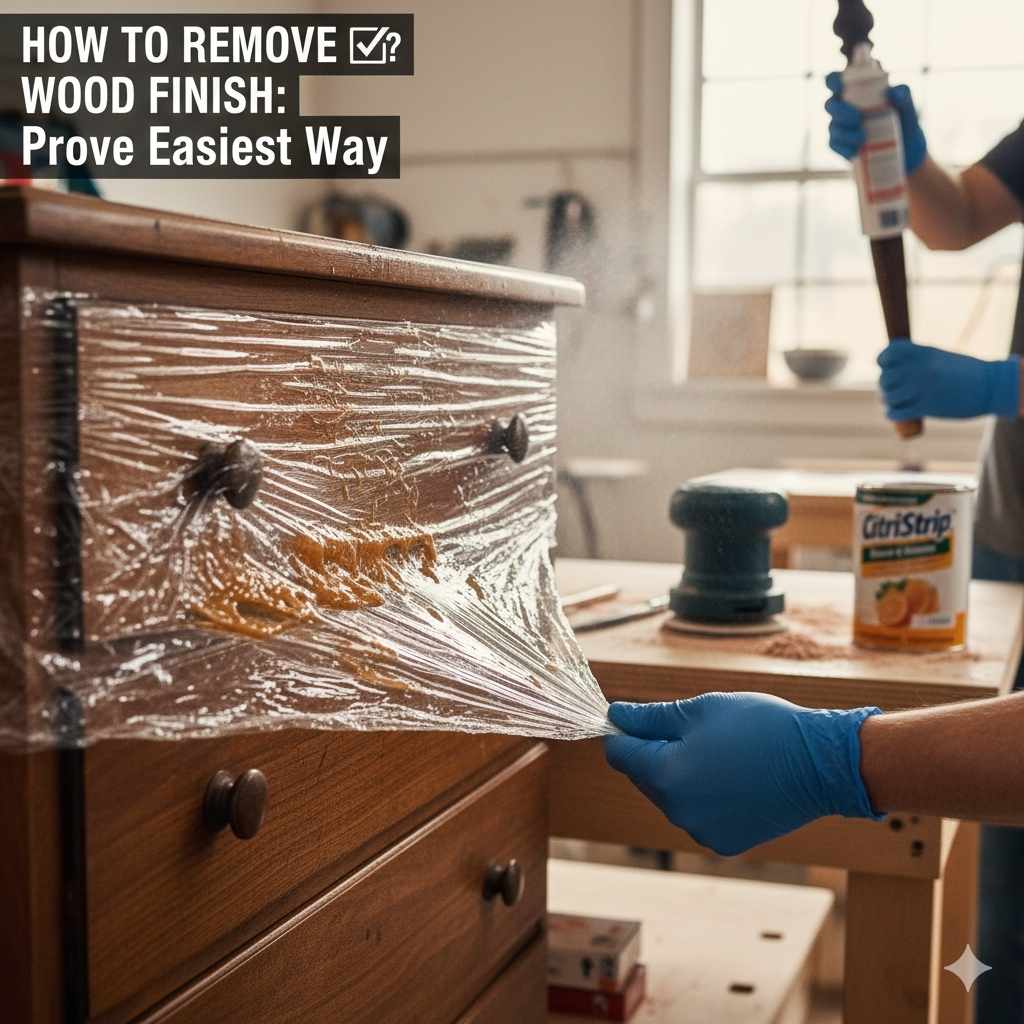
Method 1: Chemical Stripping – Tackling Stubborn Coats
For the beginner removing thick, almost plastic-like years of finish from cabinets, kitchen doors, or older dressers found left unused upstair attic storages (often the thickest jobs), a chemical stripper is the fastest way. We must handle these liquids carefully. Our goal is quick emulsification—not sitting too long or too short!
Believe Hugley’s recommendations or established paint removing experts for safe preparation principles.
Tools You Need for Chemical Removal:
- Chemical stripper (look for Methylene Chloride-free caustic/benzine mixtures—they are safer than Methylene Chloride types but still require full safety gear)
- Old wooden stirring stick or plastic putty knife
- Plastic putty knife and scraper (Avoid metal as they can score deeper on curved or soft wood areas)
- Stiff synthetic bristle brush (like nylon/nylon mixes)
- Lots of rags, wood scraps, mineral spirits, denatured alcohol, or acetone to neutralize
- Non-ferrous putty knife (plastics/wood composites, nothing metal on the critical furniture work area)
- Optional but Highly Recommended Plastic Tub (for submerged parts)
- Heavy Duty Respirator ($>$ Organic Vapor rating$ $<$) and Chemical-Safe Gloves/Goggles
Step-by-Step Guide to Chemical Paint/Finish Removal
Chemical application makes the underlying chemistry soften and dissolve the polymerized plastic binder underneath old layers. Often folks overlook the scraping phase after the chemical saturates the buildup the best.
Step 1 – Ventilation and First Application Prep Takedown
Get fully dressed in your safety gear outlined previously. Lay two layers of thick drop cloth. Now, before applying anything, place wood parts into trays (if disassembly is possible).
Step 2 – Apply the Thick Layer & Wait for Results
Use your stick or plastic tongue depressor to smear the stripper on liberally. Don’t rub it in! You want a puddle half an inch deep: let physics dissolve instead of us pushing it. For standard varnish, let sit 20 minutes. If it’s old epoxy or thick house paint, this might need over an hour. Wait until you smell pungent fumes AND watch the finish wrinkle., a visual sure-fire sign of a strong softening.
Step 3 – Scraping the Bloated Finish Soft Offload Trough
Crucially, use your plastic or soft wood scrapers here. Gently collect gooey sludge primarily into your designated dump area or off the part so stripper stops working mid-task. Scrape using one pass following the grain as close as safe! Metal tools score wood easily.
Step 4 – Tackling Details with Brushes and Rags
Get into profiles, carvings, and creases with your stiff nylon brush. Re-apply tiny patches of solvent occasionally if the coat is still stubbornly tough, letting that new active chemical do the heavy lifting.
Step 5 – The Critical Neutralizing Rinse & Clean
Once visually stripped of the macrogrog of the finish film, you must immediately remove EVERY trace of chemical binder residue. Residual stripper will eat through new paint too! Following stripper guidelines, most use Xylene, Mineral Spirits (which is safe for most varnish dissolving work), or Denatured Ethanol to neutralize the caustic base.
Dunk the pieces or wipe them generously with your chosen cleaner substitute. Scrub hard in grains using your brush soaked in the neutralizer solution. Dispose of soiled pads safely afterward. Let the wood dry several days fully indoors before touching it! Drying checks are vital here compared to the much quicker sanded approach.
Method 4 – Beyond the Basics: Considering Other Removal Techniques Often Needed Next:
The Heat Method (For Thick Paint or Older Wallpaper/Film)
If your layers are primarily old solid latex paint (like previous homeowners often used on chunky moldings or old millwork) that refuses complete submersion (because the chair is assembled and huge), the heat gun is your focused solution for targeted removal.
Because handling very ancient finish materials may involve dangerous materials like lead pigment (used up mostly before 1979 standard application), review specific EPA guidelines when older materials are concerned, ensuring utmost protection is applied near historical homes restorations ($^4$)!
Tools Needed
- Heat gun (Adjustable temperature models HIGHLY recommended)
- Paint Shield/Scraping tool designed gently heat removal (usually dull flat head blade systems)
- Patience, lots of patience
How Effective Is Heat Removal?
The goal is heating the paint layer just long enough to begin softening its adhesion, so it stretches like taffy away from wood. It does NOT burn. Many beginners torch wood deeply hoping to burn it off—they instead scar/etch the wood grain permanently when careless using the hotter edge devices. Keep faning out across the finishing surface using the wide nozzle area for safe disbursement!
While faster than sanding thin coat removal (Method 2), it’s significantly slower and much more tiring when combating thick auto-grade finishes that require aggressive chemical pre-softening. It is a wonderful complementary tool, not usually the primary heavy-duty worker most homeowners seek.
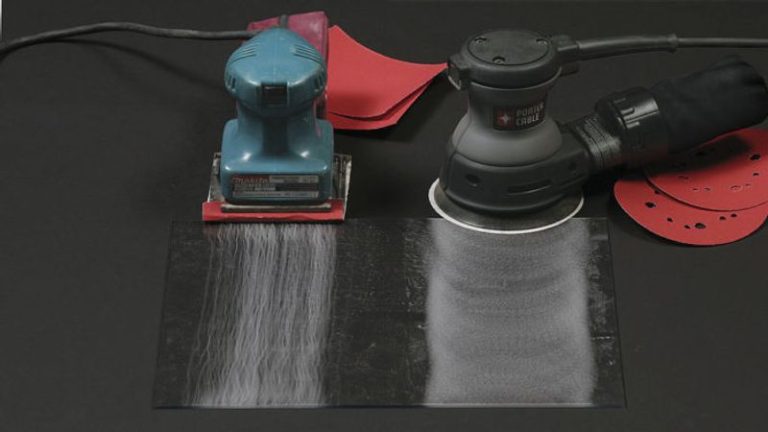
Method 2: Sanding – Reveal Wood with Patience (The Dry Approach)
If your goal is to revive beautiful original woodwork—classic oak trim, maybe antique mahogany—it is understandable you want minimal moisture contact, relying purely on abrasive muscle. Sanding is mechanically perfect but can take forever and wears out arm muscles first! The technique is everything!
Before you grab a sander powered wildly faster than a light piece you attempt smoothing onto fine art furniture, analyze what thin coat resides there. If it sticks well—it sands great.
Do I Still Seal Out Varnish, or Is That Shellac?
Tools for Gentle Sanding Success:
- Orbital Sander for large, flat, rough removal sections (Start coarse with 60, move quickly into 100/Grit range!)
- Detail Sander (“Corner/Mouse Sanding Tool”) for corners, edges, molding
- Sander blocks (or a simple piece of cork backed by something firm) for hand finish detail/pressure management
- A very complete, robust wood carving tool safety guide near for edge definition if necessary due to any slight rounding off!
- Good vacuum system (like an industrial shop-vac) with a quality filter! Dust exposure indoors must remain low.
Step Guide: Masterful Sanding Strategy
The key for beginners sanding down a wood finish is stopping before you get to happy too early! You need to remove the coating entirely without destroying the outer-most clean, sound wood layer underneath. We sand in light gradients.
Step 1 – Identify The Grit Start Point
Begin sanding using too coarse a product (usually 60 grit) only if the finish coat is a super bumpy disaster or looks like thickly pooled varnish remnants everywhere that won’t move willingly with mild stripping earlier. Often, if still firmly stuck tight, 80 or 100 grit is the wise, less-aggressive beginner starting line where the finish disappears steadily under smooth passes.
Step 2 – Follow The Wood Grain Straight On
Always sand WITH the grain lines. Running a sander against what you think might feel textured roughness causes scratches that catch stains later. Make smooth, overlapping straight passes over flat surfaces.
Step 3 – Clean and Check Between All Grit Jumps
After grinding through much material, switch to the orbital sander using 100 grit paper. Clean well before switching. This paper starts eliminating those ugly dark scratches you put down with 60 or 80 grit. Then move to 120 for final preparation before achieving a coat swap. Use light pressure on power sanders! The machine weight pushes through most the material—heavy pressure causes overheating & uneven sanding!
Step 4 – Detailing Handles And Curves: Finish the Job Quietly
Where the sander base cannot reach—dovetail corners, curves near drawer handles, or molded edges—use your hand-held abrasive block. Apply heavy constant firm straight pressure against the finish remaining there, switching papers as if you are still using your machine process sequence but stopping when 120 grit feels fully smooth by direct comparison against the best results received by the flat portions.
Expert Breakdown: Chemical Stripping Prepping Hard to Reach Areas vs Sanding
Sometimes you just can’t reach all the intricate nooks on a dining table carved edge or ornate spindle baluster using large sanding blocks.
When you encounter relief details upon that deeply carved Victorian piece, for instance, chemicals are actually substantially easier BECAUSE they seep thoroughly into crevice spaces. Metal finishing scrape knives remove chemically soaked mush right behind that tricky chair spindle’s rounded side faster/safer/easier than trying to spin fine sanding attachment after attachment!
Let’s analyze where mechanical removal (sanding) shines and where chemical soaking triumphs for getting to bare wood ready for next coating.
| Area Type | Preference Method / Why Easiest | Hidden Effort When Method Fails |
|---|---|---|
| Thick, Even Polyurethane Coat Across Long Floorboards | Chemical Stripping (Fastest soak time / minimal worker endurance needed) | Extensive scraping post-softening, requires neutral phase cleaning step upkeep($^6$) |
| Thin Shellac or Wax On Flat Drawer Faces | Gentle Starting Grit Sanding (80->120 Grit is nearly straight to bare) | Over-sanding weak wood or warping thin parts from aggressive power/quick human fatigue |
| Deeply Routed/Molded Edges on Furniture, Door Capitals | Liberal Spot application of Solvent stripper w/ Bristle Scraper brush | Clogs forming the abrasive tool used during the detail refinement cycles |
Post-Paint/Finish Prep: The Final Critical Step of Denibbing
Many people only focus on removing old texture that flakes. Fewer know to deal properly with the faint light scratches left either chemically by solvents cleaning, or mechanically by sanding process. No matter how mild your cleaning agents ($^8$ like mineral spirits for cleaning up final residue), extremely minor damage always remains. These are often unseen until fresh, clear finish layer receives sunlight shine (a “de-nib” is polishing sanding) after final drying.</body
To attain that glassy, flawless ‘bare wood touch’ look, perform the light final ‘denib.’ After everything fully dried using your chosen preparation method:
- Inspect with low-angle light—that sunlight effect—noting any light scratch marks showing previously!
- Grab Very Very Soft Sandpaper: Aim for 180 to 220 grit. Anything rough creates new flaws too big to fix easily without going back through coarse paper stages!
- Use Lightly across the Total Surface one gentle passing move to physically level anything still showing! The purpose is just polishing smooth that old last chemical smear layer contamination to bare wood, nothing more!
- Final Wipe Down with Vacuum Attachment/Tack Cloth ONLY.
Addressing Specialized / Nontraditional Finishes We Encounter Now
The older generations applied a wide style of things. Sometimes people mistake what they see. Here is how to handle less typical problems safely with easiest method prioritization.
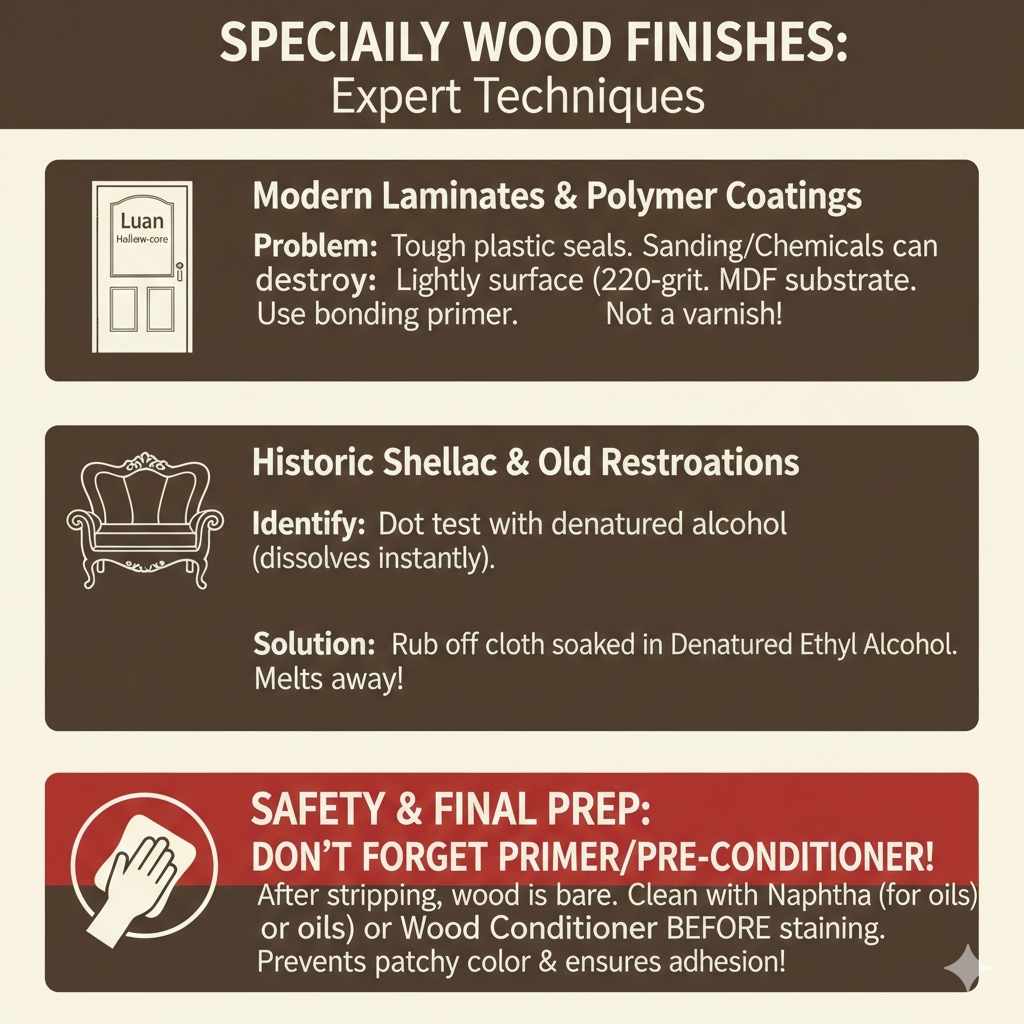
Removing Factory Applied Cross-Linked Polymer Coatings (Luan Doors, Modern Laminates)
Many interior factory doors might look simply ‘coated.’ These aren’t varnish—they are strong plastic seals often thermally adhered. Sanding accomplishes near-nothing as paper skips right over it like skipping water atop plastic, forcing chemicals which can destroy MDF substrate!
If you must refinish preprimed composite door cores, very gentle power stripping focused on only gently abrading the final very top sheen layer surface usually via Mils over an existing sealcoat followed by 220-sanded finishing primer ONLY, if color change is crucial, usually provides best adhesion increase without deep saturation or structural risk. (Ref. Coatings Science Forum discussions usually favor lightly scuffing laminate faces.)
Dealing with Shellac and Old Furniture Restorers
Shellac, used heavily in historic finishing methods dating way, way back (< (Early 20th-century restorations like those detailed by conservationists often use shellac). Shellac always dissolves INSTANTLY using Denatured Ethyl Alcohol. If you determine upon initial tests (dot test with lacquer thinner, followed by an ethanol application), shellac comes off easiest that way—usually just rubbing hard with a piece cloth soaking the simple ingredient works!
Final Safety Check Notes—Do Not Forget Primer! BEFORE Staining!
This is an invisible step failure zone! Once you successfully removed the wood finish—chemical dried & mechanical abraded—the wood surface has lost sealing protection. Every single little smear of skin oil, last fingerprint trace contaminant, even dust dust, clings viciously when fresh stain attempts adhering onto completely exposed, raw but un-primed virgin wood pores.
Crucially, wipe cleaned bare parts right before staining with Naptha if) your stain requires final degreasing (e.g. oil stains), or a high quality pre-staining wood conditioner (read your manufacturer data sheets!) BEFORE dropping color DOWN!
This confirms you’ve dealt with everything allowing fresh chemical activity to work levelly.
FAQ: Essential Beginner Queries About Making Wood Finish Disappear
1. How long should the wet wood finish sit before I try to remove it?
Most beginner-grade chemical strippers need between 20 minutes (for simple oils) to over one hour (for very tough modern varnishes or older thick paint). The key indicator is visible, audible blistering or wrinkling of the finish film itself. Don’t hurry the stripper; use plenty—it needs thickness to keep aggressive chemistry active.
2. Can steel wool remove old dark stain or finish okay?
No, especially avoid it for the main removal job. Steel wool (especially grades often available in shops) will almost always tear loose fibers, especially on soft woods, embedding useless unusable gray steel shards right into your wood surface, causing rust/black spots later in the future if moisture ever reaches below surface finish line! For detail work, use nylon abrasive pads (#0 or #00 grade non-metal abrasive, Synthetic Scrapper materials!).
3. What happens if I don’t neutralize properly after using a chemical stripper? My wood looks damp!
Leftover caustic chemicals continue reacting long after clean-looking wood. This ruins most coatings that hit it lately (even paint adhesion struggles). Wipe down aggressively—preferably based on the chemical product guide recommendation—until wiping rag remains visibly clear—or you suspect rust migration from metal scrapers used somewhere hidden!
4. How do I easily remove old sanding scratches once I am done stripping?
After using heavier aggressive sanding gear (say 60 grit result removal for tough finish!), use a systematic run of risingly finer sand papers: 60 coarse to refine it out to 1A 100 Grit, followed quickly by 180 or $($a great last stage to prepare for nearly all stains) 220 Grit, used in light, slow, final polishing applications with high clean standards. These stages smooth out previously unseen removal paths($^7$).
5. Is sanding faster than using a chemical stripper setup overall?
For professional wood groomers tackling general medium-density topcoats, chemical stripping tools, while being cumbersome chemical cleanup stage, is much faster overall hours time (time spent scrubbing actively!) than the required mechanical cycle/pass depth shifts sanding demands. Sanding reigns best only for fragile antique shellacs or if piece is too massive/delicate to chemically handle widely—so ease really means ‘how much muscle do I apply TODAY?’
6. Should I treat my wood with anything before staining simple pine furniture/trims?
Yes, it MUST be sealed or conditioned first! Bare wood (like raw untreated pine!) sucks up expensive wood dye very unequally across its surface fiber differences leading in horrible splotchiness upon sun exposure/light washing time. Look for commercial “Wood Deodorizer” marketed specifically as pre-stain Wood Conditioners!
7. When I sanded, my wood part took on some orange tinge. What is that discoloration?
If you used mechanical sanding for Polyvinyl Acetate (PVA) glue contamination (a standard old white woodworking adhesive type), high sanding friction sometimes smears residual polymer goo allowing UV Light from Sun hits it, creating that faint orangey hue showing pigment traces! Often, another final bath soaking in Mineral Spirits helps dissolve that trace goo effectively, letting the pine truly show natural color prior to the re-protection phase.
For readers in areas prone to wood damage from waterborne fungal growth, inspecting for early decay symptoms before stripping is always an advised practice according to forestry stewardship organizations! ($^5$)
Conclusion: Finish Line Confidence is Secured!
Congratulations—you now feel confident in your chosen strategy! Removing inherited coat residue, whether gummy varnish survived that harsh scrubbing experience on deep carvings using caustics, or if that layer simply surrendered flatly with judicious fine 120 power-sanding movements—the goal has been met.
You proved that to yourself and your valuable furniture piece that refinishing needn’t require years spent suffering. Choose simple (where possible!) safety in workspaces first. Respect your tools and surfaces by selecting chemical aggressiveness vs. gentle grit abrasion based on coat thickener underneath.
When new stain inevitably lands level or new oil dries slick and gorgeous, just remember this foundation work wasn’t easy—it was well-prepped. Now stand back from your revitalized wood piece; the next steps awaiting it—oiling, waxing, or painting—have an extremely solid surface structure waiting beneath their final beauty coat, crafted entirely by your capable hands!