How to Woodblock Print: Essential Guide
Learn how to woodblock print with this easy guide. Discover the simple tools and steps to carve your own design into wood and create unique prints on paper or fabric. Start your creative journey today!
Woodblock printing, a beautiful art form with a rich history, can seem a bit daunting at first. You might see stunning, intricate designs carved into wood and wonder if it’s something only experienced artists can do. The good news is, it’s more accessible than you think! With a few basic tools and a little patience, you can create your own unique prints. This guide will walk you through everything you need to know, step-by-step, so you can start carving and printing with confidence.
What is Woodblock Printing?
Woodblock printing is a technique where a design is carved into a block of wood. The raised areas of the wood form the image that will be printed. Ink is applied to these raised areas, and then the block is pressed onto paper or fabric to transfer the ink, creating a print. It’s a method that has been used for centuries, originating in East Asia and playing a significant role in art and book production before the advent of modern printing technologies.
It’s a hands-on process that connects you directly to the creation of your art. Each print is a direct result of your carving and inking decisions. This makes every piece unique and carries a special kind of charm.
Why Try Woodblock Printing?
- Creative Expression: It’s a fantastic way to bring your own designs to life.
- Unique Results: Each print has a slightly different character, making your artwork stand out.
- Rewarding Hobby: The process of carving and printing is deeply satisfying.
- Durable Art: Woodblock prints can last for a very long time when cared for properly.
- Custom Gifts: Create personalized items for friends and family.
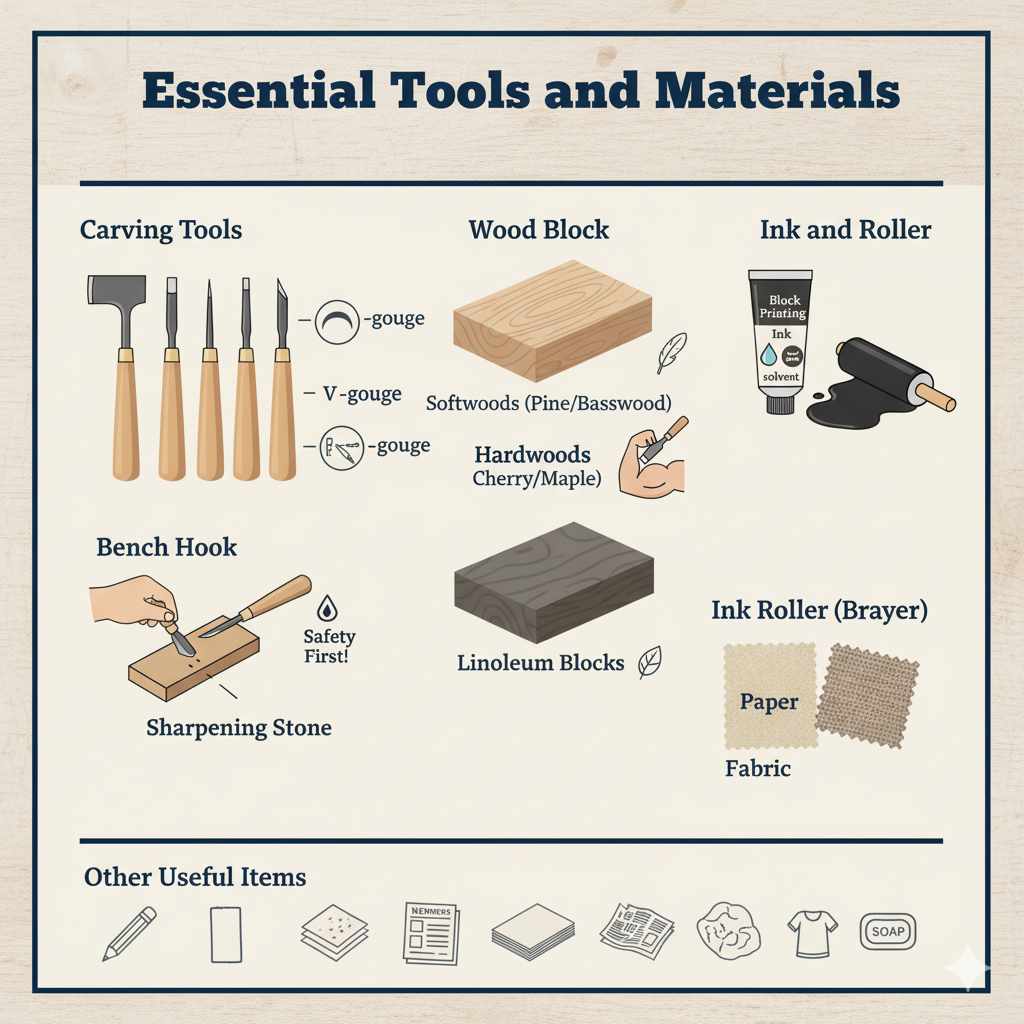
Essential Tools and Materials
Don’t worry; you don’t need a professional print shop to get started! A few key items will set you up for success. Here’s a breakdown of what you’ll need:
Carving Tools
These are your primary instruments for shaping the wood. They come in various shapes and sizes, allowing for different line weights and textures. For beginners, a basic set is perfect.
- Gouges: These have a U-shaped or V-shaped blade. U-gouges are great for clearing larger areas, while V-gouges are excellent for fine lines and details.
- Bench Hook or Safety Pad: This helps secure your woodblock while you carve, keeping your hands safe. A simple piece of scrap wood can also work in a pinch, but dedicated safety gear is always best. For more information on workshop safety, check out resources from organizations like the Occupational Safety and Health Administration (OSHA), which often provides general safety principles applicable to many crafting environments.
- Sharpening Stone: Keeping your tools sharp is crucial for clean cuts and reducing effort.
Wood Block
The surface you carve your design into. The type of wood can affect the ease of carving and the final print quality.
- Softwoods (like pine or basswood): These are easier to carve, making them ideal for beginners.
- Hardwoods (like cherry or maple): These offer finer detail but are harder to carve.
- Linoleum Blocks: While not wood, linoleum is a very popular and accessible alternative for relief printing, especially for beginners. It’s soft, easy to carve, and readily available.
Ink and Roller
This is what transfers your design onto paper.
- Block Printing Ink: Water-based inks are easiest for beginners as they clean up with soap and water. Oil-based inks offer more permanence but require solvent for cleanup.
- Ink Roller (Brayer): A rubber roller used to spread the ink evenly onto your carved block.
Paper or Fabric
The surface you’ll be printing on.
- Paper: Look for thick, absorbent paper like printmaking paper, watercolor paper, or even sturdy drawing paper.
- Fabric: For fabric printing, use materials like cotton, linen, or canvas. You’ll need fabric ink for this to ensure the print is washable.
Other Useful Items
- Pencil (for sketching your design)
- Tracing paper (optional, for transferring your design)
- Scrap wood or lino block for practice
- Newspaper or a protective mat (to keep your workspace clean)
- Damp cloth or paper towels (for cleanup)
- Bar of soap (for cleaning hands and tools with water-based ink)
Setting Up Your Workspace
A well-prepared workspace makes the entire process smoother and safer. Here’s how to get ready:
- Find a well-lit area: Good lighting is essential for seeing your carving details clearly.
- Protect your surfaces: Lay down old newspapers, a drop cloth, or a protective mat. This is especially important when you start inking.
- Clear the clutter: Make sure you have enough space to work comfortably without bumping into things.
- Have everything within reach: Arrange your tools, block, ink, and paper so they are easily accessible.
- Ventilation: If using oil-based inks, ensure the area is well-ventilated. Water-based inks are generally low in VOCs (Volatile Organic Compounds).
Step-by-Step Guide to Woodblock Printing
Let’s get carving and printing! Follow these steps to create your first woodblock print.
Step 1: Design Your Image
This is where your creativity shines! You can draw directly onto the woodblock or sketch on paper first. Keep your design relatively simple for your first attempt, focusing on bold shapes and clear lines. Remember, the areas you carve away will be white (or the color of your paper), and the areas you leave raised will take the ink.
Pro-tip for beginners: Think about positive and negative space. What do you want to be inked, and what do you want to be the unprinted background? Simple illustrations, geometric patterns, or bold lettering work well.
Step 2: Transfer Your Design to the Woodblock
If you sketched on paper, you can transfer it in a few ways:
- Tracing Paper Method:
- Draw or print your design onto tracing paper.
- Rub the back of the tracing paper with a soft pencil.
- Place the traced side down onto your woodblock.
- Go over your original design with a pencil or a stylus, pressing firmly. This will transfer the graphite from the back of the tracing paper onto the wood.
- Freehand: If you’re confident, draw directly onto the woodblock with a pencil.
Ensure your pencil lines are clear enough to see while carving.
Step 3: Carve Your Design
This is the most crucial part. Take your time, and always carve away from yourself.
- Secure your block: Place the woodblock on a stable surface. Use a rubber mat or a bench hook to prevent it from slipping.
- Choose your tool: Start with a V-gouge or a small U-gouge for initial outlines.
- Carve with control: Gently push the gouge into the wood, following your pencil lines. For lines, use a V-gouge to create a channel. For clearing larger areas, use a wider U-gouge.
- Work slowly: Focus on making clean, controlled cuts. It’s better to remove too little wood initially than too much. You can always carve more away.
- Remove all unwanted areas: Ensure that any part of the wood you don’t want to print is carved away. These areas will become the white space in your print.
- Check your depth: You don’t need to carve extremely deep, especially with softer woods. A few millimeters is usually sufficient to ensure these areas don’t pick up ink.
Safety First: Always keep your fingers and hands behind the cutting edge of your carving tool. If using a bench hook, ensure your material is securely clamped and you are carving away from your body and towards the hook.
Step 4: Ink Your Block
Once your carving is complete, it’s time to ink it up!
- Squeeze ink: Place a small amount of block printing ink onto a clean, flat, non-porous surface, like a glass slab, a plastic palette, or even a piece of thick card. A dollop about the size of a Rolo candy is a good starting point.
- Roll the ink: Dip your roller (brayer) into the ink. Roll it back and forth across the ink slab to spread the ink evenly onto the roller. You want a thin, consistent layer.
- Ink the block: Gently roll the inked brayer over the raised surface of your carved woodblock. Try to cover all the areas you want to print evenly. Avoid getting ink into the carved-out (recessed) areas.
- Listen and feel: A properly inked roller makes a smooth, quiet sound. If it’s sticky or making a tearing sound, you may have too much ink or the ink is too thick.
Step 5: Make Your Print
The moment of truth!
- Place your paper: Lay a sheet of paper (or fabric) carefully over the inked woodblock. Make sure it’s positioned exactly where you want your print to be.
- Apply pressure: Gently rub all over the back of the paper with a clean, dry brayer, a wooden spoon, or even your hands. The goal is to ensure even pressure so the ink transfers well from the raised surfaces of the block to the paper.
- Peel carefully: Slowly and carefully peel the paper away from the block. Try to lift it straight up to avoid smudging.
- Inspect: Admire your first print! See how the ink has transferred.
Step 6: Clean Up
This is a vital step for protecting your tools and ensuring they last.
- For water-based inks: Use a damp cloth to wipe off excess ink from the block and your brayer. Then, wash thoroughly with warm water and soap. Ensure all ink is removed from the carved grooves.
- For oil-based inks: You’ll need a solvent like vegetable oil or a specialized printmaking solvent. Wipe the block and brayer clean with a rag dipped in the solvent. Then, wash with soap and water.
- Dry everything: Make sure your tools and block are completely dry before storing them.
Cleaning your tools immediately after use is key to their longevity and the quality of your future prints.
Tips for Better Woodblock Prints
As you get more comfortable, here are a few tips to enhance your prints:
- Experiment with ink consistency: Sometimes adding a tiny bit of a reducer can make ink spread more smoothly.
- Test prints: Do a few “test prints” on scrap paper to get the ink coverage and pressure just right before printing on your final paper.
- Layering colors: For more advanced prints, you can carve multiple blocks or carve sections of a single block to print in different colors. This is called multi-block printing or reduction printing (where you progressively carve away more of the same block for subsequent color layers).
- Paper choice matters: Different papers take ink differently. Experiment to see what effects you like.
- Burnishing techniques: For very detailed prints, using a piece of smooth wood or a bone folder to “burnish” (rub) the paper firmly can help capture fine lines.
Common Woodblock Printing Mistakes and Fixes
It’s normal to encounter a few hiccups. Here’s how to handle them:
| Problem | Possible Cause | Solution |
|---|---|---|
| Faint or patchy print | Not enough ink, ink drying too fast, not enough pressure | Apply more ink to the block, break up ink on the roller. Work faster if ink is drying. Apply more even pressure when printing. |
| Ink in the carved-out areas | Too much ink on the roller, ink too thick, roller is “too wet” | Use less ink. Roll the ink out more thinly on the slab. Ensure your roller is not overloaded or too soft. |
| Jagged or rough lines | Dull carving tools, wood splitting | Sharpen your gouges. Carve with more deliberate, shorter strokes. Try a different wood type. |
| Smudged print | Paper shifted during printing, ink not dry | Hold the paper firmly in place. Allow the ink to dry completely before stacking or handling. |
| Block is difficult to carve | Using a hard wood with dull tools | Switch to a softer wood like basswood or use linoleum. Ensure your carving tools are very sharp. Visit a resource like Wood Magazine’s sharpening guides for tips on tool maintenance. |
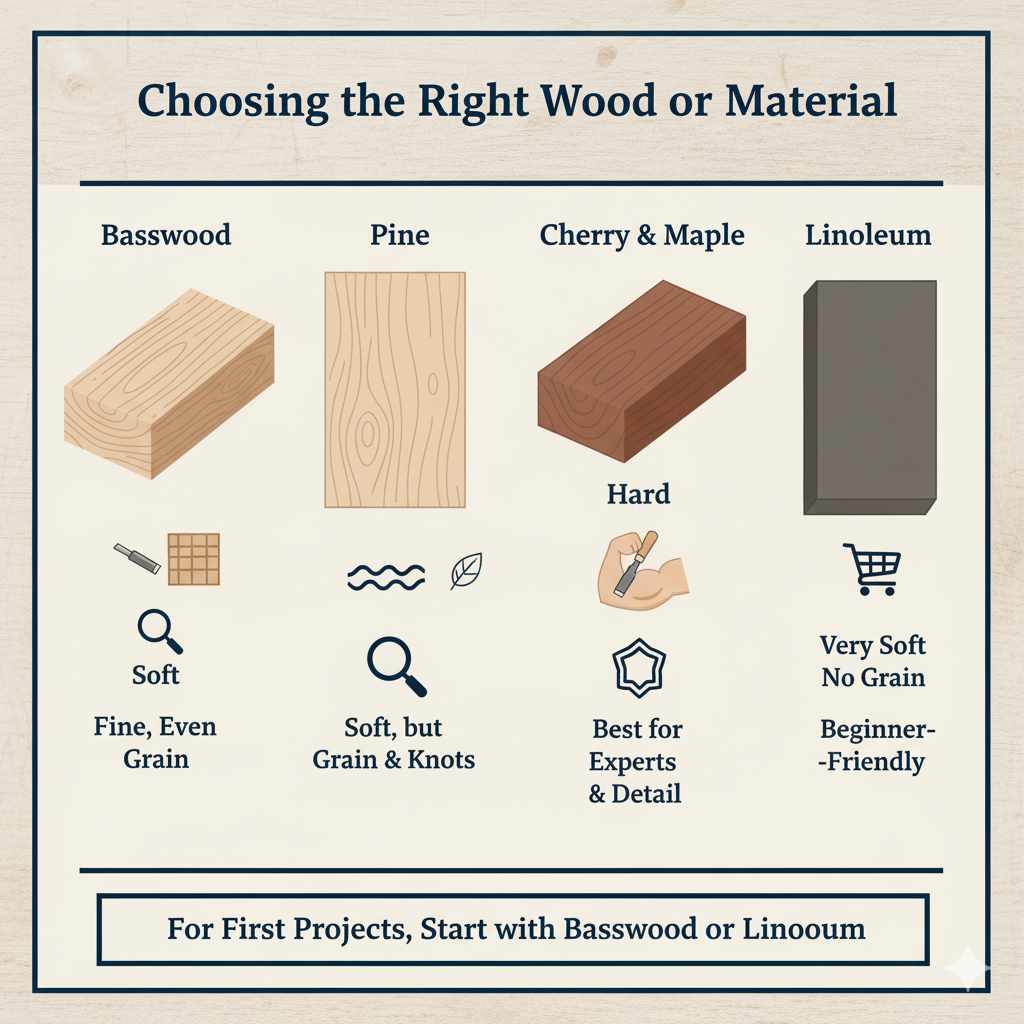
Choosing the Right Wood or Material
The material you carve into can significantly impact your experience and the final outcome. Here’s a quick look:
- Basswood: It’s a favorite for woodblock printing because it’s soft, has a fine, even grain, and carves cleanly. This makes it easy to achieve detailed work without excessive effort.
- Pine: Also relatively soft and easy to carve. However, pine can have knots and a more pronounced grain, which might show up in your prints and make detailed carving a bit trickier.
- Cherry and Maple: These hardwoods are beautiful and durable but are much harder to carve. They are best suited for experienced printmakers who want very fine detail and a lasting block.
- Linoleum: This is a fantastic alternative, especially for beginners. It’s very soft, cuts easily, and is affordable. It doesn’t have a grain like wood, so you can carve in any direction without issues. It’s readily available at art supply stores.
For your first few projects, I highly recommend starting with either basswood or linoleum. You’ll find them more forgiving and enjoyable to work with.
FAQ: Your Woodblock Printing Questions Answered
Here are some common questions beginners have:
Q1: How sharp do my carving tools need to be?
A: Very sharp! Dull tools require more force, are harder to control, and can lead to rough cuts and potential injuries. A sharp tool glides through the material with ease.
Q2: Can I use any kind of ink?
A: For beginners, water-based block printing inks are recommended. They are easy to clean up with soap and water and are generally non-toxic. Oil-based inks offer different properties but require solvents for cleanup.
Q3: How many prints can I expect from a woodblock?
A: It depends on the wood, the detail of the carving, and how well you care for the block. Well-made woodblocks can produce hundreds, even thousands, of prints. Linoleum blocks might have a slightly shorter lifespan for very fine detail.
Q4: What if I make a mistake while carving?
A: Don’t worry! Small mistakes can often be incorporated into the design. If it’s a significant error, you might be able to glue a small piece of wood into the error and re-carve, or simply start a new block. Practice makes perfect, and learning from mistakes is part of the process.
Q5: Can I print on fabric?
A: Yes! Use specialized fabric inks and heat-set the prints (usually by ironing) according to the manufacturer’s instructions after they dry. This makes the print permanent and washable.
Q6: Where can I buy woodblock printing supplies?
A: Art supply stores, craft stores, and online retailers are excellent sources for carving tools, inks, rollers, and blocks. Some woodworking stores may also carry softer wood suitable for carving.