Is Gorilla Wood Glue Good for Cedar
Many people wonder, Is Gorilla Wood Glue Good for Cedar? It can feel a bit tricky when you’re starting out, especially with specific woods like cedar. Cedar has its own needs. This guide will make it super simple.
We’ll walk through exactly what you need to know, step by step. Get ready to build with confidence and find out if Gorilla Wood Glue is the right choice for your cedar projects.
Understanding Cedar Wood Properties for Gluing
Cedar is a beautiful wood, but it can be a bit different to work with than other types. It’s known for its lovely scent and natural resistance to rot and insects. This makes it a favorite for outdoor furniture, decks, and cedar chests.
However, cedar’s natural oils and resins can sometimes affect how well glues stick. This is why people often ask, Is Gorilla Wood Glue Good for Cedar? It’s a valid question for anyone wanting their projects to last.
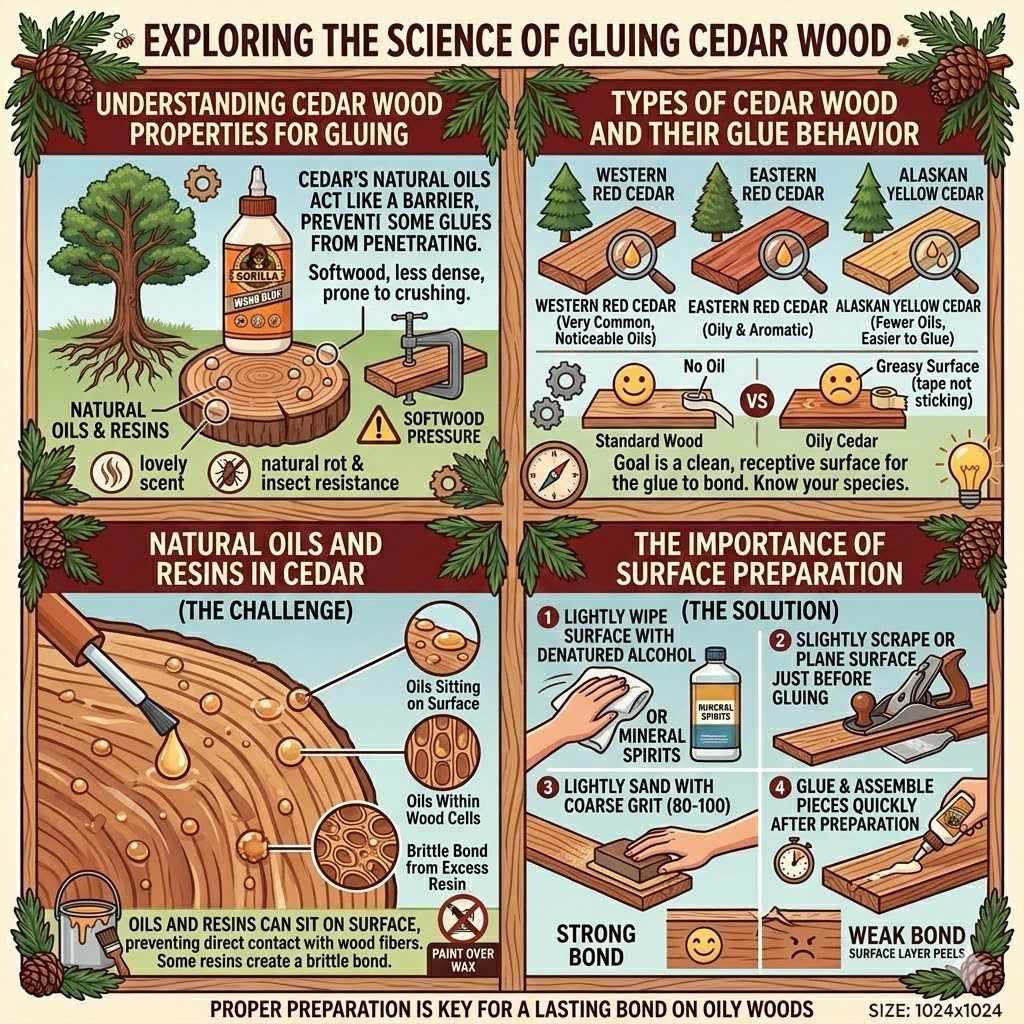
Cedar is a softwood. Softwoods are generally less dense than hardwoods. This can mean they are more prone to crushing under clamping pressure.
Also, the natural oils in cedar can act like a barrier, preventing some glues from penetrating the wood fibers. This is a key reason why choosing the right adhesive is so important for a strong bond. We need a glue that can overcome these natural characteristics of cedar.
Some glues might struggle to form a lasting bond on oily woods. They might create a surface layer that peels away over time. This is especially true for projects exposed to the elements.
The good news is, with the right preparation and the right glue, cedar can be bonded very effectively. We’ll look at how Gorilla Wood Glue performs specifically with this kind of wood.
Types of Cedar Wood and Their Glue Behavior
There are many kinds of cedar trees, and their wood can vary slightly in its properties. For example, Western Red Cedar is very common and has noticeable natural oils. Eastern Red Cedar is also oily and aromatic.
Alaskan Yellow Cedar has fewer oils than some others, making it a bit easier to glue.
The amount of natural oil can impact adhesion. When wood is more oily, glues have a harder time gripping the wood fibers. Imagine trying to stick tape to a greasy surface; it doesn’t hold very well.
The same principle applies to wood glue. The oils can interfere with the glue’s ability to soak into the wood’s pores.
Knowing your specific type of cedar can help. However, general preparation steps can often bridge the gap for most cedar varieties. The goal is always to create a clean, receptive surface for the glue to bond to.
This means sometimes removing or reducing the influence of these natural oils.
Regardless of the exact cedar species, the fundamental principles of good gluing still apply. Proper clamping, clean surfaces, and appropriate glue choice are paramount. Even oily woods can yield strong joints when these steps are followed.
Natural Oils and Resins in Cedar
Cedar’s natural oils, often called extractives, are what give it its distinctive aroma and its resistance to decay and insects. These are fantastic qualities for outdoor use. However, from a gluing perspective, they can be a challenge.
These oils can sit on the surface of the wood and also be present within the wood cells.
When you apply a standard wood glue, these oils can prevent the glue from making direct contact with the wood fibers. The glue might bond to the oil layer instead of the wood itself. Over time, this oil layer can break down or allow moisture to penetrate, leading to a weak or failed joint.
It’s like trying to paint over a waxed surface. The paint won’t stick well unless you prepare the surface first. For cedar, this preparation often involves cleaning the wood to remove as much of this surface oil as possible.
This step is crucial for a successful bond, especially when using a strong adhesive like Gorilla Wood Glue.
The resin content can also vary. Resins are sticky substances that can further complicate glue adhesion. While some resins might seem helpful, they often create a brittle bond rather than a flexible, strong one.
Removing excess surface resins helps ensure the glue bonds directly to the wood structure.
The Importance of Surface Preparation for Cedar
Surface preparation is arguably the most critical step when gluing cedar, especially with oily varieties. Forgetting this can lead to a bond that looks strong initially but fails under stress or over time. It’s the foundation for any successful woodworking joint.
The primary goal is to create a clean, porous surface that the glue can penetrate. This often means removing any surface oils and resins. A simple but effective method is to lightly wipe the mating surfaces with denatured alcohol or mineral spirits.
This helps to cut through and remove the surface oils without damaging the wood itself.
Another common and very effective method is to slightly scrape or plane the surface just before gluing. This removes the very top layer of wood, which is where most of the accumulated oils and resins tend to sit. This fresh, exposed wood grain is much more receptive to glue adhesion.
Light sanding can also be part of the process, but it’s important to use a relatively coarse grit (like 80 or 100 grit). Fine sanding can sometimes close up the wood pores, making it harder for the glue to grab. The aim is to create a slightly roughened, clean surface.
After preparing the surface, it’s important to glue the pieces together as soon as possible. Leaving the prepared surfaces exposed for too long can allow new oils to migrate to the surface. Quick assembly after preparation ensures you are working with the cleanest possible wood.
Gorilla Wood Glue: Properties and Performance
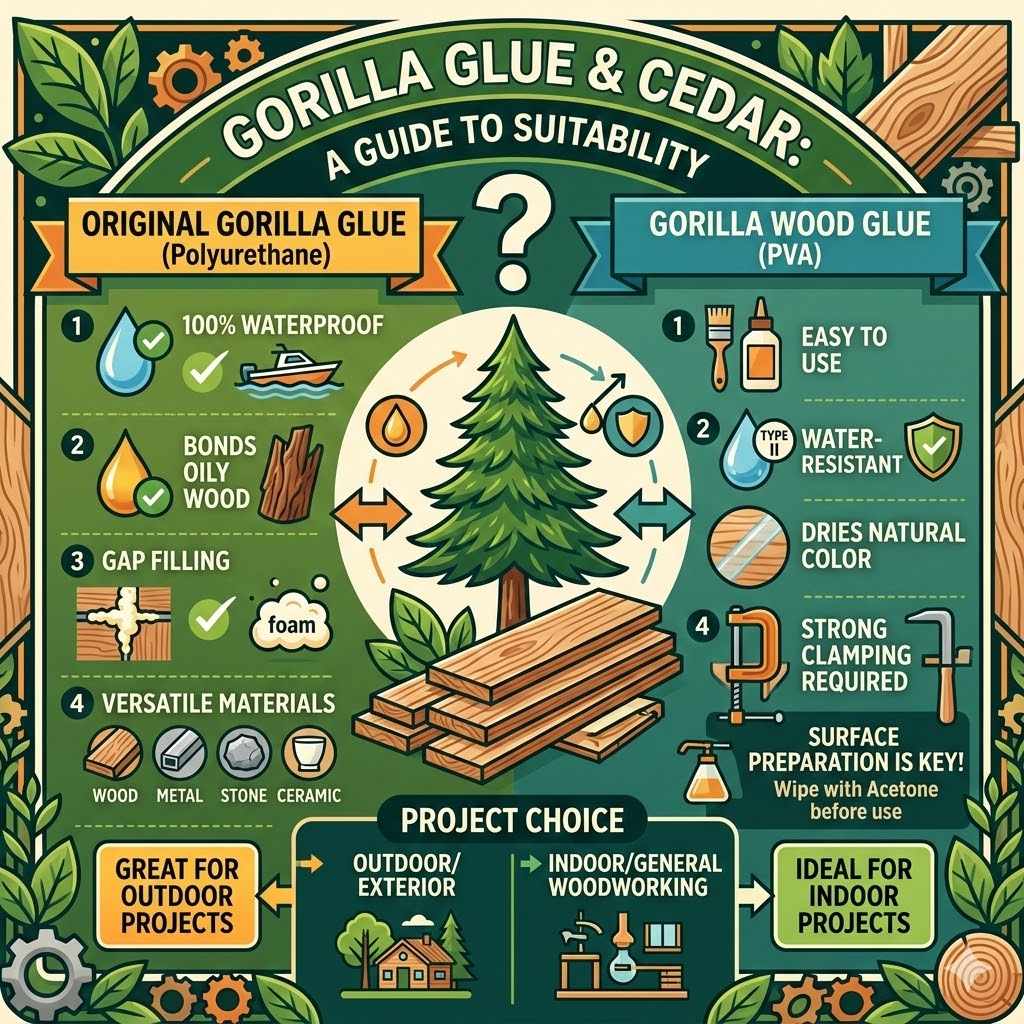
Gorilla Wood Glue is a popular choice for many woodworking projects. It’s known for its strength and durability. It’s a PVA (polyvinyl acetate) glue, similar to many white and yellow wood glues, but often formulated with added polymers to boost its strength and water resistance.
This makes it a robust option for various applications.
One of the key benefits of Gorilla Wood Glue is its bond strength. It claims to be three times stronger than ordinary wood glues. This is achieved through its formulation, which allows for a stronger, more permanent bond once cured.
It dries to a hard, durable finish, resisting stress and impact.
It’s also designed to be water-resistant, which is a significant advantage. This means it can perform better than standard PVA glues in environments where moisture might be a factor, though it’s not completely waterproof. For projects that might see some dampness, like outdoor furniture or shop jigs, this water resistance is a big plus.
When considering Is Gorilla Wood Glue Good for Cedar?, its strong formulation is a good starting point. The enhanced strength can help compensate for any slight challenges cedar might present. Its ability to form a rigid bond means that once cured, it provides a very solid connection.
The glue itself is easy to use. It typically comes in a squeeze bottle with a nozzle that allows for controlled application. It dries to a natural wood color, which is helpful if some glue squeeze-out will be visible and you don’t want it to stand out.
This makes it a practical choice for both beginners and experienced woodworkers.
Gorilla Wood Glue Formulation Explained
Gorilla Wood Glue is a type of PVA glue, but it’s enhanced for superior performance. Standard PVA glues are common and effective for many indoor projects. They work by forming a strong bond as the water in the glue evaporates, leaving behind a solid polymer structure that interlocks with the wood fibers.
Gorilla Wood Glue takes this a step further. It often contains additives that improve its bonding capabilities, making it adhere more tenaciously to wood. This can include cross-linking agents that create a more complex and resilient molecular network within the glue line.
This results in a bond that is not only stronger but also more resistant to shear forces and impacts.
The “water-resistant” claim means the cured glue can withstand exposure to moisture, humidity, and occasional splashes without breaking down. It’s important to note that this is not the same as being waterproof. For applications that will be constantly submerged in water, a different type of adhesive would be necessary.
The formulation also contributes to its long open time and clamping time. This gives woodworkers a reasonable window to position and clamp the pieces before the glue begins to set. The curing process results in a hard bond that is sandable and can be finished over, just like the wood itself.
This robust formulation is what makes people wonder about its compatibility with various woods, including cedar. The strength and durability are certainly desirable qualities for any woodworking project, especially those built with naturally beautiful materials like cedar.
Water Resistance and Durability
The water resistance of Gorilla Wood Glue is a significant advantage, particularly when compared to standard PVA glues. Many common wood glues are only meant for interior use where they won’t encounter moisture. If they get wet, the bond can weaken and eventually fail.
Gorilla Wood Glue’s water-resistant nature makes it suitable for a wider range of applications. This includes projects that might be used in a garage, workshop, or even on covered outdoor furniture. The glue can handle incidental moisture and humidity without compromising the joint’s integrity.
This durability means your projects are more likely to withstand the test of time. A strong, water-resistant bond prevents joints from opening up due to changes in humidity or accidental spills. For cedar projects, which are often used outdoors or in areas with fluctuating moisture, this is a valuable attribute.
The glue dries to a hard, opaque bond line. This hardness contributes to its overall durability and resistance to wear and tear. It doesn’t become brittle, which is important for maintaining flexibility in the wood as it expands and contracts with temperature changes.
The combination of strength and water resistance makes Gorilla Wood Glue a very versatile adhesive for many woodworking tasks, including those involving cedar, provided the surface is properly prepared.
How Gorilla Wood Glue Bonds
Gorilla Wood Glue, like other PVA glues, uses a process of absorption, evaporation, and molecular interlocking to create a bond. When you apply the glue to wood, it’s a liquid that contains polymer particles suspended in water.
The porous nature of wood allows the water in the glue to be absorbed into the wood fibers. As the water is absorbed and also evaporates into the air, the polymer particles in the glue begin to move closer together. They start to flow and intermingle with the wood fibers themselves.
Once enough water has left the glue and the particles are closely packed, they form a solid, strong plastic. This plastic then grips the wood fibers, creating a bond that is often stronger than the wood itself. The enhanced formula in Gorilla Wood Glue includes special additives that further strengthen this molecular network and improve its adhesion to various surfaces.
The clamping process is essential during this bonding phase. Clamps push the wood surfaces tightly together. This ensures maximum contact between the glue and the wood.
It also squeezes out excess air and any non-bonding material. A good clamp also helps distribute the glue evenly across the joint surface.
The result is a chemical bond that is very strong and rigid. This process allows the glue to create a lasting connection that can withstand significant stress.
Is Gorilla Wood Glue Good for Cedar A Practical Guide
So, Is Gorilla Wood Glue Good for Cedar? The answer is a resounding yes, with the right preparation. The enhanced strength and water resistance of Gorilla Wood Glue make it a very suitable adhesive for cedar projects. However, as we’ve discussed, cedar’s natural oils and resins require special attention.
Without proper preparation, even the strongest glue might not perform its best on cedar. The oils can create a barrier that prevents the glue from forming a solid, lasting bond. This is where the steps we’ve outlined become vital.
Cleaning the surface and ensuring a receptive wood fiber structure is key.
The good news is that the process isn’t overly complicated. By following a few simple steps, you can ensure that Gorilla Wood Glue creates a powerful and durable bond with your cedar wood. This means your projects will be strong, look great, and last for years to come.
We will now cover specific techniques and scenarios to help you achieve the best results. This will give you the confidence to tackle any cedar woodworking project with Gorilla Wood Glue. You’ll learn exactly how to prepare your wood and apply the glue for optimal results.
Surface Preparation Techniques for Cedar
Preparing cedar surfaces for gluing is not difficult, but it’s crucial for a strong bond. The goal is to remove any surface contaminants, especially natural oils and resins, that could interfere with the glue’s adhesion.
Here’s a breakdown of effective methods:
- Light Scraping or Planing: Use a sharp hand plane or scraper to remove the outermost layer of wood. This exposes fresh wood fibers that are free of surface oils. Aim to remove just a thin layer, enough to get past the visible surface. This is often the most effective method for dense, oily woods.
- Wiping with Denatured Alcohol or Mineral Spirits: After scraping or sanding, wipe the mating surfaces with denatured alcohol or mineral spirits using a clean cloth. This helps to lift and remove any remaining surface oils and resins. Allow the surface to dry completely before applying glue.
- Sanding with Coarse Grit: If you prefer sanding, use a grit of around 80 to 100. Avoid fine grits, as they can close up the wood’s pores. Sanding should be done with the grain. Follow up with a wipe-down as described above.
- Cleanliness is Key: Always work with clean hands and tools. Any dirt or grease transferred to the prepared surface can compromise the bond.
Applying these preparation steps ensures that the Gorilla Wood Glue has direct access to the wood fibers. This allows it to create the strongest possible bond. It turns a potentially challenging wood like cedar into a reliable material for woodworking.
Application and Clamping Strategies
Once your cedar surfaces are properly prepared, applying Gorilla Wood Glue is straightforward. The key is to apply a sufficient, even coat and then clamp the pieces securely.
Application Steps:
- Apply Glue: Apply a thin, even layer of Gorilla Wood Glue to one or both mating surfaces. You want enough to create a continuous film, but not so much that it becomes a thick, gummy layer. Squeeze-out is desirable, as it indicates you have enough glue for a full bond.
- Spread the Glue: Use a brush, roller, or even your finger (wear gloves) to spread the glue evenly across the surface. Ensure complete coverage of the joint area.
- Assemble the Joint: Bring the pieces together immediately after applying the glue. Work quickly to take advantage of the glue’s open time.
- Clamp the Pieces: This is a critical step. Use clamps to apply firm, even pressure across the entire joint. The goal is to bring the wood surfaces into tight contact and squeeze out a small bead of glue around the perimeter of the joint.
Clamping Time:
- Initial Set: Allow the glue to set under clamp pressure for at least 30 minutes to an hour for most joints. This allows the glue to form a preliminary bond strong enough to hold the pieces together.
- Full Cure: For maximum strength, allow the glue to cure for at least 24 hours before putting the joint under significant stress or load. The full cure time ensures the molecular bonds have fully formed.
The clamping pressure should be firm enough to create squeeze-out but not so excessive that it crushes the cedar’s softwood fibers. A common guideline is about 100-150 psi for softwoods. You should see a thin bead of glue coming out around the joint edges.
Dealing with Glue Squeeze-Out on Cedar
Glue squeeze-out is a good sign that you’ve used enough adhesive. However, on cedar, it can sometimes be a bit trickier to clean up perfectly, especially if left to dry completely.
Wet Cleanup:
- Wipe Away Excess: While the glue is still wet, use a damp cloth or sponge to carefully wipe away the excess squeeze-out. Try not to smear the glue over a large area or push it into the wood grain. A gentle blotting action is often best.
- Be Mindful of the Wood: Use minimal water. Too much water can raise the grain of the cedar or leave water stains, which can be harder to deal with than the glue itself.
Dried Squeeze-Out:
- Scrape Gently: If you missed some and the glue has dried, you can often gently scrape it away with a sharp chisel or a cabinet scraper. Work carefully with the grain to avoid damaging the surrounding wood.
- Sanding: For very small, stubborn bits, light sanding can be used, but be careful not to sand too aggressively, which can create a noticeable depression or change the finish of the wood.
It’s often best to get most of the squeeze-out while it’s wet. If some dries, a careful scraping approach is usually more effective than aggressive sanding on cedar. The aim is to remove the glue without creating more work for yourself later with finishing.
When Might Gorilla Wood Glue Not Be the Best Choice for Cedar
While Gorilla Wood Glue is excellent for most cedar applications, there are a few edge cases where you might consider other options. These situations typically involve extreme conditions or very specific project requirements.
1. Fully Waterproof Applications: If your project will be continuously submerged in water (like a boat component or a pond structure), even Gorilla Wood Glue’s water resistance might not be enough. In such cases, a marine-grade epoxy or a specialized waterproof adhesive would be a better choice.
These glues create a fully impermeable seal.
2. Extremely Oily or Resinous Cedar: In rare instances, if you have an exceptionally oily or resinous piece of cedar that you cannot adequately prepare, some other glues might be formulated to adhere better to such surfaces. However, proper preparation usually overcomes this for Gorilla Wood Glue.
3. Very Thin or Delicate Cedar: For extremely thin veneers or very delicate cedar pieces where excessive clamping pressure could cause damage, you might opt for a thinner, faster-setting glue or even specialized veneer glues. However, with careful clamping, Gorilla Wood Glue can still be used.
Overall, these are less common scenarios. For the vast majority of woodworking projects involving cedar, from furniture to crafts, Gorilla Wood Glue, when used with proper surface preparation, is a reliable and strong choice.
Real-World Examples and Scenarios
Let’s look at how Gorilla Wood Glue performs in real projects involving cedar. These examples illustrate the practical application and successful outcomes.
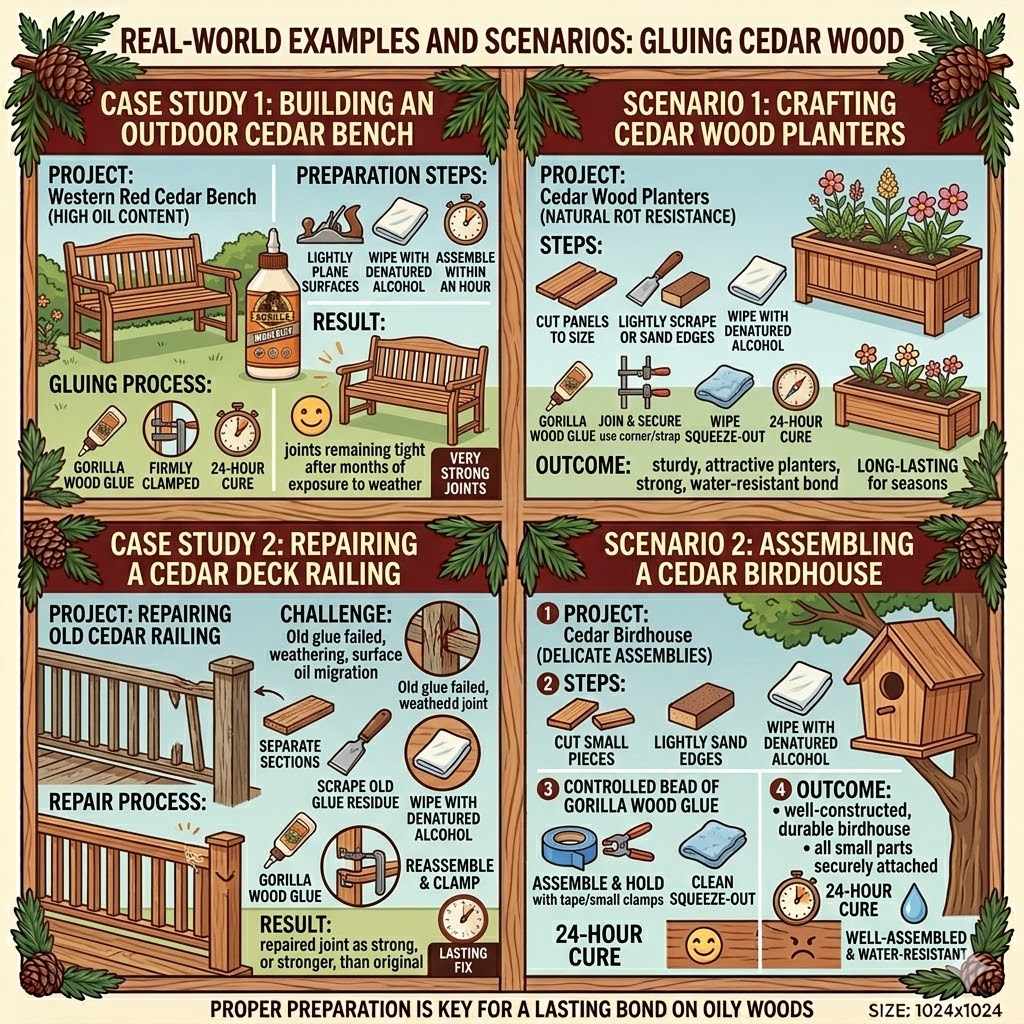
Case Study 1 Building an Outdoor Cedar Bench
A woodworker decided to build a durable outdoor bench using Western Red Cedar. This wood is beautiful but known for its high oil content. The plan was to create a bench that could withstand sun and occasional rain.
Preparation:
- The woodworker lightly planed all the mating surfaces of the cedar boards.
- He then wiped each surface down with denatured alcohol to remove residual oils.
- He made sure to assemble the pieces within an hour of preparation.
Gluing:
- Gorilla Wood Glue was applied to the joints.
- The pieces were assembled and clamped firmly, ensuring good squeeze-out.
- The bench was left to cure for a full 24 hours.
Result:
The bench turned out exceptionally strong. The joints remained tight even after several months of exposure to various weather conditions. The Gorilla Wood Glue held up perfectly, demonstrating its suitability for oily woods like cedar in outdoor settings when properly prepared.
Scenario 1 Crafting Cedar Wood Planters
You want to build a set of attractive cedar planters for your garden. Cedar is ideal because of its natural rot resistance. You need to join the cedar panels securely.
Steps:
- Cut your cedar panels to size for the sides and bottom of the planter.
- Lightly scrape or sand the edges where the panels will join.
- Wipe the mating edges with denatured alcohol and let them dry completely.
- Apply a generous bead of Gorilla Wood Glue along the edges.
- Join the panels and secure them using clamps, ensuring a tight fit. If possible, use corner clamps or strap clamps for planters.
- Wipe away any wet squeeze-out with a damp cloth.
- Allow the planters to cure for at least 24 hours before filling them with soil and plants.
Outcome:
This process will result in sturdy, attractive planters. The Gorilla Wood Glue will provide a strong, water-resistant bond that can handle the moisture from soil and watering, ensuring your planters last for many seasons.
Case Study 2 Repairing a Cedar Deck Railing
A section of a cedar deck railing had come loose. The homeowner wanted a reliable repair that would last. The cedar in the railing was older and had been exposed to the elements for years.
Challenge:
The old glue had failed, and the wood surface had some weathering and potential surface oil migration from years of exposure.
Repair Process:
- The loose section was carefully separated.
- The old glue residue was scraped off.
- The cedar surfaces were cleaned thoroughly with denatured alcohol.
- Gorilla Wood Glue was applied to the prepared surfaces.
- The railing section was reassembled and clamped securely.
- The repair was left to cure for 24 hours.
Result:
The repaired railing joint was as strong, if not stronger, than the original. The Gorilla Wood Glue’s ability to bond with well-prepared cedar, even in a weathered condition, ensured a lasting fix. This highlights the glue’s effectiveness in restoration projects as well.
Scenario 2 Assembling a Cedar Birdhouse
You’re building a charming cedar birdhouse as a weekend project. You need to join the small cedar pieces together to create a sturdy structure that can withstand outdoor conditions.
Steps:
- Cut all the cedar pieces for the birdhouse walls, floor, and roof.
- Lightly sand the edges that will be glued together. This is important for small pieces where precision matters.
- Wipe down the sanded edges with denatured alcohol and allow them to dry.
- Apply a thin, controlled bead of Gorilla Wood Glue to the edges. For small pieces, less is often more.
- Carefully assemble the birdhouse sections.
- Use painter’s tape or small clamps to hold the pieces together while the glue dries. Avoid overtightening if using clamps, as you don’t want to crush the delicate cedar.
- Clean up any wet squeeze-out with a slightly damp cloth.
- Let the glue cure for 24 hours before painting or finishing.
Outcome:
You will have a well-constructed, durable birdhouse. The Gorilla Wood Glue will ensure all the small parts are securely attached, providing a safe and lasting home for birds. The water-resistant quality is a bonus for an outdoor item.
Frequently Asked Questions
Question: Can I use Gorilla Wood Glue on unfinished cedar?
Answer: Yes, you can use Gorilla Wood Glue on unfinished cedar. In fact, unfinished cedar is often easier to get a good bond with than finished cedar. However, you still need to properly prepare the surface by removing any natural oils and resins, usually through light scraping or sanding and wiping with denatured alcohol.
Question: How long does Gorilla Wood Glue take to dry on cedar?
Answer: For an initial set that allows pieces to be handled carefully, Gorilla Wood Glue typically takes about 30 minutes to an hour to set on cedar. However, for a full, strong cure that can withstand regular use and stress, it’s best to wait at least 24 hours.
Question: Is Gorilla Wood Glue waterproof for cedar projects?
Answer: Gorilla Wood Glue is water-resistant, not fully waterproof. This means it can withstand moisture, humidity, and occasional splashes. For projects that will be constantly submerged in water, you would need a specialized waterproof adhesive like a marine epoxy.
Question: Do I need to use a lot of glue on cedar?
Answer: No, you do not need to use an excessive amount of glue. A thin, even layer applied to one or both mating surfaces is sufficient. The goal is complete coverage, and a small amount of squeeze-out around the joint edges indicates you have used enough for a strong bond.
Question: Can Gorilla Wood Glue be used on cedar plywood?
Answer: Yes, Gorilla Wood Glue is suitable for bonding cedar plywood. As with solid cedar, ensure the surfaces you are joining are clean and free from dust or contaminants. The glue will effectively bond the wood layers together.
Summary
So, Is Gorilla Wood Glue Good for Cedar? Absolutely, with the right approach. By preparing the cedar’s surface to remove oils and resins, you create an ideal foundation for this strong, water-resistant adhesive. Apply it evenly and clamp your pieces securely for a bond that is both durable and reliable.
Your cedar projects will benefit greatly from this combination.