Transform Tree Stumps into Stunning Garden Art | Easy DIY Landscaping Idea!
Imagine walking into your backyard and being greeted by a captivating piece of art made from an old tree stump. It sounds intriguing, doesn’t it?
This is not just a fantasy; it’s a simple DIY landscaping idea that can transform your garden into a stunning masterpiece. You might have a few tree stumps lying around, remnants of trees that once shaded your yard. Instead of seeing them as obstacles, picture them as unique canvases waiting to be adorned with your creativity.
This article is your guide to turning those unsightly stumps into striking garden art. You’ll discover easy techniques that anyone can follow, regardless of their artistic skills. With a few materials and a sprinkle of imagination, you can create a focal point that will not only enhance your garden’s beauty but also become a conversation starter. Keep reading to unleash your inner artist and learn how to make your garden the envy of your neighborhood.
Credit: www.8trends.com
Benefits Of Tree Stump Art
Tree stump art adds a unique touch to gardens. It makes outdoor spaces feel special. Stumps can become beautiful art pieces. They enhance the garden’s appearance. Many people use stumps as natural seating. They serve as tables for cups and books. Carving stumps into shapes is fun. Kids and adults enjoy this activity.
Stump art is also eco-friendly. It reuses old tree parts. This reduces waste in landfills. It can attract birds and insects. These creatures love natural wood. Stump art is easy to make. It requires only simple tools. Anyone can create it.

Credit: www.reddit.com
Choosing The Right Stump
Not all stumps are the same. Some are big, some are small. Size matters. Big stumps are perfect for tables. Small stumps work well for seats. Look at the shape. Is it round or oval? Round stumps have smooth edges. Oval ones may be uneven. Each shape offers different possibilities.
Location is key. Stumps near paths get noticed more. Sunny spots are best for bright flowers. Shady areas suit ferns. Think about the view. Can you see it from your window? If yes, it should look nice. Accessibility is important. Make sure it’s easy to reach.
Tools And Materials Needed
First, gather the right tools for this project. You will need a saw to cut the tree stump. A chisel is useful for shaping the wood. Bring a hammer to help with the chisel. Safety is important, so wear gloves and goggles. Use a paintbrush if you plan to paint. A drill is also handy for adding holes.
Choose paint colors that you like. Outdoor paint works best. Consider using sealant to protect the wood. Get some decorative stones or mosaic tiles. These can make your art beautiful. Some soil is needed if you wish to plant in the stump. Finally, add some plants or flowers to bring life to your creation.
Preparing The Stump
Start by removing all dirt from the stump. Use a strong brush to clean it well. Ensure no loose bark remains on the surface. Next, sand the stump smoothly. Use medium-grit sandpaper for this job. Sanding makes the surface even and ready for art. Sand until the wood feels smooth to the touch. Be careful to avoid rough patches. Once smooth, clean the dust off the stump. A damp cloth can help with this task.
Apply a wood sealant to the clean stump. Sealing protects the wood from rain and sun. Use a brush to spread the sealant evenly. Make sure every part is covered well. Let the sealant dry completely. This might take several hours. A well-sealed stump lasts longer. It remains beautiful for many years. Check the sealant instructions for drying time. Repeat the process if needed. Proper sealing ensures the art stays intact.
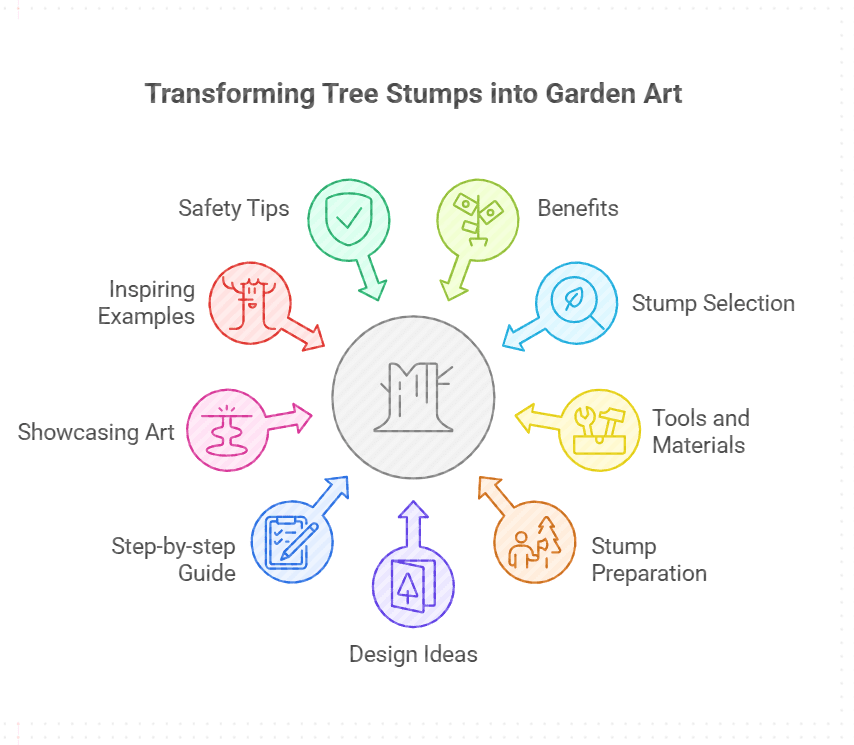
Creative Design Ideas
Turn old tree stumps into beautiful garden art by carving them. Simple tools can shape wood into animals or fun shapes. Sculpting adds a personal touch.
Small details make art stand out. Kids and adults both enjoy this creative process.
Add color with paint or stain. This brings life to dull wood. Use bright colors for a cheerful look. Stains keep the wood’s natural beauty.
Both options protect the wood from weather. It becomes a lasting garden feature.
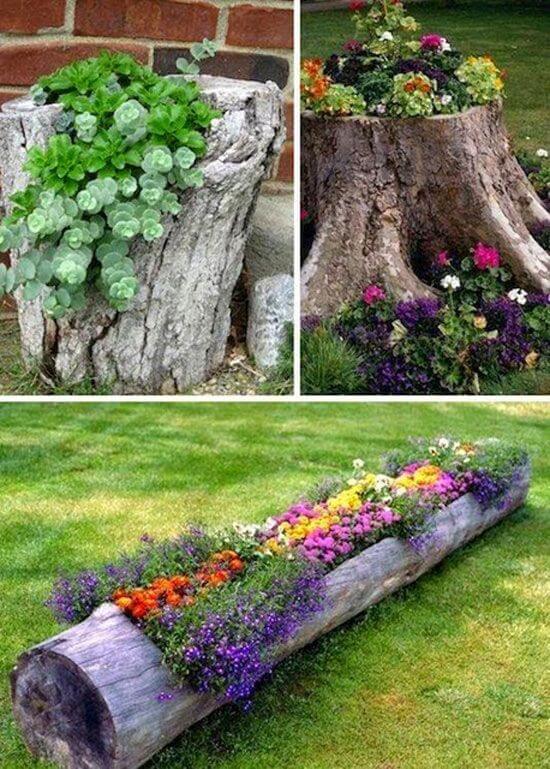
Add plants to the top of the stump. Drill holes for small plants or flowers. Use colorful blooms for a lively effect.
This turns stumps into planters. It blends nature with art. A perfect fit for any garden.
Step-by-step Guide
Transform old tree stumps into beautiful garden art with this easy DIY landscaping idea. This step-by-step guide helps you create stunning outdoor decor using simple tools.
Initial Sketch And Planning
Start with a simple sketch of your idea. Draw the tree stump. Imagine it as a canvas. Add details like flowers or patterns. Think about colors. Use bright colors to make it pop. Make a list of needed materials. This includes paint, brushes, and any tools. Plan a budget. Keep it low by using what you have. This is the fun part. Let your imagination soar!
Executing The Design
Begin with cleaning the stump. Remove dirt and loose bark. Use sandpaper to smooth the surface. Apply a base coat of paint. Let it dry completely. Then, start adding your design. Use stencils for neat patterns. Layer colors for depth. Take your time. Enjoy the process. Mistakes can be fixed. Just let it dry and repaint. It’s all about having fun!
Final Touches And Maintenance
Add a protective sealant to your masterpiece. This keeps it safe from rain. Check the stump regularly. Look for signs of wear. Add new layers of paint if needed. Change designs as you wish. It’s easy to update. Make it a family activity. Everyone can add their touch. This art will make your garden shine. Enjoy your unique creation!
Showcasing Your Art
Tree stumps can become beautiful focal points in gardens. Paint stumps in bright colors. Add small flower pots on top. This makes the stump stand out. It catches everyone’s eye. Use stumps to guide visitors through paths. Arrange them in a line. Visitors will follow the stumps naturally.
Stumps can blend with your garden. Carve them into shapes. Match them with nearby plants. This keeps the garden theme unified. Plant flowers around the stump. Use colors that match the stump. It adds harmony to the landscape. Let moss grow on the stump. It creates a natural look. The stump becomes part of the earth.
Inspiring Examples
Old tree stumps can become beautiful garden art. Some people paint them with bright colors. Others carve them into unique shapes. You can turn a stump into a fairy house. Add little windows and doors. Use moss for a magical touch. Another idea is to make a bird bath. Place a bowl on top of the stump. Fill it with water for birds to enjoy.
Some stumps become planters. Hollow out the center. Fill with soil and flowers. You can create a mini garden. Tall plants look great here. Or, make a cozy bench. Add a flat surface on top. Sit and relax in your garden. These ideas make your garden special.
Safety Tips
Tools can be dangerous. Hold them properly to avoid accidents. Always keep blades away from your body. Do not rush while cutting or carving. Check tools before using them. Make sure they work well. Keep children away from sharp tools. Store them safely after use.
Wear gloves to protect hands. Safety goggles keep eyes safe. Ear protection is needed for loud tools. Face mask helps with dust. Sturdy shoes protect your feet. Long sleeves can guard your arms. Don’t skip safety gear.

Credit: www.youtube.com
Frequently Asked Questions
How To Turn A Tree Stump Into A Garden Feature?
Transform a tree stump into a garden feature by carving designs or adding planters. Paint it with vibrant colors or use it as a base for a birdbath. Consider embedding fairy lights for nighttime charm. Surround it with flowers for a natural touch and enhance your garden’s appeal.
How To Make A Tree Stump Decorative?
Transform a tree stump by painting it with vibrant colors or patterns. Add a decorative table top or mosaic tiles for style. Plant flowers or succulents around it to enhance the natural look. Use it as a base for garden statues or birdhouses for added charm.
How To Disguise A Tree Stump?
Hide a tree stump using decorative planters or bird baths. Transform it into a garden table or seat. Surround it with vibrant flowers or shrubs. Use climbing plants to cover and beautify it. Paint or carve designs for a creative touch.
These methods enhance your garden’s aesthetics effectively.
How To Repurpose An Old Tree Stump?
Transform an old tree stump into a garden planter or birdbath. Create a whimsical fairy garden on top. Use it as a rustic outdoor seat or table. Carve it into a unique sculpture. Add decorative elements for a natural yard feature.
Stumps can become charming garden focal points.
Conclusion
Transforming tree stumps into garden art is a rewarding project. Simple and creative. It adds charm to any outdoor space. You can use paint, carvings, or plants. Each stump becomes a unique masterpiece. This DIY idea is perfect for any skill level.
It turns an eyesore into a focal point. Enjoy your new garden feature. Share your creations with friends. They might get inspired too. Remember, nature offers endless possibilities. Use your imagination and have fun. Happy gardening!