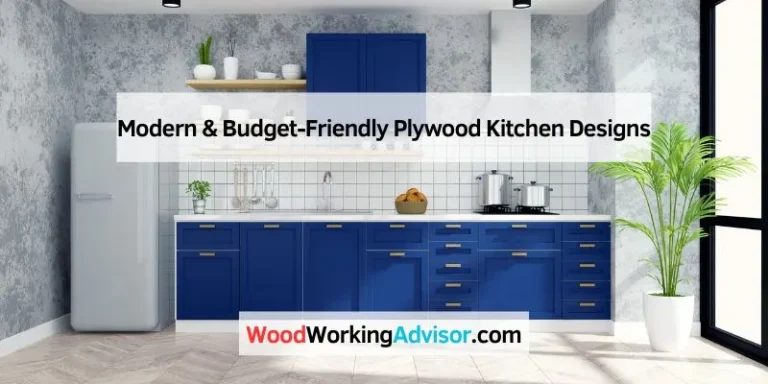
10 DIY Plywood Furniture Plans You Can Build
Creating your own furniture can be fun and rewarding. Plywood is a great material for DIY projects.
With a few tools and some creativity, you can make beautiful and functional furniture from plywood. In this blog post, we’ll explore ten simple and practical plywood furniture plans you can build yourself. These projects are perfect for beginners and experienced DIYers alike.
Whether you need a new table, shelf, or even a bed, these plans have got you covered. Get ready to transform your living space with your own handmade furniture. Let’s dive in!
Introduction To DIY Plywood Furniture
Are you interested in making your own furniture? DIY plywood furniture is a great place to start. Plywood is a versatile and affordable material. It can be used to create various pieces of furniture.
From shelves to tables, plywood offers endless possibilities. With some basic tools and a bit of creativity, you can build beautiful and functional pieces. In this blog post, we will explore ten DIY plywood furniture plans you can build. Let’s get started!
Benefits Of Plywood
Plywood has many benefits. It is strong and durable. This makes it perfect for furniture. Plywood is also lightweight. Moving your furniture around is easy.
Another benefit is its cost. Plywood is cheaper than solid wood. It is also eco-friendly. Plywood uses less wood than solid pieces.
Essential Tools And Materials
You will need some tools and materials to start. First, you need plywood sheets. Choose the thickness based on your project.
You will also need a saw. A circular saw or jigsaw works well. Sandpaper is essential for smoothing edges.
Other tools include a drill, screws, and wood glue. A measuring tape and a pencil are also necessary. These tools will help you measure and cut accurately.
With these tools and materials, you are ready to build. Follow the plans, and you will have your own plywood furniture.
Simple Plywood Bookshelf
Creating your own furniture can be a fun and rewarding experience. One of the easiest projects to start with is a simple plywood bookshelf. This project requires minimal tools and materials. It can be completed over a weekend. Let’s dive into the details of how you can build this practical and stylish bookshelf.
Materials Needed
- Plywood sheets
- Wood screws
- Wood glue
- Sandpaper
- Paint or wood stain
- Paintbrush
- Measuring tape
- Saw
- Drill
Step-by-step Instructions
First, measure and cut the plywood sheets. You need two large pieces for the sides, several shelves, and a back piece.
Next, sand all the edges of your cut plywood. This ensures a smooth finish.
Then, start assembling the sides and shelves. Use wood screws and wood glue to secure the pieces together. Ensure each shelf is level before securing it.
Attach the back piece of the bookshelf. This adds stability and keeps the structure firm.
After the assembly, sand the entire bookshelf again. This prepares it for painting or staining.
Finally, apply paint or wood stain. Use a paintbrush for an even coat. Let it dry completely before placing any items on the shelves.
Enjoy your new DIY plywood bookshelf! It’s a simple project that adds character to any room.
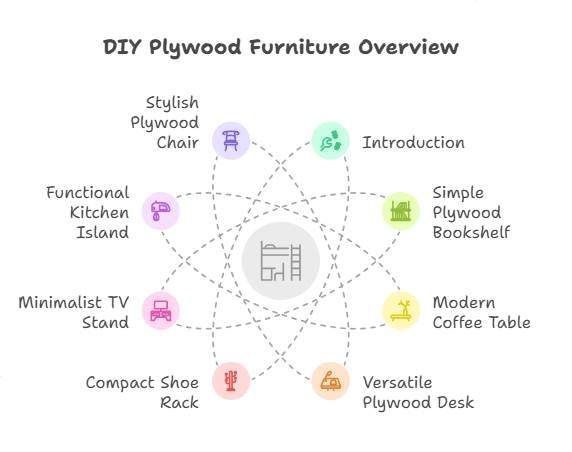
Modern Coffee Table
Creating a modern coffee table from plywood is a rewarding project. It combines sleek design with functionality. This DIY plan allows you to build a piece that fits perfectly with your living room decor.
Design And Dimensions
The modern coffee table design is simple yet elegant. It features clean lines and a minimalist look. The table top measures 40 inches in length and 20 inches in width. The height of the table is 18 inches, making it perfect for any seating arrangement. The plywood thickness should be ¾ inch for durability. You can customize the dimensions to fit your space better.
Assembly Process
Begin by cutting all the plywood pieces to the required dimensions. Use a circular saw for precise cuts. Sand the edges to smooth out any roughness. Assemble the base frame first. Use wood glue and screws to join the pieces. Ensure the frame is square by checking the diagonals.
Next, attach the table top to the base. Apply wood glue to the top edges of the frame. Place the table top on the frame and secure it with screws from underneath. Fill any screw holes with wood putty. Sand the entire table for a smooth finish. Finally, apply a sealant or paint to protect the wood and enhance its appearance.
Versatile Plywood Desk
The versatile plywood desk is an excellent addition to any workspace. It offers a simple design and functionality. You can easily build it with basic tools and materials. Plywood is affordable and easy to work with. This desk suits both small and large spaces. Customize it to fit your needs. Let’s break down the steps to create this practical piece of furniture.
Cutting The Pieces
First, gather your materials. You will need plywood sheets, a saw, and measuring tools. Measure and mark the dimensions for your desk parts. Cut the top, sides, and legs with precision. Make sure all pieces are cut accurately. This ensures a stable and sturdy desk.
Joining And Finishing
Next, assemble the desk. Use wood glue and screws to join the pieces. Start with the legs and sides, then attach the top. Ensure all connections are tight and secure. Sand the edges to smooth any rough spots. Apply a finish or paint to protect the wood. This step also enhances the desk’s appearance.
With these simple steps, your versatile plywood desk is ready. Enjoy your new workspace addition!
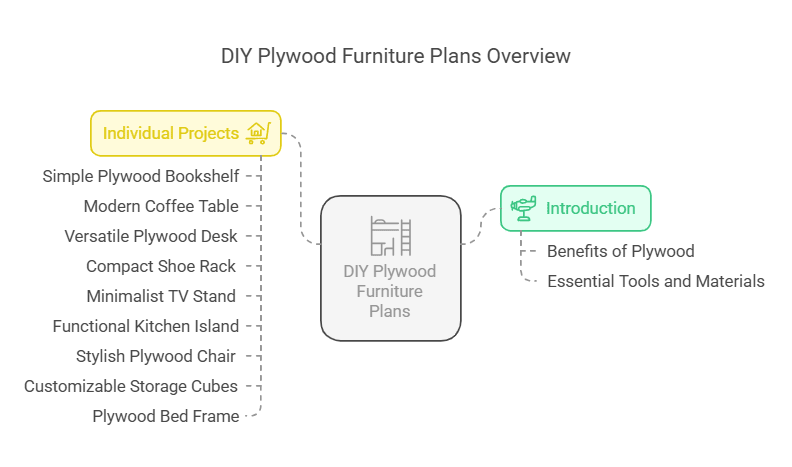
Compact Shoe Rack
Building your own compact shoe rack can be a rewarding project. This DIY furniture piece is perfect for small spaces. It helps keep your shoes organized and easily accessible. Below, we’ll guide you through the supplies needed and the steps to build your own shoe rack.
Required Supplies
- Plywood sheet (3/4 inch thick)
- Wood screws
- Wood glue
- Sandpaper (various grits)
- Paint or wood stain (optional)
- Measuring tape
- Saw (circular or table saw)
- Drill
- Clamps
Building Instructions
- Measure and cut the plywood:
- Cut 2 pieces for the sides (12 inches wide, 30 inches tall).
- Cut 3 pieces for shelves (12 inches wide, 24 inches long).
- Cut 1 piece for the back (24 inches wide, 30 inches tall).
- Sand the pieces:
- Use sandpaper to smooth all edges and surfaces.
- Assemble the frame:
- Attach the sides to the back piece using wood screws and glue.
- Use clamps to hold the pieces in place while the glue dries.
- Install the shelves:
- Evenly space the 3 shelves inside the frame.
- Secure each shelf with wood screws and glue.
- Finish the rack:
- Sand any rough edges and surfaces.
- Apply paint or wood stain if desired.
Your compact shoe rack is now ready to use! It will help keep your entryway tidy and organized.
Minimalist Tv Stand
Looking for a sleek and functional addition to your living room? A minimalist TV stand made from plywood could be the perfect fit. This DIY project is not only budget-friendly but also allows you to customize the size and design to suit your space.
Tools And Materials
Before starting, gather the essential tools and materials. You’ll need plywood sheets, a saw, a drill, wood screws, wood glue, sandpaper, a tape measure, and a pencil. Ensure you have safety gear like gloves and goggles to protect yourself during the construction.
Construction Guide
Start by measuring and cutting the plywood sheets to your desired dimensions. The base, top, and sides should fit together snugly. Use the tape measure and pencil to mark your cuts accurately.
Next, drill pilot holes for the screws to prevent the wood from splitting. Apply wood glue along the edges and screw the pieces together, starting with the base and sides. Make sure everything aligns correctly.
Once the main frame is assembled, add shelves or compartments as needed. Cut additional plywood pieces to create these sections. Secure them with wood glue and screws.
After assembling the stand, sand all surfaces to smooth any rough edges. This step ensures a professional finish and prepares the wood for staining or painting.
Finish by applying a wood stain or paint of your choice. This adds a protective layer and enhances the aesthetic appeal of your TV stand. Let it dry completely before placing your TV and other items on it.
Functional Kitchen Island
Creating a functional kitchen island with plywood can transform your cooking space. It adds extra storage and counter space. Plus, it looks fantastic. Let’s dive into the details of how you can build this valuable piece of furniture.
Design Plans
Start by deciding on the size of your kitchen island. Measure the available space in your kitchen. Consider the height, width, and depth. This will ensure it fits perfectly.
Next, sketch your design. Include shelves, drawers, and a countertop. This will help you visualize the final product. It will also guide you during the build.
Choose the type of plywood. Birch plywood is a popular choice. It is durable and looks great. Also, decide if you want to paint or stain the wood. This adds a personal touch to your island.
Assembly And Installation
Begin by cutting the plywood pieces. Use a table saw or circular saw. Follow your design plans closely. This ensures each piece fits correctly.
Assemble the base frame first. Use wood glue and screws for a strong bond. Attach the side panels, shelves, and drawers. Double-check each connection. This ensures stability.
Next, install the countertop. Secure it with screws from underneath. This keeps the surface smooth. Add handles or knobs to the drawers and doors. This completes the look.
Finally, place your kitchen island in its designated spot. Make sure it is level. Adjust if necessary. Your new functional kitchen island is now ready for use!
Stylish Plywood Chair
The Stylish Plywood Chair is a perfect addition to your home. It blends simplicity with elegance. You can build it yourself with these easy steps. This project is budget-friendly and requires minimal tools.
Cutting The Template
First, draw the chair’s design on a large sheet of paper. Use a ruler and pencil for accuracy. Once the design is ready, place the paper on the plywood sheet. Trace the outlines onto the plywood using a pencil. Carefully cut the plywood along the traced lines. Use a jigsaw for smooth and precise cuts.
Assembly Steps
Start by sanding all the cut pieces. Ensure they are smooth to the touch. Next, arrange the pieces according to your design. Use wood glue to join the parts. Let the glue dry completely. Then, secure the joints with screws for extra strength. Check for stability and make adjustments if needed. Finally, apply a finish to protect the wood and enhance its look.
Customizable Storage Cubes
Customizable storage cubes are a great addition to any home. They offer both functionality and style. With these DIY plywood furniture plans, you can create storage cubes that fit your space perfectly. You can paint or stain them to match your decor. These cubes are versatile and can be used in any room.
Materials Checklist
- Plywood sheets
- Wood glue
- Wood screws
- Sandpaper
- Paint or stain
- Paintbrushes
- Measuring tape
- Drill
- Saw
Building Process
Start by measuring and cutting the plywood sheets. You need six pieces for each cube. Ensure all pieces are the same size.
Next, sand the edges of the cut plywood. This will make them smooth. Then, apply wood glue to the edges and join the pieces together. Hold them in place with clamps until the glue dries.
Once the glue is dry, reinforce the joints with wood screws. Drill pilot holes before inserting the screws to prevent the wood from splitting.
After assembling the cube, sand all surfaces. This prepares the wood for painting or staining. Choose a color that matches your decor. Apply the paint or stain with a brush. Let it dry completely before using the cubes.
Repeat the process for additional cubes. You can stack or arrange them in various configurations. These customizable storage cubes offer endless possibilities for organizing your space.
Plywood Bed Frame
A plywood bed frame offers a sturdy and stylish addition to any bedroom. With the right plan, you can build one that suits your space and style. Below, you will find a step-by-step guide to creating a functional and beautiful plywood bed frame.
Measurement And Cuts
First, measure your mattress to determine the bed frame size. Note the length and width. Add a few inches to each dimension for comfort and ease of fitting.
Use these measurements to cut the plywood sheets. You will need pieces for the headboard, footboard, side rails, and support slats. Mark each piece with a pencil before cutting.
A circular saw or table saw works best for cutting plywood. Ensure your cuts are straight and smooth. Sand the edges to remove any splinters.
Assembly Instructions
Start by assembling the headboard and footboard. Attach the side rails to the headboard and footboard using screws. Use wood glue to strengthen the joints.
Next, add the support slats. Space them evenly across the frame. Secure each slat with screws to ensure stability.
Finally, check the frame for sturdiness. Make any necessary adjustments before placing your mattress on the frame.
Your plywood bed frame is now ready. Enjoy your new DIY project!
Frequently Asked Questions
What Tools Do You Need To Build Plywood Furniture?
You’ll need basic woodworking tools like a saw, drill, screwdriver, measuring tape, and sandpaper. For more complex projects, clamps and a router might be helpful.
Can Beginners Build Plywood Furniture?
Yes, beginners can build plywood furniture. Start with simple plans and gradually advance to more complex designs.
How Do You Finish Plywood Furniture?
Sand the plywood surface smoothly. Apply a primer, then paint or stain as desired. Finally, seal it with a clear finish.
Is Plywood Furniture Durable?
Yes, plywood furniture is durable. High-quality plywood provides strength and stability, making it ideal for various furniture pieces.
Conclusion
Creating your own plywood furniture is rewarding and fun. These 10 DIY plans make the process simple. You can personalize each piece to fit your style. Building your own furniture saves money. It also gives you unique, custom pieces. Try these projects at your own pace.
Enjoy the satisfaction of making something with your hands. Happy building!