Ash Wood Calamity: An Essential Guide
Is your ash wood project showing signs of stress, cracks, or warping? Don’t worry! The “ash wood calamity” is a common challenge woodworkers face. This guide will help you understand why it happens and how to prevent and fix these issues, ensuring your ash wood projects stand the test of time. We’ll walk through simple steps, essential tools, and expert tips to keep your wood beautiful and strong.
Welcome to the workshop, my friends! I’m Md Meraj, and I’m here to make woodworking accessible and rewarding for everyone. Ash wood is a fantastic material – it’s strong, durable, and has a beautiful grain. But sometimes, it can present us with a bit of a puzzle, often called the “ash wood calamity.” This might sound scary, but it’s usually a sign of how the wood is reacting to its environment or how it was handled. Think of it like a tree in a storm; it might sway, but with good roots, it stays strong.
This guide is designed for you, the home crafter, the DIY enthusiast, the one who loves bringing ideas to life with your own hands. We’ll break down what causes these ash wood problems, why they pop up, and most importantly, how you can avoid them or fix them if they appear. We’ll cover everything from understanding wood movement to simple repair techniques. Get ready, because by the end of this, you’ll feel confident tackling any ash wood project!
What is the “Ash Wood Calamity”?
When we talk about the “ash wood calamity,” we’re generally referring to issues that can arise with ash lumber, particularly in projects where its stability is crucial. These problems often manifest as:
- Cracking and Splitting: Especially at the ends of boards or around knots.
- Warping and Twisting: The wood can bend or twist out of its intended flat shape.
- Checking: Small cracks that appear on the surface of the wood.
- Moisture-Related Stress: The wood expands and contracts significantly with changes in humidity, leading to these issues if not managed.
Ash wood is known for its strength and shock resistance, making it a popular choice for tool handles, baseball bats, and furniture. However, its open grain structure and tendency to absorb and release moisture can make it susceptible to these “calamities” if not properly dried, stored, and finished.
Understanding Why Ash Wood Can Be Tricky
To tackle the ash wood calamity, we first need to understand what makes ash wood behave the way it does. It all comes down to its natural characteristics and how it’s treated.
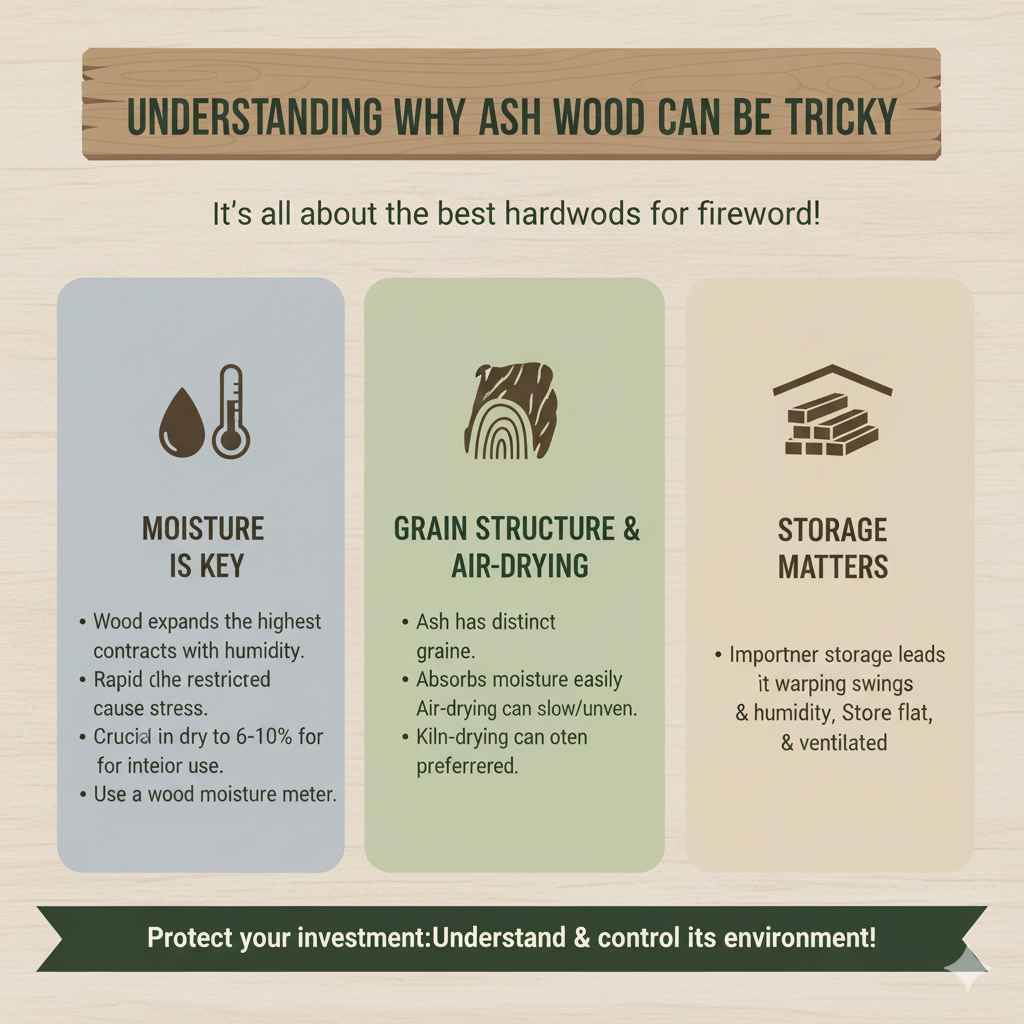
Moisture Content is Key
Wood is an organic material, and its moisture content changes with the surrounding air. Ash, like most hardwoods, will expand when it absorbs moisture and contract when it dries out. This movement is natural, but if it’s too rapid or restricted, it causes stress within the wood, leading to cracks and warping. The crucial part is ensuring the wood is properly dried to a stable moisture content before you start working with it and continuing to protect it from drastic humidity shifts.
For interior woodworking projects, aiming for a moisture content of around 6-10% is generally recommended. For exterior projects, it will typically be higher, but consistent. You can measure this using a simple wood moisture meter. These tools are relatively inexpensive and a fantastic investment for any woodworker.
Grain Structure and Air-Drying
Ash has a distinct open grain. This contributes to its strength, but it also means it can absorb moisture more readily than woods with tighter grains. Air-drying lumber, while a traditional method, can be slow and might lead to uneven drying if not done correctly, increasing the risk of internal stresses that later manifest as issues. Kiln-drying is often preferred for its speed and ability to bring wood to a more consistent, stable moisture level.
Storage Matters
Improper storage after milling is a major culprit. If ash lumber is stacked haphazardly, exposed to direct sun or rain, or stored in environments with wild humidity swings, it’s almost guaranteed to develop problems. Consistent, flat storage in a covered, well-ventilated area is vital.
Preventing the Ash Wood Calamity
The best approach to the “ash wood calamity” is always prevention. By following a few key practices, you can dramatically reduce the chances of encountering these frustrating issues.
Source High-Quality Lumber
Start with good material. Look for reputable lumber suppliers. They will often sell wood that has been properly dried (kiln-dried is usually best for stability). Avoid boards that already show signs of excessive checking, warping, or are visibly wet.
Acclimate Your Wood
This is a crucial step that many beginners skip. Before you start cutting and shaping your ash wood, let it sit in the environment where your furniture or project will live for at least a few days to a week. This allows the wood to gradually adjust to the ambient temperature and humidity, minimizing shock when you make big cuts or join pieces.
How to Acclimate Wood:
- Keep the lumber in its packaging (if any) but loosen it.
- Stack the boards with spacers (stickers) to allow air circulation.
- Store them away from direct heat sources (radiators, vents) or direct sunlight.
- This process helps the wood reach equilibrium with its surroundings.
Proper Milling and Jointing
When you first mill your lumber (flatten one face and square up an adjacent edge), do it slowly and deliberately. Use sharp tools. A jointer and planer are essential for getting perfectly flat and parallel surfaces, which are key to stable joinery.
Consider Wood Movement in Your Designs
This is a fundamental woodworking principle recognized by professionals and advanced hobbyists. Wood expands and contracts across its width more than along its length. When designing and building, especially for furniture, allow for this movement. For example, tabletops should ideally be constructed so the boards can expand and contract without binding against fixed elements like aprons or frames.
Here’s a simple way to think about it:
- Face Grain Movement: Significant, impacts width.
- Edge Grain Movement: Moderate, impacts thickness.
- End Grain Movement: Minimal, impacts length.
Finishing is Your Friend
A good finish acts as a barrier against moisture fluctuations. It won’t stop all movement, but it will slow down the rate at which the wood absorbs or releases moisture, preventing rapid expansion and contraction that can cause damage.
- Types of Finishes:
- Oils (Tung, Linseed): Penetrate the wood, offering a natural look and some protection. Good for projects where a bit of natural feel is desired.
- Varnishes and Polyurethanes: Form a protective film on the surface. Excellent for durability and moisture resistance, especially for surfaces that see a lot of use.
- Waxes: Offer minimal protection but can enhance the look and feel. Often used as a topcoat over other finishes.
- Application Tips:
- Apply multiple thin coats rather than one thick one.
- Ensure you seal all surfaces, including the underside and ends of boards, to maintain a balanced moisture exchange.
Properly Store Finished Projects
Even after a project is completed, try to keep it in an environment with relatively stable humidity and temperature. Avoid placing furniture directly next to heating vents, humidifiers, or in damp basements if possible.
Dealing with Existing Ash Wood Calamities: Repair Strategies
So, you’ve got an ash wood piece that’s showing signs of distress. Don’t despair! Here are some ways to address common issues.
Fixing Cracks and Splits
For smaller, non-structural cracks, wood glue and clamping are your best friends. For larger or more prominent cracks, you might need a more involved approach.
1. Wood Glue and Clamps:
- Clean the Crack: Remove any dust or debris from inside the crack. A vacuum cleaner or compressed air works well.
- Apply Glue: Use a good quality wood glue (like Titebond). For thin cracks, you might use a glue injector or a syringe to get the glue deep inside.
- Clamp Tightly: Use clamps to pull the cracked pieces together. Ensure the clamp pads don’t mar the wood surface; use scrap wood pieces between the clamp jaws and your project.
- Wipe Away Excess Glue: Clean up any glue that squeezes out with a damp cloth before it dries. Dried glue resist finishing.
- Let it Cure: Allow the glue to cure fully according to the manufacturer’s instructions (usually 24 hours for full strength).
2. Filling Larger Cracks (for an aesthetic fix):
If clamping isn’t an option or you want to fill a gap for a smoother surface (especially if the crack isn’t structural), you can use wood filler or an epoxy mixture.
- Wood Filler: Choose a filler that matches your wood’s color. Apply it, let it dry, and then sand smooth. This is best for minor cosmetic issues.
- Wood Epoxy/Resin: For larger, more stable fills, a two-part epoxy mixed with wood dust of a similar color can be very strong and durable. You can get colored epoxies too. Carefully mix, fill, and let cure. Once cured, it can be planed, sanded, and finished. Consider using a contrasting color resin for a unique “river table” look if the crack is wide.
Addressing Warping and Twisting
This is trickier, as it often involves getting the wood back into a stable, flat dimension. The success depends on the severity of the warp and how much material you can afford to remove.
1. Through Planing or Jointing:
If the warp is moderate, you might be able to remove it by running the board through a planer or over a jointer. The key is to understand that you’ll be removing wood to achieve flatness. Sometimes, this means you can’t use the entire width of the board for its original purpose.
Important Note: If you are planing a warped board, you may need to do it in stages. Plane one face flat, then flip the board and plane the opposite face parallel. For twisting, you’ll typically joint one edge flat, then plane the opposite face parallel to the jointed edge until the twist is removed, and finally, plane the remaining edge parallel.
2. Re-humidifying and Clamping:
For less severe warping, especially in solid wood panels, you can sometimes coax the wood back into shape. This involves allowing the wood to absorb moisture on the “outside” of the curve and then clamping it flat.
- Lightly dampen the convex (outwardly curved) side of the board with water or a mist.
- Place the board on a flat surface.
- Apply clamps across the width of the board, pulling the edges down towards the flat surface. You might need cauls (flat pieces of wood) to distribute clamp pressure evenly.
- Let it clamp for an extended period, ideally several days.
- Monitor the moisture content. Once it seems stable and flat, remove the clamps gradually and measure.
This method requires patience and isn’t always successful, especially with thicker lumber.
3. Resawing and Rejoining:
In some cases, a badly warped board might be salvaged by resawing it into thinner pieces, flattening those pieces, and then rejoining them. This is more advanced but can be a lifesaver for valuable lumber.
Tackling Checking (Surface Cracks)
Small surface checks that don’t go all the way through the wood are often more of a cosmetic concern.
- Sanding: Light sanding can sometimes smooth over very minor checks. Be careful not to sand too deeply, as you might weaken the surrounding wood.
- Filling: As with larger cracks, wood filler or a fine epoxy mixed with wood dust can be used to fill checks for a smoother appearance before finishing.
- Acceptance: Sometimes, for a rustic look, minor checks can be left as they are, especially if they are not structural and are part of the wood’s natural character. A good finish will help stabilize them further.
Essential Tools for Working with Ash Wood
Having the right tools makes all the difference when working with any wood, including ash. Here are some essentials that will help you prevent and fix issues:
| Tool | Purpose for Ash Wood | Beginner Tip |
|---|---|---|
| Moisture Meter | Checks wood’s dryness to prevent movement. | Always test before starting, and re-test after acclimation. |
| Table Saw / Circular Saw | Cutting boards to rough length and width. | Use a sharp blade designed for hardwoods. Measure twice, cut once! |
| Jointer | Creates a flat face and a square edge. Essential for stable joinery. | Start with small adjustments. Watch for kickback and keep hands well clear. Look up resources from Wood Magazine for technique videos. |
| Planer | Makes the opposite face parallel to the jointed face, controlling thickness. | Feed wood slowly. Make light passes to avoid overloading. |
| Hand Plane (e.g., Block Plane, Bench Plane) | Fine-tuning, removing high spots, flattening small areas. | Keep the blade razor-sharp. A sharp plane is safer and easier to use. |
| Clamps (Bar, Pipe, F-Style) | Holding pieces together for gluing, or holding warped wood flat. | Have a variety of sizes. Protect your wood with clamp pads or scrap wood. |
| Wood Chisel | Cleaning out cracks, paring away excess glue. | Again, sharpness is key. Practice on scrap wood first. |
| Sanding Tools (Orbital Sander, Sandpaper) | Smoothing surfaces, preparing for finish. | Start with a coarser grit (e.g., 80-120) and move to finer grits (e.g., 180-220). Sand with the grain. |
| Wood Glue & Applicators | Essential for joinery and repairing splits. | Spread glue evenly. Excess squeeze-out is easier to clean when wet. |
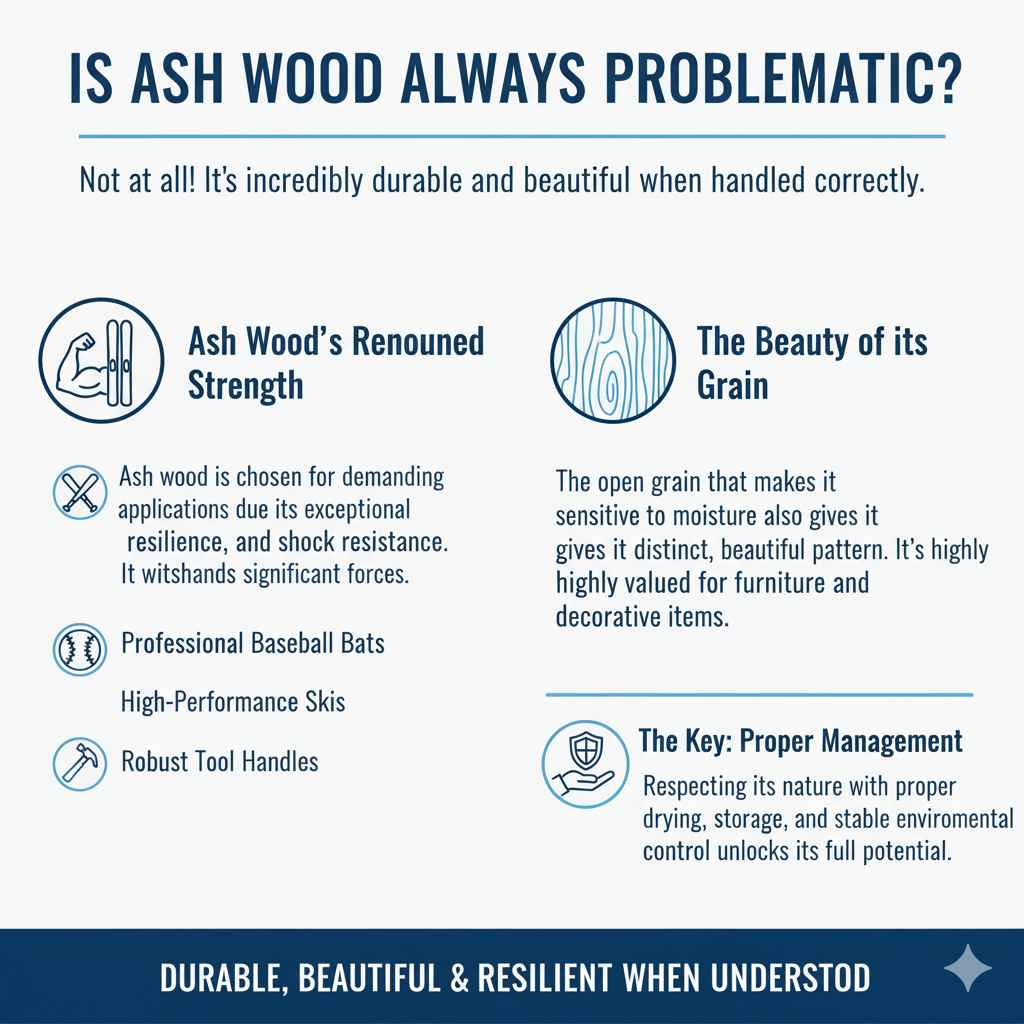
Is Ash Wood Always Problematic?
It’s easy to get the impression that ash wood is inherently flawed, but that’s not the case! The “calamity” often arises from external factors or poor handling, not necessarily a defect in the wood itself. When ash is properly dried, stored, and worked in a stable environment, it makes for incredibly durable and beautiful projects.
Think about it: ash is the wood of choice for professional baseball bats, high-performance skis, and robust tool handles because of its strength and resilience. These applications demand wood that can withstand significant forces. The issues we discuss are more about managing its sensitivity to moisture and environmental changes.
Furthermore, the open grain that can make it susceptible to rapid moisture changes also gives it a lovely, pronounced grain pattern that many people love for furniture and decorative items. The key is understanding its nature and respecting it with proper woodworking practices.
Conclusion
The “ash wood calamity” doesn’t have to be a source of stress or frustration for you. By understanding the fundamental principles of wood behavior – particularly how ash reacts to moisture – you’re already ahead of the game. Remember to always:
- Start Right: Source quality, properly dried lumber.
- Acclimate: Let your wood adjust to its new environment.
- Work Smart: Use sharp tools and allow for wood movement in your designs.
- Seal Well: Apply a protective finish to all surfaces.
- Handle with Care: Store your finished projects in stable conditions.
And if problems do arise, don’t panic! Simple techniques like gluing, clamping, and careful filling can often save your project. For more significant issues like warping, patience, careful planing, or even resawing can bring your ash wood back to life.