Best Way to Apply Chalkboard Paint: Proven Method
Quick Summary: The best way to apply chalkboard paint is by thoroughly preparing your surface, using a high-quality paint, applying in thin, even coats with a foam roller or brush, and allowing adequate drying and curing time. This ensures a smooth, durable writing surface for all your creative needs.
Have you ever dreamed of adding a fun, functional chalkboard surface to your home, only to be met with frustrating splotches, uneven texture, or a surface that just won’t erase properly? You’re not alone! Applying chalkboard paint can seem straightforward, but a few common mistakes can turn a simple DIY project into a sticky situation. I’ve seen it happen many times in my workshop, and I’m here to tell you that achieving a perfect, smooth writing surface is absolutely within your reach. With the right preparation and a little patience, you’ll be writing and erasing like a pro in no time. Let’s dive into the proven method that will help you get the best results, every single time.
Why You Want a Perfect Chalkboard Surface
Chalkboard paint is incredibly versatile. Imagine transforming a plain wall into a creative hub for the kids, a handy message center in your kitchen, or even a unique menu board for your next party. A well-applied surface makes all the difference. It’s not just about the look; it’s about the functionality. A smooth surface means your chalk glides effortlessly, and erasing leaves no stubborn residue. This keeps your chalkboard looking crisp and ready for its next masterpiece. A poorly applied surface, on the other hand, can be grainy, difficult to write on, and near impossible to clean, leading to a disappointing finish and a wasted effort.
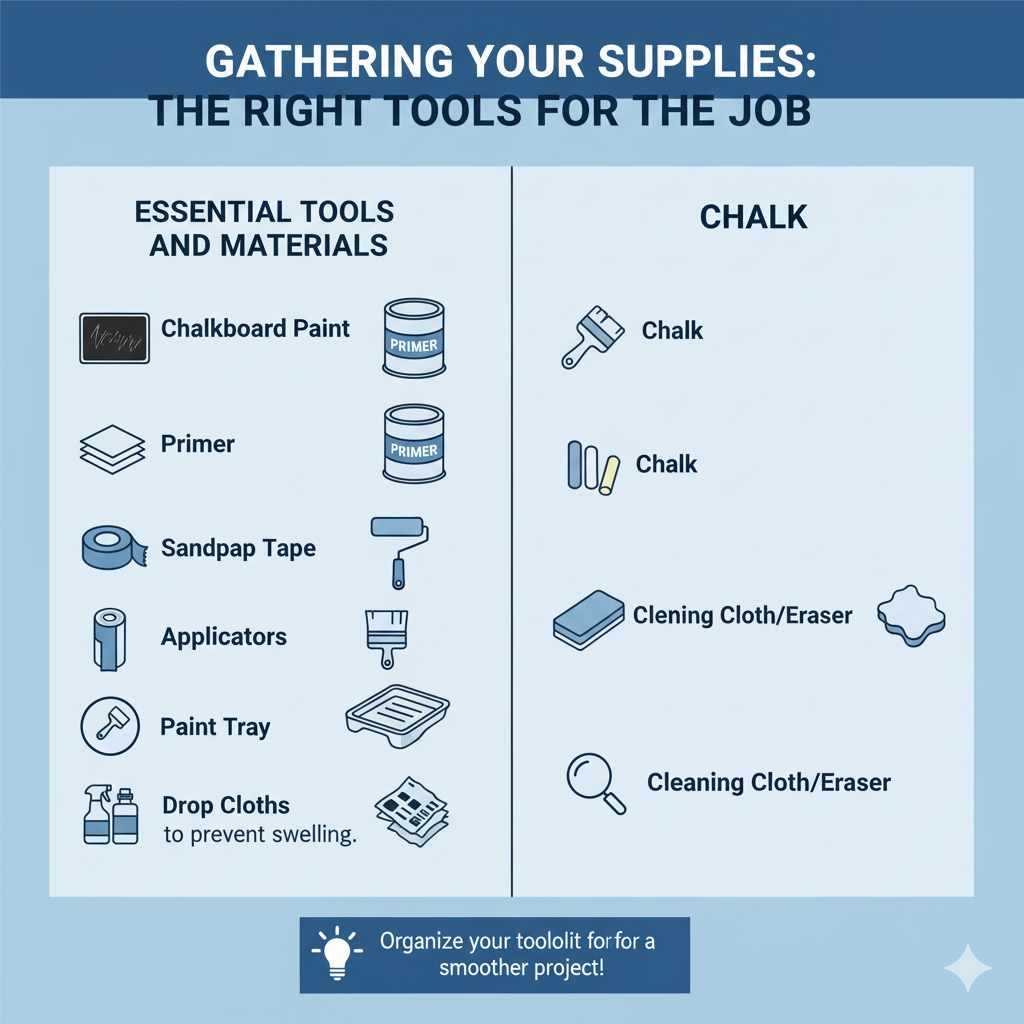
Gathering Your Supplies: The Right Tools for the Job
Before we get our hands dirty, let’s make sure we have everything we need. Having all your supplies ready will make the process much smoother and prevent frustrated trips to the store mid-project. Think of this as your essential chalkboard painting toolkit.
Essential Tools and Materials:
- Chalkboard Paint: Choose a good quality paint. There are many brands available, so do a little research or ask for recommendations at your local hardware store.
- Primer: Depending on your surface, a primer might be necessary to ensure good adhesion and a smooth finish.
- Sandpaper: Fine-grit (around 220-grit) is perfect for smoothing surfaces and creating a good base for the paint.
- Painter’s Tape: To protect any areas you don’t want to paint.
- Applicators: High-quality foam rollers (mini ones are great for smaller projects) and good quality paintbrush for edges.
- Paint Tray: For your rollers.
- Drop Cloths or Newspaper: To protect your floor and surrounding areas from drips.
- Cleaning Supplies: Rags, mild soap, and water for cleaning the surface.
- Chalk: Of course, you’ll need chalk to christen your new surface!
- Cleaning Cloth/Eraser: For testing the surface.
Surface Preparation: The Secret to a Flawless Finish
This is arguably the most important step, and one that beginners often rush. Proper surface preparation is the foundation of a great chalkboard. Skipping this step is like building a house on sand – it’s not going to last, and it certainly won’t look good.
Step 1: Choose Your Surface Wisely
Chalkboard paint can be applied to a variety of surfaces, including wood, drywall, metal, and even concrete. For this guide, we’ll focus on common DIY surfaces like wood and drywall, as they are most frequently encountered by beginners.
Step 2: Clean, Clean, Clean!
Whatever surface you are painting, it must be impeccably clean. Dust, grease, grime – anything will prevent the paint from adhering properly. Wipe down your surface thoroughly with a damp cloth and mild soap, then rinse with clean water. Allow it to dry completely. For tougher grime on wood, you might need a degreaser. For existing painted walls, ensure the paint is in good condition. If it’s peeling or chalky, it needs to be removed first.
Step 3: Smooth as Silk
This is where the sandpaper comes in. Lightly sand the entire surface you plan to paint. The goal isn’t to remove a lot of material, but to create a slightly textured canvas for the paint to grip onto. For wood, this will also help remove any minor imperfections. After sanding, wipe away all the dust with a clean, dry cloth or a slightly damp cloth. Make sure there’s absolutely no dust left, as dust specks will show up in the finished paint.
Step 4: Prime Time (If Necessary)
For porous surfaces like raw wood or MDF, a good quality primer is your best friend. It seals the surface, prevents the chalkboard paint from soaking in unevenly, and helps create a smoother finish. For surfaces that are already painted and in good condition (like a glossy or semi-gloss wall), you might be able to skip primer, but check the manufacturer’s recommendations for your specific chalkboard paint. If you’re unsure, it’s always safer to prime. Apply one to two coats of primer, allowing each to dry completely according to the manufacturer’s instructions. Lightly sand again after the primer has dried, then wipe away dust.
Step 5: Tape It Off
Use painter’s tape to carefully mask off any edges or areas you don’t want to paint. Press the tape down firmly to ensure a clean line and prevent paint from bleeding underneath. This step is crucial for a professional-looking finish, especially when painting around trim or adjacent walls.
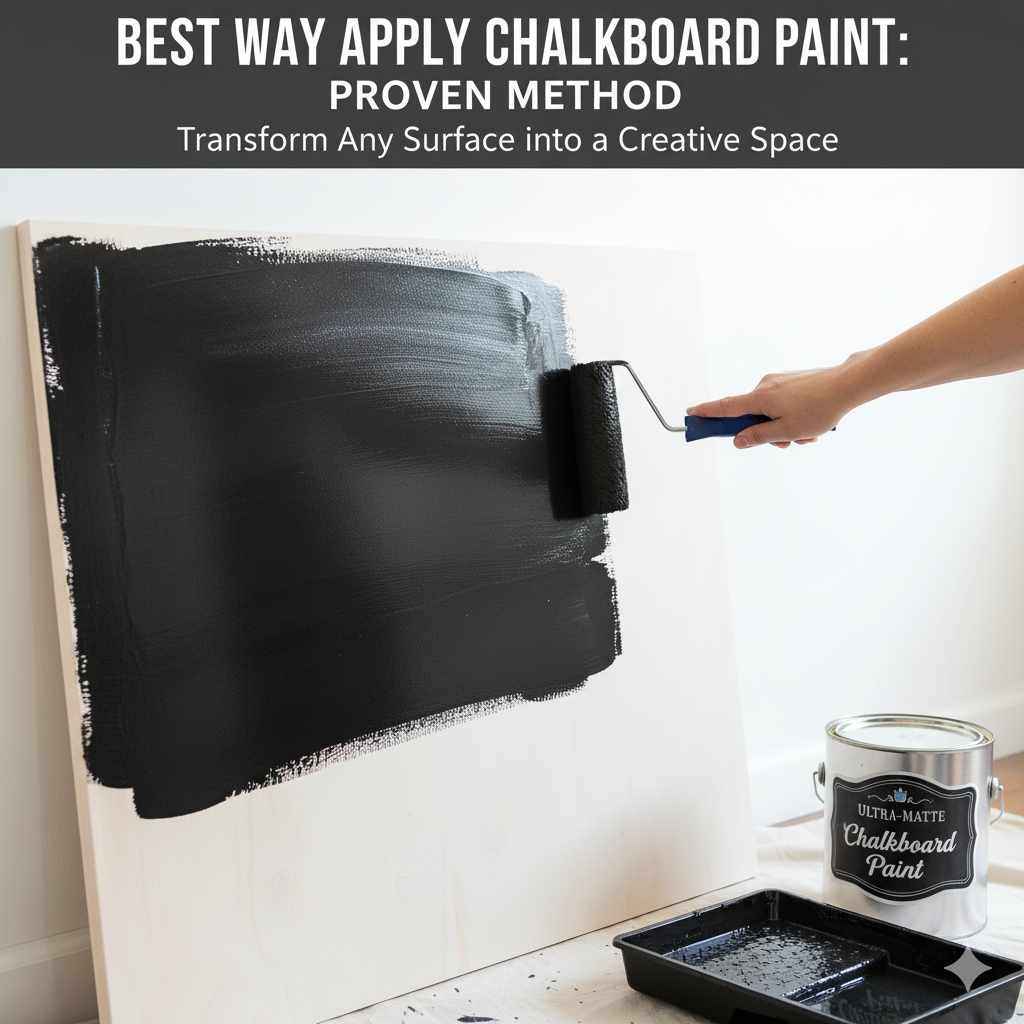
Applying the Chalkboard Paint: The Proven Method
Now comes the exciting part – applying the paint! Remember, patience and thin coats are key to achieving that perfect chalkboard look. Think of it like building up layers of smooth frosting on a cake.
Step 1: Stir, Don’t Shake!
Before you begin, give your chalkboard paint a good stir. Unlike regular paint where shaking might be an option, you want to stir chalkboard paint gently but thoroughly. This is because chalkboard paint often contains fine abrasive particles that help create the writing surface. Shaking can vigorously mix these particles and potentially damage the paint’s consistency or create unwanted bubbles.
Step 2: The First Thin Coat
Dip your foam roller or brush into the paint, but don’t overload it. If using a roller, keep it evenly coated. Start applying the paint in long, even strokes. Work in a consistent direction, maintaining a “wet edge” so you don’t get lap marks. For walls, it’s often best to work in sections from top to bottom. If you’re painting a piece of furniture, try to work with the grain of the wood. The first coat might look a little streaky or uneven – that’s perfectly normal! The goal here is just to get a thin, even layer down.
Step 3: Allow for Drying Time
This is critical. Let the first coat dry completely according to the paint manufacturer’s instructions. Typically, this is a couple of hours, but always check the can. Rushing this step will lead to peeling, cracking, and a very frustrating experience when you try to write on it later.
Step 4: The Second (and Third, if needed) Thin Coat
Apply a second thin coat in the same manner as the first. Again, aim for smooth, even coverage without any thick globs. You might find that your second coat covers much better and smooths out any streaks from the first. Depending on the paint brand and your surface, you might need a third coat for optimal coverage and opacity. Apply it thinly and evenly, just like the others. Always allow adequate drying time between coats.
Step 5: Remove Painter’s Tape
This is best done while the last coat of paint is still slightly wet, or just after it has dried but before it’s fully cured. Gently pull the painter’s tape away from the painted surface. If you wait too long for the paint to cure completely, the tape can pull off dried paint with it, leaving jagged edges. Pull slowly and at an angle away from the painted surface.
Curing: The Patience Game
This is where many people encounter problems. Chalkboard paint doesn’t just need to dry; it needs to cure. Curing is a chemical process where the paint hardens completely, creating its durable, erasable surface. This takes much longer than drying.
Most chalkboard paints require at least 3-7 days to cure. During this time, avoid touching the surface as much as possible. Do not write on it, erase it, or clean it. Resist the urge! Think of it as letting a new piece of furniture settle in. This curing period is vital for ensuring your chalkboard paint is durable and will erase cleanly for years to come. If you write on it too soon, you risk leaving permanent chalk marks or damaging the paint.
First Use: Seasoning Your Chalkboard
Once your chalkboard paint has fully cured, it’s time to prepare it for its first “real” use. This process is called “seasoning” or “priming” the chalkboard, and it helps prevent permanent ghosting from chalk marks.
- Cover it in chalk: Take a piece of chalk (sideways is best for even coverage) and completely cover the entire surface of the chalkboard. Don’t draw pictures; just rub the chalk all over.
- Erase: Use a clean, dry microfiber cloth or a standard chalkboard eraser to wipe away all the chalk dust.
This simple step fills any tiny pores in the paint with chalk dust, creating a smoother surface for future writing and making it much easier to erase later on. Your chalkboard is now ready for action!
Tips for Maintaining Your Chalkboard
To keep your chalkboard looking great and functioning perfectly, here are a few maintenance tips:
- Regular Cleaning: For general cleaning, use a clean, dry microfiber cloth or a chalkboard eraser.
- Damp Cloth Cleaning: For a deeper clean or to remove stubborn marks, lightly dampen a cloth with water (wring it out well!) and wipe the surface. Follow up with a dry cloth.
- Avoid Abrasives: Never use abrasive cleaners, solvents, or harsh chemicals on your chalkboard. These can damage the paint and its erasable qualities.
- Chalk Choice Matters: Standard chalk works best. Chalk containing dyes or wax can sometimes leave residue.
- Proper Erasing: Always erase when the surface is dry. If you’ve just used a damp cloth, wait for it to dry completely before writing.
Troubleshooting Common Chalkboard Paint Problems
Even with the best intentions, little hiccups can happen. Here’s how to tackle some common issues:
Problem: Uneven Texture or Streaks
Cause: Uneven application, too much paint on the roller/brush, not enough coats, or poor surface prep.
Solution: If the paint is still wet, try to smooth it out with your roller. If it’s dry, you’ll likely need to lightly sand the affected area and apply another thin, even coat. Always use thin, consistent coats.
Problem: Chalk Marks Won’t Erase (Ghosting)
Cause: Writing on the surface too soon before it’s fully cured, or not “seasoning” the board first.
Solution: Ensure the paint is fully cured (minimum 3-7 days) and that you seasoned it properly before writing. If ghosting is still an issue, try a slightly damp cloth to clean the board (let it dry completely before writing again) or consider a commercial chalkboard cleaner designed for such paints. Some tough marks might be permanent, unfortunately.
Problem: Paint Peeling or Bubbling
Cause: The surface wasn’t clean, primer wasn’t used on a porous surface, or too much paint was applied at once.
Solution: This is the trickiest. You may need to carefully scrape and sand away the affected areas, re-prime if necessary, and reapply the chalkboard paint in thin coats. Ensuring a clean, properly primed surface is key to avoiding this.
Types of Chalkboard Surfaces
Chalkboard paint isn’t the only way to get a chalkboard effect! Understanding these options can help you choose the best method for your project.
| Method/Product | Pros | Cons | Best For |
|---|---|---|---|
| Traditional Chalkboard Paint | Versatile (apply to almost any surface), affordable, wide color selection. | Requires careful application for a smooth finish, needs curing and seasoning. | Walls, furniture, custom shapes, beginners on a budget. |
| Liquid Chalk Markers | Vibrant colors, smooth application, often water-based and erasable. | Can be more expensive than paint, less durable than true chalkboard surface. | Signage, temporary labels, doodling on existing chalkboards. |
| Chalkboard Wallpaper/Contact Paper | Easy to apply, removable, instant chalkboard surface. | Can sometimes bubble or peel if not applied carefully, writing surface might not be as smooth as paint. | Temporary applications, rentals, quick kitchen labels. |
| Chalkboard Spray Paint | Fast application, good for small and intricate items. | Can be difficult to achieve an even coat without drips, fumes require good ventilation. | Craft projects, small furniture, decorative items. |
For a durable, professional-looking finish that you can rely on for years, traditional chalkboard paint, applied using the method outlined above, is generally the preferred choice. It offers the best balance of affordability, customization, and a high-quality writing experience.
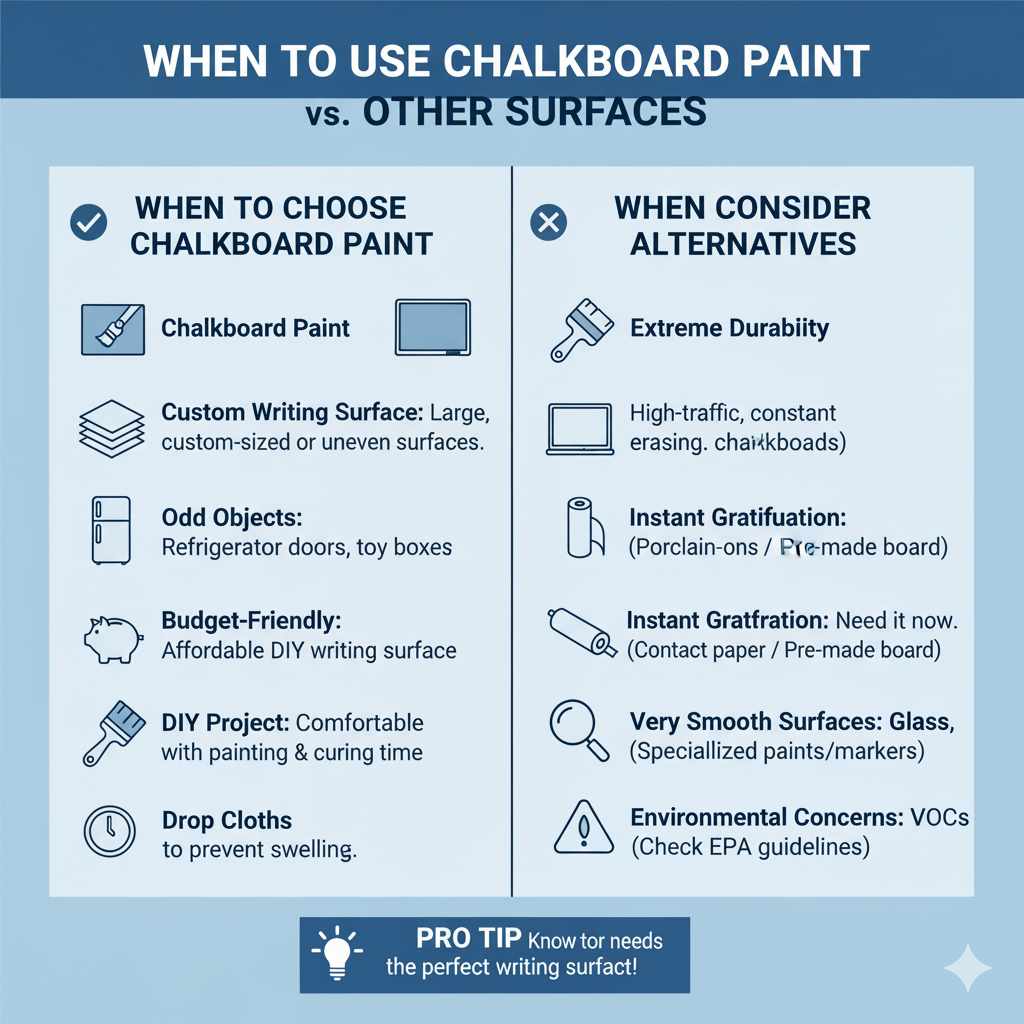
When to Use Chalkboard Paint vs. Other Surfaces
Chalkboard paint is fantastic, but it’s not always the perfect solution for every situation. Here’s a quick guide:
When to Choose Chalkboard Paint:
- You want to create a large, custom-sized writing surface.
- You are painting a slightly uneven surface where traditional chalkboards might not fit or look right.
- You want to paint an object that isn’t a flat board (e.g., a refrigerator door, a toy box).
- You are on a budget and want an affordable way to create a writing surface.
- You are comfortable with a multi-step painting process and waiting for drying and curing times.
When to Consider Alternatives:
- Extreme Durability Needs: For very high-traffic areas where constant rewrites and erasing will occur, a true porcelain-on-steel chalkboard might be more durable. These are significantly more expensive.
- Instant Gratification: If you need a chalkboard surface right now with minimal fuss, chalkboard contact paper or a pre-made chalkboard board might be better.
- Very Smooth, Non-Porous Surfaces: For a very smooth, slick surface like glass or highly glossed laminate, specialized glass paints or permanent markers might be more suitable, or you might need an additional bonding primer.
- Environmental Concerns: Always check the Environmental Protection Agency (EPA) guidelines for VOCs (volatile organic compounds) in paints if this is a major concern for your project and ensure adequate ventilation.
Conclusion: Your Chalkboard Masterpiece Awaits!
There you have it! By following these steps—especially focusing on thorough surface preparation, applying thin, even coats, and respecting those crucial drying and curing times—you’ll be well on your way to creating a beautiful, functional chalkboard surface. Remember, the “best way” is all about attention to detail and a little bit of patience. Don’t be discouraged if your first attempt isn’t absolutely perfect; every project is a learning experience. With this proven method, you’ve got the knowledge to transform ordinary surfaces into creative canvases. So gather your supplies, follow these steps, and get ready to write, draw, and create to your heart’s content!
Frequently Asked Questions (FAQ)
Q1: How many coats of chalkboard paint should I apply?
A1: Typically, two to three thin, even coats are recommended. Always apply them thinly to avoid drips and ensure a smooth finish. Allow each coat to dry completely before applying the next.
Q2: How long does chalkboard paint take to cure?
A2: Most chalkboard paints require a curing period of at least 3 to 7 days. During this time, you should avoid writing on, erasing, or cleaning the surface to ensure maximum durability and an erasable finish.
Q3: Can I paint over existing paint with chalkboard paint?
A3: Yes, you can, but the existing paint must be in good condition (no peeling or flaking). Lightly sanding the surface and cleaning it thoroughly is essential for good adhesion. In some cases, a primer might be beneficial.