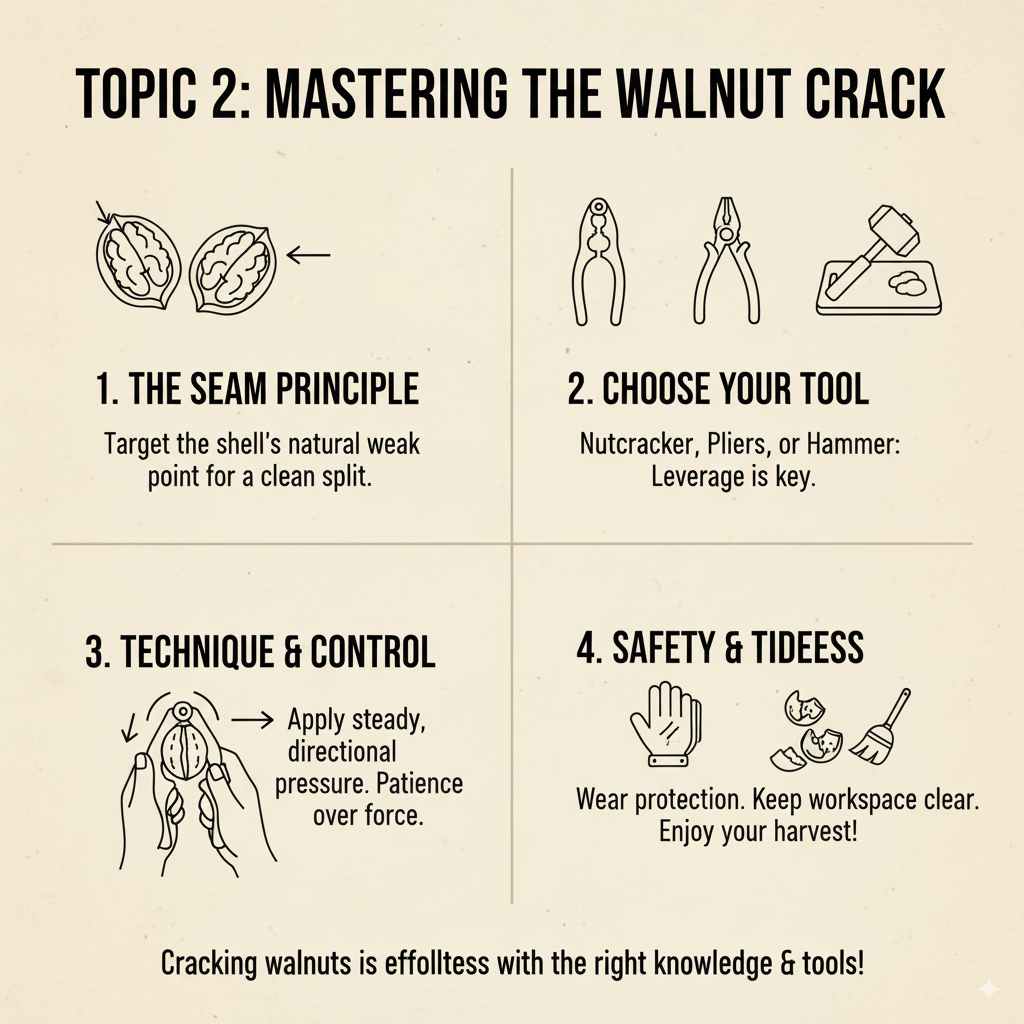
Best Way To Crack Walnuts: Effortless
The best way to crack walnuts effortlessly involves using the right tool and technique to split the shell cleanly along its natural seam, yielding the most intact nut meat with minimal mess and frustration.
Cracking walnuts can sometimes feel like a battle. You’re left with tiny shell fragments, bruised thumbs, and hardly any of the delicious nut meat. It’s a common frustration for anyone who loves adding walnuts to their baking, salads, or just enjoys them as a snack. But it doesn’t have to be this way! With a few simple tricks and the right approach, you can crack walnuts with surprising ease and get those beautiful, whole nut halves every time.
Imagine this: no more struggling, no more wasted nut meat, and only perfectly cracked shells. We’re going to walk through the most effective methods, from simple household items to specialized tools, ensuring you get the hang of it quickly. Stick around, and you’ll be a walnut-cracking pro in no time!
Why Cracking Walnuts Can Be Tricky
Walnut shells are naturally tough. They’ve evolved to protect the precious nut inside from the elements and pests. This toughness, while vital for the walnut’s survival, presents a challenge when we want to get to the kernel. The hard, woody shell requires more than just brute force; applying the wrong kind of pressure can shatter the shell into countless pieces, making it difficult to extract the nut meat cleanly. This is why simply squeezing them with bare hands rarely works well.
Different varieties of walnuts also have slightly different shell thicknesses and structures. For instance, English walnuts, the most common type, tend to have ridges and a harder shell than some other varieties. Understanding these nuances can help you choose the best cracking method. The goal is to find a way to apply concentrated, controlled pressure precisely where it will split the shell along its weakest points, typically the seam where the two halves of the shell meet.
Understanding Walnut Anatomy: The Key to Effortless Cracking
Before we dive into cracking methods, let’s take a quick look at a walnut shell. Most walnuts are naturally divided into two halves, joined by a thicker seam. This seam is often the secret to cracking them efficiently. Instead of trying to crush the entire shell, focus your efforts on this seam. When you apply pressure along this line of separation, it’s much more likely to give way cleanly, splitting the shell into two pieces and often leaving the nut meat largely intact.
Think of it like a seam on a piece of fabric or a line of perforations on paper. It’s designed to be the weak point. By locating this seam and applying steady, directional pressure, you can often achieve perfect cracks. Many cracking tools are designed specifically to target this seam, making your job much easier. Knowing where this seam is will make deciphering how to use your chosen tool much more intuitive.

The Best & Easiest Ways to Crack Walnuts
There are several effective methods for cracking walnuts, each suited to different situations and available tools. The “best” way often depends on how many walnuts you need to crack and what equipment you have on hand. We’ll explore the most reliable and beginner-friendly options.
Method 1: The Classic Nutcracker (The Most Reliable)
This is the go-to tool for many, and for good reason. A well-designed nutcracker provides leverage, allowing you to apply significant force with relative ease. However, not all nutcrackers are created equal.
Choosing the Right Nutcracker
- Leverage Design: Look for nutcrackers with good leverage. Those with longer handles generally make cracking easier.
- Jaw Style: Some have serrated jaws to grip the nut better, while others have a simpler, smooth design. For walnuts, a jaw that can accommodate the size of the nut and apply pressure across its diameter is ideal.
- Material: Stainless steel or sturdy cast metal is preferable for durability.
- Ergonomics: Comfortable handles will make the process more enjoyable, especially if you’re cracking a large batch.
How to Use a Nutcracker
- Inspect the Walnut: Find the natural seam running along the walnut’s shell.
- Position the Walnut: Place the walnut inside the nutcracker’s jaws, aligning the jaws with the seam. You can place it either over the widest part of the walnut or directly on the seam if the cracker allows.
- Apply Gentle Pressure: Begin squeezing the handles slowly and steadily. Listen for the shell to crack.
- Adjust and Squeeze Again: If it doesn’t crack, reposition the walnut slightly within the jaws, focusing pressure on the seam, and squeeze a little harder. You may need to squeeze with moderate force. The goal is to crack the shell, not crush the nut meat.
- Troubleshooting: If one side splits but the other doesn’t, try rotating the walnut or cracker slightly and applying pressure again. Once cracked, gently remove the shell pieces.
This method is incredibly effective for English walnuts and many other similar nuts. It’s efficient, relatively clean, and with a decent nutcracker, requires minimal effort.
Method 2: The Tongue-and-Groove Pliers (A Sturdy Alternative)
If you have a sturdy pair of adjustable pliers, often called tongue-and-groove pliers or channel locks, you can adapt them into a surprisingly effective nut-cracking tool. Their strong grip and ability to apply focused pressure make them a good option, especially if you don’t have a dedicated nutcracker.
How to Use Tongue-and-Groove Pliers
- Select the Right Pliers: Choose a pair that isn’t too large. You need to be able to control the pressure well.
- Adjust the Grip: Set the pliers to a narrow opening, just slightly larger than the walnut. This is crucial for control.
- Position the Walnut: Find the seam of the walnut. Place the jaws of the pliers over the walnut, ideally with one jaw on each side of the seam, or with the crushing surface directly on the seam.
- Apply Controlled Pressure: Gently and gradually squeeze the handles together. Move slowly and listen for the crack. You’re aiming to apply pressure along the seam.
- Work the Seam: If the initial squeeze doesn’t crack it, try slightly adjusting the position of the walnut within the jaws or opening the pliers a bit and repositioning them to target a different part of the seam. Squeeze again with steady pressure.
- Extract the Nut: Once the shell cracks, carefully remove the pieces and extract the nut meat.
Safety Note: Be very careful not to over-squeeze, as these pliers can be powerful and might shatter the shell unexpectedly, sending pieces flying. Always wear eye protection if attempting this method.
Method 3: The Hammer and Cutting Board (For Larger Batches)
When you have a lot of walnuts to crack, or if you don’t have a specific nut-cracking tool, a hammer and a sturdy surface can be surprisingly effective. This is a more rustic method but works well if executed carefully.
Tools Needed
- Hardwood Cutting Board: A thick, solid cutting board is essential to protect your countertop and provide a stable surface. Avoid glass or thin plastic boards.
- Small Hammer: A ball-peen hammer or even a small claw hammer can work. You need something with a flat striking surface.
- Bowl for Walnuts: To hold the nuts and catch shell fragments.
How to Use the Hammer Method
- Prepare Your Workspace: Place the hardwood cutting board on a stable counter. Put a small amount of walnuts into a bowl positioned on the board.
- Locate the Seam: Pick up one walnut and find its seam.
- Position for Impact: Place the walnut on the cutting board with the seam facing upwards.
- Gentle Tap: Take your hammer and give the walnut a firm, but not violent, tap directly on the seam. The goal is to apply enough force to split the shell along its weakest point.
- Check and Repeat: Lift the walnut carefully. If it has cracked open nicely, great! If not, turn it slightly or reposition it on the seam and give it another tap. You may need to try tapping from a couple of angles on the seam.
- Extract the Nut: Once the shell is cracked, gently pull the halves apart.
- Contain the Mess: This method can create more shell fragments, so keep the walnuts in a bowl or on the cutting board to manage the cleanup.
For a better understanding of the science behind impact and materials, you can explore resources on physical properties of materials, like those found on educational sites such as Scientific American, which often breaks down everyday physics.
Method 4: The Vice (Precision Control)
If you have a woodworking vice or a small bench vice, this is one of the most controlled and effective ways to crack walnuts, especially if you need perfect halves. It allows for incredibly precise pressure application.
How to Use a Vice
- Prepare the Vice: Ensure the vice is clean and has parallel jaws.
- Position the Walnut: Place a walnut in the vice jaws, with the seam aligned directly between the tightening screws and the jaws. You want the crushing force to be applied equally on both sides of the seam.
- Tighten Slowly: Gradually tighten the vice handles. As the jaws close, they will apply increasing pressure to the walnut.
- Listen and Feel: Continue tightening slowly. You’ll feel resistance, and then suddenly, the shell should crack. Stop tightening immediately once you hear or feel the crack.
- Open and Extract: Gently open the vice and remove the cracked walnut. The halves of the shell should separate cleanly, often keeping the nut meat intact.
This method is particularly useful for larger quantities where precision and clean breaks are desired. It requires minimal physical effort and can be very satisfying to watch the shell yield perfectly.
Method 5: The “Kitchen Tool” Hack (When in a Pinch)
Sometimes, you just need to crack a walnut and don’t have any specialized tools. Several common kitchen items can be surprisingly effective in a pinch.
Options Include:
- Door Hinge Trick: Open a sturdy interior door slightly. Place the walnut in the hinge gap, on the side of the hinge pin. Slowly and carefully close the door. The pressure applied by the hinge pin along the walnut’s seam can crack it open. Be very cautious with this method to avoid damaging the door or pinching fingers.
- Sturdy Spoon Handle: Place the walnut on a hard surface. Use the sturdy handle of a metal spoon to firmly press down on the walnut’s seam. It might take a bit of force and some repositioning.
- Mortar and Pestle (Carefully): Place a few walnuts in a mortar. Use the pestle to gently tap or press down on them, aiming to crack the shells rather than pulverize them. This is best for just a few nuts and requires a delicate touch.
These methods are less precise and can be messier, but they demonstrate that with a little ingenuity, you can often achieve the goal with everyday items.
Comparing Walnut Cracking Methods
Choosing the best method depends on your needs. Here’s a quick comparison to help you decide:
| Method | Pros | Cons | Best For |
|---|---|---|---|
| Nutcracker | Effective, clean breaks, easy to use, widely available. | Requires purchasing a specific tool, quality varies. | Everyday use, moderate amounts, clean nut halves. |
| Tongue-and-Groove Pliers | Sturdy, good leverage, often already owned. | Requires more control to avoid crushing, can be messier. | When a nutcracker isn’t available, moderate amounts. |
| Hammer and Cutting Board | Good for large batches, uses common tools. | Can be messy, requires more force, potential for shell fragments. | Large quantities, rustic settings. |
| Vice | Highly controlled, precise cracks, yields perfect halves. | Requires a vice tool, might be overkill for a few nuts. | Large quantities needing perfect halves, workshops. |
| Kitchen Tool Hacks | Convenient when no other tools are available. | Less precise, potentially messy, requires caution, lower success rate. | Emergency situations, cracking just one or two nuts. |
Tips for Effortless Walnut Cracking
Beyond just the tool and technique, a few extra tips can make your walnut cracking experience even smoother:
- Work Over a Container: Always crack your walnuts over a bowl, tray, or countertop with a lip. This catches stray shell fragments, making cleanup much easier.
- Soften the Shells (Sometimes): For very hard-to-crack walnuts, some people find briefly soaking them in warm water can slightly soften the shell. However, this can also affect the taste and texture of the nut meat, so it’s not always recommended for immediate consumption or baking where crispness is key.
- Rotate and Re-grip: Don’t be afraid to adjust your grip or rotate the walnut if the first attempt doesn’t yield a clean crack. Sometimes a slight shift in angle is all it takes.
- Patience is Key: Especially when using methods like the hammer or pliers, approach it with patience. Applying steady, controlled pressure is far more effective than trying to force it.
- Inspect Your Nuts: Look for walnuts that have a visible, pronounced seam. These are generally easier to crack.
- Safety First: Always be mindful of your fingers and eyes. Wear protective eyewear if you’re concerned about flying shell fragments, especially with methods involving impact or strong force.
Nut Meats and Storage
Once you’ve successfully cracked your walnuts, you’ll want to enjoy or store the nut meats properly. The goal is to get them out in large pieces, rather than crumbled bits.
- Extracting Meat: After cracking, use your fingers or a small, dull utensil (like the tip of a butter knife or a toothpick) to gently pry out the nut meat. Often, the two halves will come out together. If they break, carefully extract each piece.
- Removing the Skin: The thin, papery skin of the walnut can sometimes be bitter. If you prefer, you can lightly toast the nut meats in a dry pan over low heat for a few minutes, then gently rub them between your hands or in a clean tea towel to remove the skins.
- Storage: Raw walnut halves and pieces are best stored in an airtight container in a cool, dark place. For longer storage, the refrigerator or freezer is ideal. Walnuts contain oils that can go rancid, so proper storage is important for maintaining freshness and flavor. Check out the Old Farmer’s Almanac for excellent general nut storage tips.
Mastering the Walnut Crack: Your Final Takeaway
Cracking walnuts doesn’t need to be a chore. By understanding the structure of the walnut shell and employing the right technique with the appropriate tool, you can achieve effortless, clean breaks every time. Whether you opt for the classic nutcracker, leverage sturdy pliers, or even resort to a hammer and cutting board for a larger harvest, the principle remains the same: target the seam with controlled pressure.
The most straightforward and often the most effective method for most people is a good quality nutcracker. It’s designed for the job and provides the right balance of grip and leverage. However, knowing these alternative methods ensures you’re always prepared, no matter what tools you have at your disposal. Remember to work with patience, keep your workspace tidy, and always prioritize safety. Soon, cracking walnuts will become a simple, even satisfying, part of your cooking or snacking routine!
Frequently Asked Questions (FAQs)
Q1: What is the easiest way to crack walnuts?
The easiest way is generally using a good quality nutcracker designed for nuts. Place the walnut in the cracker by its seam and apply steady pressure until it cracks open.
Q2: How can I crack walnuts if I don’t have a nutcracker?
You can use sturdy tongue-and-groove pliers by adjusting them to a narrow grip and applying controlled pressure along the walnut’s seam. Alternatively, a hammer tapped gently on the seam over a cutting board can work, but be cautious.
Q3: How do I get the nut meat out without it breaking?
The key is to crack the shell along its natural seam with controlled pressure. Once cracked, gently pry the shell halves apart. Many tools, like a vice or a well-designed nutcracker, help achieve this with whole nut halves.