Best Way to Strip Paint: Effortless Genius Method
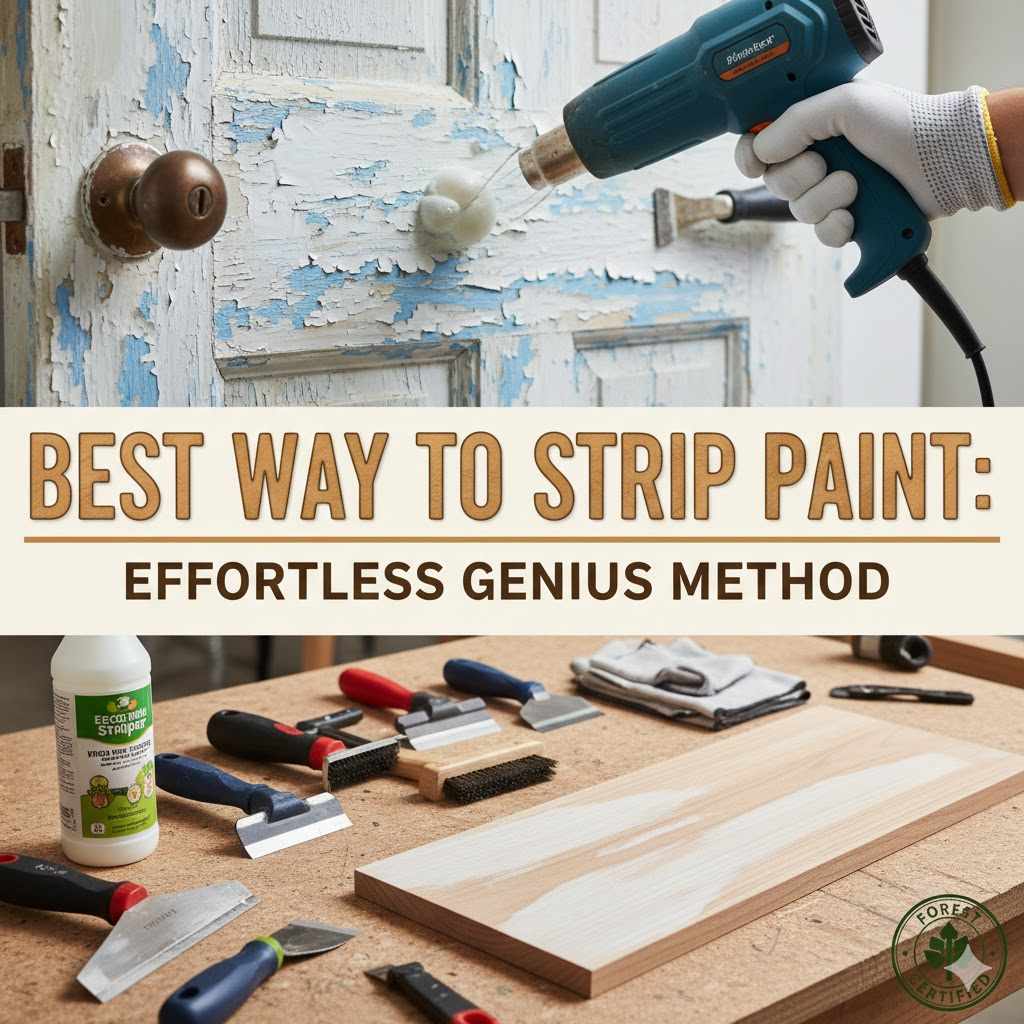
The best way to strip paint, especially from wood, is using an infrared paint stripper. This method is safer, faster, and gentler than harsh chemicals or high-heat guns. It uses specific wavelengths of light to heat the paint from behind, causing it to bubble up for easy, clean scraping without damaging the surface or creating toxic fumes.
Hello there! I’m Md Meraj. In my workshop, I’ve seen countless beautiful old furniture pieces hidden under layers of mismatched, chipped paint. It’s a common roadblock for many DIY projects. You have a vision, but that stubborn old finish stands in the way. It can feel like a chore, messy and frustrating. But what if I told you there’s a method that feels less like a battle and more like magic?
Today, I’m going to walk you through my absolute favorite way to strip paint—a method that is so simple and effective, you’ll wonder why you ever did it any other way. Let’s get that old surface ready for a beautiful new life, together.
Why Bother Stripping Old Paint?
You might be tempted to just slap a new coat of paint over the old one. It seems faster, right? Sometimes that’s okay for a quick fix, but for a project you care about, starting with a clean slate is key. When you properly strip old paint, you’re not just getting rid of an old color. You are creating a perfectly smooth, stable foundation for your new finish.
Here’s why it’s worth the effort:
- A Flawless Finish: New paint sticks much better to a clean surface. Without the bumps, cracks, and flakes of the old layer, your final coat will look professional and smooth.
- Long-Lasting Results: Painting over unstable, peeling paint means your new coat will start peeling right along with it. Stripping ensures your hard work lasts for years to come.
- Revealing Hidden Beauty: Especially with wood furniture, stripping away old paint can reveal gorgeous wood grain you never knew was there. You might decide to stain it instead of painting!
- Proper Repair: It allows you to see and fix any underlying damage to the wood, like dents or cracks, before you apply your new finish.
Think of it like building a house. You wouldn’t build on a cracked, crumbling foundation. The same idea applies here. A little prep work upfront saves you from headaches and disappointment later.

The Secret to Effortless Paint Stripping: The Infrared Method
Over the years, I’ve tried everything: messy chemical strippers, scorching-hot heat guns, and endless, dusty sanding. They all work, but each comes with big drawbacks. Chemicals are smelly and harsh. Heat guns can easily scorch wood and release harmful fumes. Sanding creates a massive dust storm and can damage delicate details.
Then I discovered infrared paint stripping, and it was a complete game-changer. This is the “effortless genius method” I share with everyone who feels intimidated by the stripping process.
What is an Infrared Paint Stripper?
An infrared paint stripper is a tool that looks a bit like a futuristic lamp. It uses special infrared heat waves to warm up the surface you’re working on. Unlike a traditional heat gun that blows hot air and can easily burn the wood, infrared heat penetrates through the paint layers and warms the surface underneath the paint. This breaks the bond between the paint and the wood. The paint gently bubbles and softens in a matter of seconds, making it incredibly easy to scrape away in large, satisfying sheets.
Why This is My Go-To “Genius Method”
I recommend this method to beginners and seasoned woodworkers alike for several simple reasons:
- It’s Gentle: Because it heats the wood gently from within, there’s a much lower risk of scorching or damaging the wood surface. This is perfect for antique furniture or detailed woodwork.
- It’s Safer: Infrared tools operate at a lower temperature than heat guns (around 400-600°F instead of 1000°F+). This significantly reduces the risk of fire and the release of toxic fumes, especially from old lead-based paints.
- It’s Cleaner: Forget the goopy mess of chemical strippers or the endless dust from sanding. The paint comes off in soft, rubbery peels that are easy to clean up.
- It’s Quiet and Fume-Free: The tool is silent and doesn’t produce the harsh fumes associated with chemicals. You can even work indoors with proper ventilation.
- It’s Surprisingly Fast: You can clear large areas quickly once you get into a rhythm of heating and scraping. It turns a dreaded task into a remarkably satisfying one.
Your Toolkit for Success: What You’ll Need
Getting set up for this method is simple. You don’t need a huge arsenal of professional tools. Here is your shopping list:
- Infrared Paint Stripper: This is the star of the show. Brands like Speedheater™ are famous, but there are other great options available too. It’s an investment, but one that pays for itself in time and results.
- Paint Scrapers: Get a good quality pull scraper and a few different sizes of push scrapers (a 1-inch, 2-inch, and a detail scraper are a great start). Sharp blades make all the difference.
- Safety Gear (Non-Negotiable!):
- Heat-resistant gloves to protect your hands.
- Safety glasses or goggles to protect your eyes.
- A respirator, especially if you suspect the paint is old. An N95 mask is a minimum, but a respirator with P100 cartridges is better.
- Drop Cloths: Canvas or plastic sheets to protect your floor and make cleanup a breeze.
- Metal Can or Bucket: A safe place to put the hot, scraped paint chips.
- Mineral Spirits and Rags: For cleaning the surface after stripping.
- Sandpaper: A medium grit (like 120) and a fine grit (like 220) for the final prep.
The Step-by-Step Guide to Flawless Paint Stripping
Alright, you’ve got your tools, and you’re ready to go. Let’s walk through this process one step at a time. Remember, take your time and enjoy the process. Revealing that beautiful wood underneath is one of the most rewarding parts of any project.
Step 1: Safety First! Prepare Your Area
Before you even plug in the tool, set up your workspace for success. Lay down your drop cloths to catch all the paint peels. Ensure your area is well-ventilated—open a window or a garage door. Put on your safety glasses, gloves, and respirator. If you’re working with a piece you can move, bring it to a comfortable working height. This saves your back and gives you better control.
Step 2: Get to Know Your Tool
Read the manual for your specific infrared stripper. Understand how to turn it on, how far to hold it from the surface, and what the recommended heating time is. Most models are designed to be held 1-3 inches away from the paint. They often have built-in supports so you can rest it on the surface without getting too close.
Step 3: Heat Things Up (Gently)
Place the infrared stripper over your starting section. Turn it on. The magic happens quickly! Depending on the type and number of paint layers, it will take anywhere from 20 to 60 seconds. You’ll see the paint start to bubble and blister. You might even hear a faint sizzle. This is the sign that the bond has broken. Don’t overheat it! If you see or smell smoke, you’ve held it there for too long. Move the tool to the next section to get it warming up while you work on the section you just heated.
Step 4: The Satisfying Scrape
Once the paint is bubbling, it’s ready. Use your pull scraper for flat surfaces. Pull it toward you with firm, even pressure. The softened paint should come off easily in long strips. For other areas, a push scraper works best. The goal is to let the sharp edge of the scraper get just under the paint layer and lift it off. Don’t dig into the wood. Let the tool do the work.
Step 5: Tackling Tricky Spots
What about curved legs, spindles, or detailed molding? This is where your smaller detail scrapers come in handy. Heat the area just as before, but use a scraper that matches the contour of the surface. For tight corners, a pointed triangular scraper is your best friend. Work slowly and methodically in these areas. The gentleness of the infrared heat is a huge advantage here, as it’s much less likely to damage these delicate spots.
Step 6: The Clean-Up Crew
As you work, place the soft, warm paint peels into your metal can. Once you’ve stripped the entire piece, sweep or vacuum up any remaining bits from your drop cloth. Then, take a rag dampened with mineral spirits and wipe down the entire surface. This will remove any lingering paint residue and prepare the wood for the final step.
Step 7: Final Prep Before the Fun Part (Refinishing!)
Your piece is now bare, but it needs one last touch. Lightly sand the entire surface with medium-grit sandpaper (120-grit) to smooth out any minor imperfections. Follow up with fine-grit sandpaper (220-grit) to get it silky smooth to the touch. Always sand in the direction of the wood grain. After sanding, wipe it all down with a clean, dry cloth to remove any dust. Now, you have a perfectly prepped surface, ready for whatever beautiful new finish you have planned!
Paint Stripping Methods at a Glance
To help you see why I favor the infrared method, here’s a quick comparison of the most common options. Every method has its place, but for a beginner working on a valuable piece, the choice is clear.
| Method | Best For | Pros | Cons | Safety Level |
|---|---|---|---|---|
| Infrared Stripper | Wood furniture, windows, siding, historical restoration. | Gentle on wood, minimal fumes, no chemicals, fast, clean. | Higher upfront tool cost, requires electricity. | High (with standard PPE) |
| Chemical Stripper | Intricate metalwork, surfaces with many nooks and crannies. | Requires no electricity, effective on many layers at once. | Messy, harsh fumes, requires careful handling and disposal, can darken wood. | Low (requires full PPE and excellent ventilation) |
| Heat Gun | Flat, durable surfaces where scorching is not a major concern. | Relatively inexpensive, fast on thick paint. | High risk of scorching wood, can release toxic fumes (especially with lead paint), fire hazard. | Low-Medium (high risk of fumes and burns) |
| Sanding | Removing very thin finishes or scuffing a surface for repainting. | Inexpensive, good for final smoothing. | Extremely dusty, slow for heavy paint removal, can damage details and veneers. | Medium (requires excellent dust mask/respirator) |
Common Problems and Easy Fixes
Even with the best method, you might run into a little snag. Don’t worry! Here are some common issues and how to solve them like a pro.
| Problem | Possible Cause | Solution |
|---|---|---|
| The paint isn’t bubbling or is hard to scrape. | Not enough heat time or the paint is a modern latex/acrylic. | Leave the stripper on for another 10-15 seconds. If it’s a very stubborn paint, a final pass with a chemical stripper on the last thin layer might be needed. |
| I’m seeing or smelling smoke. | The wood is getting too hot. | Immediately remove the stripper. You are holding it too close or for too long. Let the area cool completely before trying again for a shorter time. |
| My scraper is gouging the wood. | The scraper is dull or you’re using too much pressure. | Sharpen or replace your scraper blade. Let the heat do the work and use a lighter touch, focusing on lifting the paint, not digging. |
| There’s a sticky residue left on the surface. | Some of the paint binder has been left behind. | Wipe the area thoroughly with a rag soaked in mineral spirits or denatured alcohol. This should dissolve the residue. |
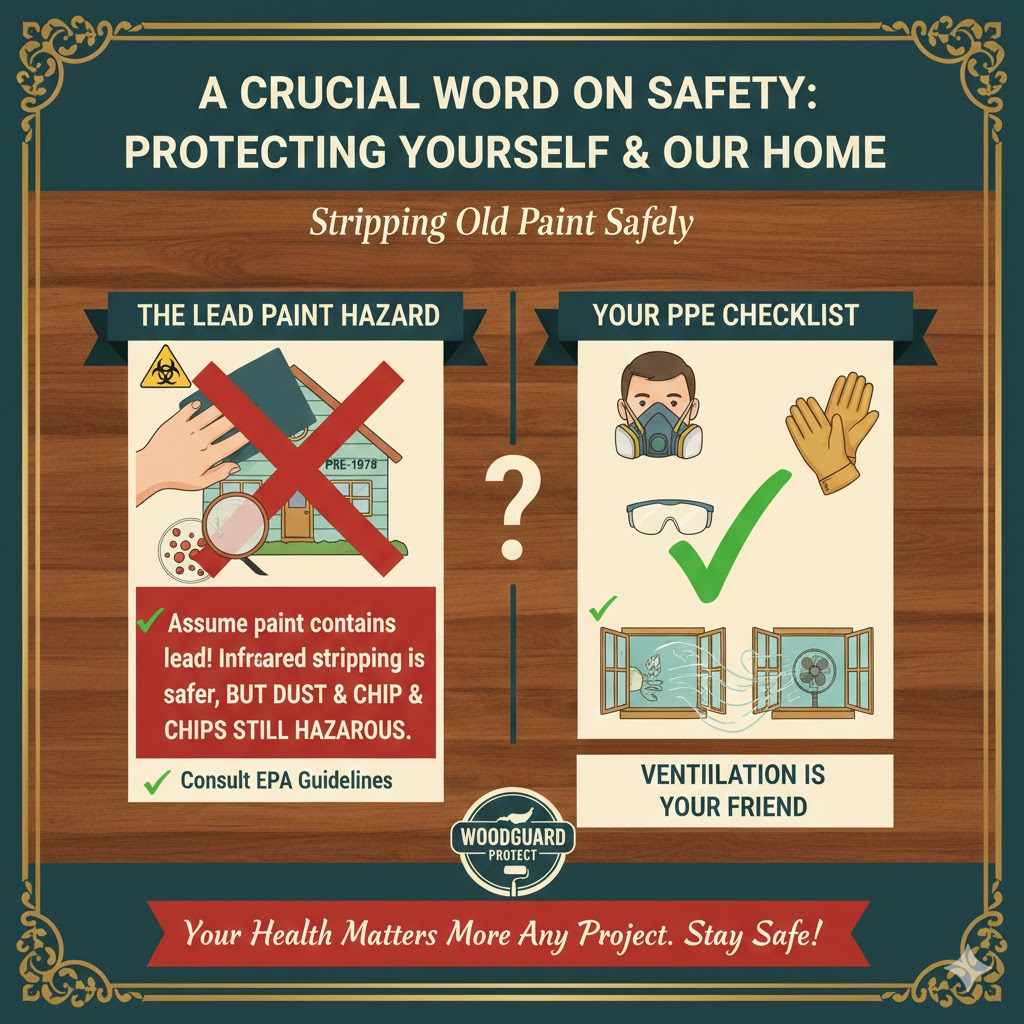
A Crucial Word on Safety: Protecting Yourself and Your Home
This is the part of the guide I never want you to skip. Your health and safety are more important than any project. Stripping paint, especially old paint, requires you to be careful and aware.
The Lead Paint Hazard
If you’re working on a house or furniture from before 1978, you must assume the paint contains lead. Lead is extremely toxic, especially to children and pets. Infrared stripping is one of the safest ways to remove lead paint because its lower heat helps prevent lead from turning into a vapor you can inhale. However, the dust and chips are still hazardous.
To learn more about how to protect your family from lead in your home, please consult the official resources from the Environmental Protection Agency (EPA). They provide detailed guides on testing for lead and handling it safely.
Your Personal Protective Equipment (PPE) Checklist
This is your non-negotiable uniform for this job.
- Respirator: Protect your lungs. A P100 cartridge respirator will filter out lead dust and other particulates.
- Eye Protection: Safety glasses or goggles are a must to protect from flying chips.
- Gloves: Heat-resistant gloves will protect your hands from the tool and the hot paint.
Ventilation is Your Best Friend
Always work in a well-ventilated space. Open windows and doors. Use a fan to create a cross-breeze that blows fumes and dust away from your work area and out of the room. Good airflow is essential, even with a low-fume method like infrared.
Frequently Asked Questions (FAQ)
Can I use this infrared method on any surface?
It’s best for wood, including siding, decks, windows, and furniture. It can also work on some masonry and metal surfaces, but you should always test a small, hidden spot first. Avoid using it on plastics, veneers, or materials that could melt.
Is an infrared stripper really better than a standard heat gun?
Yes, for woodworking, it is significantly better. A heat gun is like a blunt instrument—it blasts high heat that can easily damage wood and create toxic fumes. An infrared stripper is like a surgical tool—it uses targeted wavelengths to gently release the paint, preserving the wood and creating a safer work environment.
How do I know if my paint contains lead?
The safest bet is to assume any paint from before 1978 contains lead. You can buy lead test kits at most hardware stores. They are simple to use and give you an answer in minutes. If the test is positive, follow all EPA guidelines for safe removal and disposal.
What do I do with the old paint chips?
If you suspect the paint contains lead, you must dispose of it according to local regulations for hazardous waste. Do not just throw it in the regular trash. Check with your local waste management facility for instructions. If it’s non-leaded paint, you can typically dispose of it in your household garbage once it’s bagged up.
Can I just paint over old paint instead of stripping it?
You can, but the result won’t be as durable or professional. If the old paint is chipping, peeling, or cracking, any new paint you apply on top will fail along with it. Stripping creates the best possible foundation for a finish that will look great and last for many years.
How long does it take to strip a door?
With an infrared stripper, an experienced user could strip a standard flat door in 2-3 hours. For a beginner, plan for an afternoon. The more detailed the door (like a paneled door), the longer it will take. The key is to get into a steady rhythm of heating one section while you scrape the previous one.
Are infrared strippers expensive?
They have a higher upfront cost than a heat gun or chemical strippers, often ranging from $150 to $500. However, they are reusable for countless projects, don’t require you to keep buying chemicals, and can save you from costly mistakes like scorching a valuable antique. For any serious DIYer, they are a worthwhile investment.
You’ve Got This! Your Next Project Awaits
Stripping paint doesn’t have to be the part of the project you dread. With the right tool and the right technique, it can be a quick, clean, and incredibly rewarding process. Seeing the clean, beautiful surface emerge from under layers of old finish is a powerful moment. It’s the moment your project truly begins.
So, the next time you find that perfect piece of furniture that just needs a little love, I hope you feel confident and excited to tackle it. This effortless genius method puts professional-quality results well within your reach. Grab your tools, put safety first, and go bring that hidden beauty back to life. I can’t wait to see what you create.