Can I Paint a Formica Countertop Stunning Easy Steps
Yes, you absolutely can paint a Formica countertop! With proper preparation—cleaning, sanding, and a strong bonding primer—you can transform your old, dated laminate surfaces into a fresh, modern look. This budget-friendly DIY project is a fantastic way to update your kitchen or bathroom without the cost of a full replacement.
Hello there! Md Meraj here, your friend in the workshop. Do you look at your kitchen or bathroom and see countertops from another decade? Maybe they’re a strange color, faded, or just plain tired. You might dream of a fresh, new look but worry about the huge cost of replacement. Well, I have great news for you. You don’t need a big budget or professional skills to make a huge change. You can paint your Formica countertops, and it’s easier than you think!
Painting Formica is a wonderful project for any DIY lover. It gives you the power to completely change a room in just a weekend. In this guide, I’ll walk you through every step. We will cover everything from picking the right paint to making your new finish last. Let’s get started and give your countertops the beautiful makeover they deserve.
Why Bother Painting Your Formica Countertop?
Before we grab our rollers, let’s talk about why this project is such a popular choice for homeowners. Like any project, it has its good points and a few things to keep in mind. Knowing both sides will help you decide if it’s the right fit for your home.
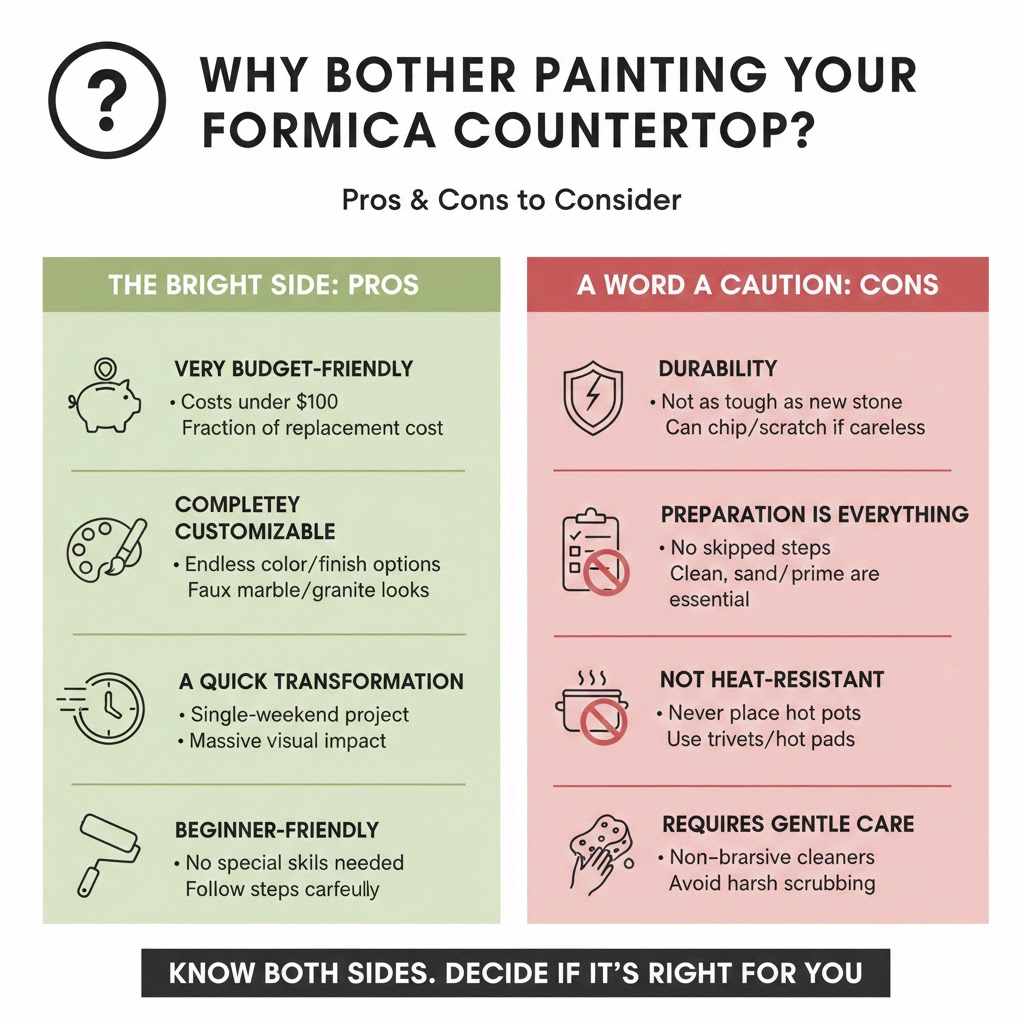
The Bright Side: Pros of Painting Formica
- Very Budget-Friendly: This is the biggest win. Replacing countertops can cost thousands of dollars. Painting them costs a tiny fraction of that, usually under $100 for all the supplies you need.
- Completely Customizable: The color and finish options are nearly endless. You can choose a solid color, or even try a faux finish like marble or granite. Your imagination is the only limit!
- A Quick Transformation: You can completely change the look of your kitchen or bathroom in a single weekend. It’s an instant gratification project that makes a massive impact.
- Beginner-Friendly: You don’t need special skills or expensive tools. If you can paint a wall, you can paint a countertop. The key is following the steps carefully.
A Word of Caution: Cons to Consider
- Durability: Let’s be honest—a painted surface will never be as tough as new granite or quartz. With the right sealer, it can be very durable for everyday use, but it can still chip or scratch if you’re not careful.
- Preparation is Everything: You cannot skip steps here. Proper cleaning, sanding, and priming are essential. If you rush the prep work, your paint will likely fail.
- Not Heat-Resistant: You cannot place a hot pot or pan directly on a painted surface. It will melt or damage the paint and sealer. You must always use trivets or hot pads.
- Requires Gentle Care: You’ll need to use non-abrasive cleaners and avoid harsh scrubbing. It’s a bit more delicate than the original laminate surface.
Gathering Your Supplies: The Ultimate Checklist
Having everything ready before you start makes the whole process smooth and enjoyable. Nothing is worse than having to stop mid-project for a trip to the store! Here is a handy list of everything you’ll need.
| Category | Item | Why You Need It |
|---|---|---|
| Safety Gear | Safety Glasses, Gloves, Respirator/Mask | To protect your eyes from splashes, hands from chemicals, and lungs from sanding dust and fumes. |
| Cleaning & Prep | Degreasing Cleaner | Removes grease, oil, and grime. This is a critical first step for paint adhesion. |
| Sponges or Scrub Pads | For applying the cleaner and scrubbing the surface thoroughly. | |
| 150-grit Sandpaper or Sanding Block | To lightly “scuff” the shiny surface, which gives the primer something to grip. | |
| Tack Cloth or Damp Rag | To remove every last bit of sanding dust before you prime. | |
| Protection | Painter’s Tape | To create clean lines and protect your walls, backsplash, sink, and cabinets. |
| Drop Cloths or Plastic Sheeting | To protect your floors and cabinets from paint drips and spills. | |
| Good Ventilation (Fan or Open Windows) | To help paint fumes escape and speed up drying times. | |
| Painting | High-Adhesion Bonding Primer | This is non-negotiable. It’s specifically made to stick to glossy, non-porous surfaces like Formica. |
| Durable Paint (Countertop Paint Kit or Acrylic Enamel) | The color and strength of your new surface. We’ll discuss options below. | |
| High-Quality Mini Foam Roller | Creates a super-smooth, brush-stroke-free finish. | |
| Small Angled Paint Brush | For cutting in along edges, corners, and the backsplash. | |
| Paint Trays | To hold your primer, paint, and sealer for easy roller application. | |
| Sealing | Water-Based Polyurethane Topcoat (in Satin or Semi-Gloss) | The clear shield that protects your paint from scratches, stains, and daily wear. |
Your Step-by-Step Guide to a Flawless Finish
Alright, with our supplies ready, it’s time for the fun part! Follow these steps carefully, and I promise you’ll be thrilled with the results. Patience is your best tool in this project.
Step 1: Prepare Your Workspace
First things first, protect the area around your countertops. You want your paint to go only on the Formica, not everywhere else!
- Clear Everything Off: Remove everything from your countertops—toasters, coffee makers, decor, you name it.
- Cover Your Floors and Cabinets: Lay down drop cloths or tape plastic sheeting over your lower cabinets and the floor in front of them.
- Tape Everything: Use painter’s tape to carefully mask off the wall along the backsplash, the edges of your sink, and anywhere the countertop meets an appliance. Press the tape down firmly to create a tight seal.
- Ventilate: Open some windows or set up a fan to get the air moving. This is important for your safety and helps with drying.
Step 2: Clean Like You Mean It
This is the most important step in the entire process. If the surface isn’t perfectly clean, the primer and paint won’t stick properly. Any hidden grease or grime will cause your paint to peel later on.
- Scrub with a Degreaser: Spray a good degreasing cleaner over the entire countertop surface. I recommend using an EPA Safer Choice certified cleaner to ensure it’s effective yet safe for your home.
- Scrub and Rinse: Use a sponge or non-abrasive scrub pad to scrub the entire surface. Pay special attention to the areas around the stove and sink where grease builds up.
- Rinse Well: After scrubbing, wipe the surface down with a clean, damp cloth to remove all the cleaner residue. Repeat this a couple of times.
- Let It Dry Completely: Allow the countertop to air dry fully. You can use a clean, dry towel to speed this up. The surface must be bone-dry before you move on.
Step 3: Sand for Success
Formica has a slick, glossy finish. Our goal here isn’t to remove the pattern or color, but to dull that shine. This process, called “scuff sanding,” creates thousands of microscopic scratches that give the primer something to hold onto.
- Lightly Sand the Surface: Take your 150-grit sandpaper or sanding block and lightly sand the entire countertop. This includes the edges and backsplash.
- Use a Gentle, Circular Motion: You don’t need a lot of muscle. The goal is just to take the gloss off. When you’re done, the surface should look dull and feel slightly rough.
- Clean Up the Dust: This is another crucial cleaning step! First, vacuum up the majority of the sanding dust with a brush attachment. Then, wipe the entire surface down with a tack cloth or a slightly damp, lint-free cloth. Make sure every speck of dust is gone.
Step 4: The Magic of Primer
Do not skip the primer! Regular paint will not stick to Formica on its own. You need a special “bonding” primer. This type of primer is designed to adhere to slick, hard-to-paint surfaces.
- Choose the Right Primer: Make sure your can says “bonding primer” or is specifically recommended for glossy surfaces or laminate.
- Cut In the Edges: Use your small angled brush to apply a thin coat of primer around the sink, along the tape lines, and in any tight corners.
- Roll the Main Surface: Pour some primer into a paint tray. Lightly load your foam roller and apply a thin, even coat to the rest of the countertop. Long, smooth strokes work best.
- Let It Dry: Check the primer can for recommended drying times. Let the first coat dry completely. If you can still see the old countertop pattern clearly, apply a second thin coat of primer.
Step 5: Let’s Paint!
Now the transformation really begins. Using the same technique as the primer, you’ll apply your chosen paint color.
- Stir Your Paint Well: Open your paint and stir it thoroughly to ensure the color is consistent.
- Cut In First: Just like with the primer, use your angled brush to paint the edges and corners first.
- Roll on a Thin Coat: Using your mini foam roller, apply a thin, even coat of paint. Avoid pressing too hard, as this can create lines. The first coat might look a little streaky—that’s okay! It’s better to do several thin coats than one thick, goopy one.
- Allow for Drying Time: Let the first coat dry completely according to the manufacturer’s instructions (usually 2-4 hours).
- Apply More Coats: Apply a second, and if needed, a third coat of paint, allowing each one to dry fully in between. Two to three thin coats will give you a beautiful, solid color.
Step 6: Seal the Deal for Long-Lasting Beauty
The topcoat is your countertop’s armor. It protects the paint from scratches, water, and stains. This step is what makes your hard work durable enough for a kitchen or bathroom environment.
- Choose Your Sealer: A water-based polyurethane is an excellent choice. It’s durable, dries clear, and doesn’t yellow over time like oil-based products can. A satin finish is often recommended as it hides fingerprints better than a high-gloss finish.
- Apply a Thin Coat: Using a new, clean foam roller and brush, apply a thin, even coat of the polyurethane. Watch out for drips or bubbles. If you see them, gently roll over them before they dry.
- Let It Dry and Lightly Sand: Let the first coat dry. For an ultra-smooth finish, you can lightly sand it with 220-grit sandpaper and wipe away the dust with a tack cloth. This step is optional but creates a very professional feel.
- Apply Additional Coats: Apply at least three coats of the topcoat, following the same process of drying (and optional sanding) between each coat. Three to four coats will provide excellent protection.
Step 7: The Hardest Part—Waiting for It to Cure
Your countertops may feel dry to the touch in a few hours, but they are not yet “cured.” Curing is the chemical process where the paint and sealer harden to their maximum durability. This takes time.
- Remove Painter’s Tape: Carefully remove the painter’s tape while the final topcoat is still slightly wet. Pull it at a 45-degree angle for the cleanest line.
- Be Patient: Wait at least 24-48 hours before placing any light items back on the countertops.
- Wait for the Full Cure: Avoid heavy use or cleaning for the full curing time recommended on your topcoat can—this is typically 3 to 7 days, but can be longer. Rushing this step is the most common reason for nicks and scratches on a new finish.
Choosing the Right Arsenal: Paint, Primer, and Sealer
The products you choose will have a huge impact on your project’s success and longevity. Let’s break down the best options.
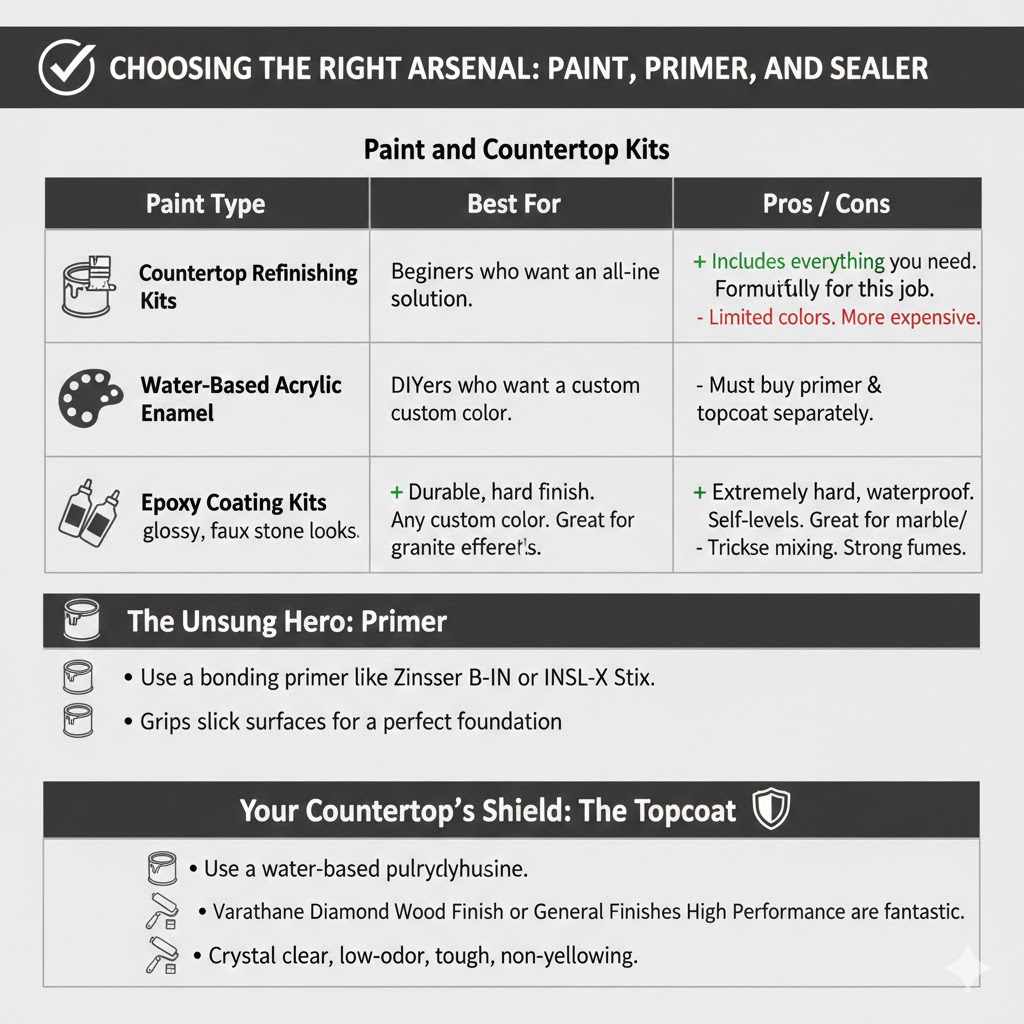
Paint and Countertop Kits
You have a few great choices for the color coat. Avoid using standard latex wall paint, as it’s not designed for this kind of heavy use.
| Paint Type | Best For | Pros | Cons |
|---|---|---|---|
| Countertop Refinishing Kits | Beginners who want an all-in-one solution. | Includes almost everything you need (primer, paint, topcoat, sometimes even tools). Formulated specifically for this job. | Limited color choices. Can be more expensive than buying components separately. |
| Water-Based Acrylic Enamel | DIYers who want a custom color. | Extremely durable hard finish. Can be tinted to any color you want. Easy water cleanup. | Must buy primer and topcoat separately. Requires careful selection of a quality brand like Sherwin-Williams Emerald Urethane Trim Enamel. |
| Epoxy Coating Kits | Creating a super thick, glossy, and durable finish, often for faux stone looks. | Extremely hard and waterproof. Self-levels to a smooth, glass-like surface. Great for creating marble or granite effects. | Can be tricky to work with, as it has a short working time. Requires very precise mixing. Fumes can be strong. |
The Unsung Hero: Primer
I can’t say this enough: use a bonding primer. Look for products like Zinsser B-I-N Shellac-Base Primer or INSL-X Stix Waterborne Bonding Primer. These are made to grip slick surfaces and create the perfect foundation for your paint.
Your Countertop’s Shield: The Topcoat
For your clear protective layer, a water-based polyurethane is the way to go. Products like Varathane Diamond Wood Finish or General Finishes High Performance Water Based Topcoat are fantastic. They are crystal clear, low-odor, and provide a tough, non-yellowing finish that is perfect for kitchens and bathrooms.
Frequently Asked Questions (FAQ)
How long does a painted Formica countertop last?
With proper prep work and a quality topcoat, a painted countertop can look great for 3 to 5 years, or even longer. Durability depends heavily on how you use and care for it. Gentle daily use will extend its life significantly.
Can I use regular wall paint on my countertop?
I strongly advise against it. Regular latex wall paint is not formulated to withstand the scrubbing, moisture, and wear-and-tear that a countertop endures. It will almost certainly chip and peel in a very short time.
Is the painted surface food-safe?
Once the topcoat is fully cured according to the manufacturer’s directions, the surface is generally considered safe for food contact, similar to any other sealed surface. However, to be extra safe and to protect the finish, you should always use cutting boards for food prep.
How do I fix a chip or scratch?
Fixing small blemishes is easy! Lightly sand the damaged area with fine-grit sandpaper, clean the dust away, and then dab on a small amount of the original primer, paint, and topcoat with a tiny artist’s brush. Let each layer dry, and it will blend right in.
Will the paint peel?
If you followed all the prep steps—especially cleaning and sanding—the paint should not peel. Peeling is almost always a sign of poor adhesion caused by lingering grease, dust, or skipping the bonding primer.
Can I create a marble or granite look?
Yes! There are many fantastic DIY kits and online tutorials that show you how to use various paint colors, sponges, and brushes to create a realistic faux stone finish. Epoxy kits are especially popular for achieving a deep, glossy marble effect.
Is this project really worth the effort?
Absolutely. For a very small investment of money and a weekend of your time, you can achieve a dramatic and satisfying transformation. It’s a powerful way to refresh a room and a great project to build your DIY confidence.
A Beautiful Finish is Within Your Reach
And there you have it! You are now fully equipped with the knowledge to tackle this project and bring new life to your old countertops. Remember, the secret ingredients are patience and preparation. Don’t rush the cleaning, sanding, or drying times, and you’ll be rewarded with a finish that is both beautiful and durable.
This project is more than just a home improvement task; it’s a chance to put your personal touch on your space, to create something you can be proud of every time you walk into the room. So roll up your sleeves, put on some good music, and get ready to transform your home. You’ve got this!
Happy crafting!