Can I Paint An Oven: An Essential & Genius Guide
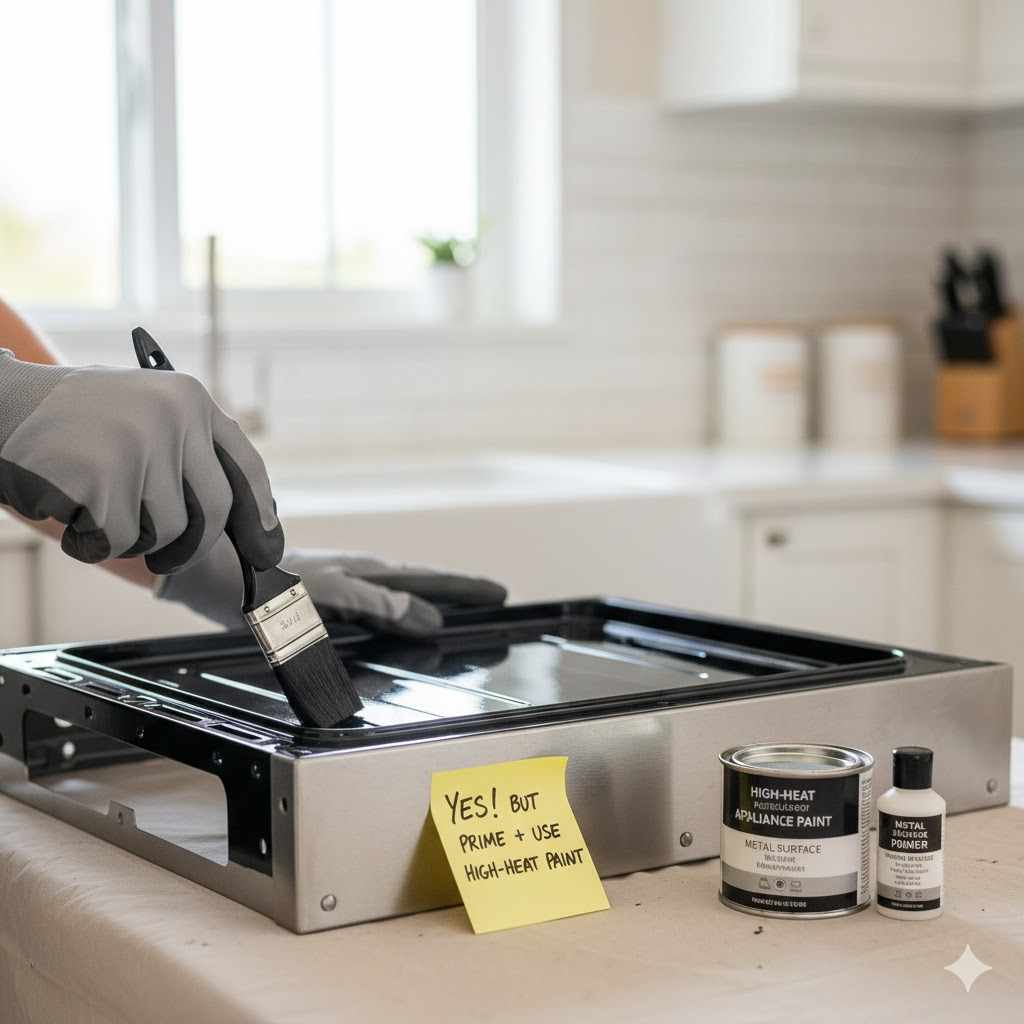
Yes, you absolutely can paint an oven, but only the exterior. It’s crucial to use a high-heat appliance paint specifically designed to withstand high temperatures. Proper surface preparation—cleaning, sanding, and masking—is essential for a durable, safe, and professional-looking finish. Never paint the interior of an oven due to food safety and fume concerns.
Hello, fellow makers! Md Meraj here. In my workshop, I’m always looking for smart ways to bring old things back to life. It’s amazing what a little know-how and a fresh coat of paint can do. One question I hear a lot is about kitchen appliances. Maybe you have an oven that works perfectly but looks dated, scratched, or just doesn’t match your new kitchen cabinets.
You find yourself wondering, “Can I paint an oven?” It feels like a project that could either be a brilliant budget-friendly fix or a complete disaster. Don’t worry—I’m here to clear things up. Giving your oven a makeover is a fantastic project that you can tackle with confidence. It’s much easier than you think when you have the right steps. In this guide, I’ll walk you through everything, from picking the perfect paint to getting a flawless finish.
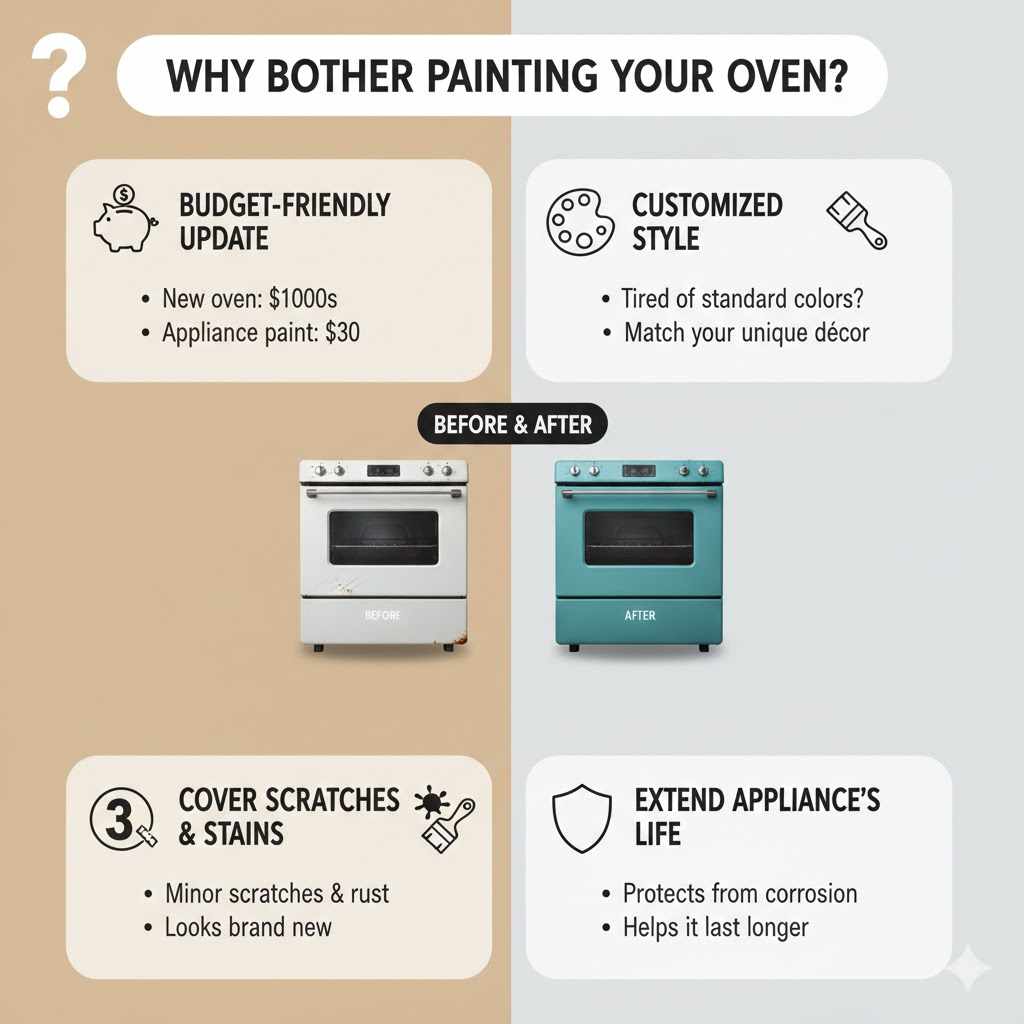
Why Bother Painting Your Oven?
Before we grab our tools, let’s talk about why this is such a great idea. Replacing a major appliance is expensive and often unnecessary if it’s still functioning well. A paint job is a simple, affordable way to make a huge impact on your kitchen’s appearance.
- Budget-Friendly Update: A new oven can cost hundreds, even thousands, of dollars. A can of specialty appliance paint costs a tiny fraction of that, giving you a fresh look without the huge expense.
- Customized Style: Are you tired of the standard white, black, or stainless steel? Appliance paint comes in various colors, allowing you to match your oven to your unique kitchen décor. You can go for a bold color or simply refresh the original finish.
- Cover Scratches and Stains: Over time, ovens can get covered in minor scratches, rust spots, and stubborn stains that just won’t come off. A new coat of paint covers these imperfections and makes your appliance look brand new again.
- Extend the Appliance’s Life: By covering small rust spots, you’re not just making the oven look better—you’re protecting it from further corrosion, which can help it last longer.
The Most Important Rule: Use the Right Paint
This is the part of the project where you absolutely cannot cut corners. Using regular wall paint (like latex or acrylic) on an oven is a dangerous mistake. Here’s why:
Standard paints are not designed to handle heat. When an oven heats up, regular paint will blister, peel, and release toxic fumes into your home. These fumes are not only unpleasant but can be hazardous to your health. The paint can also become a serious fire hazard. This is why you must use paint specifically labeled for appliances or high-heat applications.
Types of High-Heat Paint
When you head to the hardware store, you’ll find a few options. Let’s break them down so you can choose the best one for your project.
Paint TypeBest ForProsConsHigh-Heat Enamel Spray PaintSmooth, even finish on large surfaces. Great for beginners.
- Easy to apply
- Dries quickly
- Provides a factory-like finish
- Requires good ventilation (overspray)
- Can be tricky to avoid drips
High-Heat Brush-On EnamelTouching up small areas or for those who prefer not to use aerosols.
- More control over application
- Less mess from overspray
- Can show brush strokes if not applied carefully
- May take longer to dry
Epoxy Appliance PaintExtremely durable finish, resistant to scratches and chemicals.
- Very hard and long-lasting
- Excellent for high-wear areas
- Often a two-part system that requires mixing
- Longer curing time
For most beginner DIYers, high-heat enamel spray paint is the easiest and most effective choice. It gives you a smooth, professional result that looks like it came right from the factory.
Safety First: Your Pre-Project Checklist
Any good project starts with safety. We’re working with paint fumes and an electrical appliance, so let’s make sure we do this the right way. Your well-being is more important than any project.
Protect Yourself and Your Space
- Ventilation is Key: Paint fumes are strong and shouldn’t be inhaled. Work in a well-ventilated area. Open all your windows and doors. If you can, move the oven into a garage or even outside on a calm, clear day. A box fan pointing out a window can help pull fumes out of the room.
- Personal Protective Equipment (PPE): This isn’t optional. Wear a respirator mask designed for paint fumes, not just a simple dust mask. Safety glasses will protect your eyes from overspray, and gloves will keep your hands clean.
- Disconnect Power: Before you do anything else, unplug the oven from the wall. If you have a gas oven, you must turn off the gas supply. Check your owner’s manual for instructions. For more guidance on appliance safety, you can refer to resources from the U.S. Consumer Product Safety Commission (CPSC).
Gather Your Tools and Materials
Having everything you need ready to go makes the job smooth and enjoyable. Here’s a simple list of what you’ll need.
- High-Heat Appliance Paint: Choose your color and finish. One can of spray paint is usually enough for a standard oven.
- Degreasing Cleaner: A good quality kitchen degreaser is perfect.
- Clean Rags or Sponges
- Fine-Grit Sandpaper: 220-grit is ideal for scuffing the surface.
- Painter’s Tape: For masking off areas you don’t want to paint.
- Drop Cloths or Plastic Sheeting: To protect your floors and counters.
- Tack Cloth or a Damp Microfiber Cloth
- Screwdriver: To remove handles and other hardware.
- Your Safety Gear: Respirator, safety glasses, and gloves.
Your Step-by-Step Guide to a Beautifully Painted Oven
Ready to get started? Just follow these steps carefully, and you’ll be rewarded with a fantastic-looking oven. Take your time—good prep work is 90% of the job.
Step 1: Prep the Oven and Your Workspace
First, make sure the oven is completely disconnected from power and/or gas. Move it away from the wall so you can access all sides. Lay down your drop cloths to protect the entire work area.
Now, it’s time to clean. Ovens are covered in years of grease, even if they look clean. Use your degreaser and a sponge to scrub down every inch of the oven’s exterior. Pay special attention to the areas around the cooktop and handle. The paint will not stick to a greasy surface. Once clean, rinse it with a damp cloth and let it dry completely.
Step 2: Disassemble and Sand
Using your screwdriver, carefully remove the oven handles, knobs, and any other trim pieces you can. Place them in a labeled bag so you don’t lose them. This will give you a much cleaner finish than trying to paint around them.
Next, take your 220-grit sandpaper and lightly sand all the surfaces you plan to paint. You are not trying to remove the old paint, just to “scuff” it up. This creates a slightly rough texture that helps the new paint grip the surface. You’ll know you’re done when the finish looks dull instead of glossy. Wipe away all the sanding dust with a tack cloth or a damp microfiber cloth. The surface must be perfectly clean and dust-free.
Step 3: Mask Everything You Don’t Want Painted
This step requires patience, but it’s what separates a professional job from a messy one. Use painter’s tape to carefully cover anything you don’t want to paint. This includes:
- The glass on the oven door
- The control panel and clock display
- Vents and logos
- Any part of the electrical cord
- Burner elements if you are painting a stovetop
Press the tape down firmly to create a seal, preventing any paint from bleeding underneath.
Step 4: Time to Paint!
You’re ready for the transformation! If using spray paint, shake the can vigorously for at least one full minute, even after you hear the ball rattling. This mixes the paint properly.
Hold the can about 10-12 inches away from the oven’s surface. Start spraying just off the edge of the oven, move across the surface in a steady motion, and stop spraying just past the other edge. This technique helps prevent thick spots and drips at the beginning and end of each pass. Apply a light, thin coat. It won’t look perfect after the first coat, and that’s okay! It’s much better to apply 2 or 3 thin coats than one thick, drippy one.
Follow the paint manufacturer’s instructions for drying time between coats. It’s usually around 15-30 minutes. Once the first coat is dry to the touch, apply your second coat, moving in the opposite direction (e.g., if you sprayed side-to-side first, spray up-and-down for the second coat). This ensures even coverage.
Step 5: Cure the Paint (The Final, Crucial Step)
High-heat paint needs to be “cured” with heat to become hard and durable. Read the instructions on your paint can carefully, as this step is vital. Typically, the process involves heating the oven to a low temperature (around 250°F or 120°C) for about an hour.
When you do this, the paint may release some fumes and a noticeable smell. This is normal. Make sure your kitchen is extremely well-ventilated during the curing process. Open all the windows and turn on your exhaust fan. The smell will disappear once the paint is fully cured. After the time is up, turn off the oven and let it cool down completely.
Step 6: Reassemble and Admire
Once the oven is fully cured and cool, you can carefully remove all the painter’s tape. Peel it off slowly at an angle to get a crisp, clean line. Reattach your handles, knobs, and any other hardware you removed. Slide your beautifully refinished oven back into its spot, reconnect the power, and step back. You did it! Enjoy your “new” appliance.
An Important Warning: Do NOT Paint the Inside of Your Oven
I cannot stress this enough: you should never paint the interior surfaces of your oven. This includes the walls, racks, and the inside of the door. Here’s why:
- Food Safety: Even high-heat paints are not rated as food-safe. The chemicals in the paint can release toxic fumes at cooking temperatures, which can then settle on and contaminate your food. The U.S. Food and Drug Administration (FDA) has strict regulations for surfaces that come into contact with food, and no consumer-grade paint meets these standards for oven interiors.
- Extreme Temperatures: The inside of an oven gets much hotter than the outside, often reaching 500°F (260°C) or higher during self-cleaning cycles. Most high-heat paints are only rated for up to 400-600°F and will fail under these extreme conditions.
- Direct Contact: The interior surface can come into direct contact with food spills, which would cause the paint to chip and flake off, potentially ending up in your meals.
If the inside of your oven is in bad shape, it is better to clean it thoroughly or, in severe cases, consult a professional about reglazing services, which use specialized, food-safe coatings.
What About Painting the Cooktop?
Painting the cooktop is possible but tricky. This surface endures direct heat from burners, frequent spills, and abrasive cleaning. While some very high-heat paints (like those used for barbecue grills or engine blocks) can withstand the temperatures, they may not hold up well against scratches from pots and pans. For gas stoves, it’s often better to replace the grates. For electric coil stoves, you can replace the drip pans for a fresh look.
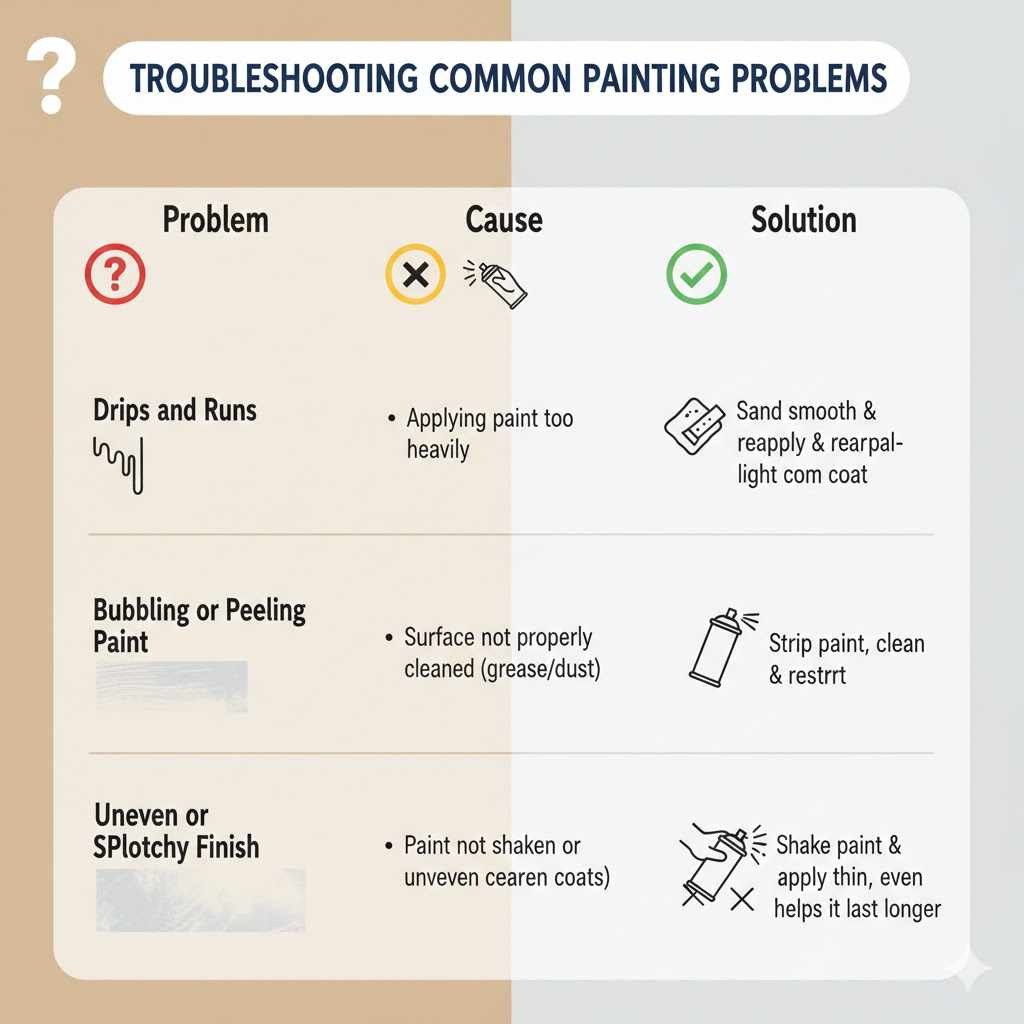
Troubleshooting Common Painting Problems
Even with the best preparation, you might run into a small issue. Don’t worry, most problems are easy to fix.
| Problem | Cause | Solution |
|---|---|---|
| Drips and Runs | Applying paint too heavily or holding the can too close to the surface. | Let the paint dry completely. Use fine-grit sandpaper to gently sand the drip smooth. Wipe away the dust and apply another light coat over the area. |
| Bubbling or Peeling Paint | The surface was not properly cleaned (grease or dust was left behind). | Unfortunately, this requires starting over. You’ll need to strip or sand off the new paint, clean the surface thoroughly with a degreaser, and reapply. |
| Uneven or Splotchy Finish | The paint can was not shaken enough, or coats were applied unevenly. | Shake the can very well and apply another thin, even coat over the entire surface to blend it all together. Make sure to use the side-to-side, top-to-bottom technique. |
Frequently Asked Questions (FAQ)
Can I paint an oven safely?
Yes, it is completely safe to paint the exterior of an oven as long as you use the correct high-heat appliance paint. You must also ensure excellent ventilation during painting and curing to avoid inhaling fumes, and always disconnect the appliance from power before starting.
What kind of paint do you use on an oven?
You must use a paint specifically formulated for high temperatures, such as a high-heat enamel or an epoxy appliance paint. These are designed to withstand the heat from the oven without peeling, bubbling, or releasing toxic fumes. Look for products labeled “Appliance Paint” or “High-Heat Enamel.”
Can I paint the inside of my microwave or oven?
No, you should never paint the inside of a conventional oven or a microwave. Standard high-heat paints are not food-safe and will release harmful chemicals when heated. For microwaves, there are specific microwave cavity paints, but for a conventional oven, there is no safe DIY paint product for the interior.
How long does appliance paint take to dry and cure?
The paint will usually be dry to the touch within 30-60 minutes, allowing for recoats. However, it needs to be “cured” with heat to become fully hardened and durable. This typically involves heating the oven as per the paint can’s instructions, usually for about an hour. It can take up to 24 hours for the paint to be fully resistant to scratches.
Will my newly painted oven smell when I use it?
You will likely notice a strong smell during the initial heat-curing process. This is normal and is part of the paint hardening. Ensure your kitchen is extremely well-ventilated during this one-time step. After the paint is fully cured, there should be no odor during regular use.
How do I clean my painted oven?
Once the paint is fully cured (wait at least 24-48 hours), you can clean the exterior with a soft cloth and a mild, non-abrasive cleaner. Avoid using harsh chemical cleaners or abrasive scrubbers, as they can scratch or damage the new finish.
Can I paint the glass on my oven door?
It is not recommended to paint the glass on the oven door. The paint will block your view of the food, and it may not adhere well to the glass. Additionally, the extreme temperature fluctuations could cause the paint to crack and peel over time. It is best to mask the glass off completely.
Conclusion: A Project Worth Your Time
So, can you paint an oven? Absolutely. With a little bit of patience and the right materials, you can transform a dated, tired appliance into a beautiful centerpiece for your kitchen. This project is about more than just saving money; it’s about the satisfaction of doing it yourself and breathing new life into something you use every day.
Remember the key takeaways: safety first, thorough preparation is non-negotiable, and always use high-heat appliance paint. Never, ever paint the inside. Take your time with each step, from cleaning and sanding to applying thin, even coats of paint. By following this guide, you’re not just painting an oven—you’re adding your own personal touch to the heart of your home. Happy making!