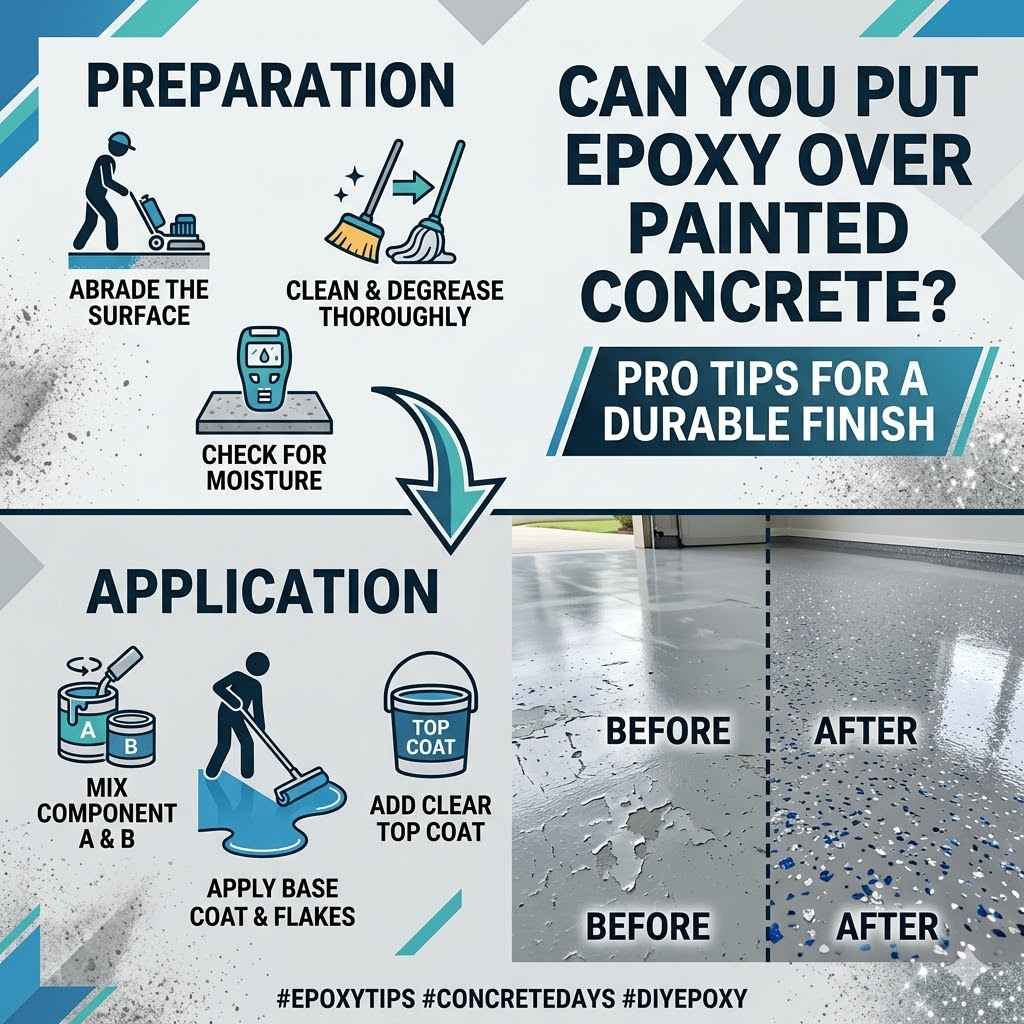
Can You Put Epoxy Over Painted Concrete Pro Tips
Many people wonder if they can apply a tough epoxy coating right over a painted concrete floor. It seems like a simple DIY project, but if you don’t get it right, your new epoxy floor might not stick well. This is a common question, and it can feel a bit tricky for beginners.
But don’t worry, we’ll walk you through exactly how to do it. We’ll make it super easy to follow, step by step.
Preparing Painted Concrete For Epoxy Success
Getting your painted concrete floor ready is the most important step if you want your epoxy coating to last. If the paint isn’t prepped right, the epoxy just won’t stick. This means your beautiful new floor could start peeling or flaking off soon after you finish.
It’s like building a house – a strong foundation makes all the difference. We need to make sure the paint layer is in good shape and that the epoxy has something solid to grab onto. This section will cover all the ways to prepare your floor so your epoxy job is a real success and looks great for years.
Assessing The Existing Paint Layer
Before you even think about buying epoxy, you need to look closely at the paint that’s already on your concrete. Is it old and peeling? Is it chipped in many places?
Or is it still firmly attached to the concrete? This is crucial information. If the paint is already coming off, you’ll have a much harder time getting the epoxy to stick.
You might even have to remove the old paint completely. It’s better to find these problems now than after you’ve spent money and time on epoxy.
Firmly Attached Paint:
If the paint is holding strong, with no signs of lifting or peeling, you’re in a good starting position. This means the original painter did a good job, or the paint is just really durable. You’ll still need to do some prep work, but it won’t be as intense as dealing with damaged paint.
We want to create a surface that epoxy can really bond with. Think of it like preparing a wall for new paint – you don’t just go over old, peeling wallpaper!
Peeling or Chipped Paint:
If you see areas where the paint is lifting, flaking, or looks like it’s about to fall off, this is a major red flag. Epoxy needs a solid surface to adhere to. If it tries to stick to loose paint, it will lift with the paint.
This means you’ll have to do some serious work. You might need to use a scraper or even a floor stripper to remove all the loose bits. It’s a lot of extra effort, but it’s absolutely necessary for a lasting epoxy finish.
Ignoring this will guarantee failure.
What kind of paint is it? Is it a standard latex or acrylic? Or is it a special concrete paint designed for floors?
Some paints are oil-based, and others are water-based. Epoxy generally sticks well to latex and acrylic paints. However, some very slick or glossy paints might need extra scuffing to create a grip.
If you’re unsure, a small test patch is always a good idea. This will show you how the epoxy interacts with the paint before you commit to the whole floor.
Cleaning the Painted Surface
A clean surface is non-negotiable for any coating application, and epoxy is no different. Dirt, grease, oil, and old spills can all create a barrier between your painted concrete and the new epoxy. This barrier prevents a strong bond.
You need to get everything off. Think of it like trying to stick a sticker onto a dirty window – it just won’t hold well. We need a perfectly clean slate for the epoxy to work its magic.
Degreasing is Key:
Garages and basements often have oil or grease stains from cars or workshops. These stains are stubborn. You’ll need a good quality concrete degreaser.
Follow the product instructions carefully. You might need to let it soak for a bit, then scrub it with a stiff brush. Rinse thoroughly.
If you don’t remove all the grease, the epoxy might bubble or fail to adhere in those spots. This is a common mistake people make.
Washing Away Dirt and Debris:
Use a good cleaner and water to wash the entire floor. A stiff broom or brush is your best friend here. Get into all the nooks and crannies.
Make sure you rinse away all the soap residue. Leftover soap can also act as a bond breaker. A wet vac can be very helpful for removing rinse water.
Letting the floor dry completely is also very important. You don’t want any moisture trapped underneath.
Testing for Contaminants:
After cleaning and drying, you can do a simple test. Sprinkle a little water on a few spots. If the water beads up and sits on the surface like on a wax car, there might still be some residue or a sealer you can’t see.
If the water soaks in or spreads out, the surface is likely ready. This simple test helps ensure your cleaning efforts were successful and you’re ready for the next step.
Scuff Sanding for Adhesion
Even if the paint looks perfect and is clean, it’s often too smooth for epoxy to get a good grip. Think about it: if you try to glue two super smooth pieces of plastic together, they might not stick as well as if one or both had a slightly rough surface. Epoxy needs a bit of “tooth” to bond to.
Scuff sanding provides this rough texture. It’s a vital step that many people skip, leading to future problems. This process creates micro-scratches that the epoxy can latch onto.
Choosing the Right Grit:
You don’t need to remove the paint. You just need to make it dull and slightly textured. A medium-grit sandpaper, like 80-120 grit, is usually best.
You can use a pole sander, a vibrating floor sander, or even a good orbital sander for larger areas. For smaller areas, sandpaper on a block works. The goal is to lightly abrade the entire surface, not to dig into the paint or concrete.
This creates a profile for the epoxy to stick to.
Sanding Technique:
Work in sections and try to sand evenly across the entire floor. Go back and forth in overlapping strokes. This ensures you don’t miss any spots.
If you have very smooth, glossy paint, you might need to go slightly finer or sand a little more thoroughly. The surface should look dull and uniform after sanding, not shiny. This visual change is your cue that you’ve created the necessary texture.
Dust Removal is Critical:
After sanding, there will be a lot of dust. This dust must be completely removed. Use a shop vacuum with a good filter to suck up all the sanding residue.
Go over the floor multiple times. Then, wipe the floor down with a tack cloth or a slightly damp (not wet) microfiber cloth. This will pick up any remaining fine dust particles.
Any dust left behind will get mixed into the epoxy, creating a weaker bond and a less attractive finish.

Can You Put Epoxy Over Painted Concrete? The “Yes, But.” Answer
The short answer to Can You Put Epoxy Over Painted Concrete? Pro Tips is usually yes, but with some very important conditions. It’s not as simple as just pouring epoxy over whatever paint is there.
The success hinges on the condition of the paint and how well you prepare it. If the paint is sound and well-adhered, and you follow the preparation steps diligently, you can absolutely achieve a beautiful, durable epoxy floor. This section breaks down why it works and what makes it a potentially challenging, but doable, project.
Understanding Epoxy Adhesion
Epoxy coatings work through a chemical reaction and physical bonding process. When you mix the two parts of an epoxy (the resin and the hardener), a chemical reaction begins. This reaction causes the epoxy to harden and cure, forming a strong, durable layer.
For this to happen effectively, the epoxy needs to bond securely to the substrate, which in this case is the painted concrete. If the surface it’s trying to stick to is weak, loose, or contaminated, the bond will be compromised. This is why the preparation steps are so vital.
Chemical Bonding:
Epoxy creates a chemical bond with porous surfaces like concrete. It can also chemically bond with certain other materials if they have the right surface profile. When applied over properly prepared paint, the epoxy can form a chemical link with the paint molecules.
This creates a strong connection, essentially becoming one with the painted layer. Without this chemical interaction, the epoxy would just sit on top, prone to peeling.
Mechanical Bonding:
This is where surface preparation really shines. Mechanical bonding, or adhesion, happens when the epoxy flows into the tiny pores, cracks, and texture created on the surface. Think of it like tiny fingers reaching out and gripping the surface.
Scuff sanding creates this texture. The smoother and less porous the original surface, the weaker this mechanical bond will be. That’s why we need to rough up the paint layer.
Potential for Delamination:
Delamination is the fancy word for peeling or separation. If the painted surface is weak, or if there’s a layer of grease, dirt, or moisture between the paint and the concrete, the epoxy can delaminate. It’s like trying to glue two pieces of paper together with a layer of oil in between – the glue won’t stick to both layers effectively.
We aim to prevent delamination by ensuring a strong, clean connection from the concrete all the way up through the paint to the epoxy.
When Epoxy Over Paint Is Not Recommended
While it’s often possible, there are certain situations where putting epoxy directly over painted concrete is a bad idea. It’s better to know these limitations upfront than to waste time and money on a project that’s doomed to fail. If the paint is in poor condition, or if it’s a type of paint that epoxy just won’t stick to, you might need to consider other options.
Sometimes, the best solution is to remove the old paint entirely and apply the epoxy directly to bare concrete.
Severely Damaged Paint:
If the paint is extensively peeling, flaking, bubbling, or has significant cracks, it’s too unstable to serve as a base for epoxy. The epoxy will simply lift off with the failing paint. In these cases, the only way to get a good result is to remove all of the loose paint.
You might need to use a paint stripper, a scraper, or even a floor grinder to get down to solid paint or bare concrete. This is a much more intensive process but necessary for durability.
Certain Types of Coatings:
Some floor coatings are not compatible with epoxy. For example, if the floor was previously coated with a wax-based sealer, a vinyl tile adhesive, or certain types of old rubber-based coatings, epoxy may not adhere. These coatings can act as a barrier.
You would need to thoroughly remove them before applying epoxy. If you’re unsure about the previous coating, a small test patch is essential.
High Moisture Levels:
Even if the paint is in good condition, if the concrete slab has a high moisture content, it can cause epoxy to fail. Moisture vapor can push up through the concrete, creating a barrier that epoxy cannot bond to. This often happens in basements or garages that are prone to dampness.
You should test for moisture vapor transmission before applying any epoxy. If levels are too high, you may need to address the moisture issue first with a special vapor barrier primer.
The Importance of a Test Patch
A test patch is your insurance policy against a failed epoxy job. It’s a small area where you apply the epoxy according to the manufacturer’s instructions. You do this after all your prep work is done.
Let it cure fully, then test its adhesion. This simple step can save you a lot of time, money, and frustration. It shows you if your preparation methods are working and if the epoxy is bonding correctly to the painted surface.
Choosing the Test Area:
Pick a small, inconspicuous spot on your floor. An area in a corner or under something permanent, like a cabinet or workbench, is ideal. This way, if the test patch doesn’t turn out perfectly, it won’t be very noticeable.
Ensure this test area is prepared just like the rest of your floor will be.
Performing the Test:
Mix and apply a small amount of your chosen epoxy product to the test area. Follow the exact same preparation and application steps you plan to use for the entire floor. Let it cure completely according to the manufacturer’s recommended time, which can be several days for full hardness.
Don’t rush this curing period.
Adhesion Testing:
Once fully cured, gently try to peel up a corner of the test patch with a putty knife or razor blade. If it scrapes off easily or if you can see the paint coming up with it, the adhesion is poor. If the epoxy is strongly bonded and you can’t easily pry it up, or if you have to scrape very hard and only manage to get a tiny bit off, the adhesion is good.
You might even damage the paint slightly underneath before the epoxy gives way, which is a sign of a strong bond.
Step By Step Epoxy Application Over Painted Concrete
Now that you know the ins and outs of preparing painted concrete, let’s walk through the actual epoxy application. Following these steps carefully will help you achieve a durable and attractive finish. Remember, preparation is key, but proper application ensures the epoxy cures correctly and bonds as it should.
We will cover everything from mixing the epoxy to applying the final coat, so you can feel confident about your project.
Preparing the Epoxy Mixture
Most epoxy floor coatings come in two parts: a resin and a hardener. They must be mixed together in a specific ratio to initiate the curing process. This mixing is critical.
If you don’t mix them correctly, the epoxy might not cure at all, or it might cure unevenly, leading to soft spots or a weak finish. Always follow the manufacturer’s instructions precisely. The pot life, or working time, of the mixed epoxy is limited, so you need to be ready to apply it once mixed.
Read Manufacturer Instructions:
Every epoxy product is slightly different. Some have different mixing ratios, different pot lives, and require different mixing times. This is the most important rule.
Your specific product’s instructions are the ultimate guide. Don’t guess or rely on general advice if it contradicts the product label.
Accurate Measuring:
Use clean measuring cups or buckets. Ensure you measure both parts accurately according to the specified ratio. For example, if it’s a 1:1 ratio, you need equal amounts of resin and hardener.
If it’s a 2:1 ratio, you need twice as much resin as hardener. Incorrect ratios are a common cause of epoxy failure.
Thorough Mixing:
Use a mechanical mixer (like a drill with a mixing paddle attachment) for best results. Mix for the time specified by the manufacturer, typically 2-3 minutes. Scrape the sides and bottom of the bucket regularly to ensure all the hardener is incorporated into the resin.
Improper mixing means uncured resin will be present in the final coating, leading to soft spots. After mixing, some manufacturers recommend pouring the mixed epoxy into a second clean bucket and mixing again for about a minute. This ensures any unmixed material clinging to the sides of the first bucket is incorporated.
Work in Small Batches:
Epoxy has a limited pot life, meaning once mixed, it starts to harden. The warmer the temperature, the shorter this working time. If you’re working alone or are new to epoxy, mix only enough that you can comfortably apply within the pot life.
It’s better to mix more batches than to have mixed epoxy harden in the bucket before you can get it onto the floor.
Applying the Epoxy Coating
Once the epoxy is mixed, it’s time to apply it to your prepared floor. Work quickly but methodically. The goal is to get an even coat without creating puddles or thin spots.
You’ll want to have all your tools ready and organized before you start mixing the epoxy. This includes rollers, brushes, squeegees, and any decorative flakes you might be using.
Start in the Back:
Begin applying the epoxy at the farthest corner of the room from your exit. This way, you can work your way backward out of the space without walking on the wet epoxy. Use a high-quality, solvent-resistant roller on an extension pole for larger areas.
For edges and corners, use a small brush.
Maintain an Even Coat:
Apply the epoxy in a consistent thickness. Avoid overworking the material, as this can introduce air bubbles or reduce its lifespan. Roll out the epoxy in long, overlapping passes.
If you’re using a squeegee, use it to spread the epoxy evenly, then back-roll to smooth out any squeegee lines. The goal is a uniform sheen across the entire surface.
Adding Decorative Flakes (Optional):
If you’re adding decorative flakes, broadcast them into the wet epoxy immediately after rolling. Throw them upwards and let them fall naturally onto the surface. This creates a more random and attractive distribution.
Don’t just toss them down; aim for a scattered effect.
Ventilation is Important:
Ensure the area is well-ventilated during application and curing. Open windows and doors, or use fans to circulate air. This helps with drying and dissipates any strong fumes.
Some epoxy systems have low VOC (Volatile Organic Compound) content, which is better for air quality.
Curing and Top Coating
After the epoxy has been applied, it needs time to cure. Curing is the process where the epoxy hardens and reaches its maximum strength. This takes longer than just drying.
It’s crucial to allow the epoxy to cure fully before allowing foot traffic or placing heavy items back on the floor. Many homeowners opt for a clear top coat for added durability and protection.
Understanding Cure Times:
Epoxy coatings have different cure times. There’s usually a ‘recoat window,’ which is the time frame during which you can apply a second coat of epoxy or a top coat and achieve a good bond. If you miss this window, you may need to lightly sand the surface again before applying the next layer.
There’s also a ‘light foot traffic’ time (usually 24-48 hours) and a ‘heavy traffic’ or ‘full cure’ time (often 5-7 days or more). Always follow the manufacturer’s recommendations.
Applying a Clear Top Coat (Recommended):
For most residential applications, a clear polyaspartic or polyurethane top coat is highly recommended over the colored epoxy base coat. This top coat provides an extra layer of protection against scratches, chemicals, and UV fading. It also adds a glossy finish.
If you applied decorative flakes, the top coat seals them in and creates a smooth, even surface.
Allow Full Cure Before Use:
Be patient. It’s tempting to walk on your new floor or move furniture back quickly, but resist the urge. Walking on the epoxy too soon can leave marks or indentations.
Driving vehicles onto it before it’s fully cured can cause serious damage. The longer you wait for the full cure, the more durable and long-lasting your epoxy floor will be. Think of it as the final hardening process that makes it tough.
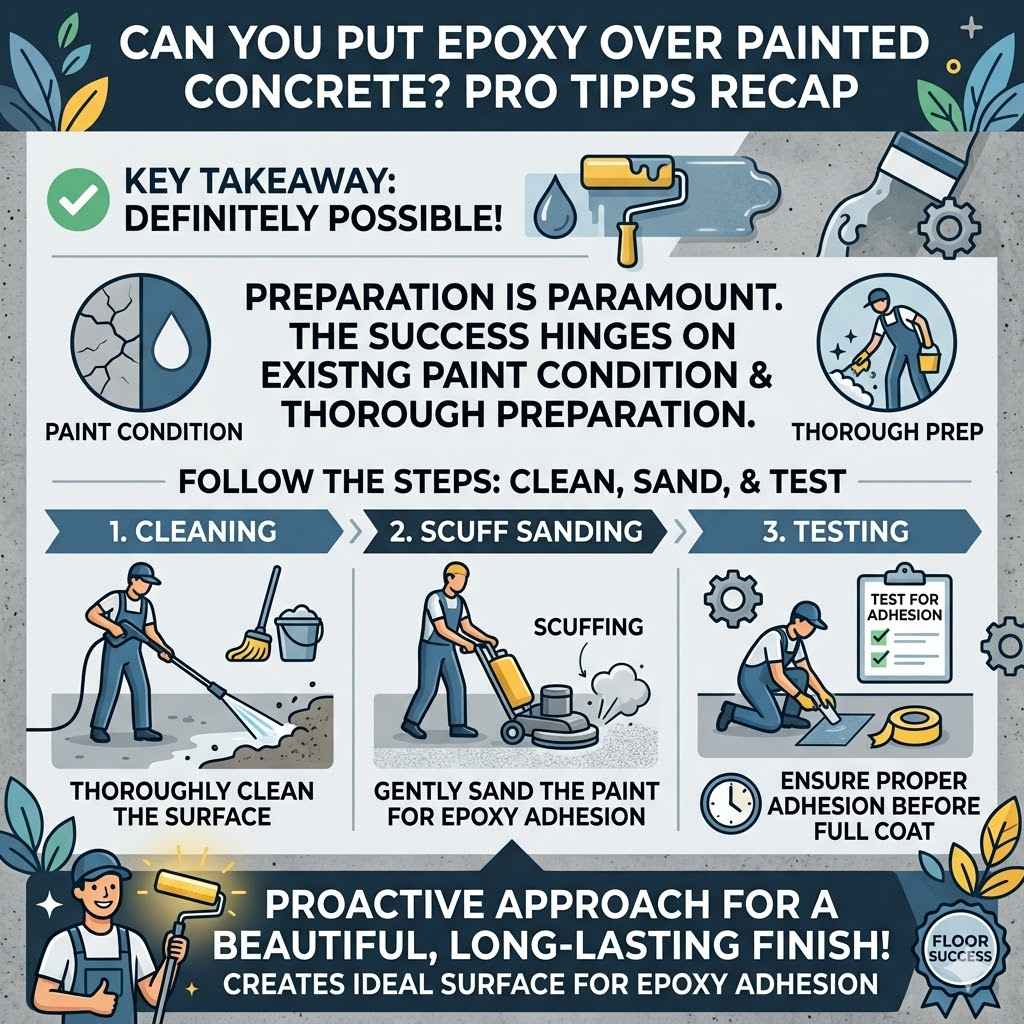
Can You Put Epoxy Over Painted Concrete? Pro Tips Recap
We’ve explored how to successfully apply epoxy over painted concrete. The key takeaway is that it’s definitely possible, but preparation is paramount. The success of your epoxy floor hinges on the condition of your existing paint and how thoroughly you clean and prepare the surface.
By following the steps of cleaning, scuff sanding, and testing, you can create the ideal surface for epoxy adhesion. This proactive approach ensures a beautiful and long-lasting finish for your concrete floors.
Frequently Asked Questions
Question: What if the paint on my concrete is peeling badly?
Answer: If the paint is peeling or flaking extensively, you cannot put epoxy directly over it. You will need to remove all the loose and damaged paint first. This might involve scraping, sanding, or using a paint stripper.
Once you have a solid paint layer or bare concrete, you can then proceed with the epoxy preparation and application.
Question: Do I really need to scuff sand the painted concrete?
Answer: Yes, scuff sanding is highly recommended. Even if the paint looks good, it’s often too smooth for the epoxy to get a strong mechanical bond. Sanding creates a slightly rough texture that the epoxy can grip onto, significantly improving adhesion and preventing peeling.
Question: Can I use any kind of epoxy over painted concrete?
Answer: It’s best to use a 100% solids epoxy or a high-solids epoxy coating specifically designed for garage floors or concrete coatings. These offer the best durability and adhesion. Always check the manufacturer’s recommendations to ensure their product is suitable for application over painted concrete.
Question: How long does it take for epoxy over painted concrete to cure?
Answer: Cure times vary by product, but generally, you can walk on the floor after 24-48 hours for light traffic. For heavy traffic, vehicles, or full chemical resistance, it usually takes 5-7 days or even longer. Always follow the specific product’s instructions for curing times.
Question: What happens if I don’t clean the painted concrete properly?
Answer: If the painted concrete isn’t cleaned thoroughly, dirt, grease, or oil can prevent the epoxy from bonding properly. This can lead to the epoxy delaminating or peeling away from the surface over time. Proper cleaning is a critical step for a lasting finish.
Summary
Applying epoxy over painted concrete is achievable with careful preparation. Ensure the paint is well-adhered, clean, and slightly scuffed for best results. Test a small area first.
Follow mixing and application instructions precisely. Allow adequate cure time for maximum durability. This process leads to a strong, beautiful concrete floor finish.