DIY Shoe Hanger: Build a Wall-Mounted Rack from Wood and Hooks
Shoes scattered all over the floor can be a real mess. A DIY shoe hanger is the perfect solution.
It helps keep your footwear organized and easy to find. Creating your own shoe hanger is a fun and practical project. You can customize it to fit your space and style. Plus, making a shoe hanger yourself can save money.
You only need some basic materials and a little time. Imagine the satisfaction of seeing your shoes neatly lined up, no longer cluttering your floor. This project is simple enough for beginners but also rewarding for more experienced DIY enthusiasts. Get ready to transform your shoe storage with this easy and creative solution. Let’s dive into the world of DIY shoe hangers!

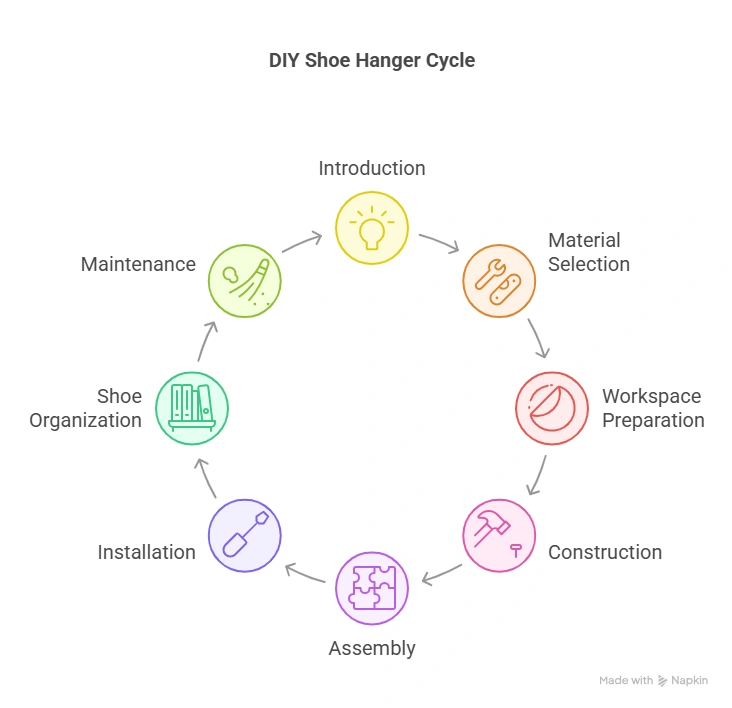
Introduction To DIY Shoe Hanger
No-Build Alternative
 |
Gorilla Grip Over the Door Shoe Organizer, 24 Pockets – $13.89 Not building today? This hangs on any door in minutes and holds 24 pairs with zero drilling or hardware.
|
Two different builds fall under “shoe hanger”: a wall-mounted wood bar with a row of hooks, which is the sturdier option and worth the extra half hour it takes to build, or a repurposed wire coat hanger bent into a hook shape, which costs nothing and takes about five minutes per hook but holds less weight and looks less finished on display. Which one makes sense depends mostly on whether the hanger will live behind a closet door out of sight, or somewhere visible like an entryway.
Either build gets shoes fully off the floor rather than just corralled into a pile, which matters more than it sounds: shoes stored flat on top of each other scuff and crease each other’s material over time, while hanging by the heel keeps each pair’s shape and lets any trapped moisture from the day actually evaporate instead of sitting trapped between two shoes.
| Wooden hanger bar or dowel |
| Hooks or pegs |
| Screws |
| Drill |
| Measuring tape |
| Sandpaper |
| Paint or varnish |
| Brush |
Choosing The Right Materials
For the hanging bar itself, a 1×3 or 1×4 pine or poplar board works well and is easy to find pre-planed at any lumber yard — a 3-foot length holds six to eight standard cup hooks comfortably. If you’d rather skip building the bar entirely, an old wire coat hanger straightened and re-bent into a single hook shape works for one pair at a time, at essentially zero material cost, though it holds less weight and can leave a light indentation on soft leather or suede if left hanging long-term.
Beyond the wood or wire, you’ll want cup hooks or small screw-in hooks (choose ones rated for at least a pound or two per hook if you’re hanging boots), wire cutters and needle-nose pliers if you’re bending your own hooks, a tape measure for even spacing, and wood glue or screws for assembling the bar itself. Sandpaper and a finish (paint, stain, or clear varnish) round things out if the piece will be visible rather than tucked inside a closet.
Preparing Your Workspace
Lay out the wood, hooks, screws, and hardware on a clear table before starting so you’re not hunting for a dropped screw mid-project — small parts like cup hooks are easy to lose in a cluttered shop. If the board needs cutting to length, measure twice and mark with a pencil and square before making a single cut; a bar that’s slightly too long for its intended closet wall is a much bigger problem than one that’s a half-inch short.
Set out a hammer, saw, and drill within reach, and take thirty seconds to confirm the drill’s battery is charged and the right bit is chucked in before you’re holding a board in place. Basic safety gear is worth the minor hassle here too — safety glasses when cutting or drilling, and a pair of work gloves if you’re bending wire, since a slipped wire cutter is a common way this particular project draws blood.
Step-by-step Guide To Making A Shoe Hanger
For the wire-hook version: cut the bottom horizontal wire out of a standard metal coat hanger with wire cutters, leaving the triangular shoulder shape intact. Bend the two remaining bottom legs upward and toward each other into a rounded U or hook shape sized to hook over a closet rod or through the heel strap of a shoe — needle-nose pliers give you much more control over the bend radius than trying to shape it by hand.
Once the basic hook shape is formed, go back over every cut end and bent corner with pliers to round it off completely — a freshly cut wire end is sharp enough to snag fabric or skin, and this is the step most rushed DIY versions skip. Test the hook’s grip by hanging an actual shoe from it before making a batch of several; it’s much easier to adjust the bend angle on one hook than to redo six of them after they’re already installed.
Assembling The Shoe Hanger
For the wood-bar version, mark hook locations every 4-5 inches along the board’s length — closer spacing fits more pairs but risks adjacent shoes bumping into each other. Pre-drill a small pilot hole at each mark (this keeps the wood from splitting when you drive the hook in) and thread the cup hooks in by hand or with pliers until they’re snug and pointing slightly upward, which helps shoes stay seated on the hook rather than sliding off.
Mount the finished bar to the wall using screws driven into wall studs wherever possible — a bar loaded with six or eight pairs of shoes, especially boots, is heavier than it looks, and drywall anchors alone are more likely to pull loose over time. Check the bar is level before final tightening, then load a couple of test pairs and give the bar a firm tug to confirm it holds before hanging the rest of your shoe collection.

Installing The Shoe Hanger In Your Closet
Pick a spot with enough clear wall or door space for the bar’s full length plus a couple of inches of clearance on each side so shoes don’t bump the closet frame when hung. A height around chest level makes hanging and grabbing shoes easiest without bending or reaching overhead, and placing it near the closet’s entrance rather than buried in the back means you’ll actually use it instead of dropping shoes on the floor out of convenience.
Locate studs with a stud finder if the wall is drywall, mark screw locations level with a torpedo level, and pre-drill pilot holes before driving the mounting screws — this keeps the wood from splitting and makes the screws go in straight. Once mounted, hang a full load of shoes and check the bar doesn’t sag or pull away from the wall after a day or two of normal use; a slight sag usually means the screws missed the stud and need to be relocated.
Tips For Organizing Shoes
Grouping shoes by type on the hanger — all the sneakers together, boots together, dress shoes together — makes grabbing the right pair faster than hanging them in whatever order they came off your feet. If closet space allows, hanging the pairs you wear most often nearest the door and less-frequent pairs (dress shoes, seasonal boots) further back keeps the daily routine quick without sacrificing storage for the rest.
A hanging bar works best as the home for shoes in active rotation; anything genuinely out of season is usually better in a labeled bin on a shelf or under a bed, since a hanger loaded past its comfortable capacity starts crowding pairs together and defeats the point of keeping them separated and visible.
Maintaining Your Shoe Hanger
Wipe down the shoe hanger with a dry or barely-damp cloth every few weeks to keep dust from building up on the hooks and bar, and skip harsh cleaners on a painted or varnished finish, since they can dull or strip the coating faster than normal wear would. If it’s a wire-hook version, a quick wipe also lets you catch any spot where the coating has worn through to bare metal, which can eventually rust.
Check screws and hook connections every couple of months, especially on a heavily used bar — vibration from a closet door closing repeatedly can gradually work screws loose. Keep the hanger in a dry area, since trapped moisture behind a mounted bar can eventually soften drywall or warp untreated wood, and avoid overloading it well past its designed hook count, which stresses both the mounting screws and the bar itself.
Frequently Asked Questions
What Can I Use Instead Of A Shoe Rack?
A hanging wire or wood hook, storage bins, baskets, or an over-the-door organizer all work as shoe rack alternatives. Under-bed storage and wall-mounted shelves are good options too if floor space is tight.
How Do You Make Easy Diy Shoe Storage?
The simplest build is a wood bar with a row of cup hooks mounted to a wall or closet door — it takes under an hour and needs only a drill, hooks, and a length of 1×3 or 1×4 board. A bent wire coat hanger is an even faster, no-cost option for a single pair.
How Can I Organize My Shoes Without A Shoe Rack?
Clear bins, under-bed storage, an over-the-door pocket organizer, or a simple row of wall hooks all keep shoes organized without a traditional rack. Grouping by type or how often you wear them makes any of these options faster to use day to day.
How Do You Store Shoes When You Have No Space?
Go vertical: a wall-mounted hook bar or slim shelf uses space that would otherwise sit empty, and an over-the-door organizer adds storage without using any floor or shelf space at all. Under-bed bins are a good overflow spot for off-season pairs that don’t need daily access.
Conclusion
A DIY shoe hanger, whether it’s a proper wood bar with cup hooks or a five-minute bent-wire hook, gets shoes off the floor and organized for less than the cost of most store-bought racks. The wood-bar version is worth the extra time for anything permanent and visible, while a wire hook is hard to beat for a quick, free fix for a single problem pair.
Whichever version you build, mount it into a stud where possible, space the hooks to match your actual shoe collection rather than guessing, and give it a quick tug test before loading it up for real. A few minutes of care at installation saves a re-mounting job down the road.
Sponsored / affiliate links. As an Amazon Associate I earn from qualifying purchases. I may earn additional commission from eligible campaigns.