Wood Santa Patterns Free: Best Cutout Ideas
For wood Santa patterns free, choose a simple one-piece silhouette for ornaments, a flat base pattern for shelf sitters, and a larger layered pattern for yard displays. Pick the wrong format and the cutout can break, tip over, or look fuzzy after scaling. This guide shows where free printable Santa patterns fit best, how to size them, and what materials and finish work for each project.
Free Santa pattern sources


Start with sites that already publish printable woodworking templates, then search their archives for Santa, Santa Claus, or Christmas ornament pattern. Good places to check include Scrollsaw Workshop, Craftsmanspace, and other maker sites that post PDF or SVG files for holiday cutouts. If a page offers a clear outline and a print option, you can usually adapt it to wood by printing it full size and tracing the line onto the blank.
Printable pattern sites and maker blogs
A Santa Claus ornament pattern is especially useful here because the shape is simple enough to transfer to wood and still reads clearly after sanding and paint. The best free sources are the ones that show the outline at full size, or give a file you can print at your chosen scale. That matters more than whether the design is fancy.
Look for pattern pages that fit one of three jobs: ornament, decorative display, or carving blank. A printable pattern for a hanging Christmas ornament can be much simpler than a yard display pattern, and a carving pattern can include forms that do not translate cleanly to a scroll saw.
Search terms that surface usable files
Use search terms that match the cut style, not just the character name. Try phrases like “Santa scroll saw pattern PDF,” “Santa ornament pattern printable,” “Santa wood cutout SVG,” and “Santa carving pattern beginner.” Those terms are more likely to surface files you can print and trace rather than craft photos with no pattern.
What to check before you download
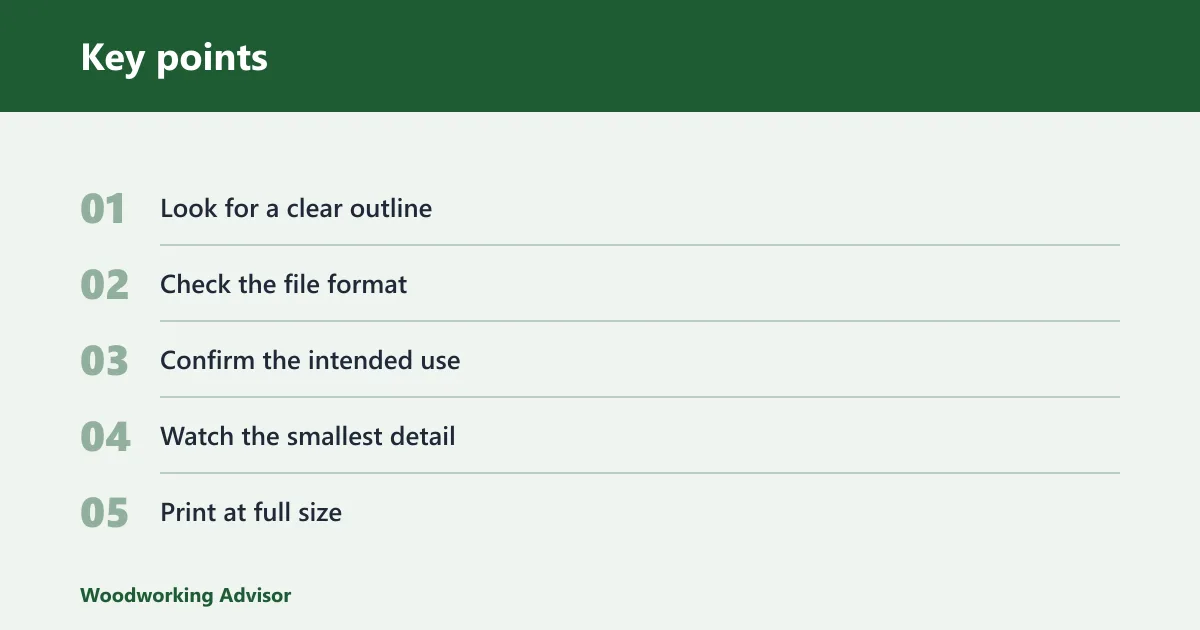
- Look for a clear outline. Thin whiskers, tiny buttons, and narrow hand bridges often fail in wood.
- Check the file format. PDF works well for print and trace. SVG is useful if you scale before cutting.
- Confirm the intended use. A carving pattern is not the same as a cutout pattern.
- Watch the smallest detail. If a line is too fine to survive in your chosen thickness, simplify it.
- Print at full size. If the source says “Actual Size” or “100%,” use that setting.
Santa pattern comparison table
This table helps you match the pattern style to the job. The key question is whether the design must hang, stand up, or survive hand carving. Thin details cut easily in thin plywood, but they break sooner. Thicker stock supports freestanding pieces, but small interior openings become harder to cut cleanly.
| Pattern style | Recommended wood thickness | Cutting tool | Difficulty | Minimum safe detail size | Finish type | Best use case | Common failure points |
|---|---|---|---|---|---|---|---|
| One-piece Santa silhouette | 1/8-inch plywood | Scroll saw | Beginner | Wide, simple curves | Acrylic paint | Ornament | Thin mustache bridges, over-sanding corners |
| Santa head ornament pattern | 1/8-inch plywood | Scroll saw | Beginner | Small but open facial shapes | Acrylic paint | Ornament | Eyes and nose too tiny to sand safely |
| Santa with beard cutout | 1/4-inch plywood | Scroll saw | Intermediate | Moderate detail spacing | Acrylic paint, optional clear finish | Decorative display | Beard tips and hat trim snapping during cleanup |
| Flat-base shelf sitter | 1/2-inch stock | Scroll saw or band saw | Beginner to intermediate | Chunky outline details | Acrylic paint, clear finish | Mantel decor | Base too narrow to stand without support |
| Freestanding Santa with base | 1/2-inch stock | Band saw | Intermediate | Large outer profile | Acrylic paint, clear finish | Mantel decor | Top-heavy shape and weak base joint |
| Layered yard Santa | 3/4-inch pine wood | Band saw | Intermediate to advanced | Large, bold forms | Exterior paint and clear topcoat | Yard art | Warping, rough edges, uneven base support |
| Santa face plaque | 1/4-inch plywood | Scroll saw | Intermediate | Facial features with room around them | Acrylic paint | Decorative display | Tiny details clogging the blade path |
| Santa sign cutout | 1/4-inch plywood | Scroll saw | Beginner | Letter-sized negative space | Acrylic paint, clear finish | Ornament or mantel decor | Letters too narrow for clean cutting |
| Printable Santa carving pattern | High-density foam | Carving tools | Beginner to intermediate | Rounded, broad forms | Paint or sealed finish | Carving blank | Sharp corners collapsing in foam |
| Mini Santa ornament | 1/8-inch plywood | Scroll saw | Beginner | Very simple silhouette only | Acrylic paint | Ornament | Too many cut-ins for the size |
How to read the failure-point column
The failure-point column is there to stop problems before you cut. Thin mustache bridges, tiny hand cutouts, and narrow beard tips are the parts most likely to break during blade changes, sanding, or paint cleanup. If those details are part of the look you want, move up to thicker stock or enlarge the pattern.
Which Santa pattern fits your project?
Choose the pattern by display use first, then by tool and thickness. Ornament patterns should stay simple and light. Shelf sitters need a flat edge or stand support. Yard art needs thicker stock and larger features. Carving blanks can hold softer curves and fewer cut-through openings, which makes them better for foam or hand carving.
Ornament, shelf sitter, mantel decor, yard art, or carving blank
A beginner-friendly silhouette works best for a Santa Claus ornament pattern because the outline stays readable at a small size. A shelf sitter needs a stable base, so the pattern should include a foot, stand, or enough width to rest against a backing. Yard art should avoid fragile flourishes and use bolder shapes that survive weather and handling.
Printable Santa carving patterns are a different category. They are meant to guide carving lines, not produce a freestanding wood cutout. High-density foam can also work as a lightweight alternative when the goal is a tree decoration that looks like Santa without the weight of wood.
How detail level changes with thickness
Thinner wood supports finer outer lines but not fine internal islands. A 1/8-inch plywood ornament can handle a simple beard outline and hat brim. A 1/4-inch plywood cutout allows more body and a sturdier feel. When you move to 1/2-inch stock or 3/4-inch pine wood, the piece becomes better for standing displays, but very tight curves take longer and need more blade control.
Say your pattern has a narrow mustache bridge and two small hand cutouts. On 1/8-inch plywood, those areas may cut cleanly if the design is scaled up slightly. On 3/4-inch pine wood, the same details can become too thin to sand safely and may split when you remove the waste.
What wood thickness should you use?
For most ornament and small display work, 1/8-inch plywood or 1/4-inch plywood is the safer starting point. Use 1/2-inch stock when the Santa needs to stand on its own. Reserve 3/4-inch pine wood for larger hanging pieces or sturdy freestanding decor where thickness helps stability rather than hurts the cut.
1/8-inch plywood for ornaments
A scroll saw guide commonly recommends 1/8-inch or 1/4-inch Baltic birch plywood for ornaments. That range fits detailed cutouts because the blade can turn more easily and the ornament stays light on the tree. If the pattern has interior openings, make sure those openings are large enough for the blade to move without tearing the wood.
1/4-inch plywood for general cutouts
Use 1/4-inch plywood when you want a little more stiffness without losing too much cutting ease. It works well for decorative display pieces and small shelf sitters. It also gives enough thickness for sanding and paint coverage without making the profile look bulky.
1/2-inch stock and 3/4-inch pine for freestanding pieces
The same scroll saw guide recommends 1/2-inch stock for freestanding decorations. That thickness helps a Santa hold an upright pose, especially if the base is wide. A project that uses 3/4-inch pine wood for a hanging Christmas ornament is more about presence than delicate detail, so it suits a larger, simpler design rather than a tiny tree ornament.
How do you transfer a Santa pattern onto wood?
The easiest methods are print and trace, carbon paper transfer, or taping the pattern to the blank and cutting through the paper. Any of those can work for a Santa Claus Christmas ornament pattern that is printed and transferred to wood. Choose the method that matches how much detail you need and how smooth the blank is.
Print and trace
Print the pattern at full size, trim around the outline, and trace it onto the wood with a pencil. This method works best on light-colored plywood or pine where the lines are easy to see. It is also the simplest option if you plan to adjust the outline by hand before cutting.
Carbon paper transfer
Place carbon paper between the printed pattern and the wood blank, then trace over the lines. This works well when the outline has tight curves or small details you do not want to lose while tracing around the edge. It is a good choice for layered Santa designs where accuracy matters more than speed.
Taping the pattern to the blank
Attach the pattern directly to the wood with small pieces of tape or a light adhesive spray. Then cut along the printed line and peel the paper away after the cut. This method is useful for scroll saw work because it keeps the design in place while you manage blade direction and starter holes.
A common first-timer mistake is scaling the pattern down too far before transfer. A 5-inch Santa ornament may look fine on screen, but tiny eyes, beard curls, and hand spaces can become hard to keep once the blade and sanding start removing material.
What tools do you need to cut it?
A scroll saw is the best match for detailed cuts in thin plywood, while a band saw is useful for quicker rough cutting on thicker stock. For interior openings, the scroll saw needs starter holes so the blade can enter the workpiece. The right blade size matters as much as the saw itself.
Scroll saw for detailed work
The Santa craft can be cut with a scroll saw, band saw, or laser cutter, but a scroll saw gives you the most control over small curves and internal cutouts. A Christmas scroll saw guide recommends a #2/0 or #1 blade for delicate fretwork and a #3 or #5 blade for larger shapes. That blade choice should match the scale of the Santa pattern, not just the wood thickness.
Band saw for faster rough cutting
A band saw works well when the pattern is large and the outline does not require tight interior turns. It is often a practical alternative for about 1/2-inch stock or about 3/4-inch pine wood, especially for yard art or freestanding decor. Use it for the outer profile, then refine edges afterward.
Starter holes and interior cuts
Any cutout with an eye opening, mouth opening, or beard window may need a starter hole before the blade can enter. Drill the hole inside the waste area, feed the blade through, and then cut along the interior line. The smaller the opening, the more likely it is to tear if you force the blade through without enough room.
How to make a Santa
If you are asking how to make a Santa from wood, start with a printable outline, choose the thickness that fits the display, cut the profile, sand the edges, and finish with paint. Keep the features bold. A Santa face with too many small cutouts looks harder to finish than it really is, and the extra detail rarely reads better from a distance.
How do you finish a wooden Santa?
After cutting, lightly sand the edges to remove saw marks and splinters. Then paint with acrylic paints for holiday color. If the piece will be handled often or displayed near moisture, add an optional clear finish after the paint cures. A clean edge and even paint do more for the final look than adding extra detail.
Light sanding after cutting
The Santa design should be lightly sanded after cutting. Focus on the outside perimeter, the corners, and any interior cut edges that will show in the finished piece. Do not over-sand delicate beard tips or thin hat trim, since those parts can disappear fast on a small ornament.
Acrylic paint for holiday color
Acrylic paint is the standard finishing step for most wooden Santa cutouts. It covers well, dries in a craft-friendly way, and gives you red, white, black, and skin-tone options for classic holiday color schemes. Paint after sanding so the surface is smooth and the edges do not shed fibers into the finish.
Optional clear finish and edge cleanup
If the Santa will be handled frequently, a clear finish can help protect the paint and reduce wear on the edges. Keep the first coat thin so it does not soften fine cut details. On porch or yard pieces, use a finish suited to exterior exposure rather than a decorative indoor coat.
How to make a paper Santa follows the same layout logic, but the material changes. Paper can handle tiny printed details that wood cannot. For woodworking, simplify the face, beard, and hands so the outline survives the saw, sanding, and paint.
How do you make a freestanding Santa wood decoration?
A freestanding Santa needs a broad footprint, a stable base, and a thickness that keeps the figure from tipping. Use 1/2-inch stock for small shelf sitters or 3/4-inch pine wood for larger standing pieces. Add a base, backing, or stand support if the body shape is narrow at the bottom.
Base width and support
Make the base wider than the narrowest part of the figure. If Santa leans forward or carries a sack, that extra width matters. A flat back, small cradle stand, or attached block support can keep the decoration upright without changing the front design.
High-density foam as a lightweight alternative
High-density foam is a useful carving material when you want a lightweight ornament or display figure instead of wood. A Santa ornament pattern was carved using high-density foam, and the foam version was described as lightweight for decorating a Christmas tree. That makes it a good option when weight matters more than wood grain.
How to make a paper Santa
To make a paper Santa, print the outline, cut it with scissors or a craft knife, and fold or layer the pieces as needed. That approach helps you test the shape before moving to wood. It is especially useful for checking whether the hat, beard, and body proportions still read clearly at the size you want.
Frequently asked questions
Where can I find free Santa patterns for wood?
Look for printable PDF or SVG files on Scrollsaw Workshop, Craftsmanspace, and similar maker sites that publish woodworking templates. Search with terms like “Santa scroll saw pattern PDF” or “Santa ornament pattern printable.” Check that the file has a clear outline and a size you can print at actual scale.
What wood thickness is best for a Santa cutout?
Use 1/8-inch plywood for small ornaments, 1/4-inch plywood for general cutouts, and 1/2-inch stock for freestanding pieces. If the design is large and meant for yard art or a bold mantel display, 3/4-inch pine wood gives more body, but it is less forgiving for fine details.
Can I cut a wooden Santa on a scroll saw or band saw?
Yes. A scroll saw is better for detailed cuts in thin plywood, especially when the design includes small openings. A band saw is better for faster rough cutting on thicker stock. Use a starter hole for interior cuts on the scroll saw, then sand the edges clean.
What tools do I need for a Santa wood project?
You need the pattern, a pencil or transfer method, the right saw, drill bits for starter holes, sandpaper, and acrylic paint. For ornaments, a scroll saw and thin plywood are usually enough. For larger stand-up pieces, a band saw and thicker stock make the work faster and the result sturdier.
Are there printable Santa carving patterns for beginners?
Yes, but keep them separate from cutout patterns. Beginner carving patterns should use broad curves, shallow facial features, and few tight corners. High-density foam is a good practice material because it is lightweight and easier to shape before you move to wood.
What size should a wooden Santa ornament be?
Keep ornament sizes small enough to hang without stressing the branch, but large enough that the pattern details still survive the saw. For a simple silhouette, a size that leaves room for a clear hat, beard, and body usually works better than an overly tiny version with fragile details.
Sponsored / affiliate links. As an Amazon Associate I earn from qualifying purchases. I may earn additional commission from eligible campaigns.