How Wood Bees Drill Holes Local Pest Control Facts
Lots of people wonder about How Do Wood Bees Drill Holes? Local Pest Control Facts. It can seem tricky when you first see those big bees making holes in your wood.
You might think they have special tools, but it’s simpler than that. We’ll walk you through it step-by-step so you can understand what’s happening. Get ready to learn how these bees do their work and what you can do about it.
Understanding How Wood Bees Drill Holes
This section explains the basic mechanics of how carpenter bees, often called wood bees, create their tunnels. We will break down the tools they use and the process they follow to bore into wooden structures. Understanding this fundamental behavior is key to effective pest control.
The Carpenter Bee’s Natural Tools
Carpenter bees use their powerful jaws, called mandibles, to chew through wood. These mandibles are strong and sharp, allowing them to bore into softwoods. They don’t drill like a power tool; instead, they gnaw and scrape the wood fibers away.
This process is slow but effective for creating the tunnels they need.
The mandibles are located at the front of their head. They are hard and pointed. Think of them like tiny chisels that the bee can move side to side.
These are their primary tools for digging. They work by scraping small pieces of wood away. It’s a bit like a beaver chewing on a tree.
Beyond their mandibles, carpenter bees also use their head and body. They push the dislodged wood particles out of the hole as they drill. This helps to keep the tunnel clear.
The process is gradual. It takes time for a single bee to create a significant tunnel.
Mandibles: Carpenter bees have strong, chitinous jaws called mandibles. These are their main tools for chewing and excavating wood. They are hardened structures that can exert considerable force against wood fibers, allowing the bee to break them down and remove them.
The shape and sharpness of the mandibles are adapted for this purpose, enabling a scraping and gnawing action. This is not a rapid drilling like a machine but a steady, persistent chewing motion. The strength of these mandibles is remarkable for their size, showcasing a specialized adaptation for their nesting habits.
How Mandibles Work in Detail
The mandibles of a carpenter bee operate like a pair of powerful scissors or chisels working in unison. They are hinged at the sides of the bee’s head. The bee can open and close them with force.
When drilling, the bee positions its head against the wood. It then begins to move its mandibles in a scraping and chewing motion. This action breaks off small particles of wood.
These wood particles are then pushed out of the entrance of the hole. The bee might use its legs to help clear the debris. This continuous removal of wood allows the tunnel to deepen.
The size and shape of the tunnel are determined by the bee’s size and the amount of time it spends chewing. Over time, these small actions create a smooth-walled gallery.
The wood fiber itself is what the bee is breaking down. It’s not like drilling through rock. Softwoods are more susceptible to this type of excavation.
The bee’s goal is to create a space to lay its eggs. The tunnel’s dimensions are usually just large enough for the bee and its developing young.

The Process of Tunnel Excavation
Carpenter bees start by selecting suitable wood. They prefer unpainted or untreated softwoods. Once a spot is chosen, the bee begins to chew.
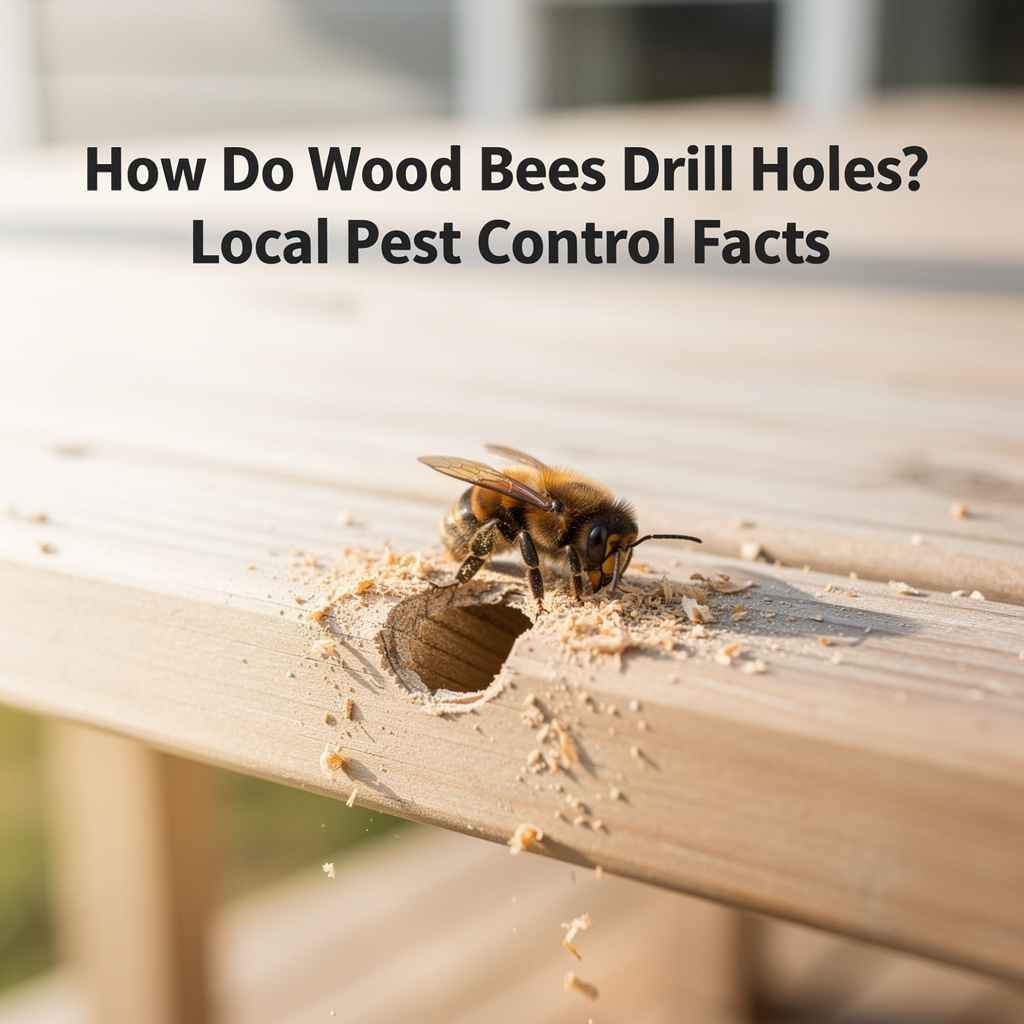
They create a small opening first. This opening is typically about half an inch in diameter. This is the entrance to their tunnel.
As they chew, they push wood shavings, called frass, out of the hole. This frass is a clear sign of carpenter bee activity. The initial tunnel goes straight into the wood for a short distance.
Then, the bee turns and tunnels along the grain of the wood. This creates a gallery that can be several inches long.
The bee may revisit and enlarge the tunnel over time. They also use these tunnels for mating and nesting. A single bee can create a new tunnel or expand an old one.
Multiple bees might use the same area if conditions are favorable. This can lead to several holes in one wooden structure.
Frass: Frass refers to the sawdust-like material that carpenter bees push out of their tunnels. It is essentially wood shavings mixed with bee saliva. This material accumulates below the entrance hole and is a primary indicator of carpenter bee infestation.
The presence of frass is a visual cue that helps pest control professionals identify the problem. It’s the direct result of the bee’s boring activity. The texture and amount of frass can vary.
It often looks like finely ground wood.
Signs of Carpenter Bee Activity
One of the most obvious signs is the presence of holes in wooden surfaces. These holes are typically round and about half an inch in diameter. They are often found on decks, porches, eaves, and other wooden structures exposed to the elements.
Unpainted or weathered wood is particularly attractive to these bees.
Another key indicator is the accumulation of frass beneath these holes. This sawdust-like material is the waste product from the bees’ boring. You might also see small yellow stains on the wood near the holes.
These are from the bees’ excrement. These stains are often a sign that the bees are actively using the tunnels.
You might also hear buzzing sounds coming from wooden structures. This can indicate that bees are actively working inside. During spring, you may see adult bees hovering around these areas.
They are often seen inspecting potential nesting sites or emerging from their tunnels. Seeing these large, noticeable bees buzzing around is a common sight. They are often mistaken for bumblebees, but they are solitary nesters.
Why Wood Bees Choose Specific Woods
Carpenter bees prefer softwoods. This includes woods like pine, fir, cedar, and redwood. These woods are easier for them to bore into.
Hardwoods are much more difficult to penetrate with their mandibles. They are looking for an easy way to create a home. They are not trying to break down the entire tree.
The condition of the wood also matters. Unfinished, unpainted, or weathered wood is more appealing. The protective coating of paint or stain can deter them.
They seem to avoid smooth surfaces. Rough or porous wood offers more grip for their mandibles. This makes the drilling process more efficient for them.
Their goal is to create a safe place for their eggs. This place needs to be protected from predators and the weather. A tunnel in a wooden structure provides this.
It’s a stable environment. The wood offers insulation and protection. The bees are looking for a long-term nesting site.
Softwoods: Softwoods are derived from coniferous trees, such as pine, fir, and spruce. They are generally less dense and easier to cut or bore into compared to hardwoods. This characteristic makes them an ideal nesting material for carpenter bees, as their mandibles are not designed for aggressive excavation of dense materials.
The ease of penetration allows the bees to efficiently create their tunnels for reproduction and shelter. Many common construction materials are made from softwoods due to their availability and lower cost. This preference makes many homes and outdoor structures vulnerable.
Factors Influencing Wood Choice
Besides the type of wood, several other factors influence where a carpenter bee will nest. The location of the wood is important. Bees often choose wood that is exposed to sunlight.
This can help warm the tunnel and the developing larvae inside. They also prefer wood that is relatively undisturbed.
The grain of the wood can also play a role. Bees tend to bore with the grain. This allows them to create longer, more efficient tunnels.
They are not just randomly chewing. They are creating a functional gallery. This gallery needs to be deep enough to protect their eggs from external threats.
The presence of existing holes or cracks can also attract them. They might expand on pre-existing damage. This means that older wooden structures or those with some wear and tear can be more susceptible.
They are opportunistic nesters. They will use what is available and easy to work with.
Local Pest Control Facts and Solutions
When dealing with carpenter bees, local pest control facts are important. These bees are active in the spring and summer. This is when they are mating and drilling new tunnels.
Early detection and treatment are key to preventing widespread damage. The holes they create can weaken wooden structures over time.
Common solutions involve treating the existing holes and preventing new ones. Insecticides can be used to kill bees inside the tunnels. Sealing the holes after treatment is also crucial.
This stops other bees from using the same tunnels. It also prevents moisture from entering and causing rot.
Repellent sprays can be used on wooden surfaces. This can make the wood less attractive for nesting. Regular maintenance of wooden structures is also a good preventative measure.
Keeping wood painted or stained can deter carpenter bees. This makes it harder for them to start drilling.
Preventative Measures: These are actions taken to stop carpenter bees from nesting in the first place. They are often more effective and less costly than dealing with an active infestation. This can include regular painting or staining of wooden surfaces.
It also involves sealing any existing small cracks or holes. Using protective covers for vulnerable wooden areas can also help. These measures make the wood less appealing and harder for the bees to penetrate.
They are about creating an environment that is not conducive to nesting. This approach focuses on long-term protection.
Effective Treatment Options
One of the most common treatment methods is using insecticidal dust or spray. This is applied directly into the drilled holes. The bee will come into contact with the insecticide as it enters or exits.
This can kill the adult bee. It also kills any larvae developing inside the tunnel.
After treatment, it is important to seal the holes. This is usually done with wood putty or caulk. Sealing the holes prevents moisture from getting in.
It also stops new bees from using the same tunnels. This step is critical for long-term success. It stops the cycle of infestation.
Some people use natural repellents. These can include certain essential oils or citrus-based products. While these may offer some deterrent effect, they are generally less potent than chemical insecticides.
Their effectiveness can also be short-lived, requiring frequent reapplication. Chemical treatments are usually recommended for significant infestations.
Insecticidal Dusts: These are finely powdered insecticides designed to be puffed into voids and cavities, like carpenter bee tunnels. When a bee enters or exits the tunnel, it picks up the dust on its body. This dust is then ingested as the bee grooms itself, leading to its demise.
Dusts are often preferred for treating galleries because they can reach deep into the tunnels and persist longer than sprays. Common active ingredients include deltamethrin or permethrin. They work by disrupting the bee’s nervous system.
Proper application requires a puffer or duster tool to ensure the dust is distributed effectively within the tunnel.
DIY vs. Professional Pest Control
For minor infestations, some homeowners opt for DIY solutions. This involves identifying the holes, treating them with readily available insecticides, and then sealing them. It requires careful attention to detail and adherence to product instructions.
Safety precautions, such as wearing gloves and masks, are essential.
However, if the infestation is extensive or if you are uncomfortable handling pesticides, hiring a professional pest control service is advisable. Professionals have the expertise, equipment, and stronger treatments to handle the problem effectively. They can identify all affected areas, even those that might be hidden.
They also understand the life cycle of carpenter bees. This allows them to time treatments for maximum impact. They can also offer advice on long-term prevention strategies.
For significant structural damage, professional help is the safest and most efficient route. They can assess the extent of the damage and provide comprehensive solutions.
Professional Pest Control Services: These are companies or individuals licensed and trained to identify, treat, and manage pest infestations. They have access to a wider range of pest control products, some of which are not available to the general public. Professionals can conduct thorough inspections to locate all nesting sites, even those that are not immediately visible.
They develop customized treatment plans based on the specific pest, the severity of the infestation, and the environment. Their services often come with guarantees, providing peace of mind for homeowners. They are equipped to handle large-scale problems and offer integrated pest management strategies.
Preventing Future Carpenter Bee Problems
Preventing carpenter bee problems is a continuous effort. It starts with maintaining wooden structures. Keeping paint and stains in good condition creates a barrier.
Bees are less likely to bore into a well-maintained surface. Regular inspections are also key. Check your decks, fences, and eaves for any early signs of activity.
Sealing any existing cracks or holes promptly is important. Even small openings can attract bees. They are looking for a protected spot to start their work.
Filling these voids with caulk or wood filler can make a big difference. This removes potential starting points for new tunnels.
Consider using protective measures on vulnerable areas. This could include wrapping the ends of exposed beams or using metal flashing. There are also commercially available carpenter bee repellent sprays.
These can be applied to wooden surfaces periodically. They are designed to create an unpleasant environment for the bees.
Wood Sealants: These are protective coatings applied to wood to prevent moisture absorption and deter pests. They can include varnishes, lacquers, stains, and specific wood sealers. For carpenter bees, the primary benefit of sealants is that they create a smooth, often less permeable surface.
This makes it more difficult for the bees to start boring into the wood. Bees tend to prefer unfinished or weathered wood. A good quality sealant can significantly reduce their attraction to treated surfaces.
Regular reapplication is usually recommended to maintain their protective properties.
Best Practices for Wood Maintenance
Regularly inspect all unpainted or weathered wooden surfaces around your home. Pay close attention to decks, fences, railings, porch ceilings, and eaves. Look for small, round holes (about 1/2 inch in diameter) and piles of sawdust-like frass beneath them.
If you find any signs of damage, address them immediately. Treat any active tunnels with an appropriate insecticide. Once the bees are gone, thoroughly clean the area.
Then, fill the holes with wood putty or a quality wood filler. Sand smooth and repaint or restain the area to match its surroundings.
For new construction or renovations, consider using hardwoods if possible, as they are less attractive to carpenter bees. If using softwoods, ensure they are thoroughly sealed and painted before exposure. Promptly repair any damage to the paint or stain.
This keeps the wood protected.
Example Case Study: Deck Protection
A homeowner in a suburban area noticed small holes appearing on their wooden deck railings over two consecutive springs. They also observed piles of sawdust accumulating on the deck boards below. Initially, they tried knocking on the wood, which sometimes startled the bees away temporarily.
However, new holes would appear each year.
In the third year, they decided to take a more proactive approach. They purchased a carpenter beeicidal dust and applied it into each visible hole using a puffer. The next day, they sealed all the holes with wood putty.
After the putty dried, they sanded the filled areas smooth and applied a fresh coat of deck stain to all the railings and exposed wooden surfaces of the deck. They have not seen new holes appear in the following spring, indicating the combined treatment and sealing was effective.
Natural Deterrents and Repellents
While not as potent as chemical treatments, some natural methods can help deter carpenter bees. One popular method involves using citrus oil sprays. The strong scent of citrus is believed to be unpleasant to bees.
Another option is to hang old CDs or shiny objects near wooden structures. The flashing light can disorient and deter bees, making them less likely to land and investigate for nesting sites. Some people have found success with essential oils like peppermint, tea tree, or eucalyptus, applied in diluted forms to wooden areas.
However, it’s important to manage expectations with natural deterrents. Their effectiveness can vary greatly, and they often require more frequent application than chemical repellents. They are best used as a supplementary measure or for very minor concerns.
For established infestations, stronger methods are usually needed.
Citrus Oil Spray: This is a DIY repellent made by combining citrus essential oils (like lemon, orange, or grapefruit) with water. Some recipes also include a small amount of mild soap to help emulsify the oil. The idea is that the strong citrus scent repels carpenter bees.
It’s applied by spraying the mixture onto wooden surfaces where bees have been active or are likely to nest. Its effectiveness is debated and may require frequent reapplication, especially after rain.
Addressing Existing Infestations
This part of the article focuses on what to do when you already have carpenter bees making holes. We’ll discuss how to deal with them and what steps to take to stop the damage.
Identifying the Extent of Damage
Before you can effectively treat carpenter bee problems, you need to know how bad the infestation is. This means looking closely at all wooden surfaces. Check for the tell-tale holes and frass.
But also look for signs of structural weakening.
Carpenter bee tunnels are not just an aesthetic problem. They can weaken the wood over time. If many tunnels are close together, they can compromise the integrity of a beam or post.
This is especially concerning for load-bearing structures like decks or porch supports.
Inspect for any unusual sagging or shifting in the wood. Sometimes, the damage is hidden inside the wood. Tapping on the wood can sometimes reveal hollow sounds, indicating tunneling.
If you suspect significant structural damage, it’s best to consult a professional.
Structural Weakening: This refers to the loss of strength or stability in a wooden material due to pest activity. Carpenter bee tunnels, by removing wood fibers, reduce the cross-sectional area of a piece of lumber. If multiple tunnels are created in close proximity, especially within a beam or joist, they can significantly reduce its load-bearing capacity.
This can lead to sagging, cracking, or even complete structural failure over time. Protecting against this requires timely intervention to stop the bees and repair the damage.
Inspecting for Tunnel Depth and Connections
When treating holes, it’s important to know how deep they go. Most carpenter bee tunnels are about 4-6 inches deep. They usually extend straight in for a few inches, then turn to run parallel to the wood grain.
This creates a gallery shape.
Sometimes, a bee might start a new tunnel very close to an old one. Or, an existing tunnel might be expanded. This means that a single visible hole might be connected to a larger gallery system.
This is why it’s important to treat all nearby holes.
Using a thin wire or probe can help you determine tunnel depth. to seal.
Gallery System: A gallery system refers to the network of tunnels and chambers created by carpenter bees within wooden structures. A typical gallery starts with a single entrance hole. Inside, it then turns and runs parallel to the wood grain, extending several inches.
Female bees lay eggs at the end of these tunnels. Each tunnel segment can house one egg. Over time, multiple tunnels might be connected or new ones may be drilled.
This interconnectedness creates the ‘gallery’ where the bees live and reproduce.
The Role of Insecticides
Insecticides are often the go-to solution for eliminating carpenter bees. They are effective at killing bees and their larvae within the tunnels. When choosing an insecticide, look for products specifically labeled for carpenter bees or similar wood-boring insects.
Commonly used active ingredients include pyrethroids like permethrin or deltamethrin. These are synthetic versions of natural insecticides found in chrysanthemum flowers. They work by disrupting the nervous system of insects.
They are fast-acting and effective for this purpose.
When applying insecticides, always follow the product label instructions carefully. Wear protective gear such as gloves and a mask. Apply the insecticide directly into the drilled holes.
Make sure to get it as far back into the tunnel as possible. This ensures it reaches the bees and eggs.
Pyrethroids: Pyrethroids are a class of synthetic insecticides that mimic the natural insecticidal compounds found in chrysanthemum flowers. They are neurotoxins, meaning they disrupt the nervous system of insects, leading to paralysis and death. Examples include permethrin, deltamethrin, and cypermethrin.
They are widely used in pest control because they are effective against a broad spectrum of insects, including carpenter bees, and tend to break down relatively quickly in the environment, reducing long-term residue concerns. They are available in various forms, including sprays, dusts, and liquids.
Application Techniques for Best Results
The most effective way to apply insecticides for carpenter bees is to treat the tunnels directly. Use a puffer or duster to apply insecticidal dust deep into each hole. The dust is less likely to run out of the hole compared to a liquid spray.
It also tends to stay in place longer, providing extended contact for the bees.
If using a liquid insecticide, a sprayer with a narrow tip can help direct the spray into the holes. Aim to saturate the interior of the tunnel. Repeat treatments might be necessary if you see continued activity.
It’s best to treat the tunnels in the evening. This is when carpenter bees are less active and more likely to be inside their nests. This increases the chances of contact with the insecticide.
Treating during the day might just drive them away temporarily.
Insecticidal Dusts vs. Sprays: When treating carpenter bee holes, insecticidal dusts are often preferred over liquid sprays. Dusts are fine powders that can be puffed into the tunnels, coating the interior surfaces.
This provides longer-lasting contact with the bees as they move in and out. Sprays, while effective, can sometimes run out of the hole quickly, especially if the tunnel is angled or has large openings. Dusts also tend to cling better to the bee’s body.
However, sprays can be easier to apply for very large areas or when reaching high locations, and some are formulated for better residual effect.
Sealing Holes After Treatment
Once you have treated the tunnels, it is crucial to seal them. This step is vital for preventing future infestations and protecting the wood. Use wood putty, wood filler, or even caulk to fill the holes.
Ensure the material you use is durable and paintable.
When filling the holes, make sure to push the material firmly into the opening. You want to create a solid seal. Once the putty or filler has dried and hardened, you can sand it smooth.
This will allow you to paint or stain over it seamlessly.
Sealing the holes does two important things. First, it prevents new carpenter bees from using the abandoned tunnels. They might be attracted to old nesting sites.
Second, it prevents moisture from entering the wood. Water can seep into empty tunnels and cause rot or fungal growth. This can weaken the wood structure even further.
Wood Putty/Filler: These are materials used to fill holes, cracks, and other imperfections in wood. They are typically made from a mixture of wood fibers or synthetic compounds and a binder. They can be sanded, painted, and stained once dry, allowing for seamless repairs.
For carpenter bee holes, wood putty or filler creates a solid plug that prevents access to the tunnel and protects the wood from moisture damage. It’s a key component of repairing the damage and preventing future nesting.
Statistics and Impact
Understanding the prevalence and impact of carpenter bee activity can help homeowners prioritize prevention and treatment. While exact statistics can vary by region, these bees are a common nuisance across many parts of the world.
Prevalence of Carpenter Bee Infestations
Carpenter bees are found in many temperate regions, including much of North America, Europe, and Asia. In the United States, they are particularly common in the eastern and southern states. Their population tends to increase in areas with abundant wooden structures and mild winters.
Studies have shown that a significant percentage of wooden decks and porches can experience carpenter bee activity. For instance, one survey in the Southern United States indicated that over 70% of untreated wooden decks showed signs of carpenter bee damage within a few years of construction. This highlights how widespread the issue can be.
The appeal of untreated softwood for nesting means that older homes and structures with weathered wood are often more susceptible. However, even new, unpainted wood can attract them. Their presence is not necessarily an indicator of poor construction, but rather an opportunistic behavior.
Regional Prevalence: This refers to how common carpenter bees are in specific geographic areas. For example, they are considered a major pest in states like Florida, Georgia, and the Carolinas due to the prevalence of suitable nesting materials and climate. In contrast, they might be less common or a minor concern in colder regions with less exposed wood or harsher winters that impact their survival rates.
Understanding regional prevalence helps in anticipating potential problems.
Economic Impact of Wood Damage
The economic impact of carpenter bees stems primarily from the damage they cause to wooden structures. This includes the cost of repairs, treatments, and preventative measures. While a single hole might seem minor, widespread infestations can lead to significant expenses.
For example, replacing damaged deck boards, railings, or siding can be costly. The ongoing need for insecticides, sealants, and professional pest control services also adds to the financial burden for homeowners. In commercial settings, such as wooden buildings or infrastructure, the costs can be substantially higher.
One estimate suggests that homeowners can spend anywhere from $100 to $500 or more annually on dealing with carpenter bee problems, depending on the severity. This does not include the cost of potential structural repairs if the damage is left unchecked for too long. It’s an expense that can often be avoided with proper prevention.
Cost of Repairs: This refers to the financial expenditure required to fix wooden structures damaged by carpenter bees. It includes the cost of materials like wood, putty, paint, or stain, as well as labor if professional services are hired for repairs. For significant damage, it might involve replacing entire sections of a deck, fence, or eaves.
The cumulative cost can be substantial, especially if multiple structures are affected.
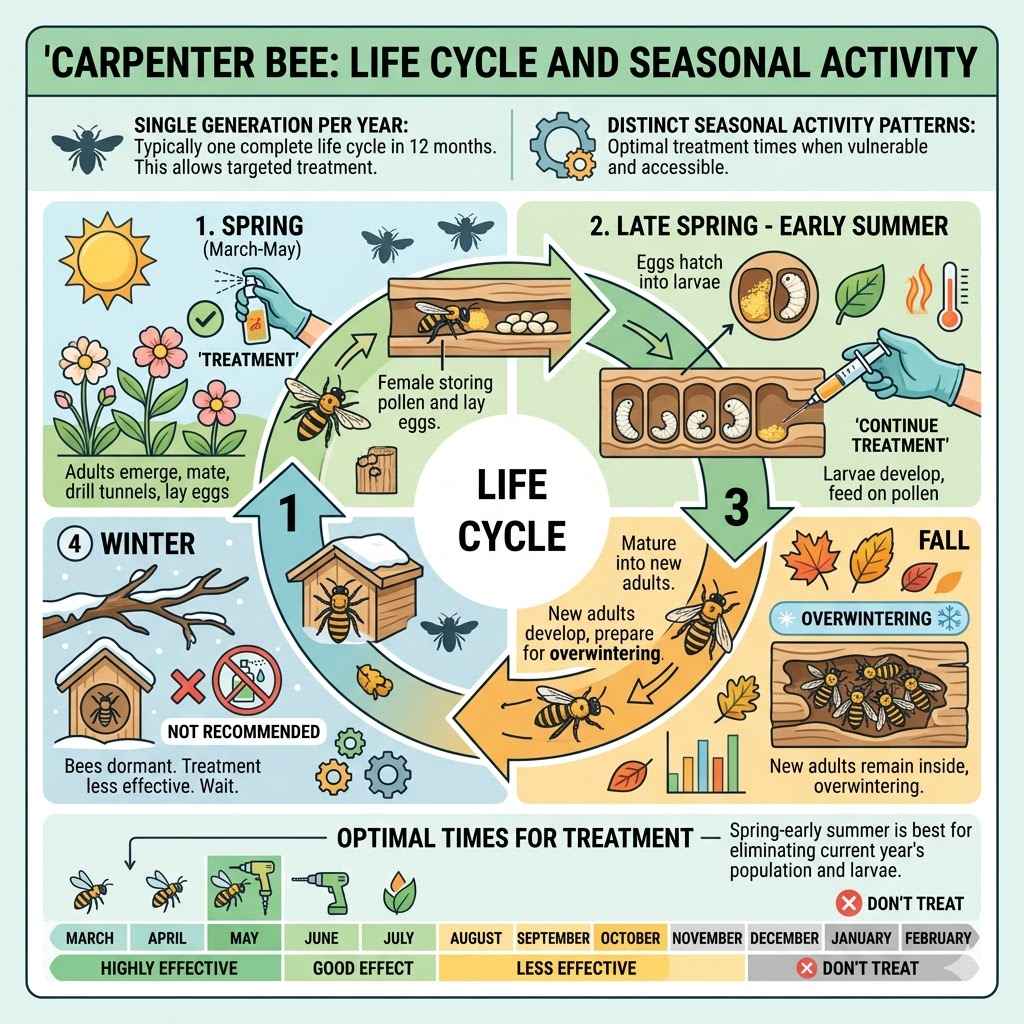
Life Cycle and Seasonal Activity
Understanding the life cycle of carpenter bees is key to timing treatments effectively. Most species in temperate regions have a single generation per year. The adult bees emerge in early spring, typically from March to May, depending on the local climate.
This is when they begin to mate and drill new tunnels or re-use old ones. The females lay eggs in these tunnels. The eggs hatch into larvae, which then develop through several stages.
They feed on pollen stored in the tunnel by the female.
By late summer or early fall, the larvae mature into adult bees. These new adults remain in the tunnels over winter to overwinter. They emerge the following spring to start the cycle anew.
This means that treating the active tunnels in spring or early summer is most effective for eliminating the current year’s population.
Single Generation Per Year: This means that there is typically only one complete life cycle from egg to adult within a 12-month period for most carpenter bee species. The adults that emerge in spring mate, lay eggs, and the offspring mature within that year. These new adults then overwinter, emerging the following spring.
This distinct seasonal activity pattern allows for targeted treatment when the bees are most vulnerable and accessible.
Optimal Times for Treatment
The best time to treat for carpenter bees is generally in the spring. This is when the adult bees are emerging from their overwintering sites and starting to drill new tunnels or re-inhabit old ones. Applying insecticides at this time can effectively eliminate the reproductive population.
Late spring and early summer are also good times. This is when females are actively drilling and laying eggs. Treating the tunnels at this stage can kill both the adult bees and any developing larvae.
If you treat in the fall, you might be killing bees that are preparing to overwinter, but the overwintering adults will still emerge the next spring.
It is generally not recommended to treat during the winter months. The bees are dormant and inside the tunnels. The insecticides may not be as effective, and you risk disturbing them without achieving eradication.
Waiting until they become active in the spring is the most efficient strategy.
Frequently Asked Questions
Question: Do carpenter bees sting?
Answer: Male carpenter bees do not have stingers. Female carpenter bees do have stingers, but they are generally not aggressive and are unlikely to sting unless they feel directly threatened or are handled. Their primary focus is on nesting.
Question: Can carpenter bees damage the structural integrity of a house?
Answer: While carpenter bees can weaken wood over time by drilling extensive tunnels, it is rare for them to cause significant structural failure in a well-built house. They prefer softwoods, and damage is usually confined to surfaces like decks, eaves, and siding. However, significant infestations can compromise structural elements.
Question: How can I tell if it’s a carpenter bee or a bumblebee?
Answer: Carpenter bees are typically large, black, and shiny on their abdomen, which is usually bald. Bumblebees are often fuzzy and have yellow and black banding patterns. Carpenter bees are also solitary nesters, while bumblebees live in colonies.
Question: Are carpenter bees attracted to any specific colors of wood?
Answer: Carpenter bees are not typically attracted to specific wood colors but rather to the type of wood itself and its condition. They prefer unpainted, unfinished, or weathered softwoods. The color of the wood is less of a factor than its texture and ease of excavation.
Question: What if I see a carpenter bee hovering around a hole but it doesn’t seem to go in?
Answer: This could mean the bee is inspecting the hole as a potential nesting site, or it may be guarding its territory. It might also be emerging from the hole. If you see this behavior, it’s a good indicator that treatment is needed to prevent further activity or nesting.
Summary
Carpenter bees drill holes using their powerful mandibles, preferring unpainted softwoods for nesting. Local pest control facts show they are active in spring and summer. Effective treatment involves insecticides applied directly into tunnels, followed by sealing the holes to prevent further damage and moisture entry.