How Does PVC Glue Work: Genius Guide
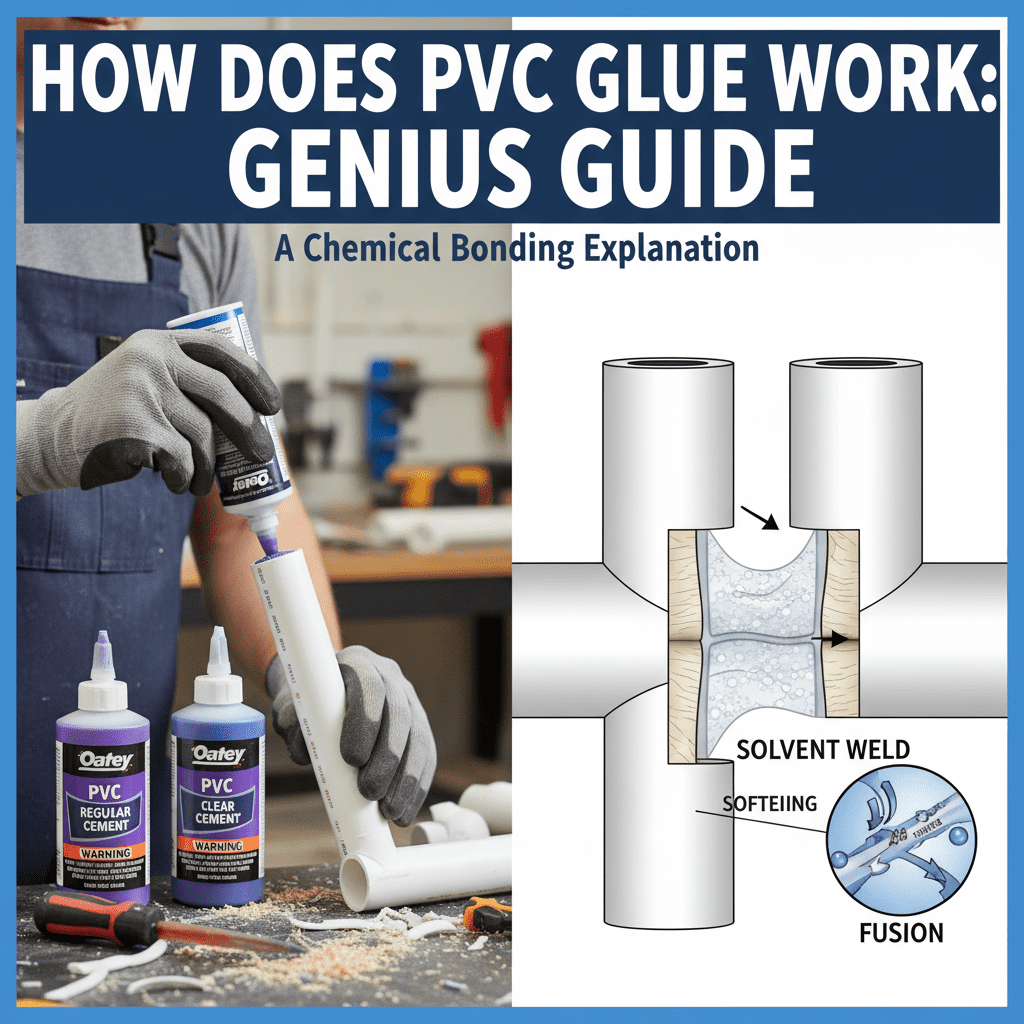
PVC glue works by chemically welding two pieces of PVC pipe together, creating a strong, leak-proof bond that’s as durable as the pipe itself. It dissolves the surface of the PVC, allowing the plastic molecules to fuse as the solvent evaporates.
Ever stared at a tube of PVC glue, wondering what magic happens inside? It’s a common sight in any DIYer’s toolbox, essential for projects ranging from simple plumbing repairs to building sturdy garden structures. But how does this seemingly simple adhesive create such a robust, permanent connection? It’s not really glue in the traditional sense; it’s more like a chemical welder!
Don’t worry if the technical side seems daunting. My goal is to break down this process into easy-to-understand steps. We’ll explore what makes PVC glue unique, how it achieves its powerful bond, and why it’s the go-to for so many PVC projects. Stick around, and you’ll be a PVC glue pro in no time!
Understanding PVC Pipe: The Foundation of the Bond
Before we dive into how the glue works, let’s quickly touch on what PVC is. Polyvinyl Chloride, or PVC, is a versatile plastic widely used for pipes, window frames, flooring, and more. Its popularity stems from its durability, resistance to corrosion, and affordability. For plumbing, PVC is a fantastic choice because it resists rust and mineral buildup, common issues with metal pipes.
When it comes to joining PVC pipes, a special kind of “cement” is used. This isn’t like the glue you might use for wood or paper. Instead, PVC cement is a solvent-based product designed specifically to interact with PVC plastic. Knowing a bit about the material helps us appreciate the science behind the connection.
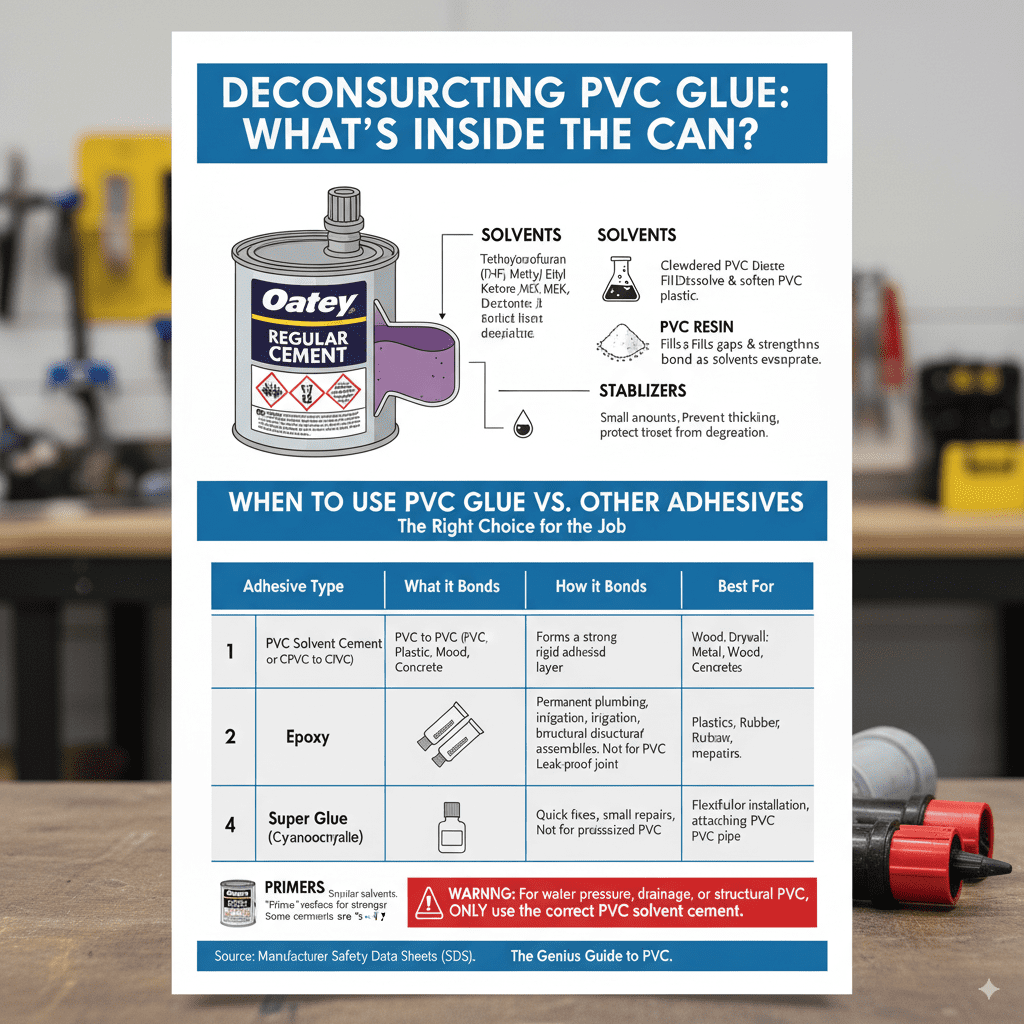
Deconstructing PVC Cement: What’s Inside the Can?
PVC cement, more accurately called PVC solvent cement, is a potent mixture. It’s not designed to simply stick two surfaces together with an adhesive layer, like epoxy or super glue. Instead, it works by chemically altering the PVC material itself. The primary components are:
- Solvents: These are the active ingredients that do the heavy lifting. Common solvents include tetrahydrofuran (THF), methyl ethyl ketone (MEK), and acetone. These chemicals are powerful enough to soften and partially dissolve PVC plastic.
- PVC Resin: This is essentially powdered PVC mixed into the solvents. The resin plays a crucial role in filling small gaps and, as the solvents evaporate, it helps to solidify and strengthen the bond, acting like a filler and reinforcing agent.
- Stabilizers: Small amounts of stabilizers are added to prevent the cement from becoming too thick too quickly and to protect it from degradation.
- Primers (Optional but Recommended): While not part of the cement itself, primers are often used before applying cement. They contain similar solvents but are formulated to “prime” the PVC surface, ensuring a cleaner, more complete dissolve for a stronger weld. Some cements include a primer component, making it a “3-in-1” product.
The exact formula can vary slightly between brands and for different types of PVC applications (like pressure pipes vs. drain/waste/vent pipes), but these core components are pretty standard. You can often find detailed safety data sheets (SDS) for specific products on manufacturer websites. For instance, a quick search for “PVC cement SDS” will lead you to valuable information from major manufacturers.
The “Welding” Process: How PVC Glue Actually Works
This is where the real magic happens! PVC cement works through a process called “solvent welding.” It’s a chemical reaction that permanently fuses the PVC pieces together. Here’s a step-by-step breakdown:
- Surface Softening: When you apply PVC cement to a PVC pipe and fitting, the solvents immediately begin to work on the surface of the plastic. They soften and partially dissolve the outer layer of the PVC. Think of it like how water can soften sugar – the solvent breaks down the material.
- Molecular Intermingling: As the surfaces soften and dissolve, the plastic molecules from the pipe and the fitting begin to mix and intermingle. They lose their distinct boundaries and start to blend into each other.
- Evaporation and Fusion: The active solvents are volatile, meaning they evaporate relatively quickly. As the solvents escape into the air, the dissolved PVC resin from the cement and the softened PVC from the pipe and fitting begin to harden again.
- Creating a Monolithic Bond: Because the molecules have intermingled and then re-solidified together, the pipe and fitting are no longer just stuck; they are chemically bonded. This creates a seamless, fused, and leak-proof joint that is as strong, if not stronger, than the original PVC material. It’s not a glue line; it’s a weld line.
This process is why speed is important when working with PVC cement. You need to assemble the pieces while the surfaces are still soft and able to intermingle. Once the solvents evaporate, the window for this molecular fusion closes.
The Crucial Role of Primer
You’ll often see cans of primer alongside PVC cement. While some “3-in-1” cements include primer properties, using a separate primer is highly recommended, especially for critical applications like pressurized water lines. Here’s why:
- Deeper Surface Preparation: Primers are formulated to clean and soften the PVC surface more effectively than cement alone often can. This ensures all dirt, grease, or oxidation are removed, and the PVC is adequately softened.
- Enhanced Chemical Weld: A properly primed surface allows the solvent cement to penetrate deeper and interact more thoroughly with the PVC molecules, leading to a stronger and more reliable weld.
- Color Indication: Many primers are colored (often purple or blue). This visual cue helps ensure that you’ve actually applied the primer to the entire surface that will be joined.
The primer works by breaking down the PVC’s surface molecules, preparing them to accept the solvent cement. It’s like prepping a wall for paint – you clean and smooth it first for a better finish. For a truly robust and long-lasting PVC joint, don’t skip the primer!
Step-by-Step Guide: Applying PVC Cement Like a Pro
Now that you understand the science, let’s get hands-on. Following these steps will ensure a strong, leak-proof connection every time:
1. Preparation is Key
Gather your tools and materials. You’ll need:
- PVC pipes and fittings
- PVC primer
- PVC solvent cement (check the can for the correct type for your pipes, e.g., DWV or pressure)
- Applicator brush (usually attached to the can lid)
- Rag for wiping excess cement
- Measuring tape
- Pipe cutter or saw
- Deburring tool or sandpaper
- Safety glasses and gloves
Ensure your work area is well-ventilated. PVC fumes can be strong.
2. Cut and Fit
Measure and cut your PVC pipes to the required lengths. Use a proper PVC pipe cutter for clean, square cuts. Avoid saws that might leave a rough or jagged edge. Once cut, deburr the inside and outside edges of the pipe ends using a deburring tool or sandpaper. This smooths the edges, preventing debris from interfering with the joint and ensuring the pipe can be fully inserted into the fitting.
3. Dry Fit First
Before applying any chemicals, perform a dry fit. Push the pipe into the fitting as far as it will comfortably go without excessive force. Mark the pipe and fitting with a pen or pencil at a point where they align. This alignment mark will help you twist the pipe and fitting during the cementing process, ensuring even distribution of the cement and a complete fusion. Ensure the pipe can be inserted to about one-third or one-half of its socket depth without forcing; if it’s too tight or too lose, you might have the wrong size pipe or fitting.
4. Apply the Primer
With your safety gear on and in a well-ventilated area, apply primer to the outside of the pipe end and the inside of the fitting socket. Use the applicator provided with the primer. Apply enough primer to moisten the entire surface that will be joined. Work quickly but thoroughly. Let the primer flash off for a few seconds (it will look wet but not pooled).
5. Apply the Solvent Cement
Immediately after priming, apply the PVC solvent cement. Apply a medium, even coat to the outside of the pipe end (up to the depth of the fitting socket) and a thinner coat to the inside of the fitting socket. Avoid excessive amounts; too much cement can weaken the joint or create messy drips.
6. Assemble Quickly
Without delay, insert the pipe into the fitting until it bottoms out. As you push them together, give the pipe a quarter-turn twist (using your alignment marks as a guide). This action spreads the cement evenly, ensuring maximum contact and molecular intermingling. Hold the pieces firmly together for about 30 seconds to prevent them from pushing apart as the cement begins to set. Wipe away any excess cement that squeezes out with a clean rag.
7. Allow for Cure Time
This is a critical step! The joint needs time to set and cure properly. While it might feel solid within minutes, it’s not yet fully strong. Refer to the PVC cement manufacturer’s instructions for recommended cure times. These times vary based on pipe size, temperature, humidity, and whether the system is for pressure or non-pressure use.
- Handling time: Typically a few minutes to an hour. The joint can be moved carefully.
- Service/Pressure time: This is when the joint is strong enough to withstand pressure or full use. This can range from 2 hours for small diameter DWV pipes to 24 hours or more for larger diameter pressure pipes in cold temperatures.
Premature pressure or stress on the joint can cause it to fail. It’s worth revisiting the Uniform Plumbing Code (UPC) or local building codes for specific requirements on cure times, especially for plumbing involving potable water or drainage systems.
Factors Affecting the Bond Strength and Cure Time
Several environmental and application factors can influence how well and how quickly your PVC joints cure:
Temperature
Cure times are significantly longer in cold weather. Warmer temperatures speed up the evaporation of solvents and the fusion process. Always check the cement’s specifications for recommended temperature ranges.
Humidity
High humidity can slow down solvent evaporation, extending cure times. In extremely humid conditions, a primer specifically designed for high humidity might be beneficial.
Pipe Size and Type
Larger diameter pipes have a greater surface area to bond, requiring more cement and longer cure times. Different types of PVC (e.g., Schedule 40, Schedule 80, DWV) also have specific cementing requirements and recommended cure times.
Ventilation
Good ventilation is crucial not only for safety due to fumes but also because it helps the solvents evaporate properly, allowing the joint to cure. Poor ventilation can trap solvent vapors, slowing down the final hardening.
Proper Application
As detailed in our step-by-step guide, correct primer and cement application – timely assembly, proper twisting, and adequate hold time – are paramount. For any critical structural or plumbing application, always consult official guidelines like those provided by the Plastics Pipe Institute (PPI).
Troubleshooting Common PVC Gluing Issues
Even with clear instructions, beginners might encounter a few snags. Here are common problems and how to fix them:
Gap at the Socket
Problem: You can see a gap between the end of the pipe and the bottom of the fitting socket after assembly. This usually means the pipe wasn’t inserted far enough or the fitting is the wrong size.
Solution: This is difficult to fix after the fact because the cement has already started to cure. For non-critical applications, you might be able to live with it if it’s small. For critical systems, the joint will likely leak and needs to be redone. Always ensure proper pipe insertion during assembly.
Leaking Joints
Problem: The joint leaks after it has supposedly cured.
Solution: This could be due to several reasons:
- Insufficient cure time before pressurizing.
- Improper drying or priming.
- Uneven cement application or insufficient cement.
- Temperature too low during application.
- Damage to the pipe or fitting.
The best approach is to cut out the faulty joint and re-do it, paying close attention to all steps, especially cure times and proper application.
Messy Appearance
Problem: Excess cement squeezed out, creating a messy, hardened bead around the joint.
Solution: While unsightly, a bit of excessive cement squeeze-out usually doesn’t affect the joint’s integrity. You can carefully trim away hardened drips once fully cured. Wiping away excess immediately after assembly with a rag can minimize this.
Safety First: Working with PVC Cement
PVC cement and primer contain strong solvents that require careful handling. Always prioritize safety:
- Ventilation: Work in a well-ventilated area. Open windows and doors, or use fans. Avoid working in enclosed spaces.
- Personal Protective Equipment (PPE): Wear safety glasses or goggles to protect your eyes from splashes. Wear chemical-resistant gloves (like nitrile or neoprene) to protect your skin.
- Avoid Ignition Sources: Solvents are flammable. Keep away from open flames, sparks, pilot lights, and hot surfaces.
- Inhalation: Avoid breathing in the fumes. If you feel dizzy or experience any adverse effects, move to fresh air immediately.
- Skin and Eye Contact: If cement or primer gets on your skin, wash thoroughly with soap and water. If it gets in your eyes, flush immediately with large amounts of water for at least 15 minutes and seek medical attention.
- Storage: Store cans tightly closed in a cool, dry place away from direct sunlight and ignition sources.
For comprehensive safety information, always refer to the specific product’s Safety Data Sheet (SDS) and the manufacturer’s instructions.
When to Use PVC Glue vs. Other Adhesives
PVC solvent cement is highly specialized. It’s the ONLY appropriate choice for permanently bonding PVC to PVC (or CPVC to CPVC with the correct type of cement). Never try to use it on other materials, and don’t use other glues on PVC plumbing meant to be permanently joined.
Here’s a quick comparison:
| Adhesive Type | What it Bonds | How it Bonds | Best For |
|---|---|---|---|
| PVC Solvent Cement | PVC to PVC (or CPVC to CPVC with correct type) | Chemically welds by dissolving and re-fusing the plastic. | Permanent plumbing, irrigation, structural PVC assemblies. Creates a monolithic, leak-proof joint. |
| Epoxy | Many materials: plastic, metal, wood, concrete. | Forms a strong, rigid adhesive layer. | Repairing broken items, bonding dissimilar materials where flexibility isn’t needed. Not suitable for PVC plumbing. |
| Super Glue (Cyanoacrylate) | Plastics, rubber, metal, ceramics. | Rapidly forms a strong bond through a chemical reaction with moisture. | Quick fixes, small repairs, hobby projects. Can be brittle and not suitable for water pressure or structural PVC applications. |
| Construction Adhesive | Wood, drywall, concrete, masonry, metal. | Flexible, strong adhesive bond. | Subfloor installation, attaching trim. Not for bonding PVC pipe. |
Remember, for any application involving water pressure, drainage, or structural integrity with PVC, only the correct PVC solvent cement will provide a safe and code-compliant connection. Using anything else is a recipe for leaks and failure.

Frequently Asked Questions (FAQ)
What is the main ingredient in PVC glue?
The main ingredients are strong solvents like Tetrahydrofuran (THF) and Methyl Ethyl Ketone (MEK), along with PVC resin. These solvents soften and dissolve the PVC surface, allowing it to fuse together as the solvents evaporate.
Does PVC glue dry or cure?
PVC “glue” doesn’t technically dry; it cures. The solvents evaporate, and the dissolved PVC hardens, creating a chemical weld, not just a surface bond.
How long does PVC glue take to cure?
Cure times vary widely based on pipe size, temperature, and humidity. Handling time can be as little as a few minutes, but full cure for pressure applications can take 24 hours or more. Always check the cement manufacturer’s label.