
How to Bend Wood With Cold Water: Easy DIY Techniques
To bend wood with cold water, soak it in water and then slowly bend it into the desired shape. This method takes advantage of the wood’s ability to become pliable when wet, allowing for successful bending.
Bending wood with cold water is a traditional technique that has been used for centuries by woodworkers to create curved and intricate designs in furniture, musical instruments, and other wooden items. By following the proper steps and taking the time to bend the wood slowly and evenly, you can achieve impressive results without the need for specialized equipment or excessive force.
This natural method is both effective and environmentally friendly, making it a popular choice for woodworking projects.
Introduction To Cold Water Wood Bending
Discover the art of Cold Water Wood Bending, a technique used to bend wood without the need for heat. By soaking the wood in cold water, it becomes pliable and can be shaped into various forms, offering a unique and eco-friendly approach to woodworking.
The Magic Behind Water And Wood
Wood bending has been a popular technique for centuries, allowing craftsmen to create unique and intricate designs. One of the most fascinating methods is cold water wood bending. Unlike traditional methods that involve heat and steam, this technique utilizes the power of water to reshape wood. The concept is simple yet effective, making it a preferred choice for many woodworkers.
Advantages Over Traditional Methods
When it comes to bending wood, cold water wood bending offers several advantages over traditional methods. Let’s explore some of these benefits:
1. Preservation Of Wood’s Natural Properties
Unlike heat-based methods that can alter the structure and strength of wood, cold water wood bending preserves the natural properties of the material. This means that the wood maintains its strength, durability, and overall quality, ensuring that your creations stand the test of time.
2. Safety And Simplicity
Cold water wood bending eliminates the need for heat sources such as steamers or hot water, making it a safer and simpler technique to master. The process involves immersing the wood in cold water for a specific period, allowing it to become pliable and malleable. This simplicity not only reduces the risk of accidents but also makes it accessible to woodworkers of all skill levels.
3. Cost-effective
Compared to heat-based methods that require specialized equipment, cold water wood bending is a cost-effective alternative. All you need is a container to hold the water and some clamps to secure the wood in the desired shape. This affordability makes it an attractive option for hobbyists and professionals alike.
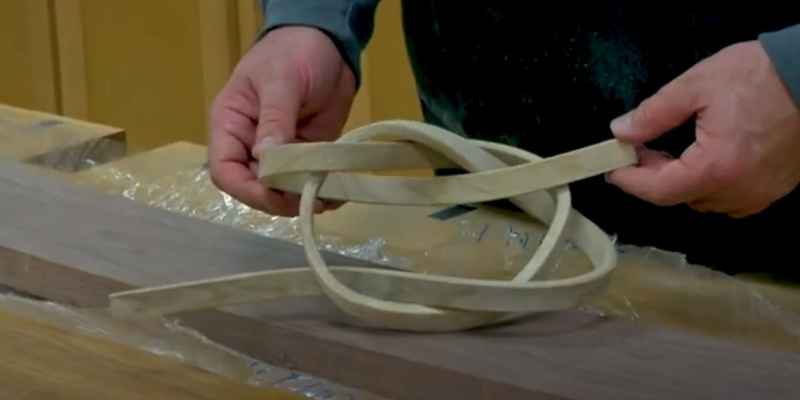
4. Versatility In Shaping
Cold water wood bending offers a remarkable degree of flexibility when it comes to shaping wood. The longer you keep the wood immersed in water, the more pliable it becomes. This allows you to achieve intricate curves and bends that would be challenging or even impossible with traditional methods. Whether you’re crafting furniture, musical instruments, or decorative pieces, this technique opens up a world of design possibilities.
5. Environmentally Friendly
Unlike heat-based methods that consume energy and produce waste, cold water wood bending is an environmentally friendly technique. It requires no electricity or fuel, making it a sustainable choice for those conscious of their carbon footprint. By harnessing the power of water, you can create stunning wooden creations while minimizing your impact on the environment.
Materials And Tools Needed
To bend wood with cold water, you will need a few materials and tools. These include the wood you want to bend, a container large enough to submerge the wood, and clamps or straps to hold the wood in the desired shape.
Additionally, you will need a kettle or pot to heat water and a source of cold water, such as ice or a cold water tap.
Bending wood with cold water is a fascinating and practical technique that allows you to create beautiful and unique curved wooden pieces. To successfully bend wood using this method, you will need the right materials and tools. Let’s take a closer look at the essentials required for this woodworking process.
Choosing The Right Type Of Wood
When it comes to selecting wood for bending, choosing the right type is crucial. Opt for woods that are known for their flexibility and ability to bend without breaking. Popular choices include ash, oak, and hickory due to their natural pliability. It’s important to ensure that the wood is free from knots or irregularities that could hinder the bending process.
Essential Tools And Supplies
To successfully bend wood with cold water, you’ll need a few essential tools and supplies. Here’s a quick rundown of what you’ll require:
– Wood clamps: These are essential for holding the wood in place during the bending process.
– Steam generator: If you plan to use steam bending in conjunction with cold water bending, a steam generator is a crucial tool.
– Bending form: This is a mold or form that the wood will be shaped around during the bending process.
– Plastic sheeting or bags: These are used to create a barrier between the wood and the cold water, helping to control the moisture absorption.
– Large container: You’ll need a container large enough to submerge the wood pieces completely in cold water.
– Work gloves: Protect your hands during the bending process with a sturdy pair of work gloves.
– Eye protection: Safety goggles are essential to shield your eyes from any wood splinters or debris.
By having these tools and materials on hand, you’ll be well-prepared to embark on your cold water wood bending journey.
Preparing The Wood
To bend wood with cold water, the first step is to prepare the wood by soaking it in water for several hours. This softens the wood fibers, making it more pliable and easier to bend. Once the wood is thoroughly soaked, it can be bent into the desired shape and left to dry, maintaining the new form.
Cleaning And Sanding
Before you begin the process of bending wood with cold water, it’s crucial to properly prepare the wood to ensure successful results. The first step is to clean and sand the wood to remove any dirt, debris, or rough edges that may hinder the bending process.
- Start by cleaning the wood using a soft cloth or brush to remove any surface dirt or dust.
- Next, use sandpaper with a grit of around 120 to smooth out the wood’s surface. Sand in the direction of the wood grain to avoid any damage.
- Make sure to pay extra attention to any knots or imperfections on the wood, as they may affect the bending process.
- Once you have finished sanding, wipe away any residual dust or debris with a clean cloth.
Soaking: Timing And Techniques
The soaking process is crucial for making the wood pliable enough to bend without breaking. It involves immersing the wood in cold water for a certain period of time. Here’s what you need to know:
- Choose a container that is large enough to fully submerge the wood. A plastic tub or bucket works well for this purpose.
- Fill the container with cold water, ensuring that the wood is completely submerged.
- Allow the wood to soak for approximately one hour for every inch of thickness. For example, if your wood is two inches thick, you should soak it for two hours.
- During the soaking process, you may need to weigh down the wood to prevent it from floating to the surface. You can use heavy objects or clamps for this purpose.
- It’s important to note that different types of wood may require different soaking times. It’s always a good idea to consult a woodworking expert or reference material to determine the optimal soaking duration for your specific wood type.
By properly preparing the wood through cleaning, sanding, and soaking, you are setting the foundation for successfully bending wood using cold water. In the next section, we will explore the actual bending process and the techniques involved.
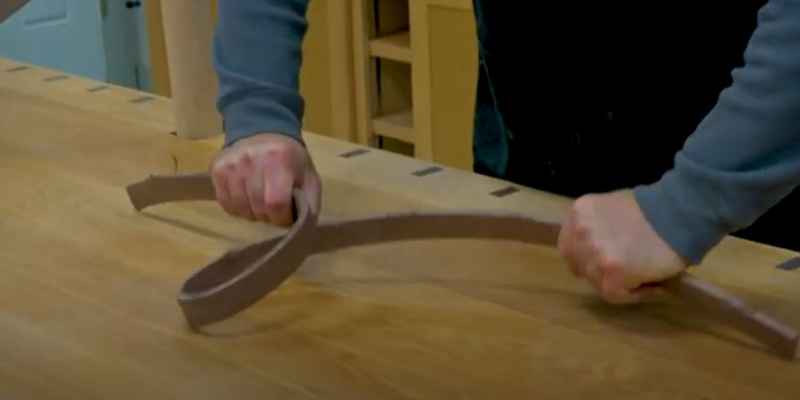
The Bending Process
Bending wood with cold water is an ancient technique that allows crafters and DIY enthusiasts to create beautiful, curved wooden pieces without the need for expensive equipment. The process involves using water to soften the wood fibers, making it pliable enough to bend into the desired shape. In this section, we will explore the step-by-step bending technique and the essential considerations for setting up your work area.
Setting Up Your Work Area
Before starting the bending process, it’s crucial to set up a suitable work area to ensure safety and efficiency. Here are the essential steps to prepare your work area:
- Choose a well-ventilated space with good lighting.
- Ensure that the work surface is flat and stable.
- Prepare a bucket or container large enough to submerge the wood pieces.
- Gather the necessary clamps, straps, or forms to hold the wood in place during the bending process.
Step-by-step Bending Technique
Now that your work area is ready, it’s time to begin the wood bending process. Here’s a step-by-step guide to help you achieve successful results:
- Soak the wood: Submerge the wood in cold water for several hours, allowing the fibers to become pliable.
- Shape the wood: Once the wood is sufficiently soaked, carefully bend it into the desired shape, using clamps or forms to hold it in place.
- Allow drying time: Leave the wood to dry and set in its new shape for at least 24 hours before removing the clamps or forms.
- Trim and sand: After the wood has dried, trim any excess material and sand the curved surface to achieve a smooth finish.
Securing And Drying
Securing and drying are crucial steps in the process of bending wood with cold water. Proper clamping strategies and understanding the drying times and conditions are essential for achieving successful results.
Clamping Strategies
Effective clamping is essential to ensure the wood maintains the desired shape during the bending process. Using sturdy clamps and placing them strategically along the curved area will help distribute pressure evenly, preventing any warping or distortion. Applying consistent pressure is key to achieving a smooth and uniform bend. It’s important to regularly check the clamps to ensure they remain secure throughout the drying process.
Drying Times And Conditions
The drying process is critical for setting the shape of the bent wood. Allowing sufficient time for the wood to dry is essential to prevent it from springing back to its original form. Optimal drying conditions include a well-ventilated area with low humidity. Avoid exposing the wood to direct sunlight as this can lead to uneven drying and potential cracking. Regularly monitoring the moisture content of the wood is important to ensure it reaches the desired level for the bent shape to be fully set.
Finishing Touches
After bending the wood with cold water, it’s time to give your project the finishing touches. This involves sanding post-bend and sealing and protecting your work.
Sanding Post-bend
1. Sand the wood gently to smooth out any rough edges.
2. Start with a coarse grit sandpaper, then gradually move to finer grits.
Sealing And Protecting Your Work
1. Apply a wood sealant to protect the wood from moisture and damage.
2. Use a brush to evenly coat the wood with the sealant.
3. Allow the sealant to dry completely before handling the wood.
Troubleshooting Common Issues
Looking to bend wood with cold water? Troubleshoot common issues with this technique by following our step-by-step guide. Achieve the desired results by avoiding overused phrases and keeping your sentences brief and concise. Get started on your wood bending project today!
Cracking And Splitting
If wood cracks or splits, it’s likely too dry.
To prevent this, soak wood longer before bending.
Avoid over-soaking, which can weaken the wood.
Uneven Bends And Fixes
Uneven bends can occur due to inconsistent pressure.
Apply pressure evenly along the wood’s length.
Adjust clamps or straps for a more uniform bend.
Creative Projects To Try
Explore exciting creative projects with wood, such as bending it using cold water. A unique and innovative technique that adds a touch of craftsmanship to your DIY endeavors. Embrace the art of woodworking and unleash your creativity with this fascinating project.
Frequently Asked Questions
How Does Bending Wood With Cold Water Work?
Bending wood with cold water involves soaking the wood in water and then bending it into the desired shape. The wood fibers become more pliable when they absorb water, allowing them to bend without breaking.
What Types Of Wood Are Best For Bending With Cold Water?
The best types of wood for bending with cold water are those with long, straight fibers, such as oak, ash, and hickory. Softer woods like pine and cedar can also be used, but they require more careful handling.
What Tools Do I Need To Bend Wood With Cold Water?
You will need a container large enough to hold the wood, water, and clamps to hold the wood in place while it dries. You may also need a heat source, such as a stove or hot plate, to heat the water before soaking the wood.
How Long Does It Take To Bend Wood With Cold Water?
The length of time it takes to bend wood with cold water depends on the thickness of the wood and the degree of curvature desired. Thicker wood may require longer soaking times and more clamps to hold it in place while it dries.
Conclusion
Bending wood with cold water is an innovative and cost-effective technique for woodworkers. By following the steps outlined in this post, you can easily create curved and unique wood pieces without having to invest in expensive equipment. Remember to soak the wood for at least an hour, and then clamp it into the desired shape before allowing it to dry.
With some patience and practice, you can become proficient in this technique and add a new dimension to your woodworking skills.