How To Bleach Oak Wood For A Lighter And Cleaner Finish
Bleaching oak wood can completely change its look. It takes away the natural yellow or brown tones. This gives you a much lighter, cleaner appearance.
Many homeowners want this look. It fits with modern styles and bright rooms. But the process can seem tricky.
You might worry about ruining your nice oak furniture or floors. This guide will help you. We will break down how to bleach oak wood step-by-step.
You’ll learn what you need and how to do it safely. Get ready to transform your oak!
Bleaching oak wood involves using a chemical solution to remove its natural color, resulting in a lighter, often whiter or grayish, finish. This process lightens the wood grain and can prepare it for stains or topcoats, creating a desired aesthetic for furniture, flooring, and cabinetry.
Understanding Oak Wood and the Bleaching Process
Oak is a popular hardwood. It’s strong and has a beautiful grain. But its natural color can be quite warm.
Think deep browns or golden yellows. Sometimes, this warmth doesn’t fit a modern or minimalist design. Bleaching oak is a way to fight this natural color.
It essentially lifts or fades the wood’s pigments. This makes the wood look much lighter. It can also make the grain stand out more clearly.
Or it can give a very uniform, pale look.
There are a few ways to bleach wood. You can use household products. Or you can use stronger, specialized wood bleaches.
Household bleaches often use chlorine. They can work, but they might not be as effective on dense woods like oak. They can also damage the wood fibers if used too much.
Stronger wood bleaches use chemicals like sodium hydroxide or oxalic acid. These are more powerful. They are designed to deeply penetrate wood and change its color.
It’s vital to know which type of bleach you are using. Each has different safety needs and results.
Why do people bleach oak? The main reason is aesthetics. A lighter oak can make a room feel bigger and brighter.
It’s perfect for beachy vibes or Scandinavian decor. It also offers a great neutral base. You can then apply a light stain or a clear coat.
This lets the wood grain show through. But it’s a different, lighter grain than the original. Sometimes, wood might have water stains or dark spots.
Bleaching can help hide these imperfections. It evens out the color. But it’s not a magic eraser for deep damage.
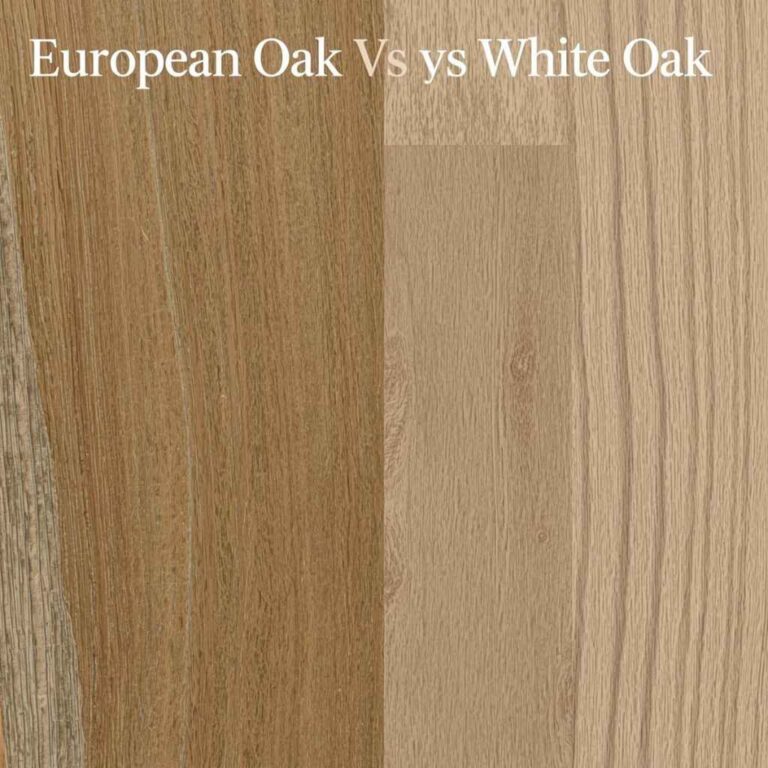
Oak has two main types: red oak and white oak. They react a bit differently to bleaching. White oak tends to have more subtle color variation.
It often has a grayish or tan tone naturally. Red oak has a pinker or reddish hue. It also has more pronounced, open grain.
White oak might lighten more evenly. Red oak’s red tones might need more work to lift. Understanding your specific oak type can help you predict the outcome.
It can also guide how long you need to bleach.
My Own Oak Bleaching Adventure
I remember tackling an old oak dresser. It was beautiful, solid wood. But its dark, reddish-brown color felt so heavy.
My bedroom felt dim. I dreamed of a airy, coastal feel. I decided to try bleaching it.
I’d read online that it was easy. But wow, was I wrong! I started with a simple household chlorine bleach.
I slathered it on thick. I waited. Then I wiped it off.
The dresser looked… a little less red. But still pretty dark. And the grain looked a bit fuzzy.
I felt so frustrated. I had spent hours. The dresser looked worse, not better.
I almost gave up. Then I did more research. I learned about two-part wood bleaches.
One part is usually sodium hydroxide. The other is a phosphoric or oxalic acid. This seemed much more serious.
I was a bit scared. But I really wanted that light finish. I bought a kit.
I put on gloves, a mask, and eye protection. I worked in a super well-ventilated garage. The smell was strong!
I applied the first part. It frothed a little. Then I waited.
After rinsing, the wood was noticeably lighter. It was more of a tan color. I applied the second part.
This seemed to lift even more color. Finally, after neutralizing and rinsing, the oak was a pale, creamy tan. It was a dramatic change!
It took a lot more effort and safety precautions than I first thought.
Choosing the Right Bleach for Your Oak Project
Selecting the correct bleach is the first big step. It impacts the results and safety. There are generally three main types.
Each has its pros and cons for oak.
Wood Bleach Types Explained
1. Chlorine Bleach (Household Bleach):
This is what most people have under their sink. It’s a liquid, usually 5-6% sodium hypochlorite. It works by breaking down the wood’s natural color pigments.
It’s best for light discoloration or very pale woods. For dense oak, it’s often not strong enough. It can take many coats.
It also can sometimes make the wood grain fuzzy. You need good ventilation. Wear gloves and eye protection.
2. Oxalic Acid Bleach:
This is a powder you mix with water. It’s great for removing dark stains. Think iron stains, water spots, or tannin bleed-through.
It can lighten wood effectively. It also helps to “de-gray” wood that has weathered. It works by reacting with the wood’s natural compounds.
It’s less harsh than some other types. It needs to be neutralized afterward. Always use gloves and eye protection.
Work in a ventilated area.
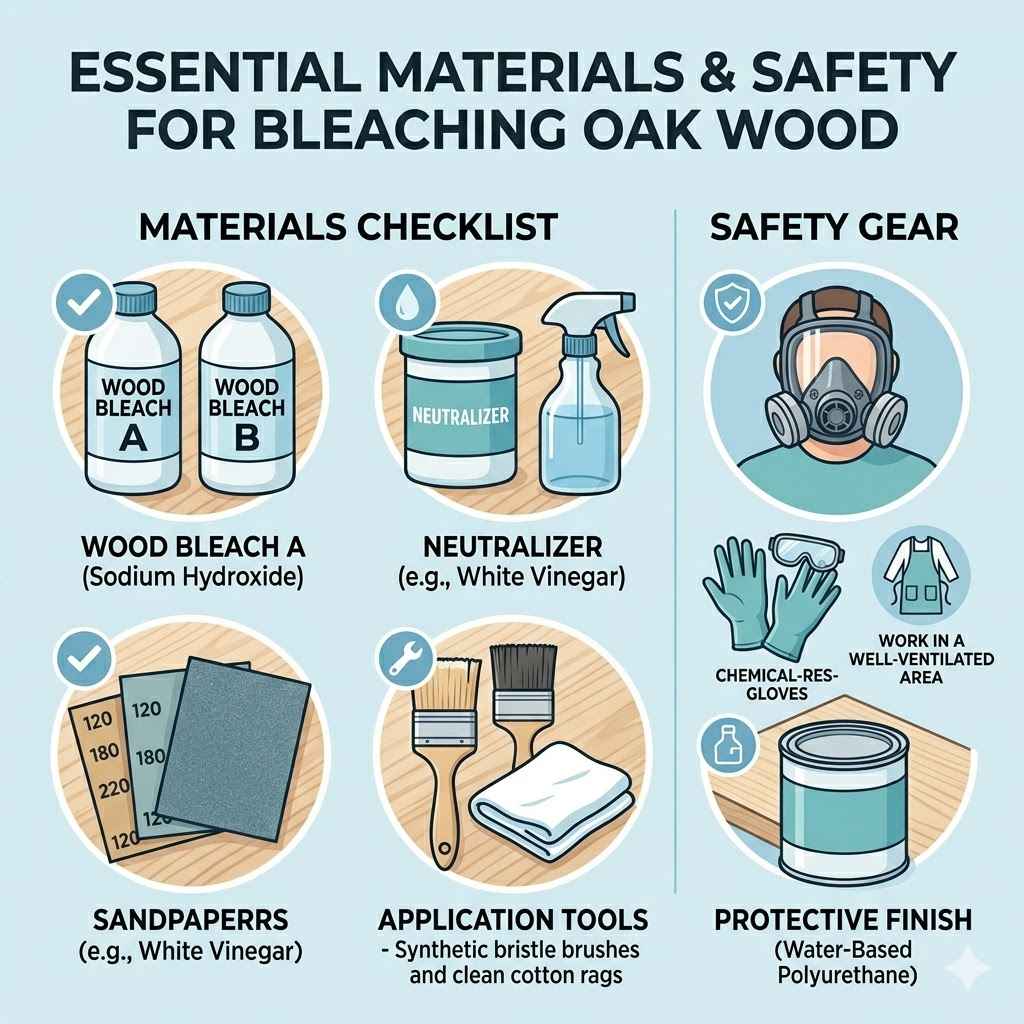
3. Two-Part Bleaches (Sodium Hydroxide + Acid):
These are the most powerful. They come in two separate containers. Part one is usually a strong alkali like sodium hydroxide.
Part two is an acid, often phosphoric or oxalic acid. This combination deeply penetrates and oxidizes the wood. It removes the wood’s natural color very effectively.
It can achieve very pale, almost white results. This is often the go-to for a dramatic light wood look. But it is also the most hazardous.
You MUST use full protective gear: gloves, goggles, respirator mask. Work in a very well-ventilated area or outdoors. It requires careful application and neutralization.
For oak, especially if you want a significant lightening effect, a two-part bleach or a strong oxalic acid bleach is usually best. Household bleach might disappoint. It’s like trying to paint a dark wall with light paint without a primer.
It will take many tries and might not give the best finish.
Preparing Your Oak for Bleaching
Good preparation makes all the difference. It ensures the bleach works evenly. It also protects your project.
Think of it like getting ready for a big art project. You wouldn’t start painting on a dirty canvas, right?
First, clean the oak thoroughly. Any dirt, grease, or old finish will stop the bleach from working right. If there’s an existing finish (like varnish or paint), you need to remove it.
Sanding is the usual way. Start with a medium grit sandpaper, maybe 100 or 120. Sand until all the old finish is gone.
Then, move to a finer grit, like 180 or 220. This smooths the wood surface. Sanding creates a nice, even surface for the bleach.
After sanding, vacuum all the dust. Then, wipe the wood down with a tack cloth. A tack cloth picks up any tiny dust particles left behind.
This is super important. Dust can cause blotches. You want the bleach to touch only clean wood.
If you skip this step, you’ll see the dust in your final finish.
Now, consider the area. You need excellent ventilation. Open all windows and doors.
If you’re indoors, consider using fans to push air out. For strong bleaches, working outside or in a garage with the door open is best. You also need to protect yourself.
Wear chemical-resistant gloves. Safety goggles are a must. For two-part bleaches, wear a respirator mask designed for chemical fumes.
Don’t underestimate this. These chemicals are strong.
Protect surrounding areas too. Cover floors and nearby objects with plastic sheeting or old drop cloths. Bleach can splash.
It can also discolor things it touches. Make sure you have all your tools ready: brushes, rags, a bucket for water, and neutralizing solution (if needed).
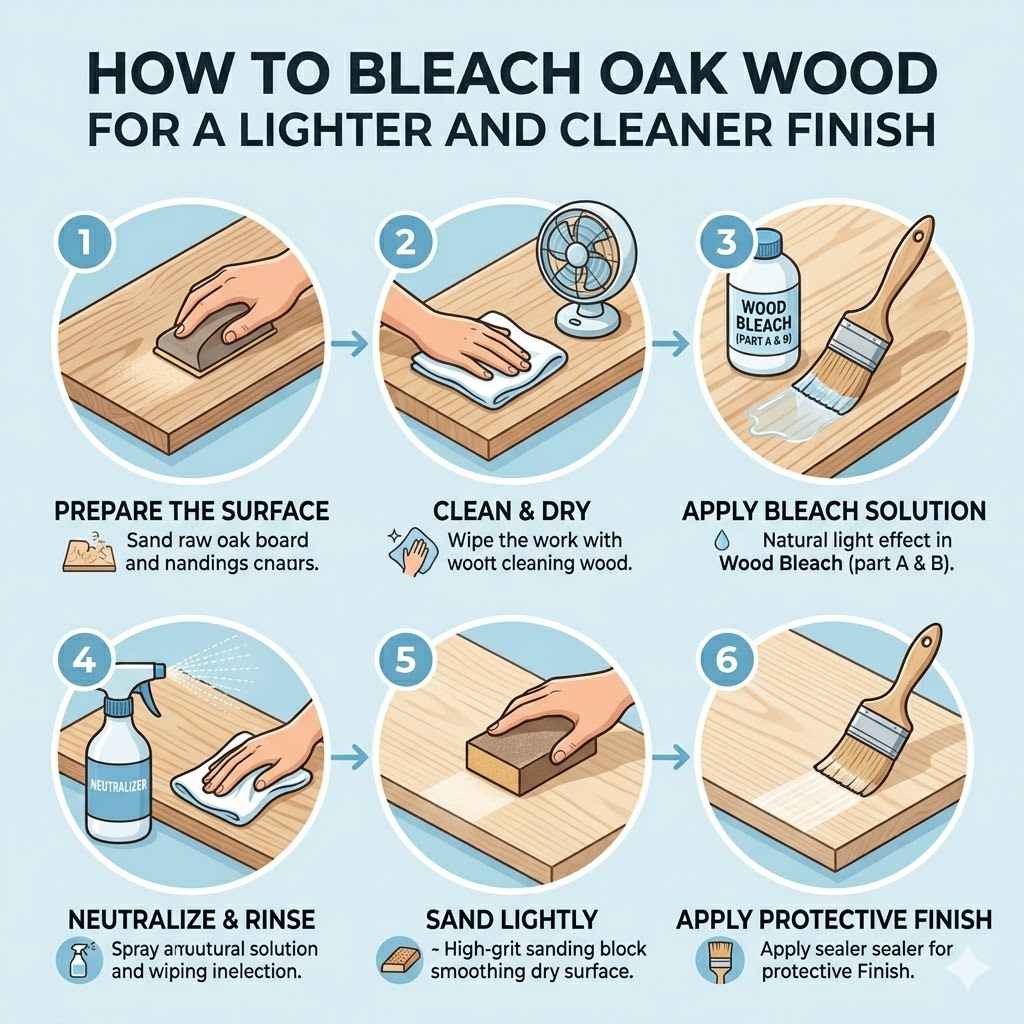
The Bleaching Steps: A Detailed Walkthrough
Let’s get into the actual bleaching. This is where the magic happens, but carefully.
Safety First! Essential Protective Gear
Must-Haves:
- Chemical-resistant gloves (nitrile or neoprene)
- Safety goggles or a full face shield
- Respirator mask (for two-part bleaches or if fumes are strong)
- Long-sleeved shirt and long pants
- Closed-toe shoes
Work Area:
- Extremely well-ventilated space (outdoors or garage with doors open)
- Plastic sheeting to cover floors and nearby items
Step 1: Apply the Bleach
Read your bleach product’s instructions carefully. They might differ slightly. For liquid bleaches (chlorine or pre-mixed acid), use a good quality synthetic brush.
Apply it evenly. Work with the wood grain. Don’t let it pool too much.
For powder bleaches, mix them with water as directed. Then apply with a brush or roller.
With two-part bleaches, apply Part A first. This is the alkali. Use a brush.
It might foam a bit. Work quickly and evenly. Do not let it dry completely before moving to Part B.
Follow the product’s recommended wait time between parts.
Apply the bleach to a small section first. This helps you get the hang of it. It also lets you test the color change.
Some people bleach the whole piece at once. Others do it in sections. Doing it in sections can prevent lap marks.
That’s when one area dries before you apply bleach next to it. This can cause an uneven look.
Step 2: Let it Work
Now, you wait. The time needed depends on the bleach. It also depends on how light you want the oak.
Check the product label for recommended times. Usually, it’s between 15 minutes to an hour. You should see the wood start to lighten.
If you’re using a two-part system, Part B is the acid. Apply Part B after the waiting period for Part A. Again, follow the instructions.
Part B often neutralizes Part A as it works.
Keep an eye on the color. Don’t leave it too long, especially with strong bleaches. You can always apply another coat if needed.
But you can’t undo over-bleaching easily. It’s better to go slow. If the desired lightness isn’t reached in one go, you can repeat the process after neutralizing and rinsing.
Step 3: Rinse and Neutralize
This is a critical step. You need to stop the bleaching action. You also need to remove all the bleach residue.
For most bleaches, you’ll rinse with plain water. Use a clean rag or sponge. Rinse the wood thoroughly.
Make sure to get into the grain. Rinse multiple times if needed.
For chemical bleaches (especially two-part or oxalic acid), you often need to neutralize. This stops the chemical reaction completely. It also prevents future damage to the wood or finishes.
A common neutralizer is a solution of baking soda and water. Mix about 1 tablespoon of baking soda with a quart of water. Apply this solution.
Let it sit for a few minutes. Then rinse thoroughly with clean water again. Some products might suggest a specific neutralizer.
Always check your product’s instructions.
After rinsing and neutralizing, let the wood dry completely. This can take 24 hours or more. You’ll see the final color once it’s fully dry.
It might look slightly different when wet versus dry.
Step 4: Second Coat (If Needed)
Once the wood is totally dry, assess the color. Is it light enough? If not, you can repeat the bleaching process.
This is common with oak. It can be stubborn. Just follow steps 1-3 again.
Ensure the wood is completely dry before reapplying.
You might notice the grain looking a bit rough after bleaching. This is normal. Bleach can raise the wood fibers.
A light sanding with very fine-grit sandpaper (220 or higher) can smooth it out. Do this after the wood is dry and before any new finish is applied. Vacuum and tack cloth the dust away again.
Dealing with Oak Grain and Potential Issues
Oak’s prominent grain is one of its beauties. But it can also be a challenge during bleaching. The open pores of the grain can absorb more bleach.
This can lead to darker streaks within the grain. It can also cause the grain to appear fuzzy.
Oak Grain Considerations
Open Pores: Oak has larger pores than woods like maple. These absorb more bleach. This can make the grain lines appear darker or more pronounced after bleaching.
Fuzzies: Bleach can raise the wood fibers. This creates a rough, fuzzy texture. Light sanding with fine-grit sandpaper fixes this.
Blotching: Uneven application or dust can cause blotches. This looks like darker or lighter patches on the wood.
Color Variation: Even within the same piece of oak, there can be color differences. Bleach might lighten some areas more than others.
To manage the grain, many people use a pre-stain wood conditioner. You apply this after sanding but before bleaching. It helps the wood absorb the bleach more evenly.
This can reduce blotching and streaks. However, some people find it makes the wood too uniform. They prefer the natural variation.
It’s a personal choice.
If you end up with fuzzy grain, don’t panic. A light sanding with 220-grit sandpaper is your friend. Sand gently with the grain.
Then wipe away the dust with a tack cloth. This will smooth things out nicely.
What about blotching? If you get blotches, you might need to re-bleach that area. Or you might need to sand it down and start that section again.
It’s a common problem. Take your time. Apply the bleach evenly.
Work in good light.
Finishing Your Bleached Oak
Once you’ve achieved the light look you want, and the wood is totally dry, it’s time to finish it. This protects the wood. It also gives it the final sheen.
You have several options. A clear coat is very popular. This lets the pale oak grain show through.
Polyurethane (water-based or oil-based), lacquer, or a wax finish all work. Water-based polyurethanes tend to stay clear. They won’t yellow over time.
Oil-based finishes can add a slight amber tone. This might darken your bleached oak a bit. Consider that when choosing.
You can also apply a light stain over the bleached wood. This can give you a hint of color while keeping it light. Think of a very pale gray, white, or even a soft, muted natural tone.
Test your stain on a scrap piece of bleached oak first. The results can be surprising. Bleached wood takes stain differently than raw wood.
If you want a very bright, almost white look, you might use a whitewash or a white glaze. These are applied on top of the bleached wood. They fill in the grain a bit.
They give a painted-on, yet still rustic, feel. Always apply finishes in thin, even coats. Follow the manufacturer’s instructions for drying times between coats.
Finishing Options for Bleached Oak
Clear Coats:
- Polyurethane (Water-Based): Dries clear, durable, won’t yellow. Great for modern, bright looks.
- Polyurethane (Oil-Based): More durable, but adds a slight amber tint over time.
- Lacquer: Dries fast, good for spray application, can be sensitive to heat.
- Wax: Soft, natural sheen, but less durable and can be damaged by heat or moisture.
Light Stains:
- Pale Gray
- White Wash
- Soft Beige
- Natural/Clear (but a stain base)
Topcoats for Color:
- Whitewash
- White Glaze
- Lime Wash
Applying a finish protects your hard work. It also ensures the bleached look lasts. Without a finish, the wood is still vulnerable to spills, scratches, and UV rays.
A good finish seals and beautifies.
When Is Bleaching Oak the Right Choice?
Bleaching oak isn’t for every project. It requires effort and a specific goal in mind. It’s a great idea when:
- You want a very light, airy feel.
- Your decor style is modern, minimalist, Scandinavian, or coastal.
- You want to de-emphasize the natural warm tones of oak.
- You are preparing wood for a very pale stain or a white-washed look.
- You have oak furniture or flooring that looks dated due to its color.
- You want to unify the color of mismatched oak pieces.
It might not be the best choice if:
- You love the natural warmth and rich color of oak.
- You want a deep, dark wood finish.
- You are looking for a quick, weekend project (it can take time).
- You are uncomfortable working with strong chemicals.
- The oak has deep gouges or structural damage that bleaching won’t fix.
Consider the overall look you’re going for. Bleaching is a powerful transformation. It changes the wood’s character.
Make sure it’s the character you want.
Frequently Asked Questions About Bleaching Oak
Can I bleach oak floors?
Yes, you can bleach oak floors. However, it’s a much bigger undertaking than furniture. You’ll need to sand the entire floor down to bare wood first.
This requires specialized sanding equipment. Proper ventilation and safety are even more critical with a large area. You’ll also need to be meticulous about rinsing and neutralizing.
Apply a durable finish afterward, like several coats of polyurethane, for protection.
How many coats of bleach do I need for oak?
It depends on the original color of the oak and the bleach you use. For a significant change, especially with red oak, you might need two or even three applications of bleach. Always let the wood dry completely between applications.
Also, ensure you neutralize and rinse thoroughly after each bleaching step. Don’t rush the process. It’s better to do multiple lighter applications than one heavy one that might damage the wood.
Will bleaching remove tannins from oak?
Bleaching, especially with oxalic acid or two-part bleaches, can help reduce tannins. Tannins are natural compounds in wood that can cause dark stains or bleed-through. Oxalic acid is particularly effective at removing these darker spots.
However, it might not remove all tannins from deep within the wood. If you have severe tannin staining, you might need multiple treatments or a specialized tannin-blocking primer before finishing.
Can I bleach particle board or MDF that looks like oak?
No, you generally cannot effectively bleach particle board or MDF. These materials are not solid wood. They have a veneer or a printed layer that is not meant to be chemically altered.
Bleaching would likely damage the surface, ruin the printed grain pattern, or cause the material to break down. Stick to solid wood for bleaching projects.
Is bleaching oak safe for my pets or children?
The bleaching process itself is NOT safe for pets or children. The chemicals used are harsh. You must ensure they are not present in the work area during application, drying, and neutralization.
Once the wood is completely dry and a protective finish is applied, it is generally safe. The chemicals are neutralized and sealed away. However, always follow product safety instructions closely.
What happens if I don’t neutralize the bleach?
If you don’t neutralize chemical bleaches, the bleaching action can continue. This can weaken the wood fibers over time. It can also interfere with the adhesion of your finish.
The finish might peel or not cure properly. Neutralizing stops the chemical reaction. It ensures the wood is stable and ready for its final protective coats.
It’s a critical step for long-term results.
Conclusion
Bleaching oak wood is a rewarding process. It transforms dark, heavy wood into something bright and modern. It takes patience and care.
Understanding the different bleach types is key. Proper preparation and safety are non-negotiable. By following these steps, you can achieve a beautiful, clean, lighter look for your oak projects.
Enjoy your refreshed wood!