How To Cut Wooden Dowels Without A Saw: Genius Method
Need to cut a wooden dowel but no saw? You can achieve clean cuts using common household items and a bit of technique. This guide reveals a genius, surprisingly effective method for precise dowel cuts without a traditional saw, perfect for quick fixes and small projects.
Sometimes, you’re in the middle of a DIY project, and you realize you need a wooden dowel cut to a specific length. The frustration hits when you don’t have a saw handy or the right kind of saw for such a small job. Trying to force a cut with the wrong tool can lead to jagged ends, splintered wood, and a ruined dowel. But don’t worry, there’s a smarter way! This guide will show you a simple, ingenious method to cut wooden dowels cleanly and precisely, even without a saw. Get ready to be amazed by how easy it can be to tackle this common woodworking challenge.
The “Genius” Method: Cutting Dowels with Basic Tools
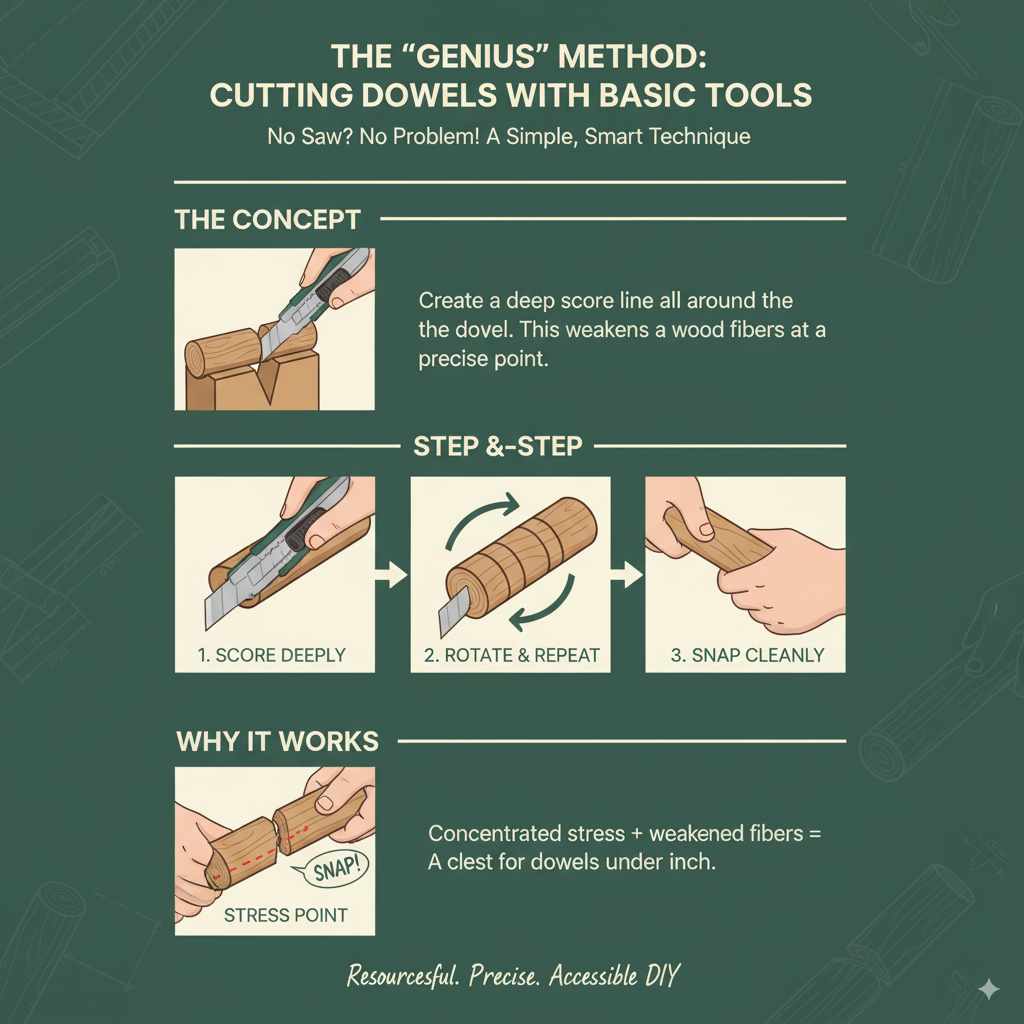
As a woodworking enthusiast who loves making DIY accessible, I’ve learned that sometimes the simplest solutions are the most effective. When you need to cut a wooden dowel without a saw, the key lies in creating a very deep score line and then applying controlled breaking force. This technique works best on smaller diameter dowels, typically those under 1 inch. For larger diameters, you might find it more challenging, but it can still work with patience.
The “genius” in this method isn’t about exotic tools; it’s about understanding wood and physics. We’re essentially mimicking how a saw cuts by creating a concentrated stress point. By deeply niching into the wood fibers all the way around, you weaken the dowel at that exact spot. When you then apply pressure, the wood will snap cleanly along that weakened line.
What You’ll Need
The beauty of this method is its simplicity and the fact that most of these items are readily available around your home or workshop. You won’t need to invest in expensive power tools for this task.
Essential Tools:
- A Sharp Utility Knife or Craft Knife: This is your primary cutting tool. Ensure it has a fresh, sharp blade for the cleanest score. A good quality utility knife like those from Stanley or a precision craft knife from X-Acto are excellent choices.
- A Workbench or Sturdy Surface: You need a stable place to work. A workbench, a sturdy table, or even a thick piece of plywood clamped down can work.
- A Metal Ruler or Straight Edge: This will help you guide your knife and ensure a straight, consistent cut line.
- Clamps (Optional but Recommended): To hold the dowel securely in place, preventing it from moving while you work. Bar clamps or C-clamps are very useful here. You can find reliable clamps at hardware stores like Home Depot or Lowe’s.
- Sandpaper (Medium to Fine Grit): For smoothing the freshly cut end.
- Safety Glasses: Always protect your eyes, especially when working with sharp tools and breaking wood.
Step-by-Step Guide to Cutting Dowels Without a Saw
Follow these steps carefully for the best results. Remember, patience is your best friend when using this cutting method.
- Prepare Your Workspace: Clear a sturdy, well-lit surface. If you have clamps, secure your dowel to the workbench at the point where you want to make the cut. This is crucial for safety and precision. If clamping isn’t an option, ensure you can hold the dowel very steady with one hand while working with the knife in the other.
- Mark Your Cut Line: Using a pencil, mark the exact spot on the dowel where you want to make the cut. For extra precision, you can wrap a piece of paper or tape tightly around the dowel at this mark, draw a line on the paper/tape, and then carefully transfer that line onto the dowel’s surface. This helps ensure your score line will be perfectly perpendicular to the length of the dowel.
- Begin Scoring the Dowel: Take your sharp utility knife and the metal ruler. Place the ruler along your marked line to act as a guide. Begin to score the wood. You aren’t trying to cut through the dowel in one go. Instead, you’re creating a deep groove. Apply firm, consistent pressure with the knife, moving it along the line. Rotate the dowel slightly after each pass, continuing to deepen the score using the ruler as your guide. You want to cut into the wood fibers, working your way around the entire circumference.
- Deepen the Score Line: Continue this process of scoring and rotating for several minutes. The goal is to create a deep, consistent groove all the way around the dowel. Think of it like cutting into a piece of cheese – you’re not sawing, you’re creating a well-defined channel. The deeper the score, the cleaner the break will be. It’s better to take your time and make many shallow passes than to try and force the knife too deep, which could cause it to slip. This stage is critical for a clean break. A good tip is to aim for at least 1/8 to 1/4 inch depth, depending on the dowel’s thickness. For more detailed information on scoring techniques, you might find resources from woodworking guilds or educational sites like the Woodworking Association of North America helpful, as they often cover fundamental techniques applicable to all skill levels.
- Prepare for the Break: Once you have a deep, continuous groove all around the dowel, it’s time to break it. You can do this while the dowel is still clamped (if using clamps) or by holding the dowel firmly on your sturdy surface with one hand on each side of the score line. Make sure your fingers are well away from the score line to avoid accidental cuts.
- Apply Controlled Force: Apply firm, steady pressure to snap the dowel along the scored line. Try bending it gently but firmly away from the score. If it doesn’t break cleanly, don’t be discouraged. Go back and score a little deeper, especially in any areas that feel less weakened. Sometimes, a slight twisting motion in addition to bending can help initiate the break cleanly.
- Smooth the Edges: Once the dowel has snapped, you’ll likely have a slightly rough edge. Take your sandpaper and smooth both ends of the dowel until they are clean and free of splinters. This also ensures a nice, flat surface if you plan to join it with other pieces.
When This Method Shines (And When It Doesn’t)
This method is a lifesaver in specific situations. However, like any DIY technique, it has its strengths and limitations.
Pros of the Scoring Method:
- Accessibility: Requires only basic tools you likely already have.
- Affordability: No need to buy specialized cutting tools for small jobs.
- Speed: Can be quicker than finding and setting up a saw for a single cut.
- Portability: Perfect for projects on the go or in situations where power is limited.
- Cleanliness: When done correctly, it can produce surprisingly clean breaks, especially on softer woods.
Cons of the Scoring Method:
- Dowel Size Limitations: Works best on smaller diameter dowels (under 1 inch). Larger dowels are much harder to score deeply and break cleanly.
- Wood Type: Hardwoods like oak can be more difficult to score and may splinter more easily than softer woods like pine.
- Potential for Jagged Breaks: If the score isn’t deep or consistent enough, the break can be uneven or splintered, requiring more sanding.
- Requires Patience & Practice: It might take a few tries to get the hang of the scoring depth and breaking force needed.
A Quick Comparison: Saw vs. Scoring Method
To help you decide when to use which method, let’s compare them side-by-side. Understanding the differences will help you choose the best approach for your specific project needs.
| Feature | Sawing Method | Scoring Method |
|---|---|---|
| Tools Required | Handsaw, hacksaw, miter saw, or power saw. | Utility knife/craft knife, ruler, clamps (optional). |
| Ease of Use (Beginner) | Can be challenging with hand saws, easier with power saws but require safety training. | Relatively easy to learn, but requires patience and practice for clean results. |
| Precision & Cleanliness | Generally offers very precise and clean cuts, especially with guide jigs or power saws. | Can be very clean if done perfectly, but risk of a less-than-perfect break is higher, especially on larger or harder woods. |
| Speed | Can be very fast with power tools. Hand sawing for a single dowel can be slow. | Can be fast for a single cut if you’re experienced; can be slow if multiple passes are needed. |
| Ideal For | Multiple cuts, larger diameter dowels, hardwoods, projects requiring high precision. Resource for OSHA safety standards for woodworking machinery can be found at OSHA’s wood products industry page. | Single or few cuts, smaller diameter dowels, softwoods, quick fixes, “no-saw” situations. |
| Cost | Higher investment for power tools; basic hand saws are affordable. | Very low cost, uses common household/beginner tools. |
Tips for Achieving a Cleaner Break
Even with the best technique, wood can be unpredictable. Here are some extra tips to help you get that perfectly clean break every time:
- Use a Very Sharp Blade: This is non-negotiable. A dull blade will crush wood fibers and lead to splintering. Replace your blade if it feels dull or starts to tear the wood instead of slicing.
- Score in One Direction First: Make your first few passes in one continuous direction around the dowel. Then, rotate and score again. This helps achieve a consistent depth.
- Maintain a Consistent Angle: Try to hold your knife at roughly the same angle for each pass. This creates a more uniform groove.
- Don’t Rush the Break: Once you’ve scored, apply steady, controlled pressure. If it feels like it’s going to splinter, stop and score a bit more.
- Consider the Grain: While dowels are often made from stable wood, try to feel for any obvious imperfections or changes in grain that might affect the break.
- Practice on Scrap: If you have some scrap dowels, practice the scoring and breaking technique a few times before working on your actual project piece.
Alternative “No-Saw” Methods (For Very Specific Needs)
While the utility knife method is a “genius” staple for many, there are a couple of other approaches you might consider for extremely specific situations, though they also come with their own caveats.
1. Using a Strong String or Wire:
This is a bit more advanced and less common for dowels, but theoretically possible for very thin dowels. You would tighten a strong, abrasive string (like dental floss or fishing line, sometimes coated with an abrasive material like grit or sand) around the dowel very tightly and then “saw” it back and forth. The friction and abrasion slowly cut through the wood. This method is time-consuming and usually results in a rougher cut than the knife method.
2. Using a Hot Wire (With extreme caution):
For very specific craft applications, a heated wire can cut through wood fibers. However, this is not recommended for general DIY projects due to fire hazards and the difficulty in achieving a clean, precise cut. It essentially burns its way through. If you’re interested in heated cutting tools, please research specialized equipment and safety protocols at reputable sites like Inventables’ guides on hot wire cutting, but be aware this is outside the scope of a simple dowel cut.
For most DIYers looking for a quick and effective solution, the utility knife scoring method remains the most practical and reliable “no-saw” technique for wooden dowels.
When the Scoring Method is Absolutely Perfect
I often find myself reaching for this method when I’m:
- Working on furniture repairs where I need to trim a dowel to fit a small hole.
- Creating decorative elements for crafts that require precise dowel lengths.
- Building small, intricate models or supports.
- In a rental property or a situation where bringing a saw is impractical or not allowed.
- Just need “one quick cut” and don’t want to set up my larger tools for it.
It’s a skill worth having in your DIY toolbox. It instills a sense of resourcefulness and problem-solving that is at the heart of home improvement and crafting.
Frequently Asked Questions (FAQ)
Q1: Can this method work on hardwood dowels?
A1: It can work on hardwoods, but it will require more effort and patience. The wood fibers are denser, so you’ll need to make more scoring passes to achieve the necessary depth. Be prepared for potentially a slightly rougher break and more sanding, and ensure your knife blade is extremely sharp.
Q2: What if the dowel splinters badly?
A2: If the dowel splinters significantly, it usually means the score line wasn’t deep or consistent enough, or too much force was applied too quickly. In this case, you’ll need to sand down the splintered area as much as possible. You may need to trim the dowel further down with your knife (or a saw, if available) and re-score to get a cleaner break. Sanding is your best friend here to clean up the edges.
Q3: How do I ensure the cut is perfectly straight?
A3: Using a metal ruler or a straight edge is key. Place it firmly against the dowel to guide your knife on each pass. Rotating the dowel consistently between passes also helps keep the score line even all the way around, leading to a straighter break. For ultimate precision, consider using a dowel jig designed for marking or cutting, even if you’re using a knife.
Q4: What’s the maximum dowel diameter I can cut this way?
A4: This method is most reliable for dowels up to about 3/4 inch or 1 inch in diameter. For anything larger, the depth of score needed becomes very significant, making it difficult to break cleanly without specialized tools. For larger dowels, a saw (like a handsaw or miter saw) is highly recommended.
Q5: Can I use this method for any woodworking project?
A5: This method is best for quick fixes, small projects, or situations where a saw isn’t an option. For structural projects, furniture construction, or when you need a large number of perfectly identical cuts, using a saw (especially a miter saw for accuracy) is generally the preferred and more professional approach. Always consider the project’s demands for precision and strength.
Q6: Is it safe to use a utility knife this way?
A6: It’s generally safe if you take precautions. Always cut away from your body, keep your fingers clear of the blade line, use a stable surface, and wear safety glasses. Ensure the blade is sharp, as a dull blade requires more force and is more likely to slip. If the dowel is secured with clamps, it adds an extra layer of safety.
Conclusion
Mastering the art of cutting wooden dowels without a saw is a fantastic skill for any DIYer. This simple yet ingenious scoring and breaking method proves that you don’t always need specialized tools to achieve great results. By using a sharp utility knife, a steady hand, and a bit of patience, you can make clean, accurate cuts on smaller dowels, saving time and effort when a saw isn’t readily available.
Remember the key steps: secure your workpiece, establish a clear and deep score line all the way around, and apply controlled force to snap the wood. Don’t forget to finish with a light sanding to ensure smooth, splinter-free edges. This technique expands your DIY capabilities, empowering you to tackle projects with confidence, no matter your tool collection.