How to Make a Wooden Level: DIY Mastery Guide
To make a wooden level, gather a straight piece of wood, a small spirit level, and wood glue. Attach the spirit level to the center of the wood using glue.
Creating a wooden level is a rewarding DIY project that enhances your tool collection. This simple device helps ensure surfaces are perfectly horizontal or vertical, making it invaluable for various home improvement tasks. By crafting your own level, you gain the satisfaction of using a personalized tool that fits your needs.
The project requires minimal materials and tools, making it accessible for beginners. With a few straightforward steps, you’ll produce a functional and attractive tool. Whether for carpentry or simple household tasks, a wooden level can improve accuracy and efficiency in any project. Let’s dive into the steps to create your own wooden level.
Introduction To Crafting A Wooden Level
Crafting a wooden level is a fun project. DIY woodworking attracts many people. It allows creativity and hands-on skills. Building your own tools brings satisfaction.
A reliable level is key in construction. It ensures straight lines and accurate measurements. This tool helps avoid mistakes in projects. A well-made wooden level is durable and precise.
Using wood for this project adds character. Different types of wood can create unique finishes. It’s also an eco-friendly choice. Crafting your own level shows craftsmanship and pride.
Essential Tools And Materials
Choosing the right wood is very important for making a wooden level. Use hardwoods like oak or maple. They are strong and durable. Softwoods like pine can work too, but they may not last as long.
For tools, you will need a saw for cutting the wood. A chisel helps to shape the wood edges. A sandpaper will smooth out rough surfaces. A drill is useful for making holes, and wood glue helps in assembly. A clamp will hold pieces together while the glue dries.
Designing Your Wooden Level
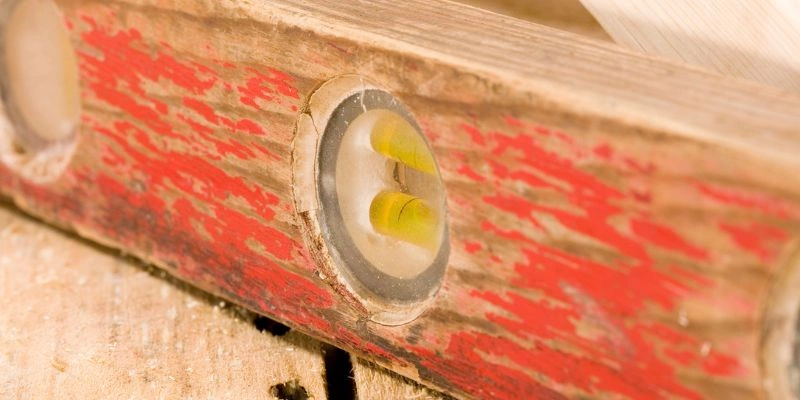
Designing a wooden level requires understanding the traditional design. A classic level uses a simple, straight beam. The beam has a bubble vial in the center. This vial shows if a surface is level.
For custom features, consider personal needs. You can add handles for better grip. Marking measurements on the side can help in various tasks. Choose different wood types for unique looks. Pine offers a light weight, while oak provides durability.
Lastly, finishing touches can enhance the level’s appearance. Applying stain or sealant makes the wood shine. This protects it from moisture and wear.
Cutting And Shaping The Wood
Use a sharp saw for accurate cuts. Measure wood pieces carefully before cutting. A straight edge helps guide the saw. Check angles with a square to ensure precision.
Smoothing surfaces is key for a good finish. Start with rough sandpaper to remove splinters. Follow with finer sandpaper for a smooth touch. Always sand in the direction of the grain. This prevents scratches and keeps the wood beautiful.

Assembling The Level Components
To join pieces with accuracy, measure each component carefully. Use a square to ensure corners are precise. Mark where pieces meet to guide your cuts. A clamp can help hold everything together while you work.
Ensuring structural integrity is crucial. Use wood glue for a strong bond. After applying glue, secure with screws for extra strength. Check that all joints are tight and aligned properly. This makes your wooden level more durable and reliable.
Installing The Level Vial
Choosing the right vial is very important for your wooden level. Look for a vial that is accurate and easy to read. A clear bubble in the center helps with precision.
Securing the vial is crucial for accurate readings. Use strong adhesive to attach it to the wooden frame. Make sure it is level before the glue dries. Double-check the alignment for the best results.
Finishing Touches
Start by sanding the wood to create a smooth finish. Use different grits of sandpaper. Begin with a coarse grit and move to a finer one. This will help remove any rough spots.
Make sure to sand along the wood grain. This helps maintain the wood’s natural beauty. Pay special attention to edges and corners for a polished look.
After sanding, it’s time to apply protective coatings. Choose a suitable finish, like varnish or oil. These will protect the wood from moisture and damage.
Apply the coating with a clean brush or cloth. Ensure even coverage for best results. Let it dry completely before using your wooden level.
Calibration And Testing
Calibration ensures your wooden level is accurate. Follow these steps for precise calibration:
- Place the level on a flat surface.
- Use a known straight edge for comparison.
- Adjust the level until it reads correctly.
- Check the level in different positions.
Maintaining accuracy is vital. Regular checks help keep your level precise.
- Store the level in a safe place.
- Avoid exposing it to extreme temperatures.
- Inspect it for damage or warping regularly.
- Clean it gently to avoid dirt buildup.
Creative Customizations
Adding decorative elements can make your wooden level unique. Consider using wood stains for color. Engraving designs or initials adds a personal touch. Use paint for a fun and colorful look.
Functional enhancements can improve usability. Attach a bubble level for quick checks. Add rubber grips for better handling. A hanging hole makes storage easy. Consider a measuring tape feature for added convenience.
Using Your Homemade Wooden Level
Using a homemade wooden level can be very helpful. Make sure to check it often. Place the level on a flat surface. Watch the bubble closely to see if it’s centered.
For best practices, always keep your level clean. Dust and dirt can affect its accuracy. Store it in a dry place to avoid warping. Use gentle pressure when placing it on surfaces.
Common issues can arise with wooden levels. If the bubble is stuck, tap gently on the side. If the wood bends, try to reshape it carefully. For best results, always check the level before each use.
Maintenance And Care
To keep your wooden level in great shape, regular cleaning is essential. Use a soft cloth to wipe off dust and dirt. Avoid using water directly on the wood. Instead, slightly dampen the cloth when needed. For tougher stains, a mild soap can help.
Store your wooden level in a dry place. High humidity can warp the wood. Keep it away from direct sunlight to prevent fading. Use a protective case or bag for added safety.
Check your level periodically for any signs of wear. Look for cracks, warps, or loose parts. Tighten any screws or fittings to ensure accuracy. Regular maintenance keeps your level reliable for years.
Frequently Asked Questions
How Do I Choose Wood For A Level?
Choosing the right wood is crucial for making a level. Opt for hardwoods like oak or maple for durability. These woods resist warping and provide stability. Ensure the wood is straight and free of knots. Quality wood will enhance the accuracy of your level.
What Tools Are Needed To Make A Wooden Level?
To make a wooden level, you’ll need a few essential tools. A saw, chisels, and sandpaper are must-haves. Additionally, a drill and a level vial will ensure precision. Having clamps will help secure the wood during assembly. This toolkit will make the process smoother and efficient.
How Long Does It Take To Make A Wooden Level?
The time required to make a wooden level can vary. On average, it takes about 2 to 4 hours. This includes measuring, cutting, and assembling the wood. Allow extra time for drying if you use glue. Patience will ensure a quality finished product.
Can I Customize My Wooden Level Design?
Absolutely! Customizing your wooden level is a great idea. You can modify its size, shape, and finish. Adding personal touches makes it unique to your style. Just ensure that any modifications maintain the level’s functionality and accuracy.
Conclusion
Creating a wooden level is a rewarding project. It enhances your woodworking skills while providing a useful tool. Follow the steps outlined in this guide to craft your own. With patience and precision, you’ll enjoy the satisfaction of using a handmade level.
Happy woodworking, and may your projects always be perfectly aligned!