How to Restain Wood: 9 Steps, Grit Guide + Stain Types
To restain wood, sand down to bare wood with 80–120 grit sandpaper, clean away all dust with a tack cloth, then apply stain in the direction of the grain and wipe excess after 5–10 minutes. Oil-based stains need 24 hours between coats; water-based dry in 2–4 hours. Full cure takes 7 days — avoid heavy use before then. This guide covers every step from prep through topcoat, stain type selection, and the no-sanding gel stain option.
⚡ Quick Answer
To restain wood: sand with 80–120 grit to strip old finish → 150 grit → 180–220 grit finish sand → tack cloth → apply stain with grain → wipe excess after 5–10 min → dry 2–4 hrs (water-based) or 24 hrs (oil-based) → apply topcoat. Total project time: 1–3 days depending on coats and stain type.
What You Need to Restain Wood
- Sandpaper: 80-grit, 120-grit, 150-grit, 220-grit
- Sanding block or orbital sander
- Tack cloth or vacuum + damp rag
- Wood stain (oil-based or water-based — see chart below)
- Natural bristle brush (oil-based stain) or synthetic brush (water-based)
- Clean lint-free rags or foam applicator
- Wood conditioner (recommended for pine, maple, cherry)
- Topcoat/sealant (polyurethane, lacquer, or oil)
- Safety gear: gloves, safety glasses, N95 mask (for sanding dust)
How to Restain Wood: Step-by-Step
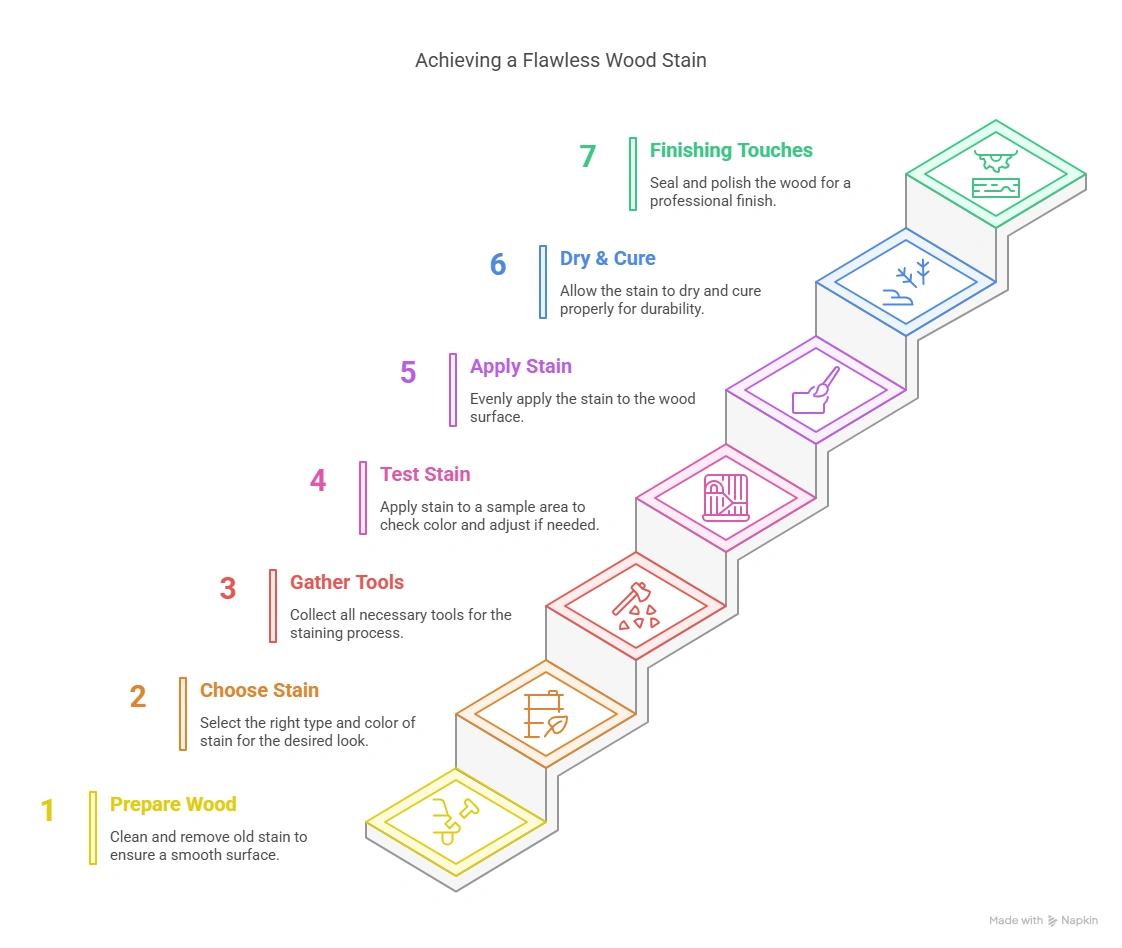
- Clean the surface: Remove all dirt, grease, and wax with a mild wood cleaner or mineral spirits. Any contamination left will block stain penetration and cause blotchy spots.
- Strip old finish (80–120 grit): Sand with 80 or 100-grit paper in the direction of the wood grain to remove the existing stain and finish. Switch to 120-grit once the old finish is gone.
- Smooth the surface (150–220 grit): Progress to 150-grit, then finish with 180 or 220-grit. The finer the final grit, the lighter the final stain color will appear — use 150 grit if you want a deeper color, 220 grit for a lighter tone.
- Remove all dust: Vacuum the surface, then wipe with a tack cloth. Sanding dust trapped under stain causes a rough, uneven finish. This step takes 2 minutes but protects hours of work.
- Apply wood conditioner (optional but recommended): On blotch-prone woods — pine, maple, cherry, alder — apply a pre-stain wood conditioner and let sit 15 minutes before staining. Skipping this on soft woods almost always causes uneven color.
- Test stain on a hidden area: Apply stain to an inconspicuous spot and let dry completely. Final color will look significantly different dry than wet — always check before committing.
- Apply first coat of stain: Brush or wipe stain on in the direction of the grain. Work in manageable sections — do not apply to the entire surface and then go back to wipe, as stain left too long becomes tacky and uneven.
- Wipe excess after 5–10 minutes: Use a clean lint-free rag to wipe off all excess stain following the grain. The longer you leave it before wiping, the darker the result. Leaving stain on without wiping causes a sticky, gummy surface that never cures properly.
- Let dry, then apply topcoat: Water-based stain: dry 2–4 hours before topcoat. Oil-based stain: dry 24 hours. Apply polyurethane, lacquer, or oil topcoat to protect the finish. Avoid heavy use for 7 days while the topcoat fully cures.
Choosing the Right Stain for Restaining
The stain type determines drying time, final color depth, and cleanup method. For restaining existing furniture, oil-based penetrating stains give the deepest color; for quick turnaround or indoor air quality concerns, water-based is the better choice.
| Stain Type | Dry Time Per Coat | Color Depth | Cleanup | Best For |
|---|---|---|---|---|
| Oil-based penetrating | 8–24 hours | Deepest | Mineral spirits | Furniture, hardwood floors |
| Water-based | 2–4 hours | Moderate | Soap and water | Indoor projects, quick dry |
| Gel stain | 8–12 hours | Moderate-deep | Mineral spirits | Over existing finish (no full strip) |
| Wiping stain | 2–4 hours | Light-moderate | Varies | Detail work, small pieces |
Recommended Product
Minwax Wood Finish — Oil-Based Penetrating Stain
Deep-penetrating oil-based stain available in 30+ colors. Enhances wood grain and provides a durable finish — the most widely used restaining stain for furniture and floors. Apply with a brush, wipe excess after 5–15 minutes.
Check Price on Amazon →How to Restain Wood Without Sanding
You can restain wood without full sanding using gel stain — a thick stain that sits on the surface rather than penetrating the wood. This works on furniture that has an intact, non-peeling existing finish.
- Clean thoroughly: Remove all wax, grease, and grime with a TSP substitute or wood cleaner. Allow to dry completely.
- Apply deglosser/liquid sandpaper: Wipe on a chemical deglosser (like Klean-Strip Prep & Etch) with a cloth. This dulls the existing finish so the new stain can grip. No power sanding needed.
- Apply gel stain: Brush on gel stain in the direction of the grain. Gel stain is forgiving and easy to control — good for beginners or vertical surfaces.
- Wipe and build color: Wipe excess after 8–10 minutes. Apply additional coats to deepen the color, allowing 8–12 hours between coats.
- Topcoat: Seal with oil-based polyurethane for durability.
Limitation: Gel stain cannot change a dark finish to a lighter color — it can only go darker. To lighten the color, sanding down to bare wood is required.
Preparing the Wood for Restaining
Cleaning the Surface
Clean with a wood-safe cleaner or a 1:1 mix of white vinegar and water. For grease or wax buildup, use mineral spirits on a cloth. Any oil or wax remaining on the surface will repel the new stain and create blotchy areas that cannot be fixed after the stain is applied.
Removing Old Stain
Sand with 80–100 grit sandpaper to strip the old stain down to bare wood. Work with the grain — never across it. On turnings or carved areas where sandpaper won’t reach, use a chemical stripper (apply with a brush, wait 15–20 minutes, remove with a plastic scraper). After stripping, wipe with mineral spirits to confirm all old finish is removed — bare wood absorbs mineral spirits evenly; areas with remaining finish will look shiny or repel the liquid.
Drying and Curing Time
Drying Time by Stain Type
| Stain Type | Touch dry | Recoat time | Topcoat ready |
|---|---|---|---|
| Water-based | 1 hour | 2–4 hours | 2–4 hours |
| Oil-based | 4–6 hours | 8–24 hours | 24 hours |
| Gel stain | 4 hours | 8–12 hours | 12–24 hours |
Curing Process
Full cure — when the topcoat reaches maximum hardness and chemical resistance — takes 7 days for most polyurethane topcoats. During curing: avoid placing objects on the surface, avoid cleaning with chemicals, and keep the area dust-free. A surface that is “dry to the touch” is not yet cured. Light use after 48 hours is acceptable; full use after 7 days.
Common Mistakes to Avoid
- Skipping dust removal after sanding: Dust trapped under stain creates a rough, sandpaper-like texture. Always vacuum and tack cloth before staining.
- Not wiping excess stain: Leaving stain on without wiping creates a sticky, gummy surface. Always wipe excess within 5–15 minutes of application.
- Skipping wood conditioner on soft woods: Pine, maple, and cherry absorb stain unevenly. Pre-stain conditioner prevents blotching and is worth the extra 15 minutes.
- Going cross-grain with sandpaper: Cross-grain scratches show through the final stain. Always sand in the direction of the grain.
- Applying topcoat too soon: A topcoat applied before the stain dries traps solvents and causes bubbling, peeling, or a permanently tacky surface.
Tips for Working With Wood Stain
- Apply thin coats: Two thin coats produce a more even, durable result than one thick coat. Thick coats peel.
- Work in sections: On large surfaces, work 2–3 ft at a time so you can wipe excess before it becomes tacky.
- Control ambient temperature: Ideal staining temperature is 50–90°F (10–32°C). Cold slows drying; heat accelerates it and can cause lapping marks.
- Raise the grain on bare wood: Wipe bare wood with a damp cloth and let dry before the final 220-grit sand. This raises and removes small wood fibers that would otherwise create a rough surface after staining.
- Dispose of rags safely: Oil-soaked rags can spontaneously combust. Spread flat outdoors to dry, then store in a sealed metal container with water.
Frequently Asked Questions
Can I Restain Wood Without Sanding?
Yes — use gel stain over an existing finish after applying a chemical deglosser (liquid sandpaper). This works only for going darker; gel stain cannot lighten an existing stain color. For a lighter color or a fully stripped base, sanding to bare wood is required. The no-sand method saves 1–2 hours of prep time but limits your color options.
Can You Stain Over Already Stained Wood?
Yes, but the result depends on the existing finish condition. If the old finish is peeling, cracking, or heavily worn, sand down to bare wood first. If the finish is intact and you only want to go darker, clean thoroughly, apply deglosser, and use gel stain. Going lighter requires complete stripping — you cannot apply a light stain over a dark finish.
Do You Have to Remove Old Wood Stain Before Restaining?
Not always. For going darker: clean, degloss, and apply gel stain over the existing finish. For going lighter or matching a different color: yes, strip completely with 80–100 grit sanding or chemical stripper. If the existing finish is peeling or damaged, always strip first — staining over a failing finish causes the new stain to peel within months.
How Do You Prepare Stained Wood for Restaining?
Clean the wood with a wood-safe cleaner or mineral spirits to remove wax, grease, and grime. Sand with 80–120 grit to remove the old finish, then progress to 150 and 220 grit. Vacuum all dust, wipe with a tack cloth, and apply wood conditioner to blotch-prone species (pine, maple, cherry). Test stain on a hidden area before full application.
How Long Does Restained Wood Take to Dry?
Water-based stain is touch-dry in 1 hour and recoat-ready in 2–4 hours. Oil-based stain takes 4–6 hours to touch dry and 24 hours before recoating or topcoating. Full cure of the topcoat takes 7 days regardless of stain type. High humidity significantly extends drying time — ideal conditions are 50–90°F with under 70% relative humidity.