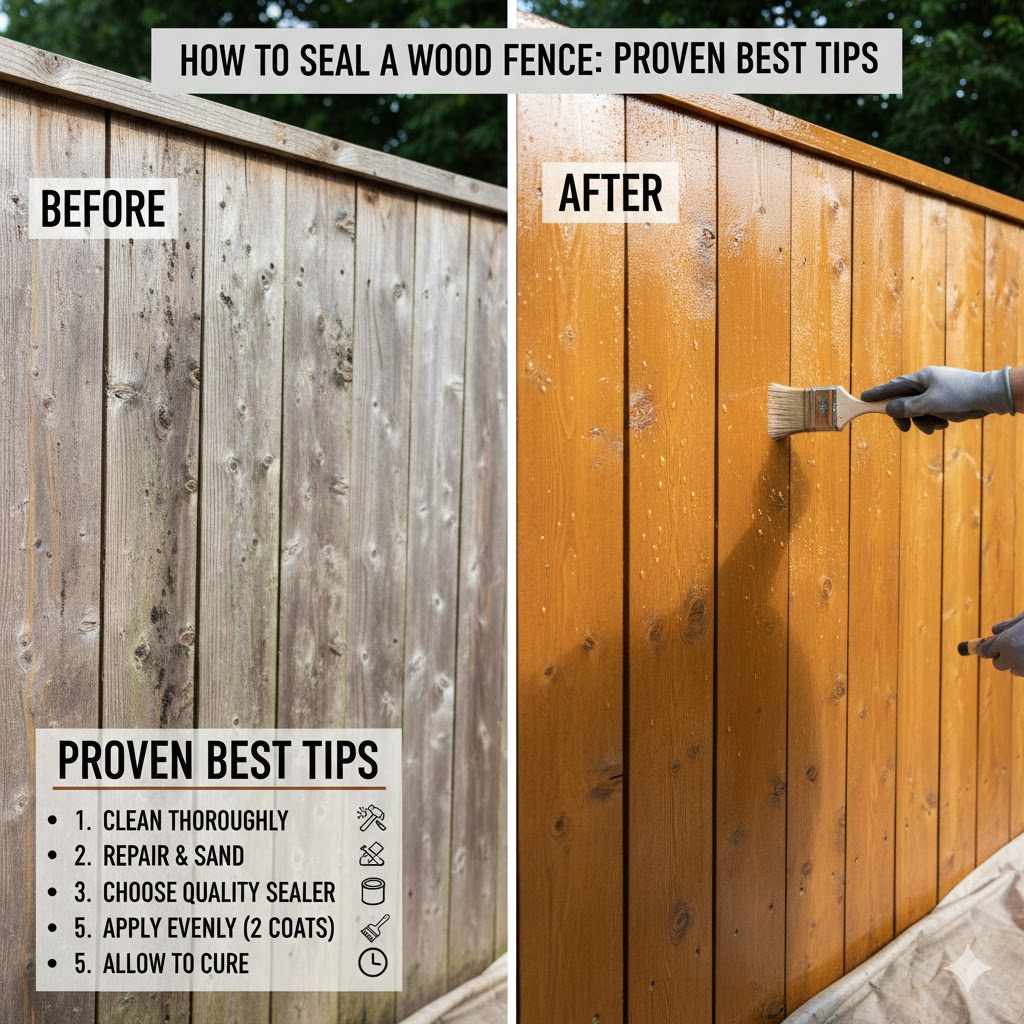
How To Seal A Wood Fence: Proven Best Tips
To successfully seal a wood fence, thoroughly clean and prep the surface, let it dry completely, apply a high-quality stain and sealer in appropriate weather, and ensure even coverage. This protects your investment from moisture and sun damage.
How To Seal A Wood Fence: Proven Best Tips
That beautiful wood fence you built or bought takes a beating every year. Sun bleaches it, rain rots it, and insects see it as a free lunch. Dealing with a graying, splintering fence is frustrating, and putting off sealing it just makes the job harder later. But sealing wood doesn’t need to be a weekend nightmare! I’m Md Meraj, and I promise you that sealing your fence is simpler than you think. With the right prep and the right product, you can give your fence years of protection. Let’s walk through the easiest way to make your fence look new again, step by step.
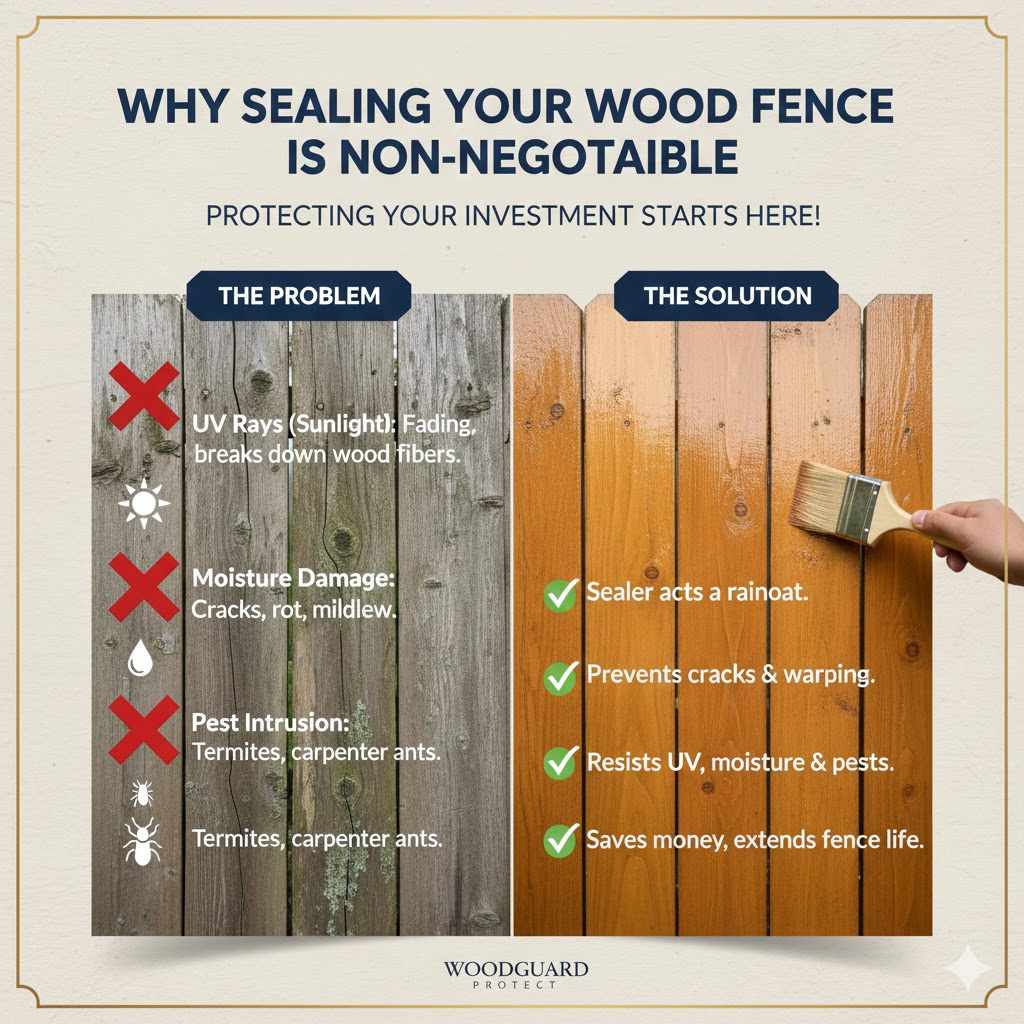
Why Sealing Your Wood Fence Is Non-Negotiable
Sealing isn’t just about looks; it’s essential maintenance. Think of the sealer as a strong raincoat for your wood. Without it, water soaks into the wood grain. When that moisture evaporates, it damages the wood fibers, leading to cracks, splits, and warping.
Here are the main enemies you are fighting:
- UV Rays (Sunlight): These break down lignin, the natural glue in wood, causing that common silvery-gray fading.
- Moisture Damage: Water causes wood to swell and shrink, leading to surface damage and creating the perfect environment for mildew and rot.
- Pest Intrusion: Sealer acts as a barrier, making the wood less appealing to termites and carpenter ants.
Taking the time now saves you the headache—and major expense—of full fence replacement later. Protecting your investment starts right here!
Step 1: Timing Is Everything – Choosing the Right Day
The biggest mistake beginners make is sealing the wood when the weather is wrong. If you apply sealant when the wood is damp or it rains immediately after, the product won’t penetrate correctly, leading to peeling or a gummy finish. As a general rule of thumb, good weather is your best tool.
Ideal Weather Checklist:
- Temperature: Most stains recommend temperatures between 50°F and 90°F (10°C and 32°C). Avoid extreme cold or heat, as this affects drying time.
- Humidity: Keep humidity levels below 80%. High humidity slows down curing significantly.
- Rain Forecast: Check the forecast for at least 24 to 48 hours after you plan to apply the sealant. You need a dry spell.
- Direct Sun: Direct, scorching sunlight can make the stain dry too fast on the surface, preventing deep penetration. Overcast but warm days are actually perfect for application.
Step 2: Essential Gear – Tools and Materials Checklist
Before we start scrubbing, let’s make sure you have everything ready to go. Having all your supplies handy prevents unnecessary trips to the store mid-project.
Tools You Will Need:
- Hose or Pressure Washer (set to a gentle fan setting)
- Stiff-bristled brush or scrub brush
- Safety gear (goggles, gloves, and long sleeves)
- Paint tray or five-gallon bucket
- Pump sprayer, roller, or good quality natural bristle brush
- Extension pole (for sprayer or roller application)
Material Choices: What Should I Use?
When choosing your sealer, you usually decide between two main types: oil-based or water-based (latex). Oil-based products often penetrate deeper, offering better UV protection, but they take longer to clean up and dry. Water-based formulas are easier to clean, low in odor, and dry quickly.
For DIY homeowners seeking durability and ease of use, modern high-quality, acrylic-based water-based sealers often provide the best balance. Always opt for a product labeled as a “stain and sealer” if you want to add color back to the wood.
Step 3: The Crucial Prep Work – Cleaning the Fence
This is, without a doubt, the most important phase. If you seal dirt, mildew, or old failing finish onto your fence, the new sealer will fail right along with the dirt underneath it. Think of cleaning as the ultimate surface prep.
How to Clean Wood Fence Effectively:
You need to remove surface debris, mold, and any failing gray wood fibers. We have two main methods:</ manual scrubbing or using a pressure washer.
Method A: Manual Scrubbing (Best for Beginners/Smaller Jobs)
- Rinse: Hose down the fence lightly to remove loose dirt and debris.
- Apply Cleaner: Mix a commercial wood cleaner (or a solution of mild dish soap and water) according to the label instructions. If you have heavy mildew, use a dedicated wood deck/fence cleaner that contains sodium percarbonate or oxalic acid. For heavy duty results, check out the treatments recommended by organizations like the American Wood Preservers Institute for best practices on surface preparation.
- Scrub: Working on small sections (about 6 feet wide), apply the cleaner and use your stiff-bristled brush to scrub the wood thoroughly. Work the cleaner into the grain.
- Let it Sit: Allow the cleaner to sit for the time specified by the product (usually 10–15 minutes). Do not let it dry on the wood surface!
- Rinse Completely: Rinse the entire fence with clear water. You must remove all traces of the cleaning solution.
Method B: Pressure Washing (Faster, but requires caution)
A pressure washer speeds things up, but misuse can tear up the wood surface, creating fuzzy wood fibers that will absorb too much stain later. If you use one:
- Use a fan tip, never a zero-degree (pencil) tip.
- Keep the pressure below 1500 PSI for older wood, or up to 2000 PSI for newer, dense wood.
- Keep the wand at least 10–12 inches from the surface, using sweeping, vertical motions.
Step 4: The Drying Period – Patience Pays Off
You must let the wood dry completely. This means not just “dry to the touch,” but dry deep inside the fibers.
The benchmark we look for is a moisture content (MC) of 15% or lower. If you don’t have a moisture meter, you must rely on the weather. After washing, most fences need:
- Sunny, Warm Weather: 2 to 3 full days.
- Cooler, Cloudy Weather: Up to 4 or 5 full days.
Tip from Meraj: To test readiness, flick some water onto the wood surface. If the water beads up, the wood is still somewhat sealed or repelling water too much. If the water soaks in immediately, it’s ready to accept the new stain. If it darkens slightly when the water hits, you’re good to go.
Step 5: Application Technique – Putting the Sealer On
Now for the fun part! Applying the sealer correctly ensures even color, better UV blockage, and a long-lasting finish. We are aiming for uniform saturation.
Choosing Your Applicator
There is no single “best” tool; it depends on your fence’s condition and your comfort level. For fence pickets, which are vertical, overlap matters greatly.
| Applicator | Best For | Pros | Cons |
|---|---|---|---|
| Pump Sprayer | Large fences, quick coverage | Fastest method; great for even coats. | Requires overspray cleanup; can use more product. |
| Natural Bristle Brush | Detailed areas, precise coverage | Forces product deep into wood grain; best penetration. | Slowest method; requires significant manual labor. |
| Roller (with long nap) | Smooth, flat fence panels | Covers large areas quickly like painting. | Can leave lap marks if not careful; product pools easily. |
Applying the Sealer (The Flow-On Method)
Whether you use a brush or a sprayer, the key to avoiding lap marks (streaks where one section overlapped another and absorbed more stain) is working wet-to-wet.
- Start at the Top: Always start applying the product from the top boards downward. Gravity helps the product flow and even out.
- Sectional Approach: Work in manageable 3 to 4-foot sections from one fence post across to the next.
- Spray/Brush Generously: Apply enough product so the wood is thoroughly saturated, but stop short of letting it pool heavily.
- Back-Brushing/Back-Rolling: This is your secret weapon! If you use a sprayer, immediately follow up with a brush or roller to “back-brush” the area. This smooths out the wet edge and pushes the sealer deep into the wood before it starts to set up.
- One Coat is Usually Enough: Most high-quality fence sealers are designed to penetrate, not build up thick layers on the surface. Check your specific product instructions, but generally, only apply one coat. Re-applying a second coat too soon often just results in a thick, shiny surface film that will peel quickly.
- Wipe Excess (If Necessary): If you notice any puddles or thick layers of stain sitting on the surface 15–30 minutes after application, wipe the excess off with a clean, dry rag. Excess product that can’t soak in will cure sticky.
Expert Tips for Different Wood Types
The density and type of wood significantly change how it accepts stain and how often it needs protection. Knowing your wood type helps you choose the best sealer longevity.
Pressure-Treated Lumber
This is wood infused with chemicals to prevent rot. It often needs to dry out for several months after installation before sealing can even be attempted, as it starts out heavily saturated with water and chemicals. Once you’ve waited the recommended time (consult the supplier or lumber grading rules), use a good quality penetrating stain.
Cedar and Redwood
These woods are naturally beautiful but have open grain patterns. They can soak up stain like a sponge, meaning you might use more product than expected. Use oil-based formulas here if possible for deeper protection, as the natural oils in these woods marry well with oil carriers.
Aging/Weathered Wood
If your fence is already gray and heavily weathered, you must aggressively clean it (Step 3) and possibly use a wood brightener after cleaning but before sealing. Brighteners restore the wood’s natural color, allowing the stain to look more vibrant and uniform.
Sealer Maintenance: When To Reapply
Sealing a fence isn’t a once-and-done chore. It’s routine maintenance, much like changing the oil in your car. Over time, UV radiation will eventually break down the protection.
Most high-quality exterior fence sealers last between 2 to 5 years, depending on sun exposure and weather severity. Fences that face harsh afternoon sun will need re-sealing sooner than those in deep shade.
The Simple Water Test (Repeat Annually)
This easy test tells you when it’s time for a touch-up:
- Get a spray bottle or cup of water.
- Spray or lightly pour a small amount of water onto the fence surface.
- Observe what happens after 10 minutes.
- If the water beads up: The seal is still doing its job. Wait another year!
- If the water soaks in quickly and darkens the wood: The protection has worn off. It’s time to clean and reseal that section.
When it is time to reapply, you rarely need to strip the old sealer off. Usually, a light wash with soap and water followed by a thorough rinse is enough surface prep before applying a fresh coat of sealer over the existing one. This keeps the heavy stripping job for much further down the road, saving you massive amounts of time.
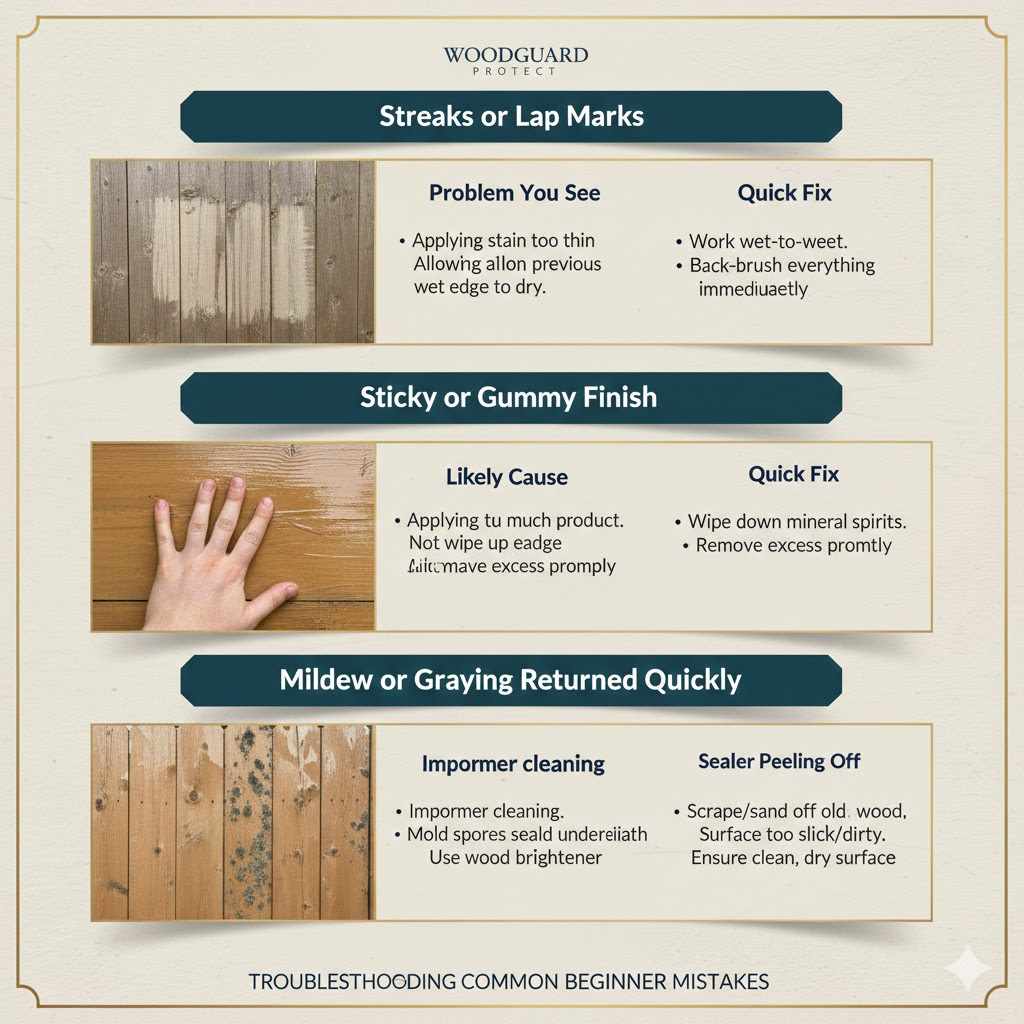
Troubleshooting Common Beginner Mistakes
Every woodworker, even me, has learned a few hard lessons over the years! Here are the most common pitfalls and how you can easily avoid them.
| Problem You See | Likely Cause | Meraj’s Quick Fix |
|---|---|---|
| Streaks or Lap Marks | Applying stain too thin in patches, or allowing a previous wet edge to dry before overlapping. | Always work wet-to-wet, covering the whole section before stopping. Back-brush everything immediately. |
| Sticky or Gummy Finish | Applying too much product or not wiping up excess stain left sitting on the surface. | If noticed quickly, wipe the sticky areas down with a rag dipped in mineral spirits or the product’s recommended solvent. |
| Mildew or Graying Returned Quickly | Improper cleaning; mold spores or dirt were sealed underneath the product. | Scrub much more aggressively next time, perhaps using a wood brightener solution during cleaning. |
| Sealer Peeling Off | Applying sealer over wood that was too wet or applying it over a surface that was too slick/dirty. | This usually requires scraping or sanding off the peeling product completely before reapplication. Prevention is key here. |
FAQ Section: Your Fence Sealing Questions Answered
Q1: Do I have to stain my fence, or can I just use a clear sealant?
A: While a clear sealant protects against water, it does almost nothing to stop UV damage. UV rays turn wood gray quickly. If you want your fence to keep its natural color for a long time, always choose a transparent or semi-transparent stain along with your sealer.
Q2: How long must the fence be dry before I can walk on it or use it?
A: For most fence sealers, you should wait at least 24 to 48 hours before exposing it to normal foot traffic or light moisture. Always defer to the manufacturer’s recommended “tack-free” or “recoat” time listed on the can.
Q3: Can I seal a fence if it was recently treated with chemicals?
A: Yes, but you must wait! New pressure-treated lumber needs several months (often 3 to 6 months, sometimes longer depending on climate) to dry out sufficiently. If the wood is too wet, the sealer will fail.
Q4: Is a pressure washer necessary for cleaning my fence before sealing?
A: No, a pressure washer is not necessary, and it can actually damage soft wood if misused. A stiff brush, cleaner, and a garden hose work perfectly well, especially for beginners who want to be gentle on the wood surface.
Q5: Should I seal the fence from the inside, the outside, or both sides?
A: If possible, seal both sides! Sealing the side facing the yard and the side facing the neighbors protects the entire wood piece equally. If you can only do one side, do the side most exposed to harsh weather, usually the side facing the afternoon sun or prevailing wind/rain.
Q6: My fence is old and splintered. Will sealing hide that damage?
A: Sealer will not fix structural damage or remove deep splinters, but a good quality semi-transparent or solid stain will hide much of the discoloration and blend small surface imperfections nicely. For heavy splinters, you might consider light sanding before sealing.
Conclusion: Enjoying Your Protected Investment
You’ve just learned the proven, professional steps to protect one of the largest wooden structures on your property. Remember, the secret to a great-looking, long-lasting fence isn’t finding a magic product; it’s sticking to thorough preparation. Clean, dry wood is happy wood, ready to accept that protective coating.
Take your time during the cleaning phase, watch the weather forecast closely, and apply your chosen sealer generously and evenly. Whether you used a brush or a sprayer, by following these steps, you have locked in years of protection against the elements. Now step back, admire your hard work, and enjoy a fence that looks fantastic and is built to last!