How To Use Wood Chips: A Genius & Essential Guide
To use wood chips, spread a 3-6 inch layer in your garden as mulch to suppress weeds and retain moisture, keeping it away from plant stems. For smoking food, soak chips for 30 minutes, drain, and place them in a smoker box or foil pouch on your grill to create flavorful smoke for cooking.
Hello, fellow makers and homeowners! I’m Md Meraj, and in my workshop, I see a lot of wood. One thing that always comes up is what to do with the leftovers—the scraps, the branches, the offcuts. Many people see this as waste. But I see a secret weapon for your garden, your grill, and your yard: wood chips. They are incredibly useful! But it can be tricky to know where to start. You might wonder if you’re using the right kind, or if you’re putting them in the right place. Don’t worry. I’m here to show you just how easy and smart it is to use wood chips. Let’s turn that “waste” into a wonderful resource, together.
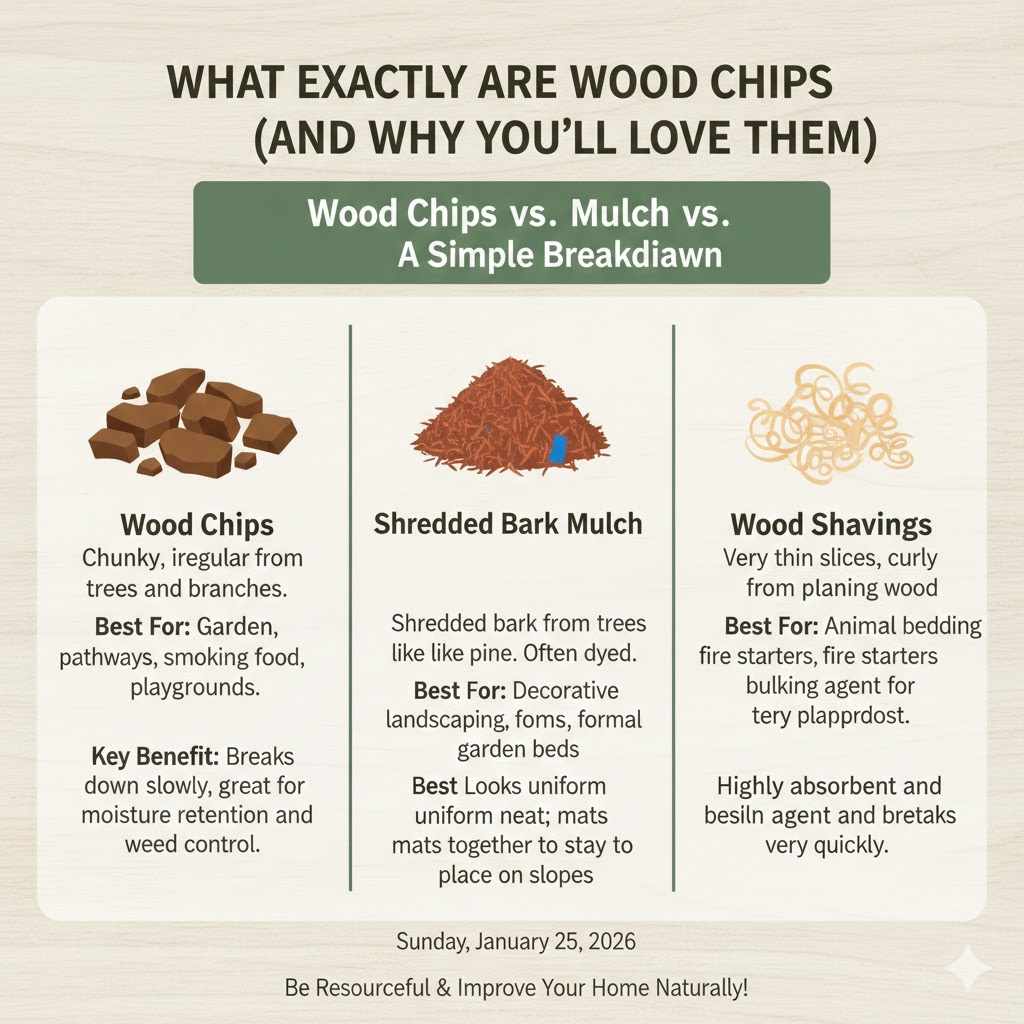
What Exactly Are Wood Chips (And Why You’ll Love Them)
First things first, let’s clear up a little confusion. You might hear people talk about wood chips, mulch, and wood shavings as if they’re the same thing. They’re related, but they have different jobs. Think of them as cousins in the same family. Wood chips are small, chunky pieces of wood, usually from shredded branches or trees. They are larger and more irregular than other wood products.
Their size is their superpower. It means they break down slowly, making them perfect for long-term projects like mulching or creating rustic garden paths. They create a strong, breathable barrier that other materials can’t match. Using them is a fantastic way to be resourceful, save money, and improve your home and garden in a natural way.
Wood Chips vs. Mulch vs. Shavings: A Simple Breakdown
Understanding the difference helps you pick the right tool for the job. You wouldn’t use a hammer to turn a screw, right? Same idea here. Using the wrong type of wood product can lead to poor results. This simple table breaks it all down.
| Material Type | Description | Best For | Key Benefit |
|---|---|---|---|
| Wood Chips | Chunky, irregular pieces from shredded trees and branches. | Garden mulch, pathways, smoking food, playgrounds. | Breaks down slowly, great for moisture retention and weed control. |
| Shredded Bark Mulch | Shredded bark from trees like pine or cedar. Often dyed. | Decorative landscaping, formal garden beds. | Looks uniform and neat; mats together to stay in place on slopes. |
| Wood Shavings | Very thin, curly slices of wood from planing or shaping wood. | Animal bedding, fire starters, bulking agent for compost. | Highly absorbent and breaks down very quickly. |
The Top 3 Ways to Use Wood Chips Like a Pro
Alright, now for the fun part! Let’s get into the most popular and effective ways you can put those wood chips to work. I like to think of these as the “big three” uses that will give you the most bang for your buck (or your effort!).
1. In the Garden: Your Soil’s Best Friend
This is where wood chips truly shine. Using them in your garden is one of the smartest, most affordable things you can do to get healthier plants and spend less time on chores. It’s a technique that mimics a natural forest floor, and your plants will thank you for it.
As a Superior Mulch
Mulching is simply covering the soil around your plants with a protective layer. Wood chips are my absolute favorite material for this.
- Weed Blocker: A thick layer of wood chips blocks sunlight from reaching the soil, which means weed seeds can’t sprout. Say goodbye to hours of pulling weeds!
- Moisture Saver: The chips act like a sponge, soaking up rain and then slowly releasing it to the soil. This means you have to water less often, saving you time and money. It’s a huge help during dry summer months.
- Temperature Control: This layer also insulates the soil. It keeps it cooler in the summer and warmer in the winter, protecting your plant roots from extreme temperatures.
- Soil Builder: As the chips slowly decompose over a year or two, they add rich organic matter back into the soil. Earthworms and beneficial microbes love this, and they will help turn your soil into a dark, healthy, nutrient-rich home for your plants.
For Natural, Mud-Free Pathways
Are you tired of muddy trails in your garden every time it rains? Wood chips are a fantastic solution. Laying a thick layer of wood chips (around 4-6 inches) creates a beautiful, rustic-looking path that is soft to walk on and stays mud-free. Just level the ground, lay down some cardboard to block stubborn weeds, and cover it with chips. It’s an easy weekend project that completely transforms the look and feel of your garden.
To Supercharge Your Compost Pile
A healthy compost pile needs a balance of “greens” (like grass clippings and kitchen scraps) and “browns” (like dry leaves and, you guessed it, wood chips). According to the U.S. Environmental Protection Agency, composting is an excellent way to recycle organic materials. Wood chips are a powerhouse “brown” material. Their chunky size helps create air pockets in your compost pile, which is essential for the good bacteria to do their work. Because they are pure carbon, they perfectly balance out nitrogen-rich greens, preventing your pile from getting slimy and smelly.
2. For Grilling & Smoking: Unlock Incredible Flavor
If you love to grill, using wood chips is a game-changer. It’s the easiest way to add that amazing, smoky flavor you get from a real smokehouse right in your own backyard. It makes your food taste like it was cooked by a professional chef.
Choosing the Right Wood for the Job
Different woods create different flavors, just like different spices. Pairing the right wood with the right food is key. Here’s a quick guide to some of the most popular choices.
| Wood Type | Flavor Profile | Pairs Great With |
|---|---|---|
| Hickory | Strong, bacon-like, savory flavor. A classic! | Pork (especially ribs and shoulder), beef, bacon. |
| Mesquite | Very strong, earthy, intense flavor. A little goes a long way. | Beef (especially brisket), steak, dark meat poultry. |
| Apple | Mild, sweet, slightly fruity flavor. Very versatile. | Pork, poultry (chicken and turkey), ham, vegetables. |
| Cherry | Mild, sweet, and fruity. Gives a beautiful rosy color to meats. | Poultry, pork, beef, and especially good with duck. |
| Oak | Medium smoky flavor, not overpowering. A great all-purpose wood. | Beef, brisket, lamb, sausages. |
How to Use Smoker Chips: A Simple Guide
- Soak Your Chips (Optional but Recommended): Place a couple of handfuls of wood chips in a bowl of water and let them soak for at least 30 minutes. This helps them smolder and produce smoke instead of just catching fire and burning up too quickly.
- Drain the Chips: After soaking, drain the water thoroughly. You want them damp, not dripping wet.
- Contain the Chips: You have two easy options. You can use a small metal smoker box (you can buy these at any hardware store) or make a simple pouch out of heavy-duty aluminum foil. Just place the damp chips in the pouch and poke a few holes in the top to let the smoke escape.
- Get Smoking: Place the smoker box or foil pouch directly on top of the hot coals or above the burners on a gas grill. Close the lid and wait a few minutes for smoke to start pouring out. Now you’re ready to add your food and start cooking!
3. Around the Home & Yard: Practical and Pretty
Wood chips aren’t just for gardens and grills. They have a ton of other practical uses around your property that can save you money and solve common problems.
For a Safe Playground Surface
Have kids? A deep bed of wood chips is a great surface for under a swing set or playset. It provides a soft, cushioned landing that is much safer than hard dirt or grass. Be sure to use a special type called “engineered wood fiber” which is designed for this purpose. The U.S. Consumer Product Safety Commission recommends a depth of at least 9 inches for adequate fall protection.
For Natural Erosion Control
If you have a steep slope or hillside on your property that tends to wash away during heavy rain, wood chips can be your best friend. Spreading a thick layer helps to slow down rainwater, allowing it to soak into the ground instead of running off and taking your soil with it. The chips knit together and hold the soil in place beautifully.
For Happy Animal Bedding
For those with chickens, rabbits, or other small animals, a layer of clean, dry wood chips makes excellent bedding. They are highly absorbent, help control odors, and are easy to clean out. Once used, the bedding can be added straight to your compost pile, where it will break down into amazing fertilizer for your garden.
Your First Project: Using Wood Chips as Garden Mulch (Step-by-Step)
Ready to try it out? Mulching is the easiest and most rewarding way to start using wood chips. Let’s walk through it together, step by step. I promise, you can do this!
Step 1: Get Your Wood Chips
You can often buy bags of wood chips at a garden center, but there are better (and cheaper) ways! Consider these options:
- Tree Care Companies: This is my favorite trick. Local arborists or tree trimming services often have mountains of fresh wood chips they need to get rid of. Many are happy to drop a full truckload at your house for free!
- Local Municipality: Your town or city might have a yard waste collection site where they grind up branches into wood chips and offer them to residents for free or a small fee.
- Bulk Delivery: Landscape supply companies will deliver a large amount of wood chips right to your driveway for a reasonable price. This is a great option if you have a big area to cover.
Step 2: Prepare Your Garden Bed
Before you lay down the chips, you need to give your garden a little TLC. A bit of prep work now will save you headaches later.
- Weed Thoroughly: Pull out any existing weeds, making sure to get the roots. Don’t skip this step! The chips will prevent new weeds, but they won’t kill big, established ones.
- Water Deeply: Give the entire bed a good, deep watering. This ensures the soil underneath the mulch is nice and moist, creating a water reserve for your plants.
- Add a Weed Barrier (Optional): For areas with very stubborn weeds, you can lay down a layer of plain brown cardboard or several sheets of newspaper before adding the chips. This provides an extra layer of protection. Do not use plastic weed barriers, as they prevent water and air from reaching the soil.
Step 3: Apply the Wood Chips
Now it’s time to lay down that beautiful blanket of mulch. Using a wheelbarrow and a pitchfork or a sturdy rake makes this job much easier.
- Aim for Depth: The ideal depth is between 3 to 6 inches. Less than that, and it won’t be effective at stopping weeds or holding moisture. Too much more can make it hard for water to get to the soil.
- Keep a “Donut” Around Plants: This is super important! Do not pile the wood chips right up against the stems of your plants or the trunks of trees. This can trap too much moisture and cause the stem to rot. Leave a small, 2-3 inch gap of clear space around the base of each plant, like a little donut.
- Spread Evenly: Use your rake to spread the chips into an even layer across the entire garden bed.
A great resource for learning more about the benefits of different mulch types is the University of New Hampshire Extension, which provides detailed fact sheets for gardeners.
Step 4: Maintain Your Mulch
Your work is mostly done! Wood chip mulch is very low-maintenance. Over time, the bottom layer will slowly decompose and enrich your soil. You will notice the layer getting thinner. About once a year, usually in the spring, you’ll just need to top it off with a fresh 1-2 inch layer to bring it back up to the ideal depth. It’s that simple!
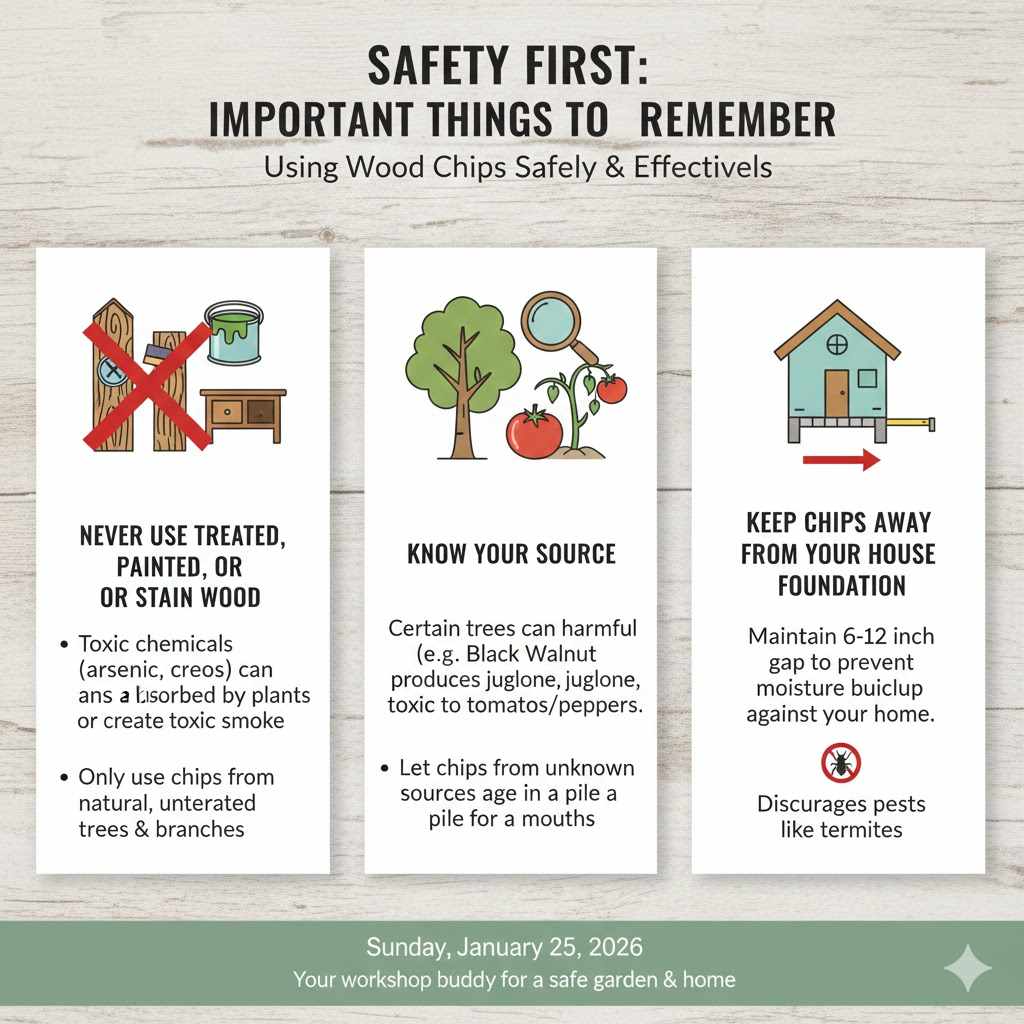
Safety First: Important Things to Remember
Using wood chips is safe and easy, but as with any project, there are a few important safety rules to follow. Think of me as your workshop buddy looking over your shoulder to make sure everything goes smoothly.
Never Use Treated, Painted, or Stained Wood
This is the most important rule. Wood from old decks, fences, or furniture (often called pressure-treated wood) is loaded with chemicals to prevent rot. These chemicals, like arsenic or creosote, are toxic. You do not want them in your garden soil where they can be absorbed by your vegetables, or in your grill where they can create toxic smoke. Only use chips from natural, untreated trees and branches.
Know Your Source
Be a little careful about where your chips come from. Some trees can cause problems. For example, Black Walnut trees produce a natural chemical called juglone, which is toxic to many other plants, especially tomatoes and peppers. If you get a load of free chips from an unknown source, it’s a good idea to let them age in a pile for a few months before putting them on your garden. This allows any potentially harmful compounds to break down.
Keep Chips Away From Your House Foundation
While the risk is often overstated, it’s a smart practice to keep any type of mulch, including wood chips, at least 6-12 inches away from the foundation of your house. This narrow gap helps prevent moisture from being trapped against your home and discourages pests like termites from seeing it as a bridge into your house.
Frequently Asked Questions (FAQ)
Will wood chips attract termites to my house?
This is a common fear, but it’s mostly a myth. Termites are primarily attracted to large, solid pieces of wood, not small chips. While termites might be present in a mulch pile, they are unlikely to move from the mulch to your house. As a simple precaution, just keep a 6-12 inch barrier of bare ground between your mulched beds and your home’s foundation.
How deep should I spread wood chips in my garden?
The sweet spot is between 3 and 6 inches. For general garden beds, 3-4 inches is perfect. For pathways or for suppressing very tough weeds, you can go thicker, up to 6 inches. Any deeper can sometimes make it difficult for rainwater to reach the soil below.
Can I use fresh (“green”) wood chips?
Yes, you absolutely can! In fact, fresh chips are excellent. There’s a myth that fresh chips will “rob” nitrogen from the soil. While the microbes that decompose wood do use nitrogen, they only pull it from the very thin layer where the soil and chips meet. The deeper soil is unaffected. This process does not harm established plants at all. Over time, as the chips break down, they release all that nitrogen and more back into the soil.
How long do wood chips last as mulch?
This depends on the type of wood and your climate. Generally, a good layer of wood chip mulch will last for 2-4 years. You will notice the layer thinning out over time as it decomposes into the soil. You’ll only need to add a fresh top layer every year or two to keep it at the ideal depth.
Can I make my own wood chips?
Yes! If you have a lot of tree branches, you can rent a wood chipper from a local home improvement store. It’s a great way to turn storm debris or pruned branches into a valuable resource. Always wear proper safety gear, including safety glasses and gloves, when operating a chipper.
What’s the best type of wood for garden mulch?
Honestly, a mix of different types is the best! Chips made from a variety of trees (both hardwood and softwood) will provide a wider range of nutrients to your soil as they break down. The most important thing isn’t the type of wood, but that it is clean and untreated.
Your Next Step to a Better Yard
So there you have it. Wood chips aren’t just something to be raked up and thrown away—they’re a fantastic resource that can save you time, effort, and money. Whether you’re growing a more beautiful garden, cooking a more delicious meal on the grill, or creating a safer play area for your kids, wood chips are there to help.
I hope this guide has given you the confidence to get started. Don’t be afraid to experiment. Start with a small garden bed or a simple pathway. You’ll be amazed at the difference it makes. Seeing that “waste” turn into something so useful is one of the most satisfying parts of any project. Happy chipping!