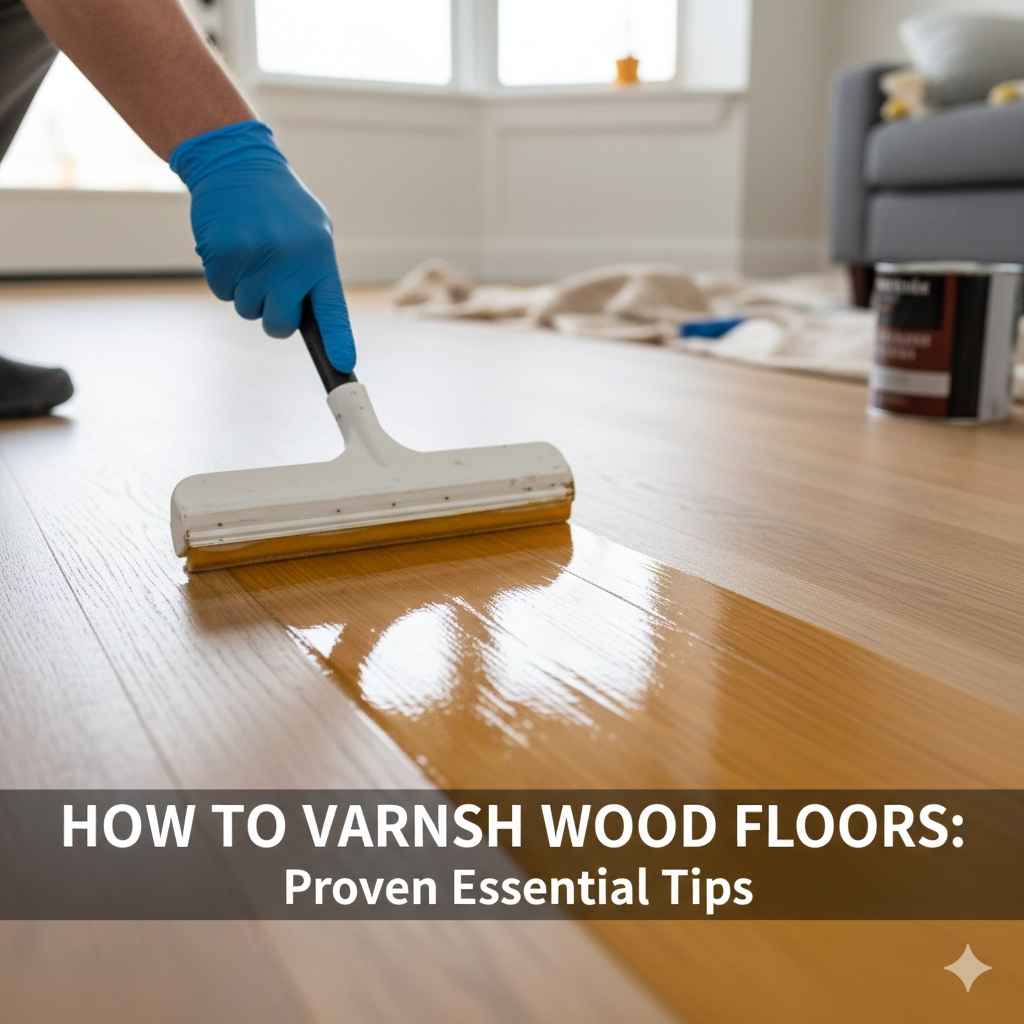
How To Varnish Wood Floors: Proven Essential Tips
Varnishing wood floors properly is simple: meticulously clean and sand the existing surface, apply thin, even coats of high-quality floor varnish using a good brush or applicator, following the grain faithfully for maximum durability and a beautiful, long-lasting shine.
There are few jobs in home improvement that boost a room’s look and value quite like a freshly finished wood floor. Seeing dull, scratched wood transformed into a beautiful, glossy surface feels great. But perhaps starting scares you? Learning how to varnish wood floors seems intimidating. Will it look streaky? Will it last? Not with good steps! Many homeowners think this refinishing project needs professional skills. I am here to show you that with patience, an open space, great tools, and my proven tips right here, you can absolutely apply a showroom finish easily and confidently. We will break down achieving that tough, perfect topcoat right now.
The Craftsman’s Choice: Understanding Why Varnish Matters
Before we dive into splashing, we need to know what we are painting on! Varnish acts as a rugged coating safeguard and beautifying finisher for your floors. It’s the defense line against daily wear.
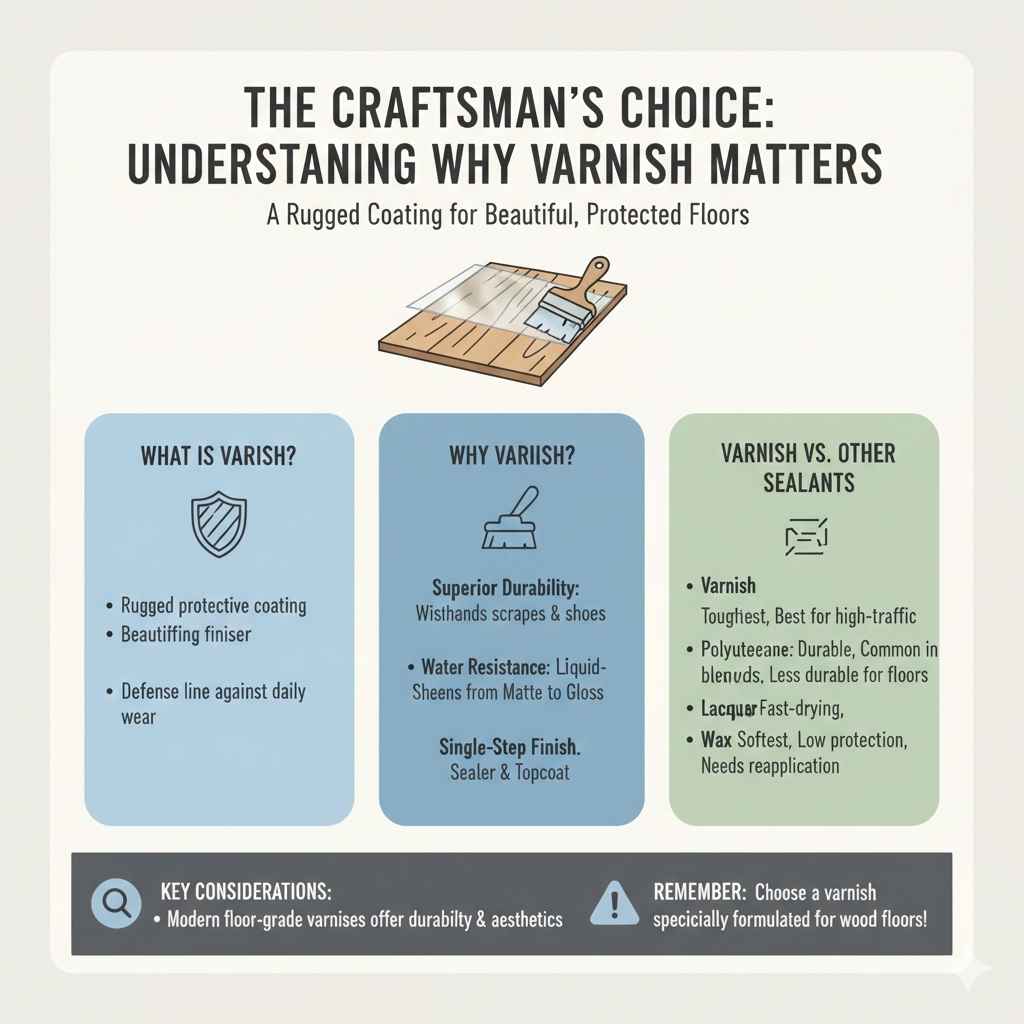
Why Choose Varnish Over Other Sealants?
When we talk about sealing floors, you might hear about polyurethane, lacquer, or even wax. But good floor varnish (which often today is tough polyurethane marketed specifically for floors) brings specific advantages perfectifying surfaces under heavy foot traffic.
Think of it like giving your floor military-grade protection.
- Superior Durability (Hardness): Varnishes are formulated using oils or resins tough enough to withstand scraping chairs and muddy shoes without denting or yellowing rapidly.
- Water Resistance: They create a seamless, liquid-repelling barrier essential for protection below washing buckets or pet accidents.
- Aesthetics: Varnish comes in varying sheens (Dull Matte to High Gloss), letting you choose the exact look your wood deserves.
- Single-Step Finish: Unlike ancient systems, modern floor-grade varnishes act as both stain sealer and topcoat sometimes (if you have existing color), consolidating the finish application.
Polyurethane vs. Oil-Based Varnish: Mentor’s Choice
In modern DIY flooring, when folks say “varnish,” they usually mean a polyurethane finish, designed for the home environment. Choosing between the two primary types you commonly find is usually the first big decision.
| Feature | Water-Based Varnish | Oil-Based/Alkyd Varnish |
| :— | :— | :— |
| Dry Time | Very Fast (2-4 hours Sanding between coats) | Slow (up to 24 hours cool-down) |
| Hardness/Smell | Hardens fast, low odor, cleans up with water. | Takes longer to hit final hardness, strong odor. |
| Appearance | Dries clearer, less ambering (lightening). | Accentuates heartwood; slightly yellows/ambers wood initially. |
| VOC Content | Lower Volatility, Smother on the lungs. | Higher Volatility, often better chemical protection. |
Mentor’s Insider Tip: For beginners, Water-Based provides superior forgiveness because rapid recoat times shorten the window for dust settling. If breathing protection isn’t an option, or if deep amber look of natural wood preservation is major to you, then oil suits great, BUT ensure massive ventilation.
Phase One Mastering Safety and Essential Toolkit (Your Readiness Check)
Craftsmanship starts before the varnish even opens. Protection isn’t optional—it’s fundamental. Remember, we want professional-looking results without feeling like we are in an industrial paint booth. We will stick to keeping you—and your healthy floor finish dreams—intact! Working safely actually lets you focus better.
Safety Gear: Non-Negotiable Shop Prerequisites
Seriously, investing in the right Personal Protective Equipment (PPE) saves headaches (and lung issues later). Never start the sanding or breathing area without these essentials.
- Respirator Filter: Get an N95 respirator for sanding. For polyurethane vapors (even low-VOC acrylics can need more), use a half-face respirator with organic vapor cartridges. This is crucial for solvent-based topicals.
- Ventilation Fans: Get powerful exhaust fans. Aim one fan blowing air out of the room (via an open window screen, for example). This depressurizes the room, pulling fresh outdoor air inwards—not circulating smelly air within your house.
- Gloves: Wear chemical-resistant nitrile or rubber gloves when handling fresh varnish and oily substances; thin cotton gloves wear socks over them for the application to avoid leaving skin skin residue transfers onto the finished floor after curing.
- Eye Protection: Simple safety glasses or goggles during sanding are critical; dust flies everywhere when sanding wood!
The Essential Varnishing Toolkit
Here is the assembly point: Everything needed to prepare and stain your floor project successfully. Dont run out for items if potential downtime stretches across weeks!
- High-power Variable Speed Sander appropriate size for floors (A high amount of professional guidance on handling sanders available from sources like the National Home Builders Association). Sanding rental places often provide rental systems (Drum/Orbital sanders) better than DIY purchases just renting works cheaper most all applications.
- Sandpaper (Progressive grits: e.g., 60, 80, 100, 120/150 finishing grit).
- Tack Cloths for removing fine dust after cleaning protocols.
- Good Quality Floor Applicator Wand with pads (Microfiber or Lamb’s Wool—use pad appropriate for product). Quality pads avoid streaking hugely when used wisely often times. Alternately: Wide T-Bar Push Stainer (requires slightly higher ceiling clearance sometimes), or high-foam roller frame and proper pad appropriate thickness for standard floor varnish applications usually runs fine enough too).
- Edger Sanding Tool (Crucial for sanding within 6 inches of walls).
- Large, Clean Metallic Pails for adding liquids, emptying rags immediately! NEVER leave oily rags in a heap EVER!. Refer to safety pages often on disposal regarding spontaneous combustion in Rags after initial wiping/use.
- High-Quality Wood Floor Varnish (The same product consistency should be maintained).
Phase Two Crucial Preparation: Why You Can’t Polish Dust
This is where most beginners fall short! Rushing past cleaning and sanding guarantees a weak future finish, regardless of how much high-grade varnish arrives on top. Think of preparation like building a perfect foundation for concrete! This stage dictates the final result entirely.
Step Prep 1: Empty Everything & Repair Wood Defects
Your floor must be 100% free of furniture exposure protection for perfect access right up to the walls. Protect rooms you won’t touch using fine-quality painter’s tape and plastic sheeting draped correctly!
- Remove Furniture and Carpeting: Lay runners/mats near doorways for designated “clean zones.”
- Nail Pop Check & Setting: Hammer down every loose nail head slightly below the wood surface plane (creating a shallow divot) so sanding doesn’t grab it unexpectedly! Holes left (nail pops) need wood filler afterwards where screw lines or small drill pits aren’t necessary now OR if necessary using filler stain matched, BUT filler does NOT take stain finish in the following phase reliably.
- Floor Deep Clean: Clean floor thoroughly to remove all grease spots, wax, and dirt. Use Mineral Spirits cautiously or a dedicated solution, scrubbing tough build-up spots. For heavy residue, specialized chemical floor stripper sometimes provides optimal removal, consult professional flooring advice sites closely prior adoption adoption always.
Step Prep 2: Sanding Strategy – Grit Hierarchy
Sanding removes imperfections, minor scratches, old finishes, and, most importantly in fresh installs, mill glaze (a surface hardness added at the mill that stops finish from adopting!). This must be gradual. Start with a coarse grit to cut fast and slowly progress to finer grits to “erase” cross-pattern scratch lines created by the preceding coarseness.
Safety Check: Always sand WITH the common run/grain direction of running majority of planks in the center areas!
75. Percent Coverage Goals:
Start usually around 60 grit if finishing raw/used old wood floors needing major restorative love and work sequentially outward. New, pre-sanded unfinished, manufactured wood starts likely near an equal of an 80 grit sanding, where the 100/120 or 150 just wipes surfaces clean enough!
Sanding Sequence Recommendation:
- Use 50 or 60 Grit: Apply only needed to remove old finish or deep scratches. Cover large strips gently at first! Sand only 75% of the main run direction, overlapping these passes very slightly.
- Move to 60, Next it’s an Even Pass of 80: This sandpaper replaces scratch marks from prior coarseness level easily. Ensure full consistent overlapping edge-to-center covering nearly every area multiple small times over now too
- Final Light Pass (80, 100, or 150 Grit): Use the finest paper specified by BOTH your flooring manufacturer AND recommended finish product technical information data sheet (TDS, locate online usually). Lighter sand passes clean fine scratches.
- Detail Sanding (The Edger): Use rental edger sparingly, running it softly just to address the walls carefully; use less initial coarse sandpaper size than main floors
- Go around area edge first THEN start your primary open area work slowl
Affirming Choice: If you skip sanding steps between grits or use too fine first, your wood stain/finish won’t adhere well, or surface texture will be extremely noticeable!
Step Prep 3: Dust Removal – The Finish Killer (Crucial Final Scrub Down)
Wood dust is a physical abrasive and adhesion sabotager. You MUST remove all fine dust—it should squeak under a clean vinyl glove.
- First Vacuuming: Use a powerful Shop-Vac system with a HEPA filter attachment. Vacuum floor area completely multiple rounds.
- Tack Cloth Protocol: Mix some mineral spirits/naphtha cleaner solution following wood floor prep product instruction guides – dampen a few clean soft cotton rags. Wipe the whole surface in the direction of the grain. Then, deploy the TAFFY Cloth – those specialized sticky cheesecloth squares explicitly tagged “TACK CLOTHS”—giving many small overlapping swipes over every foot area/lane path to lift the fine chalky dust settled just underneath microscopic site visibility
- Wait Before Working: Let ventilation run for another hour after physical cleaning to dissipate swirling settled dust, which might still disturb during drying cycle cycles.
Phase Three The Varnish Application (Building Coverage Layers)
Okay, you’ve scrubbed, your safety gear is set, AND everything looks impossibly smooth! Now for the rewarding fun: the pour and spread! Heat (and dryness) highly influences this phase; work cool, keep moisture level moderate, aim for low humidity if capable.
Applying Varnish Tip 1: Mixing Like a Professional Mentor
Do NOT use your orbital sander or mix by shaking big tins vigorously; bubbling ruins the smooth coat totally!
Stir, DON’T Shake! Gently fold the varnish contents with a long paddle or stick for several minutes. This reincorporates settling sedimentation without trapping air underneath mixture surfaces.
Applying Varnish Tip 2: Work Fast, Always Wetting an Edge
Varnish cures quickly when thinning solvent dissipates or when water leaves the mixture. You cannot stop midway or cut in a square block, wait 30 mins, then come back to extend it. That break line freezes instantly!
- Cut In Edges First: Use a naturally bristle brush to carefully paint only about three inches near the baseboard and tight corners.
<liWait 5-10 minutes (read your can note time); If using oil-type varnishes, slight waiting time brings necessary relaxation on its viscous viscosity level when blending next work!
- T-, W-, or Pull Methods (Main Fill Area): Pour a zigzag or bead of varnish in an arc pattern far ahead. Work backward towards yourself, pushing the applicator pad FORWARD into the ‘wet edge’ of the previously applied bead.
- The Rule of Minimal Overlap: V-apply more liquid (bead) at forefront of each pass, and leave as minimal overlap sheen marks touching previous run as possible naturally with minimum passes! Excessive reapplying varnish spots gets clumpy and dries thick unevenly then!
- Go Long: In the final drag/push action of your V/W shape, try to complete a long, single, even stroke down one entire plank row, keeping even high speed press uniformly consistent until the applicator drags minimal liquid! Leave well enough alone AFTER achieving complete smooth-streak coverage on THIS ONE wet stroke!
External reference point relating application methods to smooth movement for the longest stroke path achieving ultimate flatness achievable typically available on contractor finish site pages or within relevant specialized paint corporation guidebooks, helping your reach understanding future complex geometry finishes</ p>.
</ul<h2Adding More Coats: Building Depth and Armor
Most quality wood floor finishes MUST have three coats to set hard and provide that advertised durability rating (Referencing durability often provided by testing institutions like organizations under National Floor Covering Association standard guidance).
One simple coat is attractive sometimes but leaves an inviting route for wear spots way sooner! One coat acts as adhesive priming sealer often. Layering achieves molecular lock between resin molecules inside structure so the top piece shrugs every harsh thing daily life presents!
| Coat Number | Purpose | Drying Observation Point |
|---|---|---|
| Guard Coat 1 | Acceptance sealer. Accepts dust settling maybe! Use thin level application required. Needs light gentle scuff (sanding) afterward. | Dry to Recoat Window (Time stated heavily on the container usually needs observation right away!) |
| Coat Buffer 2 | Mid-layer for deeper saturation and leveling surface minor waves! This must completely hide tiny/moderate mistakes from Coat 1 very very well. | Ensure surface is free of small debris before touch test attempt comes after hours drying. |
| Finish Hard Coat 3 | Supreme sacrifice for appearance/lasting protection wearability. Feather tips lightly! Don’t attempt to fix bigger mistakes here if available, you’ll make it much worse trying fix this final area! If surface remains rough try sanding much finer finish grade paper before proceeding OR check liquid application pattern again! | Wait Full Days (Usually 3-7 days typically) before returning all heavy large items/major contact made on floor unless specified higher-rated floor sealant has been implemented which might reduce required complete load bearing curing time intervals. |
Inter-Coat Sanding (The Must-Do Scuff)
When Varnish DRIES there are rough bumps like small grit from atmospheric contaminants or high points that formed as solvent escaped!
Sanding those peaks ONLY (scuff sanding) will make coat two lock better with atomized microscopic key etchings, making the third layer lay slick. Use a screen pad or very very high grit finer paper (like 220 grit) by hand or softly using an edging tool with very very minimal direct downforce pressure applied on it!! This sanding is only ‘scuffing,’ no depth required at all. Vacuum afterwards thoroughly always!
Phase Four Common Hurdles & Advanced Mentor Advice
Here are the common pitfalls every single time I taught/mentored friends through this great project historically.
Troubleshooting Tip 1: Blotches and Water Marks After Drying
Causes: Uneven application technique (thin spots overlapped wrong), or contamination after the coat dried even slight water spots. In rare light water conditions sometimes seen on wood/material/subfloor where some planks might have inconsistent pore intake for the absorbing liquid/sealer.
Fix: Gently, delicately light sanding (again with 220 grit or higher screen scratch pad system which removes only 1 or 2 microliter amount, essentially ‘fogging’ the sheen completely—MUST be fogged uniformity overall entire width, THEN immediately clean dust; apply newest intended protective fluid over top with good blending methods that avoid streak marks totally).
Troubleshooting Tip 2: Bubble and Pinholes Forever Appearing
This symptom is often visible immediately after pushing coat application, though sometimes noticeable later that night too! These blemishes disrupt beautiful flow pattern required making professional-looking seal.
Probable Mentor Identified Causes:
- Applying near overly warm surfaces that catalyze sudden solvent escape when applied varnish moves toward cold spaces/air spots too abruptly.
- Varnish vigorously shaken previously (trapping inner air balls ready to release to surface over time right during their necessary drying phase cycle time).
- Moisture in wood surface from previous environment factors impacting adherence upon solvent evaporation steps!
Remember again, slow gentle folding/hand stirring technique greatly limits bubbles!
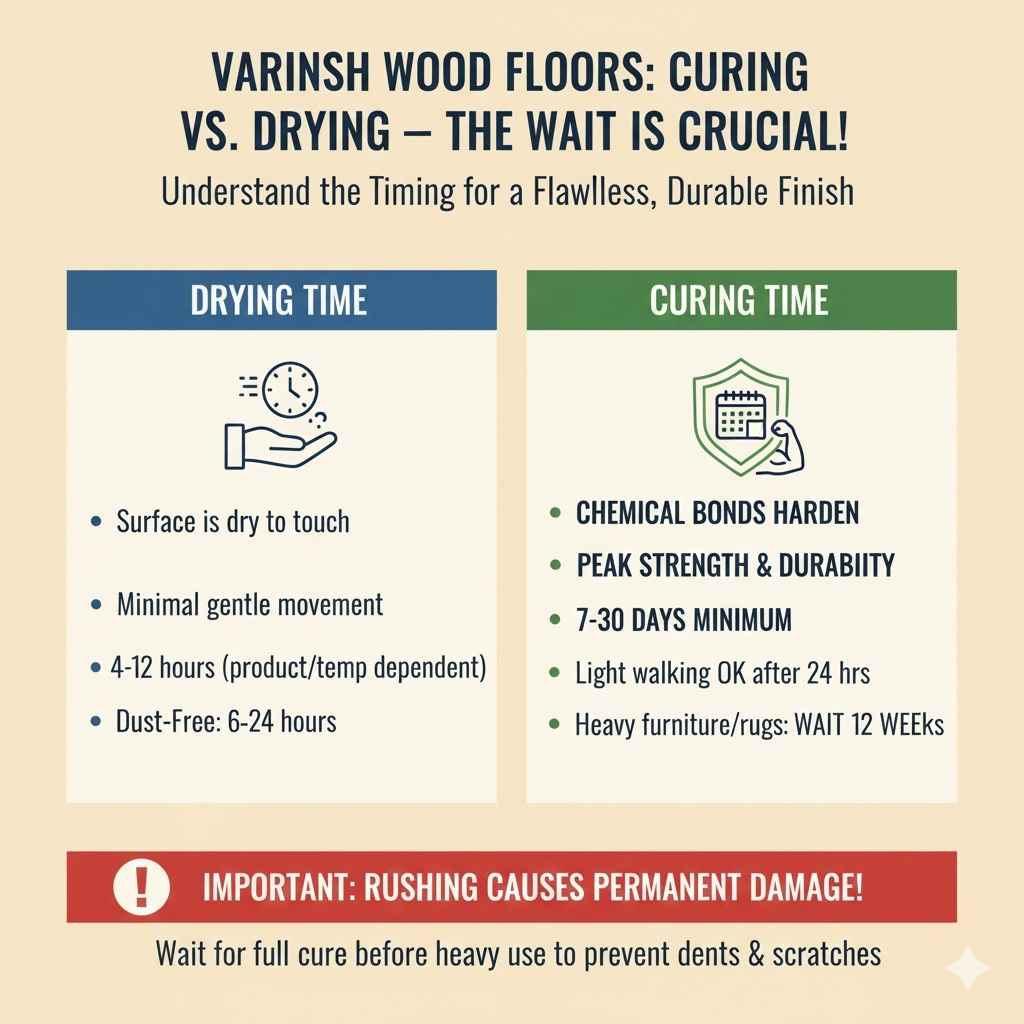
Curing vs. Drying–The Wait!
Your manual must be followed regarding timing related to moving heavy objects back or setting area rugs down on shiny surface ASAP.
- Drying Time: Surface is dry to touch, allowing minimal gentle movement usually a matter of four to twelve hours depending on product/ambient temperature measurements. Dust Free Time: Safely dust-free perhaps closer to 6-24hrs.
- Curing Time: This is MOST important regarding usage! Curing means the chemical bonds have established peak crosslinking hardness usually needing seven complete days minimum (often 14–30 days totally!). Walking lightly after drying (Coat 3 time) permitted, but a thrown chair limb dent instantly during ‘dry and ready to stand’ time might be obvious damage due extreme temporary softness right then.
FAQ Section: Quick Answers from Your Workshop Friend
Q1: Is it better to apply varnish with a brush or a pad applicator?
A: For flatness and speed on large areas, the pad or T-bar system wins daily. Use natural bristle brushes only to “cut-in” awkward edge areas that applicators cannot reach.
Q2: How many finish coats do I really need on a newly sanded dining room floor?
A: In almost every environment subjected to regular life, you need an absolute minimum of three coats. Floors see heavy abrasion; one coat seals, two gives good body, and three provides real long-wear depth.
Q3: Can I vacuum right before putting the final coat of varnish on?
A: Absolutely check. Vacuum first, then wipe obsessively with a tacky or “stock tack solution cleaning cloth for absolute last time,” aiming all vacuum lines toward window exhaust outside—ensure this final suction session did NOT just redistribute fine powder settled atop wooden material!
Q4: Will changing the sheen from dull to glossy change the coating protection?
A: Gloss sheens usually deliver slightly more noticeable resistance surface layer simply because high gloss finishes contain more concentrated high solids material right in the top layer compared to Matte finishes when measured physically!
Q5: My can specifies 4 hours recoat time, but I like it better after 8 hours when touching it. Should I Wait Longer?
A: Stick exactly to BOTH ends of the label’s provided timings. Short drying times ruin adhesion. Waiting vastly over what the can requires typically doesn’t hasten curing; it needlessly risks dust collection or atmospheric contamination sitting on the semi-wet surface awaiting final final protective layer setting soon later!
Q6: How far inside the freshly varnished room can pets venture right now (Final Coat application Complete)?
A: No impact interactions whatsoever (small pets = lighter weight distribution is OK!). Never allow medium sized dogs OR heavy animals walking only lightly on toes yet AND zero entry inside for cats or dogs unless they remain completely barefoot bare pawed standing completely still until that 3 day minimum has passed!
Conclusion: Trust The System, Master The Finish Line
Learning how to varnish wood floors smoothly boils down to control—control over surface readiness more than the application motion itself. You have access to the same good techniques professionals use now: methodical stripping of old worn material layering new surfaces gradually under optimal non-dusty, moderately temperature controlled environment now.
Double check that light sanding (scuffing) between passes has been light yet thorough, that you have used an exhausting fan system for clean air exhaust escape from zone your applying, and definitely stick to that three-coat requirement unless instructions advise you differently for specific specialized ultra modern rapid curing products.
Patience is the final finishing tool we use near the end time. Stick through that final clean resting period once that third coat pulls off flawlessly, and feel proud looking down on that durable, professional varnish coating—you absolutely achieved it.