How To Win The Pinewood Derby Secrets: Proven Tips
To win the Pinewood Derby, focus on these secrets: a low center of gravity, aerodynamic design, reduced friction on wheels and axles, light weight for speed, and a perfectly straight path down the track. Master these simple tips for a winning car!
The Pinewood Derby is a favorite event for many young builders and their mentors. It’s a chance to design, build, and race a wooden car. But let’s be honest, sometimes seeing your carefully crafted car fall short can be a bit disappointing. You might wonder, “What are the secrets to building a winning car?” Don’t worry; it’s not about magic, but about understanding a few key principles. This guide will break down the proven tips, turning your next Pinewood Derby into a success story. We’ll show you exactly how to give your little wooden racer the best chance to zoom past the competition. Get ready to build a champion!
The Secrets to Pinewood Derby Victory: A Deep Dive
Winning the Pinewood Derby isn’t just about luck; it’s about smart design and careful execution. As your woodworking mentor, my goal is to help you understand the “why” behind each tip, so you can build confidently. We’ll cover everything from weight distribution to the tiniest details that make a big difference. Think of this as your workshop masterclass for Pinewood Derby success.
1. The Power of Weight: Strategic Placement
Weight is your friend in the Pinewood Derby, but how you place it is crucial. Cars usually have a maximum weight limit, often around 5 ounces. The goal isn’t just to be heavy, but to be heavy in the right place.
Low Center of Gravity: This is arguably the most important secret. A car with a low center of gravity is more stable. When it hits the bumps or slight inclines on the track, it’s less likely to wobble or lose momentum. Imagine balancing a broomstick upright versus sideways; it’s much easier to keep upright when the weight is low.
Forward Weight Distribution: While keeping the center of gravity low, aim to have more weight towards the front of the car. A slightly front-heavy car will pull itself down the track more effectively. Too much weight in the back can cause the car to lift its front wheels and lose speed.
How to Add Weight:
Lead Weights: These are common and easy to use. You can drill holes in the bottom or sides of the car and insert lead weights, then cover them with wood filler or epoxy.
Tungsten Putty: This is denser than lead and can be hidden more easily. It’s a bit more expensive but offers excellent flexibility for fine-tuning weight.
Expert Tip: Use a small kitchen scale or a postal scale to check your car’s total weight and a simple balance test (like resting the car on your finger) to get a feel for its center of gravity. Aim for the balance point to be about 1 inch in front of the rear axle.
2. Aerodynamics: Slicing Through The Air
While the track is short, air resistance (drag) still plays a role, especially for faster cars. Making your car streamlined can shave off crucial milliseconds.
Smooth Surfaces: Any rough edges, bumps, or accessories can create drag. Sand your car until it’s incredibly smooth.
Lower Profile: A sleeker, lower car will generally face less air resistance than a tall, boxy one. Consider a wedge shape or a bullet-like design.
Minimal Protrusions: Avoid large spoilers or excessively wide wheels that stick out. Keep everything tucked in and smooth.
Consider this: Think about how a sports car is designed compared to a van. The sports car is built to cut through the air, and your Pinewood Derby car can benefit from the same thinking, albeit on a much smaller scale.
3. The Friction Fighters: Wheels and Axles
Friction is the enemy of speed. The point where your wheels meet the axles is where a lot of unwanted friction occurs. Minimizing this is key to a fast car.
True Wheels: The kit wheels can sometimes be slightly imperfect. You can “true” them by carefully sanding them on a flat surface to ensure they are perfectly round and balanced. This reduces wobbling.
How to True Wheels: You can chuck a car axle (with the wheel attached) into a drill and then use fine-grit sandpaper to smooth out any imperfections while it spins. Do this carefully and evenly.
Polished Axles: The axles need to be perfectly smooth and straight. Before assembling, polish them with fine-grit sandpaper (400, 600, then 1000+ grit) and then buff them with metal polish or a polishing compound. A mirror-smooth surface reduces friction significantly.
Proper Axle Alignment: Ensure your axles are perfectly straight and mounted parallel to each other and perpendicular to the car body. Even a slight misalignment can cause extra friction and steering issues.
Lubrication: This is critical. Use a good quality lubricant recommended for Pinewood Derby cars.
Types of Lubricants:
Graphite Powder: This is a dry lubricant that works by creating a low-friction surface. It’s clean and effective.
Silicone-Based Lubricants: These can also work well and are often a bit cleaner than oil-based options.
Avoid Oily Lubes: Traditional oils can attract dirt and gum up the works, actually increasing friction over time.
Application: Apply a tiny amount of lubricant to the inside of the wheel bore and the polished axle. Spin the wheel to distribute it evenly. Don’t overdo it, as excess lube can attract dust.
Safety Note: Always wear safety glasses when working with tools or sanding. Ensure adult supervision when children are involved in polishing or drilling.
4. The Straight and Narrow Path: Alignment is Everything
Even the fastest car won’t win if it isn’t going straight. The track has guide rails, and your car needs to stay against one of them without rubbing too much.
Steering:
One-Wheel Steering: A common technique is to slightly bend one axle (usually the rear). Bend it away from the direction you want the car to steer. For example, if you want the car to veer slightly left as it goes down, bend the right rear axle slightly to the left. This causes the wheel to scrub and keep the car against the left guide rail.
Subtle Adjustments: Make tiny adjustments. A little bend goes a long way. Test your car on a flat surface to see how it rolls. You want it to track straight, or with a very gentle pull to one side.
Wheel Contact: Make sure only the tread of the wheel touches the track. If the inside of the wheel hub rubs against the car body, it will slow the car down. You might need to slightly widen the wheel bores with a small drill bit or carefully sand the car body.
5. Building a Balanced Beauty: Design Considerations
While speed is paramount, aesthetics can add to the fun and pride of your creation. Here are some tips to keep your design practical and effective.
Simplicity is Key: Often, the simplest designs are the fastest. Overly complicated shapes can introduce drag or structural weaknesses.
Smooth Edges: Round over any sharp edges, especially on the front, to improve aerodynamics.
Paint and Finish: A glossy, smooth paint job not only looks great but can also contribute to a smoother surface, reducing drag. Use multiple thin coats of paint rather than one thick one, and sand lightly between coats if necessary.
Weight Cavities: If you’re drilling to add weight, recess the weights so they are flush with the car’s surface or completely hidden. This maintains a cleaner aerodynamic profile.
Pro Tip: Consider the width of your car. A car that is too wide might rub against the guide rails more, increasing friction. Conversely, a very narrow car might be less stable. The standard kit width is usually a good starting point.
Essential Tools for Your Winning Car
You don’t need a professional workshop to build a champion Pinewood Derby car. Here are some basic tools that will make the process easier and more effective.
Basic Hand Saw or Coping Saw: For shaping the wooden block.
Sandpaper: A variety of grits from coarse (e.g., 80-100) for shaping to very fine (e.g., 400, 600, 1000+) for smoothing and polishing.
Drill and Drill Bits: For creating cavities for weights and potentially for axle alignment.
Wood File or Rasp: For quickly removing wood and shaping.
Ruler or Measuring Tape: For accurate measurements.
Clamps: To hold the wood securely while cutting or drilling.
Safety Glasses: Absolutely essential for eye protection.
Pencil: For marking.
Wheeled Alignment Jig (Optional but Recommended): For ensuring axles are perfectly straight and parallel. You can often find these from Pinewood Derby suppliers or build a simple one.
Polishing Tools: Fine-grit sandpaper, polishing compound, or a soft cloth for axles.
Tool Guide: Key Features to Look For
| Tool | Key Features for Pinewood Derby | Why it’s Important |
|---|---|---|
| Hand Saw | Fine teeth, comfortable grip | For precise cuts and shaping the main car body. |
| Sandpaper | Assorted grits (80-1000+) | For shaping, smoothing, and achieving a high-quality finish. |
| Drill | Variable speed, comfortable handle | For drilling weight holes accurately and safely. |
| Drill Bits | Sized for weights and axles | To match the size of weights and for axle straightening. |
| Safety Glasses | Comfortable fit, clear lenses | Protects your eyes from sawdust and flying debris. |
| Alignment Jig | Holds axles securely, guides bit | Ensures axles are perfectly straight and parallel for speed. |
You can often find helpful resources and specialized tools from reputable Pinewood Derby suppliers online, such as PinewoodDerby.com’s tool section which offers a wide range of products designed specifically for this race.
Step-by-Step: Building and Tuning Your Race Car
Let’s walk through the process, from the block of wood to the starting line.
Step 1: Design and Shape Your Car
Sketch Your Idea: Draw your car on paper. Consider its profile, where weights will go, and how streamlined it will be.
Transfer to Wood: Draw your design onto the wooden block.
Cut the Shape: Using your saw, carefully cut out the basic shape. Take your time and follow the lines.
Refine with Files: Use wood files or rasps to smooth rough edges and refine the contours.
Step 2: Add Weight Strategically
Determine Weight Placement: Decide where your weights will go to achieve a low center of gravity and slight front-bias.
Drill Holes: Mark and drill holes for your weights. Ensure they are deep enough.
Install Weights: Insert lead weights or tungsten putty. Secure them with wood glue or epoxy. If using putty, mold it flush with the car body.
Check Weight: Weigh your car to ensure it’s within the limit (usually 5 oz.) and adjust if necessary.
Step 3: Prepare Wheels and Axles – The Critical Steps
This is where speed is truly gained or lost.
Straighten Axles: If your axles are bent, carefully straighten them.
Polish Axles:
Start with a medium-grit sandpaper (around 220grit) to remove any molding marks.
Move to finer grits (400, 600, 800, 1000, 1500+).
Finish with a metal polish and a soft cloth for a mirror-like finish.
True Wheels (Optional but Recommended):
Carefully drill a small hole in the center of each wheel (off-center hole is better for grip on a jig).
Mount a wheel onto a bolt or a spare axle.
Chucking this into a drill, run the drill at a medium speed and use fine-grit sandpaper to gently sand the circumference of the wheel until it is perfectly round and smooth.
Smooth Wheel Hubs: The inside of the wheel bore can be rough. Carefully smooth it out with a small round file or by very gently running a drill bit through it.
Step 4: Assemble the Car with Care
Align Axle Slots/Holes: Ensure the slots or holes where the axles will go are perfectly straight and parallel to each other and perpendicular to the car’s length. Use an alignment jig if possible.
Lubricate: Apply a small amount of graphite powder or recommended lubricant to the inside of the wheel bores and the polished axles.
Mount Wheels: Fit the wheels onto the axles. Ensure they spin freely. There should be minimal wobble. Adjust axle placement or wheel fit if needed.
Check Roll: Gently roll the car. It should coast smoothly. If there’s resistance, check for rubbing. Ensure the wheel hubs don’t touch the car body.
Step 5: Finishing Touches and Testing
Sand Everything: Sand the entire car body smooth, working up through finer grits of sandpaper for a sleek finish.
Paint and Decorate: Apply your chosen paint. A smooth, glossy finish is best for aerodynamics. Let it dry completely.
Final Check:
Weight: Double-check the weight.
Alignment: Ensure axles are straight and parallel.
Roll: Give it a gentle push on a flat surface to see how it rolls. Look for any wobble or resistance.
Track Test: If possible in a safe area, test it on a ramp to observe its behavior. Make tiny adjustments to axle alignment or add minimal steer if needed.
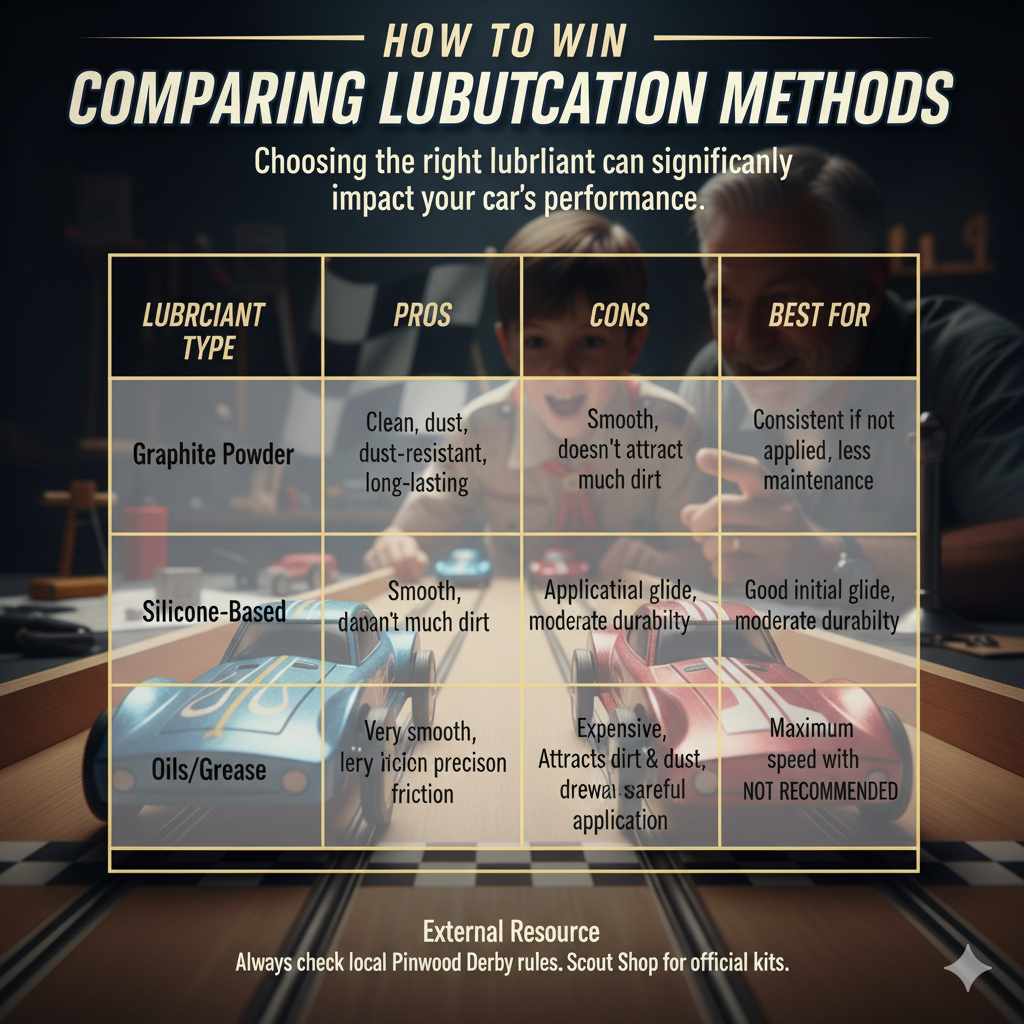
Table: Comparing Lubrication Methods
Choosing the right lubricant can significantly impact your car’s performance. Here’s a quick comparison.
| Lubricant Type | Pros | Cons | Best For |
|---|---|---|---|
| Graphite Powder | Clean, dust-resistant, long-lasting | Can be messy if not applied carefully | Consistent speed, less maintenance during an event |
| Silicone-Based | Smooth, doesn’t attract much dirt | Application can be tricky to get right | Good initial glide, moderate durability |
| Dry Lube (e.g., PTFE) | Very smooth, low friction | Can be expensive, application requires precision | Maximum speed with careful application |
| Oils/Grease | High initial glide | Attracts dirt and dust, can slow car down | Not recommended for Pinewood Derby |
External Resource: For an official perspective on rules and equipment, always check your local Pinewood Derby rules. The Scout Shop is a great place to find official kits and accessories that comply with standard regulations.
Frequently Asked Questions About Pinewood Derby Secrets
Have more questions? Here are some common ones that beginners ask.
Q1: What is the single most important factor for a fast Pinewood Derby car?
The single most important factor is minimizing friction, especially at the wheels and axles, combined with a low center of gravity for stability.
Q2: How much weight should I put in my car?
You should aim to get as close to the maximum weight limit (often 5 ounces) as possible. The key is placement: a low and slightly forward center of gravity is ideal.
Q3: Do I really need to polish the axles?
Yes, polishing the axles to a mirror-smooth finish is crucial. It dramatically reduces friction, allowing the wheels to spin more freely. Use progressively finer grits of sandpaper and a polishing compound.
Q4: How can I make my car go straight down the track?
Ensure your axles are perfectly parallel and perpendicular to the car body. A common trick is to very slightly bend one rear axle to guide the car gently against a guide rail without excessive scrubbing.
Q5: What’s the best way to add weight to the car?
The best way is to drill holes in the bottom or sides of the car and insert lead weights or tungsten putty. This allows you to achieve a low center of gravity effectively. Always ensure weights are securely fixed.
Q6: Should I make my car aerodynamic?
Yes, while friction is more critical, a streamlined shape with smooth surfaces helps reduce air resistance, which can make a difference, especially in how the car maintains speed throughout the race.
Q7: Can I use oil as a lubricant?
It’s generally not recommended. Oils can attract dust and dirt, which can increase friction over time. Dry lubricants like graphite powder or specialized racing lubes are preferred for Pinewood Derby cars.
Conclusion: Your Path to Pinewood Derby Glory
Building a winning Pinewood Derby car is a rewarding experience that blends creativity, precision, and a little bit of science. You’ve learned that victory isn’t about super-advanced techniques but about mastering fundamental principles: strategic weight placement for a low center of gravity, minimizing friction at every contact point, ensuring a straight path, and smooth aerodynamics.