
Trim Router vs Plunge Router: What Is The Difference?
Choosing the right tool can sometimes feel tricky when you’re starting out with woodworking projects. Many beginners wonder about the Trim Router vs Plunge Router: What’s the Difference? It’s a common question because these tools look similar but do different jobs. Don’t worry, we’ll break it down simply so you know which one is best for your needs.
We’ll cover what each router is good for and help you decide which you might need first. Let’s explore what makes them distinct.
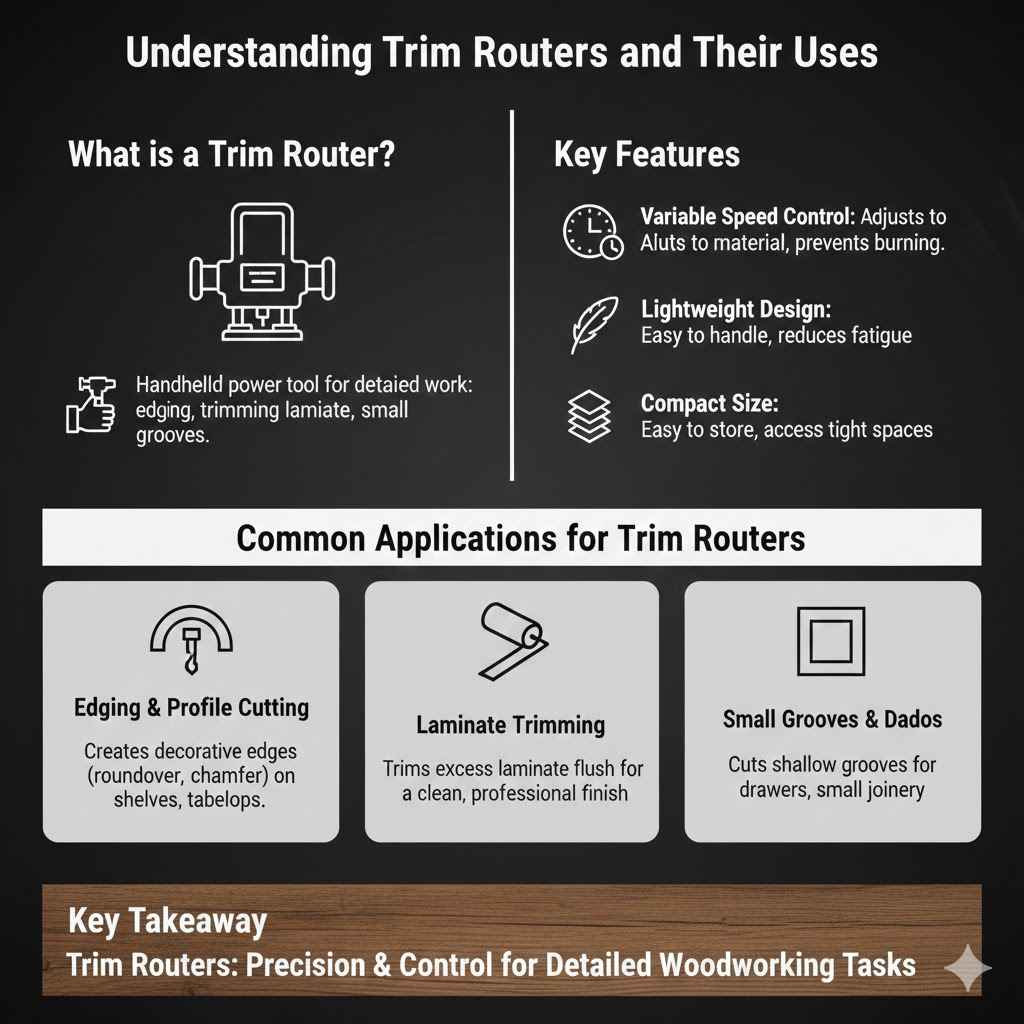
Understanding Trim Routers And Their Uses
Trim routers are small, lightweight tools perfect for detailed work and light-duty tasks. They are easy to handle and control, making them ideal for beginners and for tasks requiring precision. Think of them as the nimble specialists in the router family, great for edging, trimming laminates, and making decorative cuts.
Their compact size means they’re comfortable to use for extended periods, and they don’t take up much storage space. This section will explore the core features and applications that make trim routers a valuable addition to any workshop.
What is a Trim Router?
A trim router, also known as a compact router or a palm router, is a handheld power tool used for cutting decorative edges, trimming laminate, and making small grooves or dados. It typically features a small motor and a base that is easy to grip with one or two hands. The design prioritizes maneuverability and control, making it suitable for tasks where a larger router would be cumbersome or too powerful.
Its primary function is to shape edges of wood or other materials. This can include rounding over edges, chamfering them at an angle, or creating decorative profiles. Trim routers are also excellent for tasks like cutting out inlays, mortises for hinges, or cleaning up edges after using a jigsaw or circular saw.
Key Features of Trim Routers
- Variable Speed Control: Many trim routers offer variable speed settings. This lets you adjust the rotation speed of the bit to match the material being cut and the type of bit being used. Slower speeds are better for harder woods or larger bits to prevent burning, while higher speeds are good for smoother cuts in softer woods. This feature ensures you get clean results without damaging your workpiece.
- Lightweight Design: Trim routers are significantly lighter than their plunge or fixed-base counterparts. This makes them much easier to handle, especially for overhead work or when performing detailed tasks for extended periods. The reduced weight minimizes user fatigue, allowing for more precise control during operation.
- Compact Size: Their small footprint makes them easy to store and transport. They often come with a carrying case, making them convenient for job sites or small workshops. The compact design also allows for better access in tight spaces where a larger router wouldn’t fit.
- Interchangeable Bases: Some models come with multiple base options, such as a fixed base and an offset base. The fixed base is standard for most tasks. The offset base is particularly useful for getting close to an edge, like when trimming laminate countertops or working near a wall.
Common Applications for Trim Routers
Trim routers excel at tasks that require a delicate touch and precision. Their size and ease of use make them perfect for woodworking projects, cabinetry, and even some DIY home improvement tasks.
- Edging and Profile Cutting: This is a primary use. You can attach various bits to create rounded edges, decorative patterns, or chamfers on the edges of shelves, tabletops, or furniture pieces. For example, a quarter-round bit can add a classic finished look to the edge of a custom-made shelf.
- Laminate Trimming: When installing laminate countertops or flooring, a trim router is essential for cleanly trimming the excess laminate flush with the edge of the substrate. This leaves a neat, professional finish. It allows you to follow the edge precisely without damaging the underlying material.
- Small Grooves and Dados: For making shallow grooves for drawer bottoms or small dados for joining pieces of wood, a trim router is very handy. It offers more control than a table saw for these specific, smaller cuts. For instance, creating a small groove in a cabinet side panel to accept a thin plywood back panel is a task well-suited for a trim router.
- Inlays and Small Engravings: The precision of a trim router allows for cutting out shapes for small inlays or performing light engraving tasks on wood. This is useful for decorative elements on furniture or custom projects.
Exploring Plunge Routers And Their Capabilities
Plunge routers are built for heavier-duty tasks and offer a unique cutting action. Their base can be pushed down into the material, which is different from a trim router’s fixed or edge-following action. This plunging capability makes them ideal for cutting dados, mortises, and for inlay work where you need to start a cut in the middle of a workpiece.
We will cover what defines a plunge router and the specific projects where its design truly shines.
What is a Plunge Router?
A plunge router is a woodworking tool distinguished by its ability to lower its cutting bit directly into the surface of a workpiece and then lift it out cleanly. This action is achieved through a spring-loaded mechanism integrated into the router’s base. Unlike fixed-base routers, where the bit is always at a set depth relative to the base, a plunge router allows for dynamic depth control during the cut.
The plunge mechanism allows woodworkers to start cuts anywhere on a board without needing to “plunge” from the edge. This is crucial for tasks like creating mortises for door hinges, cutting decorative inlays into the center of a tabletop, or cutting out shapes for electrical boxes in drywall. The ability to control the depth of cut precisely, both during the plunge and throughout the operation, is what makes it so versatile.
Key Features of Plunge Routers
- Plunge Mechanism: The defining feature is the plunge system. This allows the motor and base assembly to slide up and down on posts, typically controlled by your hands pushing down against spring tension. This controlled descent into the material is the core function that sets it apart from other router types. The smooth plunge action ensures the bit enters the wood without excessive force or vibration.
- Depth Adjustment: Plunge routers usually have a robust depth adjustment system, often a rack-and-pinion or turret stop mechanism. This allows for very precise setting of the cutting depth, which is critical for tasks like mortising where consistent depth is required. Many also feature fine-adjustment dials for even greater accuracy.
- Larger Motors: Plunge routers often come with more powerful motors than trim routers. This extra power is needed to handle deeper cuts, larger bits, and denser materials efficiently. The increased motor size helps maintain consistent speed under load, preventing bogging down.
- Heavier Build: Due to their more complex mechanisms and powerful motors, plunge routers are generally heavier and larger than trim routers. This added weight can be beneficial for stability during heavy cuts, but it also means they require more effort to maneuver.
Common Applications for Plunge Routers
The plunge action of these routers opens up a range of possibilities for more complex woodworking. They are often the tool of choice for serious woodworkers needing to make specific types of cuts.
- Cutting Mortises: This is a classic use for plunge routers. A mortise is a slot or recess cut into a piece of wood to accept another piece, like in joinery or for fitting hinges. The plunge router allows you to precisely sink the bit to the required depth into the material. For instance, cutting a rectangular mortise for a door hinge involves plunging the router bit into the door stile at the marked location and cleaning out the material.
- Inlay Work: Creating inlays, where you cut a recess to fit a different material (like a contrasting wood or metal), is a common application. You can plunge the router bit into the workpiece to start the recess, ensuring a clean beginning to your inlay cut. This is useful for decorative elements on tabletops or decorative panels.
- Cutting Dados and Grooves: While trim routers can do this for shallow cuts, plunge routers handle deeper and wider dados (grooves across the grain) and grooves (grooves with the grain) with more power and control. This is essential for tasks like creating slots in shelves to hold dividers or for assembling cabinet carcasses.
- Making Speaker Enclosures or Cutouts: When building speaker boxes or cutting out openings for electrical boxes or other fixtures in wood or composite materials, a plunge router is ideal. You can plunge the bit directly into the material at the starting point of your cut.
Trim Router vs Plunge Router Direct Comparison
Now that we understand each router type individually, let’s directly compare their features and uses. This comparison will highlight the key differences to help you choose the right tool for your specific woodworking needs. We’ll look at how they handle common tasks and their overall strengths.
Design and Handling
The most striking difference lies in their design and how you handle them. A trim router is built for ease of use and precision in detailed work. Its lightweight nature makes it feel more like an extension of your hand, perfect for intricate tasks.
A plunge router, on the other hand, is designed for power and depth control. It’s heavier and requires a firmer grip to manage the plunge action, especially when cutting into dense materials. The stability of its design is key for deep, controlled cuts.
Depth Control Mechanisms
Depth control is where the two router types diverge significantly. Trim routers typically have a depth adjustment ring that you turn to set how far the bit extends below the base. Once set, this depth remains constant as you move the router.
Plunge routers have a system that allows the entire motor and base to move vertically. This means you can start the cut with the bit clear of the material and then press down to achieve your desired cutting depth. This dynamic depth control is their primary advantage for many tasks.
Power and Bit Capacity
While both can use similar router bits, their power levels and the size of bits they can handle differ. Trim routers usually have smaller motors, typically in the range of 5 to 7 amps. They are designed for smaller bits and less demanding cuts, usually up to a 1/4 inch or 1/2 inch shank diameter depending on the model.
Plunge routers often feature more powerful motors, ranging from 8 to 15 amps or more. This extra horsepower is necessary for driving larger bits and making deeper cuts in tougher materials without straining the motor. They can typically accept both 1/4-inch and 1/2-inch shank bits, and their heavier build supports larger diameter bits more stably.
Ideal Use Cases Table
| Feature | Trim Router | Plunge Router |
|---|---|---|
| Primary Use | Edging, laminate trimming, decorative profiles, light grooving. | Mortises, inlays, dados, through-cuts, starting cuts mid-board. |
| Handling | Lightweight, easy to maneuver, good for detailed work. | Heavier, more stable for deep cuts, requires more effort. |
| Depth Control | Fixed depth adjustment. | Dynamic plunge and precise depth adjustment. |
| Power | Lower to moderate (5-7 amps). | Moderate to high (8-15+ amps). |
| Bit Capacity | Smaller bits, often 1/4-inch shank. | Larger bits, 1/4-inch and 1/2-inch shank compatible. |
| Portability | Very portable, easy to carry and store. | Less portable, heavier, requires dedicated storage. |
When to Choose a Trim Router
If your projects primarily involve finishing edges, trimming laminate, or making small decorative cuts, a trim router is the way to go. Its ease of use and portability make it a fantastic tool for hobbyists and DIYers who might not need the heavy-duty capabilities of a plunge router. It’s also a great secondary tool for more experienced woodworkers who need a lightweight option for quick tasks.
Consider a trim router if you are:
- New to woodworking and want an easy-to-handle first router.
- Working on projects that involve a lot of edge detailing.
- Frequently installing laminate surfaces.
- Limited on workshop space or need a portable tool.
- Looking for a tool to complement a larger router for light tasks.
When to Choose a Plunge Router
A plunge router is essential for anyone regularly undertaking joinery, inlay work, or any task that requires cutting into the face of a board. If you’re building cabinets, custom furniture with intricate details, or need to make precise openings, this is the router for you. It offers a level of control and capability that a trim router simply cannot match for these specific applications.
Consider a plunge router if you are:
- Serious about joinery like mortises and tenons.
- Planning to do detailed inlay work.
- Needing to cut dados or grooves in various depths.
- Working with larger diameter bits for shaping.
- Looking for a robust tool for significant woodworking projects.
Choosing Between Trim Router and Plunge Router For Your Projects
The choice between a trim router and a plunge router ultimately depends on the types of projects you tackle. Understanding the strengths of each tool helps you make an informed decision about which one will serve you best in your workshop. We’ll explore scenarios where each excels and offer advice for making your selection.
Project Scenarios
Let’s look at some common woodworking scenarios and determine which router is the better fit.
- Scenario: Building a simple wooden shelf for a bookshelf.
You need to round over the front edge of the shelf for a softer feel and better appearance. You might also need to trim a bit of laminate if you’re covering the shelf with it.
Best Tool: Trim Router. Its portability and ease of use make it perfect for quickly and cleanly routing the edge and trimming any laminate. - Scenario: Creating a mortise in a door stile to fit a hinge.
This requires cutting a rectangular recess of a specific depth into the wood. You need to start the cut in the middle of the stile, not from the edge.
Best Tool: Plunge Router. The plunge action allows you to precisely lower the bit into the wood at the marked location and remove material to the exact depth needed for the hinge. - Scenario: Making a groove for a cabinet back panel.
This involves cutting a channel along the inside edge of cabinet sides to accept a thin plywood back. The groove needs to be a consistent depth and width.
Best Tool: Plunge Router. While a trim router can make shallow grooves, a plunge router offers more power and better depth control for creating these essential cabinet joinery elements. - Scenario: Adding decorative edge profiles to a coffee table.
You want to use a bit that creates a fancy bead or ogee profile along the table’s edges.
Best Tool: Trim Router. Its lightweight nature and maneuverability make it ideal for controlling the bit precisely along the table’s edge for a beautiful finish.
What If You Need Both?
For many serious woodworkers, the ideal workshop setup includes both a trim router and a plunge router. They are not interchangeable tools; rather, they are complementary. A trim router handles the lighter, more detailed tasks with ease, while a plunge router tackles the more demanding joinery and cutting operations.
If your budget or space is limited, consider starting with the router that best suits your most frequent projects. For many beginners, a trim router is a great entry point due to its versatility in common DIY tasks. As your woodworking ambitions grow, you can then add a plunge router to your collection.
Considering a Combo Router
Some manufacturers offer “combo” routers that come with both a fixed base (similar to a trim router’s function) and a plunge base. These are often full-sized routers, not compact ones, but they offer versatility by allowing you to switch between base types. This can be a good option if you want the functionality of both but have limited space or prefer to invest in one tool that performs multiple roles.
However, these are typically larger and heavier than a dedicated trim router.
The advantage is having the capability of both in one motor unit. The disadvantage is that a full-sized router might be overkill for simple trimming tasks, and it won’t have the nimble handling of a dedicated trim router.
Maintenance And Safety Tips For Both Routers
Proper maintenance and safety practices are crucial for any power tool, and routers are no exception. Keeping your routers in good working order ensures they perform reliably and safely. Understanding the best practices will help you get the most out of your tools and protect yourself.
Routine Maintenance
Both trim and plunge routers benefit from regular cleaning and checks. Dust and debris can interfere with the plunge mechanism or clog vents, reducing performance.
- Cleaning: After each use, wipe down the router, especially the plunge posts and base. Use a soft brush or compressed air to remove sawdust from vents and motor housing. For plunge routers, ensure the plunge posts are free of debris that could cause them to stick.
- Lubrication: Check the plunge posts for smooth operation. Some plunge routers may benefit from a light application of silicone-based lubricant on the posts if they feel stiff, but always consult your user manual. Avoid over-lubricating.
- Bit Changes: Ensure router bits are inserted securely and straight into the collet. Loose bits are a major safety hazard and can cause poor cut quality. Use the correct size collet for your bits.
- Inspections: Periodically inspect the power cord for any damage. Check that all adjustment knobs and levers are functioning correctly and securely.
Safety Precautions
Safety should always be your top priority when operating any power tool. Routers have fast-spinning bits, so taking the right precautions is essential.
- Personal Protective Equipment (PPE): Always wear safety glasses to protect your eyes from flying debris. Hearing protection is also recommended, as routers can be loud. A dust mask or respirator can help protect your lungs, especially when working with MDF or other fine dust materials.
- Secure Workpiece: Always clamp your workpiece firmly to your workbench. Never try to hold a small piece by hand while routing, as the router can easily grab the wood and send it flying, or pull your hand into the bit.
- Router Bit Safety: Use sharp router bits. Dull bits require more force, increase the risk of kickback, and produce poor results. Ensure the bit is inserted deep enough into the collet for secure clamping. Never exceed the maximum RPM rating of your router bit.
- Proper Technique: When using a trim router, maintain a firm grip and keep your hands away from the spinning bit. For a plunge router, press down smoothly and steadily. Always let the router reach full speed before engaging the material and allow it to stop spinning completely before setting it down. Feed the router against the direction of bit rotation to minimize the risk of kickback.
- Read the Manual: Familiarize yourself with your specific router model by reading the owner’s manual. It contains important information about its features, operation, and safety guidelines unique to that tool.

Frequently Asked Questions
Question: Can I use a trim router for cutting dados?
Answer: Yes, you can use a trim router for cutting shallow dados or grooves, especially if they are not too wide or deep. However, for deeper or wider dados, a plunge router is generally more suitable due to its power and better depth control.
Question: Is a plunge router difficult to control for beginners?
Answer: Plunge routers can be a bit heavier and require some practice to master the plunge action. However, with a bit of effort and careful attention, beginners can learn to control them effectively, especially for tasks where their plunging capability is essential.
Question: Which router is better for edge profiling?
Answer: A trim router is generally better for edge profiling. Its lightweight design and compact size make it easier to maneuver precisely around the edges of your workpiece to create decorative profiles.
Question: Can I use router bits designed for a plunge router in a trim router?
Answer: Yes, you can typically use the same router bits in both trim and plunge routers, provided the shank diameter of the bit (1/4 inch or 1/2 inch) matches the collet size of your router. The main difference is the router’s base and how it interacts with the material.
Question: Do I need a router table for a trim router?
Answer: While not strictly necessary, a router table can enhance the capabilities of a trim router, allowing for more stable and repeatable cuts, especially for edge profiling. Many trim routers are designed to be used freehand or mounted into small router tables or jigs.
Conclusion
Understanding the Trim Router vs Plunge Router: What’s the Difference? boils down to their core design and intended use. Trim routers are your go-to for lightweight, detailed edge work and trimming. Plunge routers excel at tasks requiring cuts initiated within the material, like mortises and inlays.
Choosing the right one means matching the tool to your project needs for the best results.