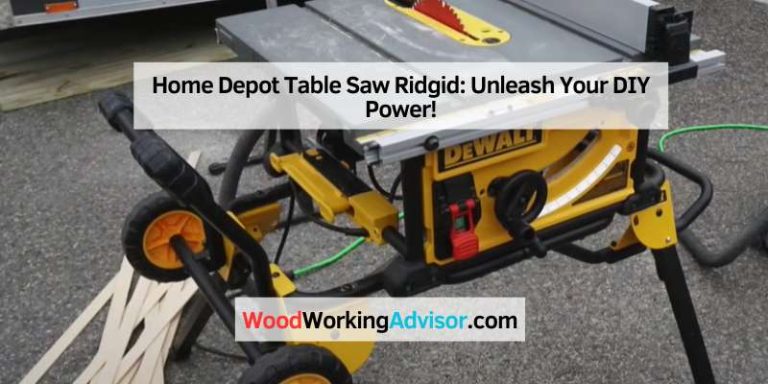
Universal Table Saw Switch: How To Find The Right Fit Fast
It’s a super common problem. You’ve got a table saw that’s seen better days. Maybe the switch is worn out.
Or perhaps it just stopped working. You want to get it back up and running. But finding a
Finding a universal table saw switch involves understanding basic electrical principles and the types of switches available. Look for switches rated for your saw’s voltage and amperage, with appropriate mounting and wiring configurations. Always prioritize safety by disconnecting power and consulting your saw’s manual if possible.
Many switches offer similar core functions, making them adaptable to various machines.
What Exactly is a Universal Table Saw Switch?
A universal table saw switch isn’t one single product that magically fits every saw ever made. Instead, it’s a term used for switches that can be adapted to many different table saws. Think of it like a general-purpose tool.
It has common features that allow it to work on a variety of brands and models. These switches are designed to be flexible. They often have extra wiring options.
They might also have different ways to mount them. This makes them a good choice when an exact replacement part is hard to find. Or if you’re building a saw from scratch.
They aim to cover the most common needs of table saw users.
The main goal of a universal switch is simplicity and broad compatibility. They usually have a few key functions. These are turning the saw on, turning it off, and sometimes having a way to stop it quickly.
For many home shops, this is all you really need. It’s about getting power to the motor and cutting it off when you’re done. Or if something goes wrong.
Most table saws use an electromagnetic switch. This type of switch has a button you push to start it. Then, it stays on.
To turn it off, you usually push a separate off button. Or sometimes a larger paddle. This is different from a simple on/off toggle.
These electromagnetic switches use a low-voltage circuit. This circuit holds the main power contacts closed. If the power flickers or goes out, the magnetic field drops.
The switch then turns off automatically. This is a crucial safety feature. It stops the saw from restarting unexpectedly when power returns.
This is often called a “no-volt release” or “loss of voltage” protection.
When you look for a “universal” switch, you’re often looking for one that mimics this core function. It needs to provide power when you tell it to. And it needs to safely shut off when you want it to, or when power is lost.
The “universal” part means it can handle the typical electrical loads of most home and light commercial table saws. And that it can be wired up without needing custom parts.
Why Do You Need to Replace a Table Saw Switch?
Switches don’t last forever. They take a beating in a workshop. Think about how many times you push that button.
Or how often dust and debris find their way into the housing. It’s a lot. The most common reason to replace a switch is simple wear and tear.
The internal contacts can get worn out. They might corrode. This can lead to the saw not starting reliably.
Or sometimes, it might not start at all.
Another big reason is damage. Sometimes a tool might fall. Or something heavy lands on the saw.
This can crack the switch housing. Or break the internal mechanisms. Water damage is also a common enemy of electrical components.
If your shop gets damp, or you have a spill, it can ruin a switch.
Safety is a huge factor here. A faulty switch can be dangerous. If it sticks in the “on” position, you might not be able to turn off the saw quickly.
This is a serious risk. If the “off” button doesn’t work, you have less control. A switch that overheats is also a fire hazard.
So, if you notice any of these issues, replacing the switch is a smart move. It’s not just about convenience. It’s about making sure your saw is safe to use.
I remember a time when I was working on a project. I needed to make a quick cut. I hit the power button.
Nothing. I hit it again. Still nothing.
I fiddled with it, wiggled it. Finally, it sputtered to life. But then it died again a few seconds later.
It was frustrating, sure. But more than that, it made me nervous. What if it had failed while I was in the middle of a cut?
That could have been really bad. I immediately unplugged the saw. I knew I had to find a new switch.
It’s one of those things you don’t realize is critical until it stops working. That was a real wake-up call for me.
Common Switch Problems
No Power: The saw won’t turn on at all. This could be a completely dead switch or a loose connection.
Intermittent Power: The saw turns on and off unexpectedly. Or it takes many tries to get it to start.
Sticking Buttons: The on or off buttons don’t spring back properly. This is a major safety concern.
Overheating: The switch housing feels warm or hot to the touch. This indicates a potential electrical issue or overload.
Visible Damage: Cracks, melted plastic, or loose wires around the switch.
How to Identify Your Saw’s Needs
Before you even start looking at universal switches, you need to know what your saw needs. This is super important. Getting the wrong electrical rating can damage your saw.
It can even be dangerous. You’ll need to find a few key pieces of information. These are usually printed on a label on your saw.
Or they might be in your owner’s manual.
First, find the amperage rating. This tells you how much electrical current the switch needs to handle. Table saws vary.
Smaller saws might use 10-15 amps. Larger ones might use 15-20 amps or more. Your new switch must be rated for at least the amperage your saw motor draws.
It’s okay if the switch is rated higher. That just means it can handle more. But it can’t be rated lower.
Next, check the voltage. Most home table saws in the U.S. run on 120 volts.
Some larger ones might run on 240 volts. Make sure the switch you buy is designed for the voltage of your saw. You don’t want to mix these up.
A 120V switch won’t work correctly on a 240V saw. And it could cause damage.
Then, look at the type of connection. How does the old switch connect to the saw? Does it have wires that screw onto terminals?
Or does it have spade connectors? Does it have a plug? Understanding this will help you choose a universal switch that can be wired to match.
Most universal switches come with screw terminals. These are pretty standard. They’re easy to work with.
Finally, consider the mounting style. How does the switch attach to the saw? Does it screw into a panel?
Does it clip in? Does it have a specific shape? Universal switches often have a standard rectangular or round shape.
You might need to do a little improvising with mounting screws or brackets. But generally, they aim for common sizes. Sometimes, the old switch housing can be reused if it’s in good shape.
You can then install the new universal switch mechanism inside the old housing.
It can be a bit of detective work. I’ve spent time with a flashlight, peering at labels. Sometimes they’re covered in dust.
Sometimes the print is faded. But taking the time to get this info upfront saves a lot of headaches later. It’s like packing the right tools for a job.
You wouldn’t show up to fix a car with only a hammer, right? The same goes for picking out electrical parts.
Quick Saw Needs Checklist
- Amperage: Check the motor plate.
- Voltage: Usually 120V or 240V.
- Wiring Type: Screw terminals, spade connectors, plug?
- Mounting: How does the old switch attach?
Understanding Universal Switch Types
When you look for a “universal” table saw switch, you’ll see a few main types. They all do the same basic job. But they might have slight differences in how they’re built or used.
Knowing these differences helps you pick the best one for your setup.
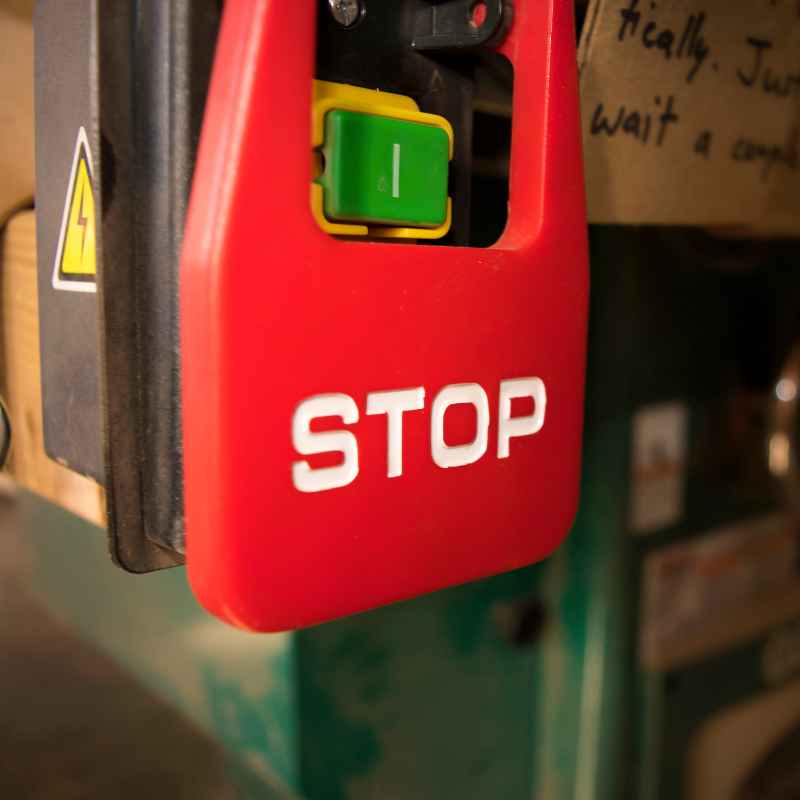
The most common type is the standalone paddle switch. These often have a large, visible paddle that you push to turn the saw on. There’s usually a separate button or area to push to turn it off.
Some have a prominent red “off” button. This is great for quick stops. Many of these are designed to be surface-mounted.
Or they might fit into a cutout in the saw’s cabinet. They are built to handle the typical power draw of most contractor-style table saws. They usually have screw terminals on the back for wiring.
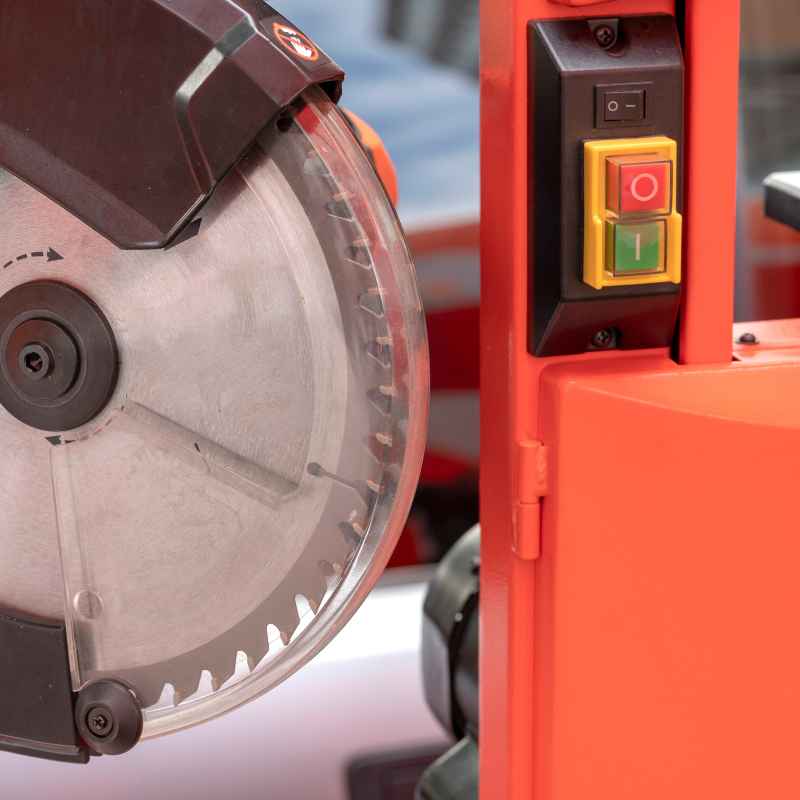
Another type is the push-button style switch. This looks more like a traditional light switch. It has distinct “on” and “off” buttons.
These are often smaller. They might be designed to fit into existing round holes. Or they might be mounted onto a small panel.
These are also very common. They’re a good option if you have limited space on your saw’s cabinet. Like paddle switches, they need to be rated for your saw’s amperage and voltage.
Some universal switches are designed to be
Then there are switches with dust covers. These are a nice feature for a workshop. The dust cover protects the buttons from sawdust and debris.
This can help the switch last longer. It also keeps the buttons clean and easy to press. These covers are usually made of rubber or plastic.
They flip up or snap on. You’ll often find these on paddle-style switches.
It’s worth noting that some “universal” switches might have more features. Some might include a small overload reset button. This button lets you manually reset the circuit breaker if the saw trips.
This is a useful addition. It can save you from having to unplug the saw and reset it at the breaker box. However, most standard table saw switches don’t include this.
They rely on the main electrical panel breaker to do that job.
When picking a type, think about your saw’s cabinet. Where will the switch fit? Do you have a large area?
Or is it tight? How do you prefer to operate the switch? Do you like a big paddle?
Or a simple button? These are personal preferences. But they matter for ease of use and safety.
Switch Type Snapshot
- Paddle Switch: Large, easy to hit. Good for quick stops.
- Push-Button Switch: Compact, classic look. Fits in smaller spaces.
- Replacement Inserts: For reusing original housings.
- Dust Covers: Protects from workshop grime.
Wiring a Universal Switch: What You Need to Know
This is where things can seem a bit tricky. But if you take it step-by-step, it’s totally manageable. The key is understanding how the power flows.
Most table saws have three main wires coming into the switch area: Line (or Hot), Neutral, and Ground. The switch’s job is to interrupt the Line wire to turn the motor on and off.
A typical electromagnetic switch has four terminals. Two are for the main power in and out. These connect to your saw’s power cord or wiring.
The other two terminals are for the “hold-in” coil. This is the electromagnet that keeps the switch on. This coil gets power from the Line wire.
It’s wired through the switch so that when you push “on,” it energizes the coil. This closes the main power contacts. When you push “off,” it de-energizes the coil.
This opens the contacts. The power cord that plugs into the wall usually has three wires: black (Line), white (Neutral), and green (Ground).
When you get a universal switch, it will have terminals clearly marked. Look for labels like “LINE IN,” “LOAD,” “N,” “G,” or similar. The instructions that come with the switch are your best friend here.
They will show you how to connect the wires.
Here’s a general idea of how it works for a typical 4-terminal electromagnetic switch:
- Terminals for Main Power: One terminal gets the “hot” wire from the power source (the black wire from your saw’s cord). The other terminal sends power out to the saw motor.
- Terminals for the Coil: One coil terminal gets power from the “hot” wire. The other coil terminal connects to the “off” switch part. This terminal is often also connected to the Neutral wire through the switch mechanism itself. When you press “on,” the hot wire powers the coil. When you press “off,” the switch breaks the connection to the coil.
Grounding is critical. The ground wire (usually green) from your saw’s power cord should be connected directly to the metal frame of the saw. It should also be connected to the ground terminal on the switch if the switch housing is metal. This provides a path for electricity to flow safely to the ground in case of a fault.
It’s your main protection against electric shock.
Neutral wire usually passes through the switch without being interrupted. It’s a return path for the electricity. Some switches might have a terminal for the neutral wire.
Others might have it bypass the switch mechanism itself. Again, check the diagram. It’s vital to get the wiring right.
If you’re unsure, consult an electrician. Or your saw’s manual. Messing up the wiring can damage the switch, the saw, or worse.
I once helped a friend wire up a new switch. He had a very old saw. The wiring diagram was almost gone.
We spent a good hour tracing wires. We used a multimeter to check continuity. It felt like being a detective.
But when we finally got it wired up and plugged it in, and the saw started perfectly, it was a great feeling. The key was patience and careful checking at every step. Never guess.
Always double-check. Safety first!
Wiring Basics (General)
- Line (Hot): This wire is interrupted by the switch.
- Neutral: This wire provides the return path.
- Ground: For safety. Connects to the metal frame.
- Coil Terminals: Power the electromagnet that keeps the switch “on.”
Always disconnect power before wiring!
Safety First: Protecting Yourself and Your Saw
Working with electricity is no joke. Table saws are powerful tools. Combining the two means you need to be extra careful.
The switch is a key safety component. If it’s not working right, your safety is at risk. So, let’s talk about how to stay safe during this process.
Always disconnect power. This cannot be stressed enough. Before you touch any wires, before you try to remove the old switch, or install the new one, unplug the saw from the wall. If your saw is hardwired, turn off the breaker to that circuit.
Make sure the saw cannot possibly turn on while you’re working on it.
Wear safety glasses. Even when you’re not cutting wood, sparks can fly. Or small pieces of plastic could break off. Safety glasses are a must.
It’s a small habit that can prevent serious eye injury.
Understand your saw’s wiring diagram. If you still have the owner’s manual, find the wiring diagram. It’s the definitive guide for your specific saw. It shows exactly how the original switch was connected.
You can use this to help you understand how the universal switch needs to be wired. If you don’t have it, search online for your saw’s model number and “manual.”
Use the right tools. You’ll need screwdrivers for removing covers and terminals. You might need wire strippers and crimpers if you’re using spade connectors. A multimeter is very helpful for checking continuity and voltage.
Make sure your tools are in good condition. And that they are insulated if possible.
Check the amperage and voltage ratings. I know I’ve said this before, but it’s crucial. Using a switch that’s not rated correctly is a fire hazard and can damage your saw. Ensure the universal switch you choose can handle the load of your saw’s motor.
You want it to be rated for the correct voltage too.
Test the new switch carefully. Once you’ve installed the new switch, before you start cutting, do a few tests. Plug the saw in (or turn the breaker on). Listen for any strange noises.
Check if the switch operates smoothly. Then, try turning it on briefly. Listen to the motor.
Does it sound normal? Turn it off. Does it shut down cleanly?
Repeat this a few times. If anything seems off, unplug the saw immediately and re-check your wiring.
Grounding is non-negotiable. Make absolutely sure the ground wire is properly connected. This is the most important safety feature for preventing electric shock. A missing or loose ground wire can have severe consequences.
I once worked on a friend’s shop where the main breaker kept tripping. We traced it back. The ground wire on his table saw was loose.
It wasn’t making good contact. That meant any fault current was looking for another way to escape. It was a dangerous situation waiting to happen.
Fixing that loose ground wire was one of the most important things we did in that shop.
Safety Reminders
- Always unplug the saw before working on it.
- Wear safety glasses.
- Verify voltage and amperage ratings.
- Ensure proper grounding.
- Consult your saw’s manual for its specific wiring.
Common Mistakes to Avoid
Even with the best intentions, people sometimes make mistakes when replacing a table saw switch. Knowing these common pitfalls can help you steer clear of them. It makes the whole process smoother and safer.
One big mistake is not disconnecting power. I can’t say this enough. Every time you work on electrical components, the first step is always to kill the power.
It’s the simplest rule. But it’s the one most often overlooked in a hurry. Always double-check that the saw is unplugged or the breaker is off.
Another error is ignoring the amperage and voltage ratings. People see a switch that looks like it will fit. They don’t check the numbers.
Then they hook it up. If the switch isn’t rated high enough, it can overheat. It might melt.
Or it could fail catastrophically. Always match the switch ratings to your saw’s motor requirements.
Confusing Line and Load terminals is also common. These terminals are where the main power comes in and goes out to the motor. If you wire them backward, the switch might not work.
Or it might not provide the correct safety features. Carefully read the markings on the new switch. Refer to your saw’s wiring diagram.
Skipping the ground wire connection is a dangerous mistake. The ground wire is your lifeline against electric shock. If it’s not connected properly, the metal casing of your saw could become live if there’s a fault.
Always ensure the ground wire from the power cord is securely connected to the saw’s frame and the switch’s grounding point.
Some people also try to force a switch that doesn’t quite fit. If the mounting holes don’t line up. Or if the switch housing is too big for the cutout.
Resist the urge to make it fit with brute force. This can crack the switch. Or damage the saw’s cabinet.
It’s better to find a switch that fits more naturally. Or be prepared to make minor modifications to the mounting area if needed. But do this carefully and deliberately.
Finally, rushing the job is a recipe for mistakes. Replacing a switch might seem like a quick fix. But if you’re in a hurry, you’re more likely to overlook a crucial step.
Take your time. Work in a well-lit area. If you feel frustrated, step away for a bit.
Come back with a clear head.
I once saw someone try to wire a switch. They were in a real rush. They crossed two wires.
The saw didn’t turn on. But when they plugged it in, they got a shock. Luckily, it wasn’t severe.
But it was a stark reminder of how quickly things can go wrong if you’re not paying attention to the details. That experience stayed with me. It made me even more committed to doing things right, no matter how simple the task seems.
Common Mistakes to Avoid
- Forgetting to disconnect power.
- Ignoring amperage/voltage ratings.
- Wiring line/load terminals incorrectly.
- Skipping the ground wire.
- Forcing a switch that doesn’t fit.
- Rushing the installation process.
When to Call a Professional
While many DIYers can successfully replace a table saw switch, there are times when it’s best to step back and call for help. Knowing your limits is a sign of wisdom, not weakness. If you’re feeling overwhelmed by the electrical aspect, it’s okay to hand it over to an expert.
If your table saw is hardwired into your home’s electrical system, and you’re not comfortable working with that kind of setup, it’s definitely time to call an electrician. This involves working with higher voltage and potentially more complex wiring than a standard plug-in saw. An electrician has the tools, knowledge, and experience to handle this safely.
If you’ve tried to wire it yourself and it’s not working, or if you smell burning, see sparks, or hear unusual sounds, stop immediately. Unplug the saw. Then call a qualified repair person or an electrician.
It’s better to pay for professional help than to risk damaging your saw or causing a safety hazard.
If your saw is a high-end or specialized model, it might have unique switch configurations or safety features. In such cases, using a generic universal switch might not be the best option. The manufacturer’s service department or a qualified technician familiar with your specific model would be the best resource.
They might be able to source an exact replacement part or advise on the correct universal alternative.
Also, consider the age and condition of your saw. If the saw is very old, and the wiring is brittle or degraded, it might be a more complex repair. A professional can assess the overall condition of the electrical system.
They can advise if it’s worth repairing or if it’s time to consider a new machine.
I had a situation with a large industrial dust collector. The control panel was fried. It was far beyond a simple switch replacement.
The wiring was complex. And the safety interlocks were extensive. I spent hours looking at diagrams.
I knew I was out of my depth. So, I called a specialized industrial electrician. It cost more than I wanted.
But they fixed it safely. And they got the system running perfectly. That was a valuable lesson for me: know when to call in the cavalry.
When to Seek Professional Help
- Saw is hardwired into your home’s system.
- You’re uncomfortable with electrical work.
- The switch was replaced, but it still doesn’t work correctly.
- You notice smoke, sparks, or burning smells.
- The saw is a specialized or high-end model.
- The saw’s electrical system is very old and degraded.
Finding and Purchasing a Universal Switch
Once you’ve got the specifications for your saw and you know what type of universal switch you’re looking for, it’s time to buy. You have a few good options for where to look.
Online Retailers: This is often the easiest and most convenient way to find a wide selection. Websites like Amazon, eBay, and dedicated woodworking or tool parts sites are great places to start. You can easily compare prices.
You can read reviews from other users. This helps you see if a particular switch has a good reputation. Use search terms like “universal table saw switch,” “woodworking switch replacement,” or “replacement power switch for table saw.”
Specialty Tool Stores: Local woodworking stores or independent hardware stores that specialize in power tools can be a good resource. The staff there often have a lot of knowledge. They can help you find the right part.
They might even have some on hand.
Manufacturer Websites: While you’re looking for a universal switch, it’s still worth checking the website of your table saw’s manufacturer. Sometimes they sell generic replacement parts. Or they might have cross-reference charts that suggest compatible universal switches.
Even if they don’t have a universal option, they might have an exact replacement part, though it could be more expensive.
Hardware Stores: Some larger hardware chains might carry basic universal switches. These are often more generic. They might not be specifically designed for table saws, but could work with the right modifications.
Check the electrical aisle. Look for switches rated for high amperage.
When you’re browsing, pay attention to the product description. Make sure it clearly states the amperage and voltage ratings. Look for details about the wiring terminals.
Does it use screw terminals? Does it come with wire nuts? Is there a dust cover?
What are the dimensions of the switch and its mounting plate?
Read customer reviews. Do people say it was easy to install? Did it fit their table saw?
Are there any common complaints? Reviews are invaluable for understanding real-world performance and ease of use.
Don’t be afraid to compare. Prices can vary. Sometimes a slightly more expensive switch has better build quality or features that are worth the extra cost.
Think about the longevity of the switch. You want something that will last.
I recently had to replace a switch on an old band saw. I looked online for hours. I compared a few options.
One had great reviews. People said it was easy to wire and very sturdy. I bought that one.
It arrived quickly. The installation was straightforward. It has worked perfectly ever since.
That experience taught me to really value those customer reviews. They offer a glimpse into how the product performs in a real workshop.
Where to Buy
- Online Retailers (Amazon, eBay, tool parts sites)
- Specialty Woodworking Stores
- Manufacturer Websites
- Large Hardware Chains
Installation: Step-by-Step Guide
Okay, you’ve got your new universal switch. You’ve got your tools. You’ve unplugged the saw.
Let’s walk through the installation process. Remember, this is a general guide. Your specific saw might have slightly different steps.
Always refer to your saw’s manual if you have it.
Step 1: Prepare Your Workspace
Work in a well-lit area. Make sure you have plenty of space. Have all your tools laid out and ready.
Keep your new switch and its instructions nearby.
Step 2: Remove the Old Switch
Locate the old switch on your table saw. It’s usually on the motor housing or the cabinet. You’ll likely need to remove a cover panel or screws to access the back of the switch.
Carefully note how the wires are connected. Taking a picture with your phone can be incredibly helpful for remembering the original setup.
Gently disconnect the wires from the old switch terminals. If they are screw terminals, loosen the screws. If they are spade connectors, pull them off carefully.
Don’t yank.
Once the wires are disconnected, you should be able to remove the old switch. It might unscrew, unclip, or pull out.
Step 3: Mount the New Switch
Your new universal switch might mount differently than the old one. If it’s a paddle switch designed for surface mounting, you might need to drill new holes. Or it might fit into an existing cutout.
If it’s a replacement insert, it will fit into the old switch housing.
Follow the instructions that came with your new switch for mounting. Ensure it is securely fastened. It shouldn’t wobble or move around.
Step 4: Wire the New Switch
This is the most critical step. Refer to the wiring diagram that came with your universal switch. And use the photos you took of the old wiring if needed.
Connect the wires from your saw to the corresponding terminals on the new switch.
- Line/Hot Wire: Connect to the “LINE IN” or equivalent terminal.
- Load Wire(s): Connect to the “LOAD” or “MOTOR” terminal(s).
- Neutral Wire: Connect as indicated by the switch instructions. It might go to a specific neutral terminal or bypass the switch mechanism.
- Ground Wire: Connect securely to the ground terminal on the switch.
If the switch housing is metal, ensure a good connection. Also, make sure it’s connected to the saw’s frame.
Make sure all connections are tight and secure. If you are using wire nuts for connections, ensure they are the correct size and screwed on tightly. For spade connectors, ensure they are fully seated on the terminals.
Step 5: Test the Switch
Before you put the covers back on, test the switch. Plug the saw into the outlet. Turn on the power.
Do not start cutting wood yet.
Listen for any odd noises. Try operating the “on” and “off” buttons. Does the switch engage smoothly?
Does it turn off cleanly? If you have a multimeter, you can check for continuity at different stages, but this is usually only necessary if you suspect a problem.
If everything seems to be working correctly, unplug the saw again.
Step 6: Reassemble
Put any cover panels back on that you removed. Secure them with screws. Make sure all wires are tucked away neatly and are not pinched.
Step 7: Final Test Run
Plug the saw back in. Turn it on briefly to ensure it runs. Turn it off.
Now you can try making a test cut on a piece of scrap wood. Listen to the motor. Check how the switch operates during the cut and when you turn it off.
This whole process might take an hour or two, depending on your saw and your comfort level. The most important thing is to take your time. Double-check every connection.
And prioritize safety above all else.
Installation Checklist
1. Unplug Saw
2. Remove Old Switch: Note wiring, disconnect wires.
3. Mount New Switch: Securely.
4. Wire New Switch: Follow diagram, tight connections, check ground!
5. Initial Test: Unplugged, then plugged in (no load).
6. Reassemble: Covers, screws.
7. Final Test: Test cut with scrap wood.
Troubleshooting Common Issues After Installation
Even with careful installation, sometimes things don’t work perfectly right away. Don’t panic! Most issues with a new switch are solvable.
Let’s look at some common problems and how to fix them.
The saw won’t turn on at all.
- Check power: Is the saw plugged in? Is the breaker on?
- Verify wiring: Double-check that the line (hot) wire is connected correctly. Ensure it’s going to the “LINE IN” terminal and that the load wire is on the “LOAD” terminal.
- Loose connection: Make sure all wire connections are tight. A loose wire is a common culprit.
- Faulty new switch: It’s rare, but new parts can sometimes be defective. Try testing continuity on the switch itself with a multimeter if you have one.
The saw turns on, but not reliably. It sputters or turns off immediately.
- Check load connections: Ensure the wires going to the motor are making good contact.
- Amperage mismatch: Did you accidentally use a switch with too low an amperage rating? This can cause it to overheat or fail under load.
- Wiring for the coil: If your switch has separate terminals for the holding coil, ensure these are wired correctly according to the diagram. An improperly wired coil won’t keep the switch engaged.
The saw won’t turn off.
- Off button wiring: This is almost always a wiring issue related to the “off” function of the switch. Double-check how the wires are connected to the “off” terminals or to the neutral side of the coil circuit.
- Stuck mechanism: Make sure the physical “off” button isn’t stuck or obstructed.
- Internal switch defect: If wiring is correct, the switch itself might be faulty.
The saw trips the breaker immediately.
- Short circuit: This is a serious sign. It means power is going where it shouldn’t. Carefully re-inspect all your wiring. Look for wires touching each other or touching the metal frame where they shouldn’t. Ensure no bare wires are exposed.
- Incorrect voltage: Did you connect a 120V switch to a 240V saw, or vice versa?
- Motor issue: While less likely to be caused by the switch installation itself, a fault in the saw’s motor could also cause the breaker to trip.
The switch housing feels warm.
- Normal operation: Some switches can get slightly warm during use, especially under heavy load. This is usually fine if it’s just slightly warm to the touch.
- Overheating: If it gets hot enough to be uncomfortable to touch, or if you smell burning, disconnect power immediately. This indicates an overload or a faulty connection. Re-check your amperage rating and all connections.
If you’ve gone through these troubleshooting steps and are still having issues, it might be time to call in a professional. Sometimes, the issue isn’t with the switch but with the saw’s motor or other internal wiring. Getting a second pair of eyes on it can make all the difference.
Troubleshooting Quick Tips
- No Power? Check connections and incoming power.
- Won’t Turn Off? Focus on the “off” wiring and mechanism.
- Trips Breaker? Look for short circuits or wiring errors.
- Switch Hot? Ensure proper amperage rating and check for loose connections.
Enhancing Table Saw Safety with Better Switches
A good switch isn’t just about turning your saw on and off. It’s a vital part of the saw’s safety system. Choosing and installing the right switch can significantly improve your workshop safety.
Think about the “no-volt release” feature we talked about. This prevents the saw from restarting by itself after a power outage. Many universal switches incorporate this.
Make sure yours does.
Consider a switch with a large, easy-to-hit paddle. In an emergency, you need to be able to shut off the saw instantly. A big, brightly colored paddle makes this much faster.
This is much better than fumbling for a small button. Especially when you might be startled or under pressure.
Some switches come with a lock-out key. This is a small key that you remove when the saw is off. Without the key, the saw cannot be turned on.
This is a fantastic safety feature. It prevents unauthorized use. It’s great if you have kids or pets around.
Or if you just want an extra layer of security. Some universal switches offer this option.
Think about dust protection. A switch with a good dust cover will last longer. It also means the “on” and “off” functions will remain reliable.
Sawdust can get into anything. It can jam buttons or corrode contacts. A protected switch is a more dependable switch.
And dependability is key to safety.
When installing, ensure the switch is mounted securely. A wobbly switch is not only annoying, but it could also lead to a loose connection over time. This could create a hazard.
Ultimately, a well-functioning, safely designed switch gives you peace of mind. It allows you to focus on your woodworking. Instead of worrying about the reliability of your tools.
Investing a little extra time and effort into choosing and installing the right switch is always a smart move for your workshop safety.
Frequently Asked Questions
Can I use any on/off switch for my table saw?
No. You must use a switch rated for the specific amperage and voltage of your table saw motor. Using an undersized or incorrect switch can be a fire hazard and damage your saw.
It also needs to be a momentary or latching switch designed for motor control, often with a “no-volt release” feature.
What does “universal” mean for a table saw switch?
A “universal” table saw switch means it’s designed to be adaptable to a wide range of table saws. It usually has standard wiring terminals, common mounting dimensions, and the necessary electrical ratings (voltage and amperage) to work with typical table saw motors. It’s not a one-size-fits-all solution but rather a flexible option when an exact replacement is unavailable.
My old switch had four wires. My new “universal” switch only has three. What do I do?
This often happens if your old switch was a magnetic (no-volt release) type and the new one is a simpler momentary switch or wired differently. You’ll need to carefully examine the wiring diagram for your new switch and your saw. Sometimes, one wire from the old setup might be for a separate safety interlock or a pilot light and might not be needed for the basic on/off function of the new switch.
If unsure, consult an electrician or the manufacturer of the new switch.
Is it safe to replace my table saw switch myself?
For most standard contractor-style table saws, yes, it can be safe if you follow proper procedures. The most critical steps are disconnecting power, understanding basic electrical wiring, and ensuring you use a switch with the correct voltage and amperage ratings. If you are uncomfortable with electrical work or if your saw is hardwired, it’s best to call a qualified electrician.
What is the “no-volt release” feature?
The “no-volt release” (or loss of voltage protection) is a safety feature. It ensures that the saw will not restart automatically if the power goes out and then comes back on. When power is lost, the electromagnetic switch disengages.
You must manually press the “on” button again to restart the saw. This prevents unexpected startup.
How do I know the correct amperage for my table saw switch?
The amperage requirement for your table saw switch is determined by the amperage draw of your saw’s motor. This information is usually found on a nameplate or sticker on the saw itself, typically near the motor. It will list the voltage and amperage.
You need a switch rated for at least that amperage. It’s okay for the switch to be rated higher than the motor’s draw.
Conclusion
Replacing your table saw switch might seem like a daunting task. But with the right information, it’s totally achievable. Understanding what a universal switch is, what your saw needs, and how to wire it safely will get the job done.
Always prioritize safety. Take your time. And don’t hesitate to ask for help if you need it.
A working, safe switch means you can get back to creating. Happy woodworking!