Wooden Calculator Kit: A Hands-On STEM Building Project
The Wooden Calculator Kit is a fantastic educational tool. It helps kids and adults learn math in a fun way. This kit combines learning and play, making math enjoyable.
What is a Wooden Calculator Kit?
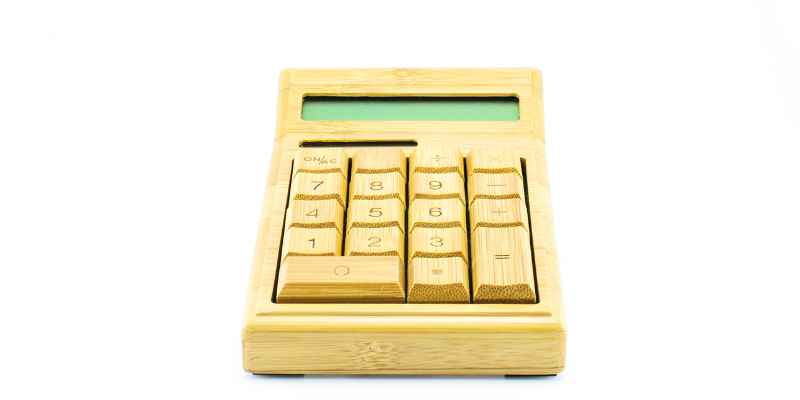
A Wooden Calculator Kit is a set of wooden pieces. These pieces fit together to make a working calculator. It’s a hands-on tool that helps understand math concepts. It is perfect for both kids and adults.
Most wooden calculator kits fall into one of two designs. The first is a bead-and-frame style, closer to a traditional abacus, where sliding beads along wooden dowels represent place value and let you add, subtract, and even multiply by moving beads in set patterns. The second is a mechanical gear-and-lever style, where laser-cut wooden gears, a ratchet, and a carry mechanism physically pass a count from one digit wheel to the next — the same basic principle used in early calculating machines like Pascal’s Pascaline, just rebuilt in plywood instead of brass. Both designs teach the same underlying lesson: a calculator doesn’t need a battery or a chip to add numbers, it just needs a mechanism that can reliably carry a value from one column to the next.
Benefits of Using a Wooden Calculator Kit
There are many benefits to using a Wooden Calculator Kit. Here are some of them:
- Interactive Learning: This kit makes learning math interactive and fun.
- Builds Fine Motor Skills: Assembling the kit helps build fine motor skills.
- Enhances Problem-Solving Skills: It encourages problem-solving and critical thinking.
- Eco-Friendly: Made from wood, it is an eco-friendly learning tool.
What’s Inside the Box: Materials and Components
Most kits ship as a flat pack of laser-cut or die-cut pieces rather than a finished object, which is part of what makes them a genuine building project instead of a pre-made toy. A typical wooden calculator kit includes:
- Precut wooden panels: usually 3mm to 5mm plywood, basswood, or MDF, cut into the frame, base, and digit-wheel or gear shapes. Pieces are often held in a punch-out sheet, similar to a model airplane kit, so you snap them out rather than saw them yourself.
- Wooden dowels or rods: thin dowels act as axles for beads or gears and as the sliding rails a bead-style calculator uses.
- Beads or gear wheels: painted wooden beads for abacus-style kits, or a set of interlocking wooden gears with a ratchet-and-pawl carry mechanism for mechanical calculator kits.
- Rubber bands or elastic cord: used in many gear-driven kits to keep tension on the carry mechanism so it resets cleanly after each digit rolls over.
- Wood glue: a small bottle of PVA (white or yellow) wood glue is usually included, though a full-size bottle from your own shop works just as well and is easier to control.
- Sandpaper: a folded sheet of fine-grit (roughly 220-grit) sandpaper for smoothing punch-out tabs and edges before assembly.
- Printed instructions: a numbered diagram sheet, since most kits rely on visual assembly order rather than long written steps.
Before starting, lay every piece out on a flat surface and match it against the parts diagram. Kits in this price range occasionally ship with a duplicate or missing piece from the die-cutting process — catching that before you start gluing saves having to back out of a half-finished joint later.
Tools You’ll Need Beyond What’s in the Box
Kits are designed to be nearly self-contained, but a few tools most woodworkers already have on hand make assembly faster and cleaner:
- A hobby knife or craft blade: for cleaning up punch-out tabs left behind when pieces are removed from the cutting sheet.
- Fine-tip tweezers: genuinely useful for placing small beads or gear pins without smearing glue on your fingers first.
- A flat, well-lit workspace: gear-driven kits especially need to be assembled on a flat surface, or the digit wheels will bind against a warped base.
- Painter’s tape or small clamps: to hold glued joints square while the glue sets, particularly on the outer frame.
- A damp cloth: for wiping excess glue squeeze-out before it dries and shows as a shiny patch.
How to Use a Wooden Calculator Kit
Using a Wooden Calculator Kit is simple and fun. Follow these steps:
- Unbox the Kit: Open the box and take out all the pieces.
- Read the Instructions: Read the instructions carefully.
- Assemble the Pieces: Start assembling the pieces as per the instructions.
- Test the Calculator: Once assembled, test the calculator to see if it works.
Common Assembly Mistakes to Avoid
The most frequent build problems aren’t about skill — they’re about sequence and patience:
- Gluing the frame before test-fitting it: dry-fit every panel first. Laser-cut plywood can vary slightly batch to batch, and a frame glued up out of square will make the digit wheels or bead rails bind later.
- Using too much glue: a thin, even line is enough for plywood joints. Excess glue squeezes into bead channels or gear teeth and can lock a moving part solid once it cures.
- Skipping the sandpaper step: punch-out tabs leave small burrs that create friction exactly where parts need to move freely — on the axles and rails.
- Forcing a tight-fitting dowel: if an axle doesn’t slide through a hole easily, sand the dowel slightly rather than pressing it through. A cracked panel from a forced fit is the most common reason a finished kit ends up with a stuck mechanism.
- Rushing the carry mechanism on gear-style kits: the rubber-band-tensioned ratchet that carries a “1” to the next digit column is the most failure-prone part of the build. Assemble it last, test it before gluing anything around it, and only glue once you’ve confirmed it resets after a full rotation.
Who Can Use a Wooden Calculator Kit?
The Wooden Calculator Kit is suitable for all ages. Here are some groups who can benefit:
- Kids: It helps kids learn math in a fun way.
- Parents: Parents can use it to teach math to their kids.
- Teachers: Teachers can use it as a teaching aid in classrooms.
- Adults: Adults who love puzzles and learning new things.
Age Range and Skill Level
Most wooden calculator kits are marketed for ages 8 and up, though the honest range depends on which style you pick. Bead-and-frame kits are simpler to assemble and are a reasonable solo project for a confident 8- to 10-year-old with occasional help. Gear-driven mechanical calculator kits involve smaller parts, a carry mechanism that needs correct tension, and more steps where a piece can go in backward — these are a better fit for a parent-and-child build, a homeschool STEM lesson with adult supervision, or an adult building it solo for the engineering challenge. Neither style requires power tools or prior woodworking experience; the main skills involved are patience, careful reading of a parts diagram, and a light touch with glue.
Why Choose a Wooden Calculator Kit?
There are many reasons to choose a Wooden Calculator Kit. Here are some:
| Reason | Description |
|---|---|
| Educational | It makes learning math fun and interactive. |
| Eco-Friendly | It is made from wood, which is good for the environment. |
| Engaging | It keeps kids engaged and interested in learning. |
| Affordable | It is a cost-effective educational tool. |
Finishing and Customizing Your Kit
Most kits arrive as bare, unfinished wood, and finishing is optional rather than required for the mechanism to work. A few realistic options once the glue has fully cured:
- Leave it natural: a light sanding with fine-grit paper after assembly is often all a kit needs — it shows off the plywood or basswood grain and keeps the piece lightweight.
- Clear finish: a wipe-on polyurethane or clear wax adds some durability and a slight sheen without adding thickness that could interfere with moving parts. Keep any finish off axles, gear teeth, and bead channels.
- Paint or stain the frame only: painting just the outer frame and base — while leaving gears, dowels, and moving parts unfinished — is a common approach that adds color without risking a sticky mechanism.
- Personalize with a marker or wood-burning tool: some builders add a name, initials, or a decorative pattern to the base panel before final assembly, when it’s easier to reach with a fine-tip marker or a woodburner.
Whatever finish you choose, let glued joints cure fully (typically about 24 hours) before applying anything liquid — a finish applied too early can seep into a joint that hasn’t set and weaken it.
Buying a Wooden Calculator Kit as a Gift
Wooden calculator kits are a popular STEM gift because they solve a problem a lot of screen-based educational toys don’t: the “aha” moment is visible. A child, or an adult, can watch a bead slide or a gear tooth engage and see exactly why the number changes, instead of trusting a chip they can’t see inside. When choosing one as a gift, check three things on the listing: the stated age range, whether it’s bead-style or gear-driven (gear kits tend to suit someone who already enjoys puzzles or model-building), and whether replacement parts or a digital instruction sheet are available in case a small piece goes missing after unboxing. A tube of extra wood glue and a small clamp make a thoughtful add-on gift alongside the kit itself, since most kits include only enough glue for one careful build.
Frequently Asked Questions
What Is A Wooden Calculator Kit?
A Wooden Calculator Kit is a DIY project that allows you to build a functioning calculator from wooden components.
How Does A Wooden Calculator Kit Work?
It includes pre-cut wooden parts and electronic components. Assemble them to create a working calculator.
Who Can Use A Wooden Calculator Kit?
Anyone interested in DIY projects and learning about electronics can use it. Suitable for kids and adults.
What Skills Are Needed To Assemble It?
Basic understanding of electronics and assembly is helpful. Instructions are usually included.
Conclusion
The Wooden Calculator Kit is an amazing tool. It makes learning math fun and interactive. It is perfect for kids, parents, teachers, and even adults. It is eco-friendly, affordable, and engaging. So why wait? Get your Wooden Calculator Kit today and start learning math in a fun way!
Sponsored / affiliate links. As an Amazon Associate I earn from qualifying purchases. I may earn additional commission from eligible campaigns.