4 Wood Fence Ideas: Proven & Essential
Looking for simple, essential wood fence ideas? This guide breaks down four popular, beginner-friendly designs that add beauty and privacy to your yard. Learn about the Stringer, Picket, Louvered, and Board on Board styles, with tips on choosing the best fit for your needs and budget.
Building a fence can feel like a big project, especially if you’re new to DIY. You want something that looks great, keeps things secure, and lasts for years. But with so many styles out there, how do you pick the right one? It’s easy to get overwhelmed! Don’t worry, though. I’m here to help you navigate these choices with clear, simple ideas that are proven and essential for any homeowner. We’ll explore four fantastic wood fence styles that are perfect for beginners. By the end of this, you’ll feel confident in choosing and even planning your new fence.
Choosing Your Wood Fence: What to Consider
Before we dive into specific fence ideas, let’s talk about what makes a wood fence a good choice and what you should think about before you start. Wood offers a natural beauty and warmth that other materials just can’t match. It’s also often more affordable and easier to work with for DIY projects. However, wood does require some maintenance to keep it looking its best and to prevent rot and insect damage. Understanding your local climate and the type of wood you’ll use is key.
Durability and Maintenance
Wood fences can last for many years, but their lifespan depends on the type of wood, how it’s treated, and the environmental conditions. Some woods, like cedar and redwood, are naturally resistant to rot and insects. Others, like pine or fir, are more affordable but require sealing or staining to protect them. Regular cleaning, checking for loose boards, and reapplying protective coatings are essential maintenance tasks. For a good overview of wood types and their properties, the Forest Products Laboratory offers valuable, in-depth information on wood characteristics.
Privacy Needs
How much privacy do you need? Some fence styles offer complete privacy, while others allow for light and air to pass through. Think about whether you want to block views from neighbors, keep pets or children contained, or simply create a peaceful outdoor space. Your privacy needs will heavily influence which fence style is best for you.
Aesthetics and Style
Your fence is a significant part of your home’s curb appeal. It should complement your house and landscape. Consider the overall look you’re trying to achieve—classic, modern, rustic, or something else. The wood grain, stain color, and fence design all play a role in its visual impact.
Budget
Wood fence costs can vary widely depending on the type of wood, the complexity of the design, and the amount of labor involved. While some basic styles are very budget-friendly, more elaborate designs or premium woods will naturally cost more. Planning your budget early helps narrow down your options.
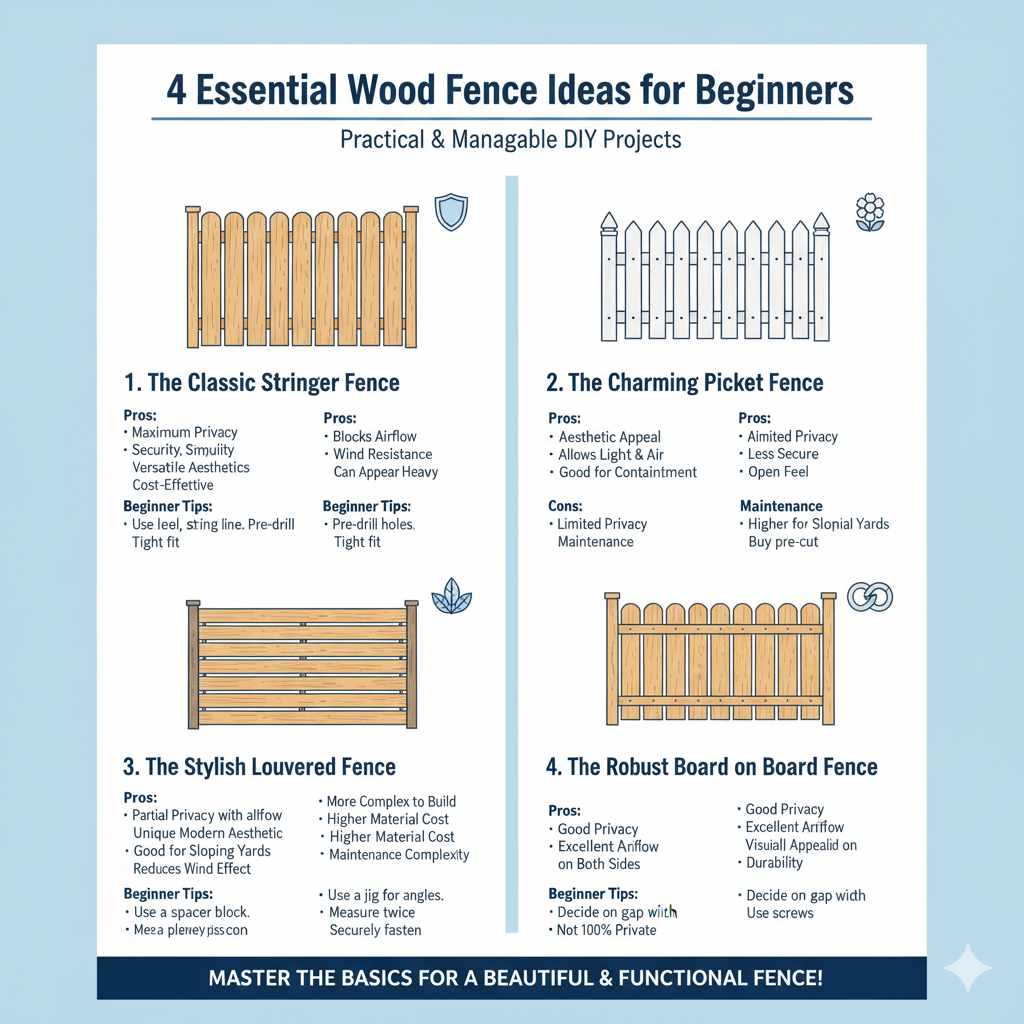
4 Essential Wood Fence Ideas for Beginners
Now, let’s explore four fantastic wood fence ideas that are perfect for DIYers. These are popular for a reason: they’re practical, look great, and are manageable for those with basic woodworking skills.
1. The Classic Stringer Fence
The Stringer fence, often called privacy fencing, is perhaps the most common and recognizable wood fence style. Its defining feature is that the vertical fence boards (pickets) are placed side-by-side, touching each other without any gaps, offering maximum privacy. This design is straightforward to build for beginners and provides a clean, uniform look.
How it Works:
This fence consists of vertical boards attached to horizontal rails (stringers) that are supported by fence posts. Because the boards are installed so closely together, they block most views and create a solid barrier.
Pros:
- Maximum Privacy: No gaps mean complete visual screening.
- Security: Creates a strong barrier for pets and children.
- Simplicity: Relatively easy for beginners to construct.
- Versatile Aesthetics: Can be stained or painted to match any home style.
- Cost-Effective: Often one of the most budget-friendly options.
Cons:
- Blocks Airflow: Can trap heat and humidity.
- Wind Resistance: Solid panels can catch strong winds if not properly braced.
- Can Appear Heavy: Some find the solid block less visually appealing than styles with gaps.
Beginner Tips:
When installing boards, use a level to ensure they are perfectly vertical. A string line can help keep your top edge straight. For a professional finish, ensure the boards are tightly butted against each other. You can pre-drill holes for screws to prevent the wood from splitting, especially near the ends of the boards. For more on fence construction best practices check out this guide from Popular Mechanics.
2. The Charming Picket Fence
The Picket fence is a timeless classic, evoking a sense of quaintness and charm. It’s characterized by evenly spaced vertical pickets that are usually topped with a decorative shape, like a dog-ear, gothic, or French gothic point. While often associated with decorative front yards, a well-built picket fence can also offer a good degree of enclosure for backyards.
How it Works:
Similar to the Stringer fence, pickets are attached to horizontal rails. However, the key difference is the gaps left between each picket. These gaps allow for light, air, and a softer visual presence.
Pros:
- Aesthetic Appeal: Offers a classic, welcoming look that enhances curb appeal.
- Allows Light and Air: Doesn’t create a solid, imposing barrier.
- Good for Containment: Effective for keeping small pets and children within a defined area.
- More Open Feel: Visually less heavy than a solid privacy fence.
Cons:
- Limited Privacy: Gaps mean views are not completely blocked.
- Less Secure: Not ideal for significant security needs or keeping out larger animals.
- Maintenance: Each picket needs individual attention during maintenance.
Beginner Tips:
Consistency is key with picket fences. Use a spacer block to ensure uniform gaps between pickets and a level to keep them plumb. Measure carefully to determine the number of pickets needed for each section. You can buy pre-cut pickets with decorative tops for a professional look without the intricate cutting. Attaching the pickets with screws is generally more durable than nails.
3. The Stylish Louvered Fence
For a modern and sophisticated look, the Louvered fence is an excellent choice. This design features boards angled like window blinds (louvers), allowing for airflow and some light while maintaining a good level of privacy. It’s a more advanced beginner project, but the unique look is well worth the effort.
How it Works:
In a Louvered fence, the boards are angled and mounted between two vertical stiles. The angle of the boards can be adjusted to control the degree of privacy and visibility. Some designs may have fixed angles, while others allow for adjustable louvers.
Pros:
- Partial Privacy with Airflow: Offers a balance between privacy and ventilation.
- Unique, Modern Aesthetic: Stands out from traditional fence designs.
- Good for Sloping Yards: Can be adapted to sloped terrain more easily than some styles.
- Reduces Wind Effect: Angled boards can help deflect wind, reducing pressure on the fence.
Cons:
- More Complex to Build: Requires more precise measurements and angles.
- Higher Material Cost: Often requires more wood due to the angled cuts and framing.
- Limited Privacy: Not suitable for those requiring complete visual blockage.
- Maintenance Complexity: Cleaning between angled boards can be more challenging.
Beginner Tips:
Using a jig for consistent angles on your louvers is highly recommended. Measure twice, cut once, especially for angled cuts. Ensure your stiles are plumb and the louvers are securely fastened to them. Consider using weather-resistant screws for longevity. For DIYers looking to tackle more complex projects, resources that explain joinery techniques, like those found on Woodsmith, can be very beneficial.
4. The Robust Board on Board Fence
The Board on Board fence, also known as shadowbox fencing, is a variation of the privacy fence that offers more ventilation and a lighter appearance while still providing excellent privacy. It’s built by alternating boards on opposite sides of the fence rails, creating an attractive overlap effect.
How it Works:
For each fence section, boards are attached to the rails, leaving a small gap. Then, on the opposite side of the rail, another board is attached to overlap the gap of the first board. This “board on board” arrangement results in a fence that looks solid from both sides but allows air to flow through the alternating gaps.
Pros:
- Good Privacy (from most angles): Offers a high degree of privacy without being a solid wall.
- Excellent Airflow: The staggered boards allow wind to pass through, reducing pressure.
- Visually Appealing on Both Sides: Unlike a traditional privacy fence, both sides have a finished look.
- Durability: The overlapping design can add structural integrity.
Cons:
- Higher Material Cost: Uses more wood than a standard privacy fence because boards are used on both sides.
- More Labor Intensive: Requires more time and precision to install the overlapping boards.
- Not 100% Private: While very private, slight gaps can still allow some visibility at direct angles.
Beginner Tips:
The key to a successful Board on Board fence is consistent spacing. Decide on the width of your gaps and the amount of overlap before you start. Use a jig or spacer blocks to maintain uniformity. Ensure your rails are level and your posts are plumb. This style looks particularly good with wider fence boards.
Wood Fence Materials Comparison
Choosing the right wood is crucial for your fence’s longevity and appearance. Here’s a quick comparison of some common options:
| Wood Type | Natural Durability (Rot/Insect Resistance) | Cost | Maintenance Level | Best For |
|---|---|---|---|---|
| Cedar | High | Medium to High | Low (recommended sealing for color retention and extra protection) | All fence styles, especially where natural beauty and longevity are priorities. |
| Redwood | Very High | High | Low (similar to cedar) | Premium fences, coastal areas, and where extreme longevity is desired. |
| Pressure-Treated Pine | Low to Medium (enhanced by treatment) | Low to Medium | Medium (requires regular sealing/staining) | Budget-friendly fences, stringer and picket styles. Requires careful handling due to chemicals. |
| Douglas Fir | Medium | Medium | Medium (benefits greatly from staining/sealing) | Sturdier fences, often used for structural elements, can be a good option for all styles. |
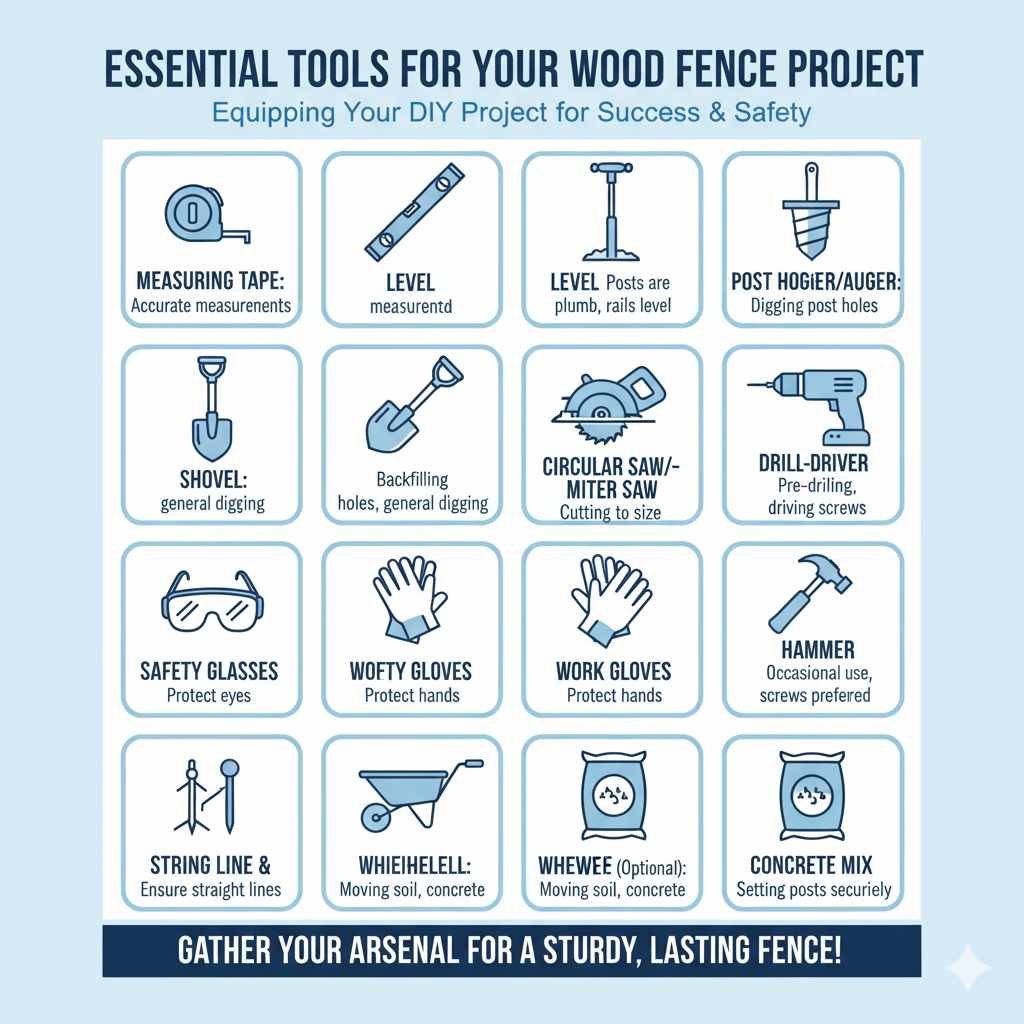
Essential Tools for Your Wood Fence Project
Gathering the right tools makes your DIY fence project smoother and safer. Here are some essentials:
- Measuring Tape: For accurate measurements of posts, rails, and boards.
- Level (4-foot or 6-foot): To ensure posts are plumb and rails are level.
- Post Hole Digger or Auger: For digging holes for fence posts.
- Shovel: For backfilling post holes and general digging.
- Circular Saw or Miter Saw: For cutting wood to size. A miter saw offers more precise angle cuts.
- Drill/Driver: For pre-drilling holes and driving screws.
- Safety Glasses: Essential for protecting your eyes from sawdust and debris.
- Work Gloves: To protect your hands.
- Hammer: For occasional use, though screws are often preferred for durability.
- String Line and Stakes: To ensure straight fence lines.
- Wheelbarrow: For moving soil, concrete, or gravel.
- Concrete Mix (optional): For setting posts securely. Use Building Science Corporation’s guidance on proper material selection and installation if considering concrete.
FAQ: Your Wood Fence Questions Answered
Q1: How deep should I dig my fence post holes?
A1: Generally, post holes should be dug to a depth of about one-third of the post’s total length, plus an extra 6 inches for gravel at the bottom. For a 6-foot fence, a 2-foot to 2.5-foot deep hole is standard for each 8-foot post. Always check local building codes for specific requirements.
Q2: How far apart should fence posts be?
A2: For most wood fences, fence posts are typically spaced 6 to 8 feet apart. The exact spacing depends on the height and style of the fence, as well as the strength of your posts and rails. Closer spacing adds strength.
Q3: What’s the easiest wood fence style for a beginner?
A3: The Classic Stringer (privacy) fence is widely considered the easiest for beginners. It involves attaching vertical boards side-by-side to horizontal rails, making the construction process straightforward and forgiving.
Q4: Do I need to seal or stain my wood fence?
A4: It’s highly recommended, even for naturally resistant woods like cedar or redwood. Sealing or staining protects the wood from UV rays, moisture, and helps prevent graying and warping, significantly extending the fence’s lifespan and maintaining its color.
Q5: How can I make my wood fence last longer?
A5: Proper installation is key: use rot-resistant wood or pressure-treated lumber, ensure posts are set deep enough and ideally in gravel for drainage, and keep the bottom of the fence boards a few inches off the ground. Regular cleaning and a fresh coat of stain or sealant every 2-3 years will also help.
Q6: Can I build a fence on a slope?
A6: Yes, you can build a fence on a slope. The most common methods are a “stair-step” fence, where panels are built level and then stepped up or down the slope, or a “rfloor” fence, where the top line of the fence follows the contour of the land, meaning posts will be at different heights relative to the ground. Stair-step is generally easier for beginners.
Conclusion
Choosing the right wood fence design is an exciting step towards enhancing your home’s outdoor space. Whether you opt for the complete privacy of a Stringer fence, the timeless charm of a Picket fence, the modern airflow of a Louvered design, or the attractive duality of a Board on Board fence, each offers unique benefits. With these proven and essential ideas, a clear understanding of your needs, and a bit of preparation, you can confidently tackle your DIY fence project. Remember to prioritize safety, use good materials, and enjoy the rewarding process of building something beautiful and functional that you can be proud of for years to come.