DIY Frame Wood: Simple Steps to Craft Beautiful Frames
Creating your own wooden frames can be a fun and rewarding project. It allows you to add a personal touch to your home decor.
Wooden frames are versatile and can fit any style. You can customize them to match your taste and the theme of your room. Whether you are a beginner or an experienced DIY enthusiast, making wooden frames is a great way to practice your skills.
Plus, it can be more cost-effective than buying pre-made frames. In this blog post, we will explore the basics of DIY wooden frames. You will learn about the materials you need, the steps involved, and some tips to ensure your frames turn out beautifully. Let’s get started on this creative journey!

Credit: thistlewoodfarms.com
Choosing The Right Wood
Pine is a soft wood. It is easy to cut and shape. Oak is a hard wood. It is very strong and durable. Maple is also hard. It has a fine grain. Cedar is soft and has a nice smell. Plywood is made from thin wood layers. It is strong and cheap.
High-quality wood has no cracks or knots. It is smooth and even. Low-quality wood has many defects. It might be rough. Always check the wood before buying. Good wood makes strong frames. Bad wood can break easily.

Credit: www.younghouselove.com
Gathering Essential Tools
Start with a hammer and nails. These are important for joining wood pieces. Get a measuring tape to ensure accurate cuts. A saw is needed to cut wood. Use a screwdriver for screws. Sandpaper will smooth out rough edges. Always wear safety goggles to protect your eyes.
A miter saw helps with precise angled cuts. Use a power drill for quicker and easier drilling. A clamp holds wood pieces together while you work. Wood glue ensures strong joints. A router is useful for decorative edges. Keep a level to make sure everything is straight.
Measuring And Cutting Wood
Start by gathering your tools. You need a measuring tape, pencil, and square. Measure the wood carefully. Mark the spots with a pencil. Precision is key. Double-check each measurement. Ensure your marks are clear and visible. Accuracy helps in getting a perfect fit. Measure twice, cut once. This saves time and avoids errors.
Use a saw for cutting. A hand saw or power saw works best. Hold the saw steady. Follow the pencil marks carefully. Cut slowly to avoid mistakes. Keep fingers away from the blade. Safety is important. If using a power saw, wear eye protection. Smooth the edges with sandpaper. This gives a clean finish. Repeat these steps for all pieces.
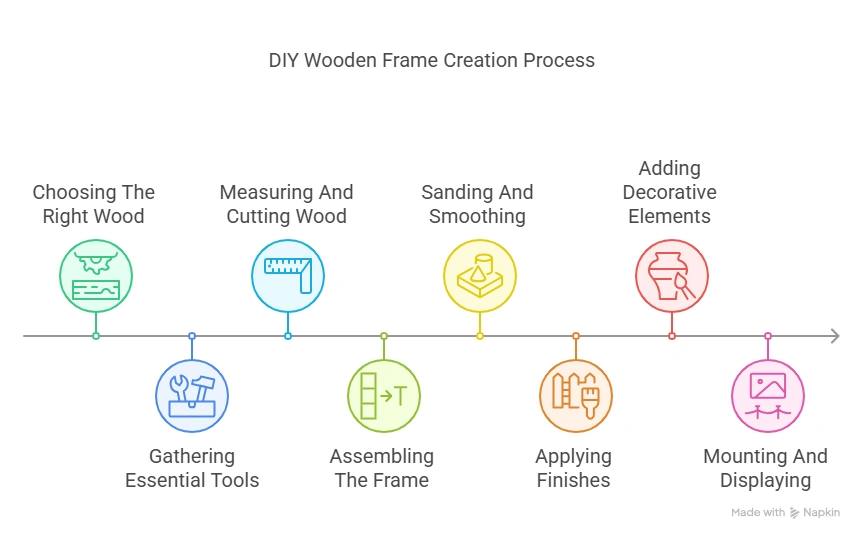
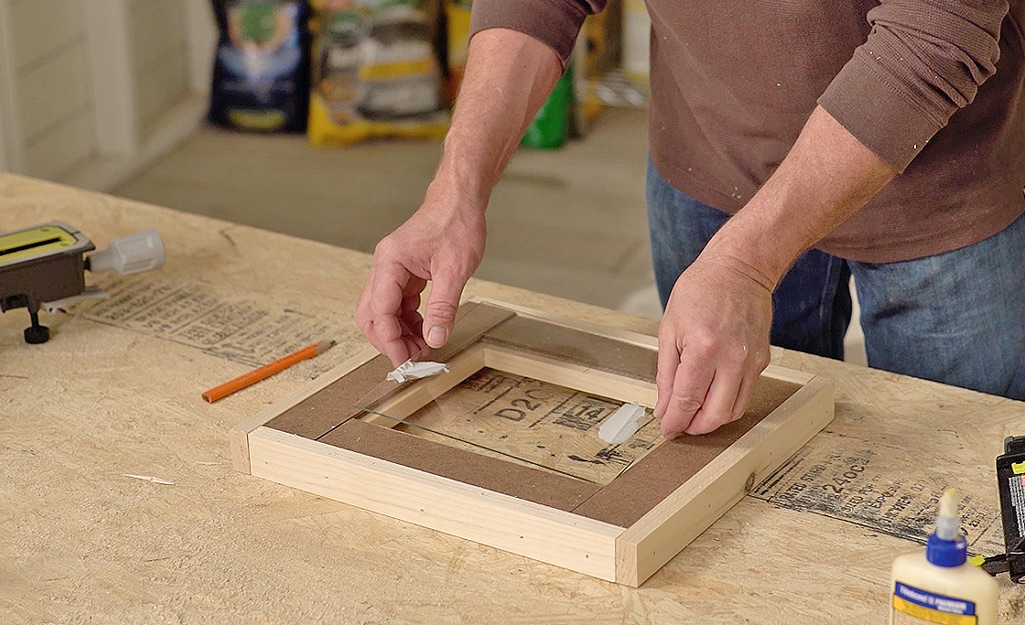
Assembling The Frame
Use different joining methods for the frame. Try butt joints or miter joints. Butt joints are simple. Cut wood pieces to the same length. Glue and nail them together. Miter joints need more precision. Cut wood ends at 45 degrees. Glue and clamp them tightly.
Secure the joints well. This keeps the frame strong. Use wood glue. It holds pieces together. Apply glue evenly on the joints. Press and hold the parts firmly. Let the glue dry.
Add nails or screws for extra strength. They help in keeping the joints tight. Pre-drill holes before using screws. This stops the wood from splitting.
Sanding And Smoothing
Use a sanding block or an electric sander. Start with coarse sandpaper. This helps to remove rough spots. Move to finer sandpaper for a smooth finish. Sand in the direction of the wood grain. This prevents scratches. Make sure to keep the pressure even. Light pressure works best.
Focus on the edges of the wood. Round them off gently. This makes the frame safe to handle. Use finer sandpaper for the edges. Smooth edges give a professional look. Check for splinters and remove them.
Credit: www.homedepot.com
Applying Finishes
Staining wood gives it a rich color. First, clean the wood surface. Sand it lightly to remove rough spots. Apply the stain with a brush or cloth. Wipe off excess stain with a clean rag. Let it dry for several hours. Check the color. Add another coat if needed. Always work in a well-ventilated area. Use gloves to protect your hands.
Varnish protects the wood from scratches. Stir the varnish gently. Do not shake it. Apply a thin coat with a brush. Let it dry for several hours. Sand the surface lightly between coats. Apply 2-3 coats for best results. Work in a dust-free area. Clean brushes with mineral spirits. Store varnish in a cool, dry place.
Adding Decorative Elements
Choose a color that fits your room. Clean the wood frame well before painting. Sand the surface to make it smooth. Use a primer to help the paint stick. Let the primer dry fully. Apply the first coat of paint. Allow it to dry completely. Add more coats if needed. Each coat should dry before adding another.
Use small decorative items to enhance the frame. Glue beads, buttons, or small flowers. Attach ribbons or lace for a soft touch. Stickers or decals can add fun designs. Ensure everything is securely fixed. Mix different elements for a unique look. Be creative but keep it simple.
Mounting And Displaying
Use sturdy screws or nails to mount the frame. Choose the right size for your wall. Drywall anchors can help if the frame is heavy. Hooks are another option. They make the frame easy to hang. Make sure the frame is level. Use a small level tool to check. Double-check the frame’s position before making holes.
Gallery walls look great with multiple frames. Arrange them in a pattern. Mix different sizes and styles. Shelves can also display frames. Lean them against the wall. Change them often for a new look. Mantels are perfect for frames. Add other items like candles. Your frame will stand out more. Corners can hold small frames. Use them to brighten up the space.
Frequently Asked Questions
What Wood Do I Need To Make A Frame?
Use hardwoods like oak, maple, or walnut for durable and sturdy frames. Pine and poplar are budget-friendly options.
How Do You Make A Simple Wooden Frame?
Cut four pieces of wood to desired frame size. Use wood glue and clamps to join corners. Let dry. Sand edges smooth.
What Is The Best Cheap Wood For Picture Frames?
Pine is the best cheap wood for picture frames. It’s affordable, easy to work with, and widely available.
What Kind Of Wood Is Used For Picture Frames?
Hardwood types like oak, walnut, and maple are commonly used for picture frames. Softwoods like pine are also popular.
Conclusion
Creating your own wood frame is truly rewarding. It adds a personal touch to your space. Plus, it’s a fun project that doesn’t require expert skills. Gather your materials, follow simple steps, and you’ll have a beautiful frame. Enjoy the process and the results.
Your creativity will shine through every piece you make. Happy crafting!