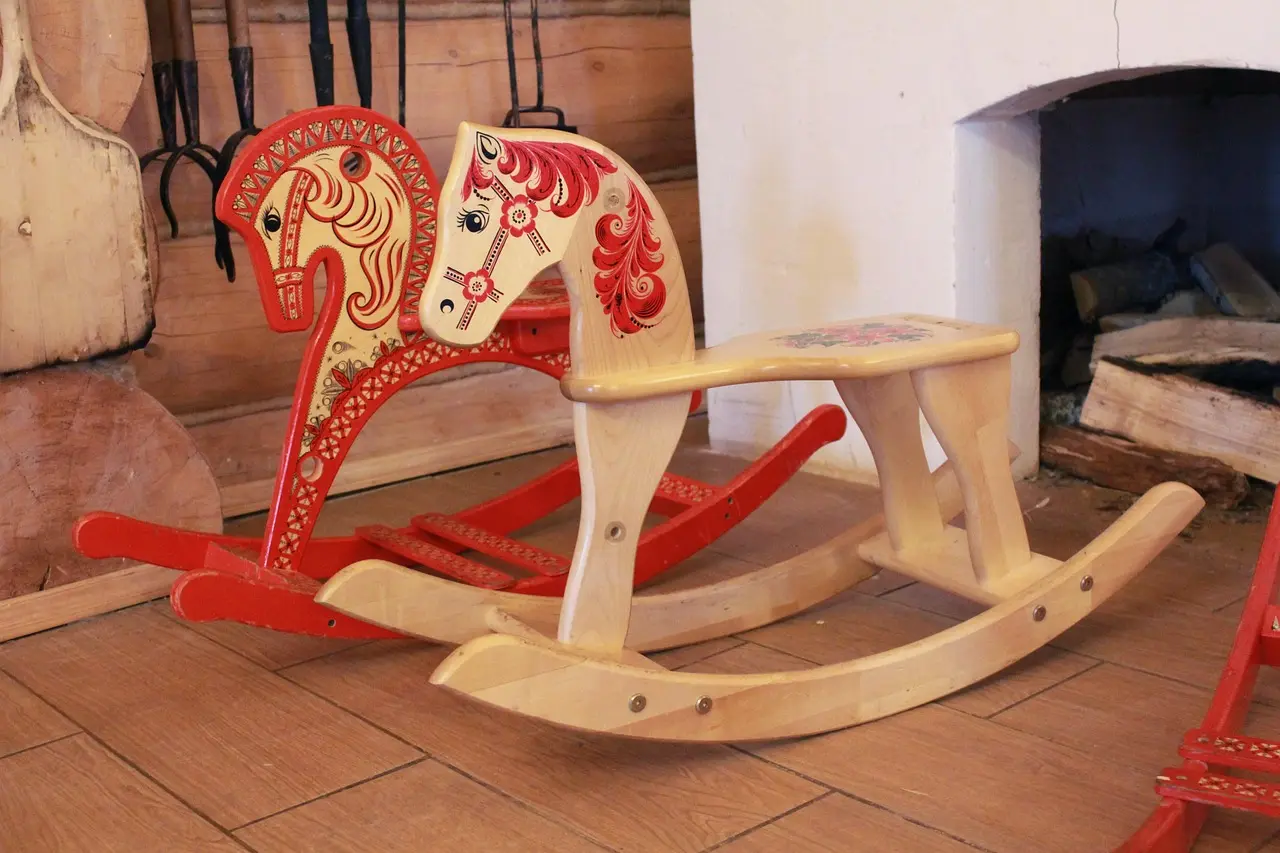
How to Build a Rocking Horse: Step-by-Step
Build a rocking horse by choosing one of two paths: a beginner flat-sided pattern with about 3/4-inch plywood and simple cutouts, or a sculpted heirloom-style build in hardwood with laminated curves and turning. Poor proportions or weak joints can make a toy tippy, uncomfortable, or unsafe for a child. This guide compares both options, then covers parts, materials, joinery, sanding, assembly, and safety checks before you cut wood.
Which build path should you choose?


If you want the safest first project, start with the flat-sided plywood horse. It is easier to lay out, faster to cut, and simpler to keep symmetrical. Choose the sculpted solid-wood version only if you are ready for more shaping, more tool setup, and more time at the bench.
Beginner flat-sided plywood horse
This version uses mirrored side panels, a seat, rockers, and a few spacers or cleats. The body stays visually simple, which helps you keep both sides matched and the center of gravity predictable. It is the better choice when your goal is a child-safe toy with fewer shaped parts, and it fits the beginner path that rewards careful layout over carving skill.
Sculpted solid-wood heirloom horse
This version uses thicker lumber, carved contours, and more refined curves in the head, neck, body, and rockers. It looks closer to a traditional heirloom toy, but the shaping demands more skill and more careful grain selection. Denser woods generally suit this path better than soft, lightweight stock.
How skill, tools, and time differ
The flat-sided build asks for careful measuring and accurate assembly, not advanced carving. The heirloom build asks for both. If you have a band saw, jigsaw, router, drill press, rasps, and gouges, the sculpted path becomes more realistic; without them, the plywood version is the safer choice.
Rocking horse decision table
This table compares the two build paths side by side so you can pick a realistic project before cutting wood. Costs vary by region and lumber grade, so use the figures as planning ranges, not quoted prices. For safety-minded sizing, many small horses land around a 10- to 12-inch seat height and a rocker radius in the roughly 24- to 30-inch range, depending on rider age and body length.
| Build path | Skill level | Estimated lumber cost | Tool list | Build time | Joinery | Finish | Child age range | Common failure risks |
|---|---|---|---|---|---|---|---|---|
| Beginner flat-sided plywood horse | Beginner to intermediate | Low to moderate; plywood and small hardwood parts | Jigsaw or band saw, drill, router, clamps, sander | Shorter; layout and assembly take the lead | Glue, wood screws, dowels, optional biscuit joints | Paint, shellac, or acrylic varnish | Best for younger riders when sized correctly and supervised | Wobble from uneven rockers, tipped seat placement, loose fasteners, mismatched sides |
| Sculpted solid-wood heirloom horse | Intermediate to advanced | Moderate to higher; denser hardwood stock | Band saw, router, drill press, rasps, gouges, clamps | Longer; shaping and fitting take more time | Dowels, glue, epoxy where appropriate, screws, clamps, biscuit joints | Tung oil, shellac, stain/finish combo, or varnish | Best for older children when the size and rocker span match the rider | Overcarving, grain tear-out, misaligned rockers, heavy parts that shift balance |
What wood and parts do you need?
Choose wood for the build path, not for looks alone. Fir and pine are easier to work for a beginner body, while tulip wood, cherry, birch, and oak are better choices when you want more wear resistance and a cleaner finished surface. The closer the material matches the design, the easier it is to keep the horse stable.
Best species for each build path
For the plywood version, Baltic birch is a strong option because it stays flat and holds fasteners well. For the sculpted build, birch, cherry, or oak give you more durability and a more refined finish quality. Pine and fir work for lower-stress parts, but they dent more easily. Fine Woodworking’s general furniture guidance on stiffness, movement, and fastener holding is a better reference here than casual toy lists, especially when the rider’s weight must stay centered.
Body panels, rockers, saddle, mane, and tail
The body panels should come from a template-based layout so both sides match. Sand the edges before assembly so you are not fighting rough edges during glue-up. Rockers are curved base pieces, and they must match the horse size and rider weight. Install them after the body shape is complete. For a small child’s toy, a 10- to 12-inch seat height and a broad, smooth rocker curve are common practical targets; that keeps the center of gravity low enough for predictable motion.
The seat or saddle must fit the child, not just the horse. It can be leather or upholstered, but it should be secured with screws and glue, and its position changes the balance point. Mane and tail are decorative, but they help the toy feel finished. Real hair, cord, yarn, or carved detail all work.
Fasteners, glue, epoxy, and clamps
Use dowels for alignment, wood screws for mechanical holding power, glue for long-term bond strength, clamps for pressure, and epoxy only where extra gap-filling or reinforcement is needed. Biscuit joints can help register pieces, but they do not replace proper layout. Fasteners should match the thickness of the parts, not guesswork. For toy safety, it is also worth checking CPSC guidance on smooth edges, pinch points, and secure attachments before final assembly.
How do you size the horse and rockers?
Start with the rider, then size the horse around that rider. The body, seat, and rocker curve all affect balance. A horse that is too tall, too narrow, or too short in the rocker span can tip easily or feel awkward when the child climbs on.
Template-based body layout and symmetry
Lay out the body on full-size templates so the left and right sides mirror each other. Mark centerlines on every major part before cutting. That makes it easier to keep the head, legs, seat, and rocker mounting points aligned so the horse tracks straight instead of leaning.
Rocker curve, height, and spacing
The rockers must be sized to the horse and the rider’s weight. They should be attached only after the body shaping is done, because their position depends on the finished center of gravity. Curved runners that are too flat reduce motion; runners that are too aggressive can feel unstable. A practical starting point is a gentle rocker radius in the 24- to 30-inch range, with spacing wide enough to prevent side-to-side tippy motion.
A common first-timer mistake is building a handsome body and then attaching rockers that are too narrow. The horse may look right but feel nervous under a child’s weight. If that happens, the safest fix is to redesign the rocker width and mounting points, not to shave random material from one end.
Seat position and rider balance
Set the seat where the rider’s weight lands between the rockers, not behind them. A seat placed too far back can make the front lift, while one placed too far forward can load the nose and change the motion. Fit matters as much as appearance. A seat height around 10 to 12 inches from the floor is a useful starting range for younger children, though body size and rocker shape still drive the final decision.
How do you cut and shape the parts?
Cut the body in stages. Rough out the panels first, then refine the curves. On the sculpted build, shape the head, neck, and legs after the main blanks are stable and square. Keep the two sides matched at every step, because symmetry is what keeps the horse balanced.
Body panels from plywood or solid stock
For plywood, trace the full-size pattern onto the sheet, rough cut it with a jigsaw or band saw, and refine the edge with a router and flush trim bit. Fine Woodworking-style methods favor clean templates, secure clamping, and final fairing over forcing a cut. That is better advice than relying on hobby-blog shortcuts when the goal is a stable child-safe toy.
For solid stock, glue up wider blanks if needed before cutting the profile. Denser woods take longer to shape but reward you with cleaner edges and better wear resistance. Keep the grain direction in mind so the legs, neck, and rockers do not split under load.
Head, neck, legs, and rocker blanks
The seminar source shapes the horse head with carbide grinding tools, coping saws, hand gouges, and contour rasps. That tool mix is a good guide for the heirloom path, where carving matters. For the beginner path, a simpler outline with eased edges usually delivers a safer and more manageable result.
Using a band saw, jigsaw, router, and rasps
Use the band saw or jigsaw for rough cutting, the router for cleaning edges and copying matching parts, and rasps or gouges for final shaping. A drill press helps keep holes square. If your bit wander is hard to control, stop and reset the layout before you create a crooked hole that throws off the build.
- Mark the centerline on every major part.
- Cut the side panels or blanks slightly oversize.
- Shape matching parts together so they stay symmetrical.
- Dry-fit the saddle, rockers, and cleats before glue.
- Drill final holes only after the parts are aligned.
How do you assemble it without wobble?
Assemble the horse in a dry fit first, then glue and fasten only after alignment checks pass. Wobble usually comes from a twisted body, a rocker that sits unevenly, or a seat mounted off center. Clamp the frame square before the glue cures, and do not attach the rockers until the body is shaped.
Dowel, biscuit, screw, and glue choices
Dowels help register parts and resist shifting, screws add holding power, glue spreads the load, and biscuit joints help align broad faces. Use all of them only where the design needs them. Good toy-building practice is to size pilot holes to the screw and hardwood density, then verify that the joint closes without forcing. That approach keeps the cleats from splitting and the body from creeping out of square.
Clamping square and checking alignment
Clamp from several directions so the body stays square while the adhesive sets. Check both diagonals and confirm the rockers sit flat on the floor. If the horse rocks side to side when unloaded, fix the mounting points before moving on to finish work. Even a small twist in the base can show up as a persistent lean after finish cures.
Attaching the rockers after shaping
Attach the rockers after the body shaping is complete so you can place them with the final center of gravity in view. Their curve and spacing are critical to stability and motion. If one rocker is slightly out of line, the horse may drift or feel unstable under a rider. This is the step where careful measuring matters more than speed.
How do you finish and safety-check it?
Sand before finishing and again after the main assembly if any joints need touch-up. Choose a finish that fits the wood and the use. For a child’s toy, the coating should be durable, smooth, and fully cured before riding. Safety checks matter as much as the surface sheen.
Sanding before finish and assembly touch-up
Break all sharp edges, smooth the seat, and remove glue squeeze-out before finish work. Sanding is not just cosmetic here; it reduces splinters and makes edges less likely to catch small hands. If you sand after assembly, keep the abrasive off decorative details you want to preserve.
Tung oil, shellac, stain, varnish, or paint
The finish step in the seminar includes tung oil on the completed horse. That is a good option for a natural-wood look. Shellac dries fast, acrylic varnish gives a tougher protective film, and a stain/finish combo adds color. Paint works well on plywood builds where you want an even appearance and easier cleanup.
Use finish materials that suit the toy’s wear. For a hard-riding child, film finishes usually resist handling better than a light oil alone. For the heirloom path, a thin oil under shellac or varnish can preserve the look of the grain while adding protection.
Mane, tail, and child-safety checks
Add the mane and tail during finishing, not before the rough work is done. Yarn, cord, carved detail, or real hair can all work if they are fastened securely and do not leave loose ends where fingers can catch. The decoration is optional; the safety check is not.
Check the final horse for tipping, loose screws, rough edges, and a seat that fits the intended age. CPSC toy safety standards emphasize secure attachments, smooth surfaces, and hazard-free finishes, while commercial spring-horse guidance such as Radio Flyer’s age ranges is only a rough reminder that the rider must match the toy. The same principle applies here: match the build to the child and supervise use.
Say your flat-sided horse feels steady on the bench but tips forward once a 4-year-old climbs onto the saddle. The likely issue is seat position, not finish quality. Move the rider’s mass back within the frame and recheck the rocker spacing before calling the project done.
Frequently asked questions
How to build a rocking horse out of wood
Build a wooden rocking horse by laying out mirrored side panels, cutting the body and rockers from suitable stock, shaping the head and seat area, then joining the parts with glue and fasteners. Finish by sanding, applying a child-safe coating, and checking balance, fastener tightness, and rider fit.
What is the best wood to make a rocking horse?
For a beginner build, Baltic birch plywood is often considered a strong choice because it is stable and easy to pattern-cut. For a sculpted heirloom build, birch, cherry, or oak are better if you want durability and a finer finish. Fir and pine work, but they dent more easily.
How to make a rocking horse diaper cake
A diaper cake is a baby-shower craft, not a woodworking project, but you can still make a horse-themed display by stacking rolled diapers around a cardboard core. If you want a reusable gift, build the wooden rocking horse and place the diaper cake beside it as party decor.
Sponsored / affiliate links. As an Amazon Associate I earn from qualifying purchases. I may earn additional commission from eligible campaigns.