DIY Wood Deck: Proven Effortless Build
Build your dream do it yourself wood deck with this easy-to-follow guide. We break down every step, from planning to finishing, using simple techniques and common tools. Achieve a beautiful, sturdy deck that enhances your home without the stress.
Dreaming of a beautiful outdoor space to relax and entertain? A backyard deck is a fantastic way to extend your living area and increase your home’s value. But if you’re new to DIY projects, the idea of building a deck might seem a bit daunting. You might worry about complicated steps, special tools, or ending up with a wobbly structure. Don’t let that stop you! This guide is designed to make building your do it yourself wood deck an enjoyable and rewarding experience. We’ll walk you through everything, from picking the perfect spot to putting on the final touches, all in simple, easy-to-understand steps. Get ready to build!
Your Dream Deck: Planning for Success
Before we even pick up a hammer, great decks start with a solid plan. Taking a little time upfront will save you headaches later. Think about how you want to use your deck. Will it be for quiet morning coffee, lively summer barbecues, or a place for kids to play? This will help you decide on the size, shape, and features like built-in seating or planters.
1. Location, Location, Location!
Consider where your deck will sit. Does it connect to your kitchen or living room for easy access? Think about the sun and shade patterns throughout the day. You’ll want to enjoy your deck when you want to, whether that’s basking in the sun or relaxing in the shade.
2. Size and Shape
Measure your available space. Most local building codes have regulations about deck size, especially if it’s attached to your house. A simple square or rectangle is the easiest for beginners. More complex shapes can be tackled later as your skills grow.
Always check local building codes and permit requirements before you start. Many areas require permits for deck construction, even for DIY projects. The U.S. Consumer Product Safety Commission offers valuable guidance on deck safety, including information on permits and construction best practices.
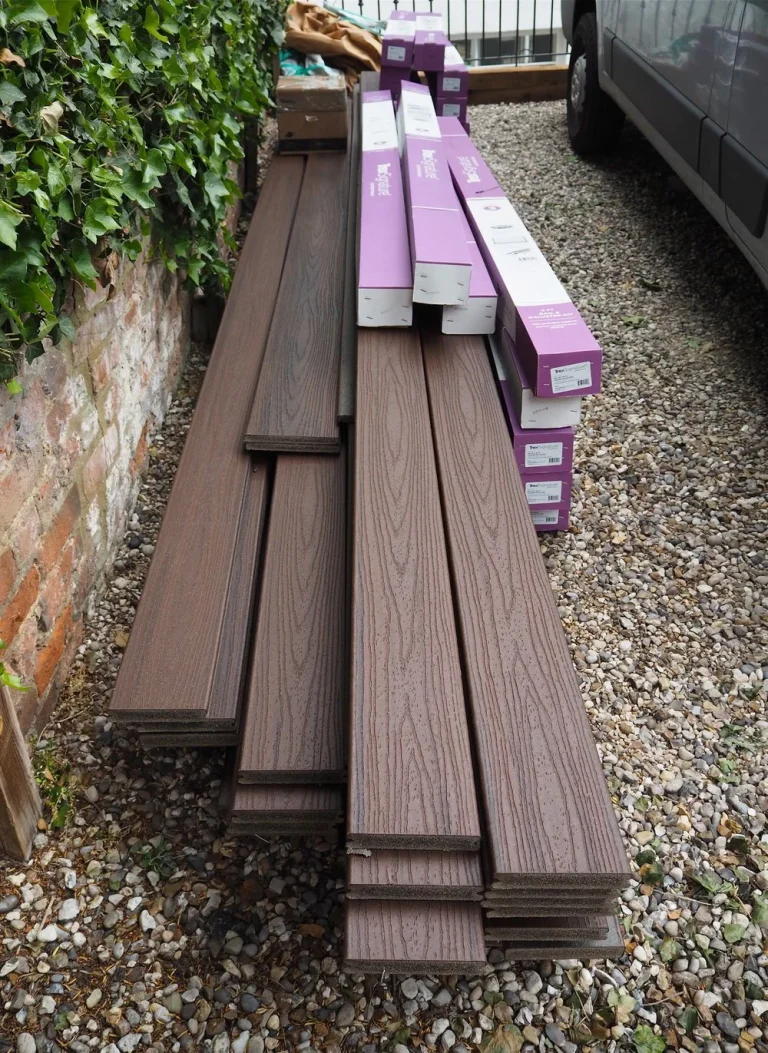
3. Material Choices
Wood is a popular choice for decks. Common options include:
- Pressure-Treated Lumber (Pine or Fir): This is the most common and budget-friendly option. It’s treated to resist rot, decay, and insects. It’s a great choice for beginners.
- Cedar or Redwood: These woods are naturally resistant to rot and insects and have a beautiful natural color. They are more expensive than pressure-treated lumber.
- Hardwoods (like Ipe): These are extremely durable and beautiful but are also much more expensive and harder to work with, so they’re usually not recommended for a first-time DIYer.
For your first do it yourself wood deck, pressure-treated lumber is often the simplest and most cost-effective choice.
4. Budgeting Your Project
Break down your costs. You’ll need to account for lumber, fasteners (screws and bolts), concrete for footings, gravel, post anchors, and any finishing materials like stain or sealant. It’s always a good idea to add about 10-15% extra to your budget for unexpected expenses.
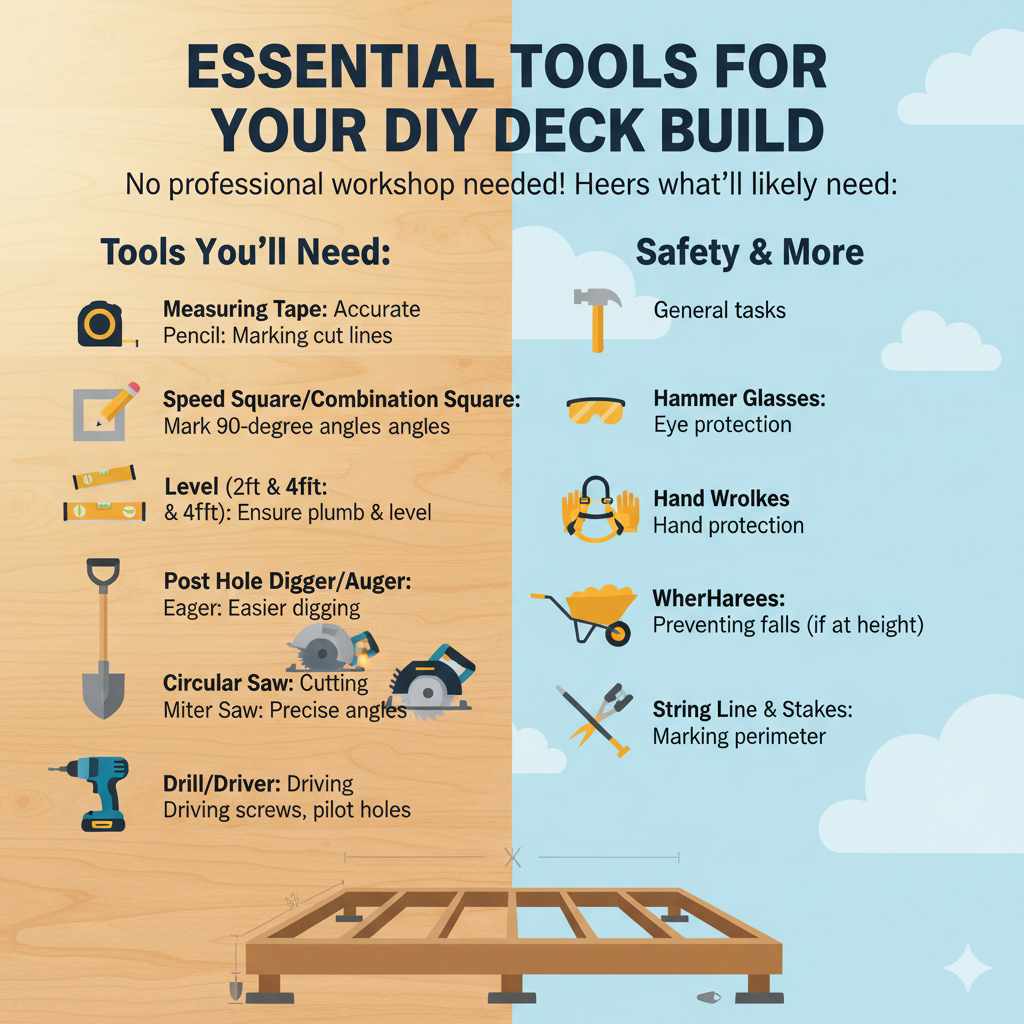
Essential Tools for Your DIY Deck Build
You don’t need a professional workshop to build a deck! Here are the key tools you’ll likely need for a successful do it yourself wood deck build:
Tools You’ll Need:
- Measuring Tape: For accurate measurements.
- Pencil: For marking cut lines.
- Speed Square or Combination Square: To mark 90-degree angles.
- Level (2-foot and 4-foot): To ensure everything is plumb and level.
- Shovel: For digging post holes.
- Post Hole Digger or Auger: Makes digging holes much easier.
- Circular Saw: For cutting lumber. A miter saw is great for precise angle cuts if you have access to one.
- Drill/Driver: Cordless models are very handy for driving screws and drilling pilot holes.
- Hammer: For general tasks and setting nails if needed.
- Safety Glasses: Absolutely essential for protecting your eyes.
- Work Gloves: To protect your hands.
- Safety Harness (if working at height): Crucial for preventing falls.
- Wheelbarrow: For moving soil, concrete, and materials.
- String Line and Stakes: For marking out the deck perimeter.
Step-by-Step: Building Your Do It Yourself Wood Deck
This section walks you through the core construction steps. Remember, patience and accuracy are your best friends here!
Step 1: Laying Out the Footings
This is where your deck truly takes root. Proper footings are critical for stability and safety.
- Mark Corners: Use stakes and string lines to mark out the exact perimeter of your deck. Ensure the corners are square by measuring the diagonals; they should be equal.
- Locate Footing Positions: Mark where your support posts will go. Your deck plan will guide this, but generally, posts are placed every 6-8 feet.
- Dig Holes: Dig your post holes. The depth will depend on your local building codes, but they generally need to extend below the frost line to prevent heaving in winter. A depth of 36-48 inches is common. Fill the bottom of the holes with a few inches of gravel for drainage.
Pro Tip: Always check your local building department for specific footing depth requirements. They are there to ensure your structure’s safety and longevity.
Step 2: Pouring Concrete Footings
Once your holes are dug, it’s time for concrete.
- Mix Concrete: Follow the instructions on the concrete bag for mixing. You want a consistency that’s easy to work with but not too soupy.
- Pour and Level: Pour the concrete into the holes, filling them to at least a few inches above ground level. Use your shovel or a trowel to level the top.
- Install Post Anchors: While the concrete is still wet, embed galvanized post anchors into the center of each footing. Ensure they are plumb and positioned correctly according to your plan. Let the concrete cure thoroughly, usually 24-72 hours, before proceeding.
Step 3: Attaching the Ledger Board (If Applicable)
If your deck is attached to your house, you’ll need a ledger board. This is a beam that attaches directly to your house’s rim joist and supports one side of your deck.
- Mark Position: With a level, mark the exact height for the ledger board on your house’s exterior wall.
- Remove Siding (Optional but Recommended): For a strong connection, it’s best to remove a section of siding where the ledger board will go.
- Install Flashing: Crucially, install proper metal or vinyl flashing over the top of where the ledger board will sit. This prevents water from getting behind the board and into your house’s structure.
- Mark and Drill Holes: Position the ledger board and pre-drill holes through it and into your house’s rim joist.
- Secure with Lag Screws/Bolts: Use substantial lag screws or through-bolts (as specified by your building code) to securely attach the ledger board to the house. Ensure it’s perfectly level.
Important Safety Note: Attaching a ledger board to your house involves understanding structural connections. If you’re unsure, get advice from a building professional or consult resources from organizations like Fine Homebuilding for detailed guides on proper ledger board installation and flashing techniques.
Step 4: Installing the Rim Joists and Beams
These form the outer frame of your deck and the main structural supports.
- Attach Rim Joists: If your deck is freestanding (not attached to the house), you’ll install rim joists on all sides. If it’s attached, you’ll have one ledger board and rim joists on the other three sides. These sit on top of your footings or beams.
- Install Beams: If your deck is large or spans a significant distance, you’ll have beams (larger lumber, often doubled up) that sit on posts and the rim joists. These will support the floor joists. Secure beams to posts using appropriate connectors and fasteners.
- Attach Your Beams: If your deck is attached to the house with a ledger board, your main structural support on the opposite side will be a beam resting on posts, which are anchored to your footings. Ensure the beam is level and securely fastened to the posts.
Step 5: Setting the Floor Joists
These are the horizontal boards that your deck floor will attach to.
- Spacing: Floor joists are typically spaced 16 inches on center (OC). Measure and mark their positions on the ledger board and beam.
- Attachment: Use metal joist hangers for a secure and code-compliant connection to the ledger board and beams. If attaching to a beam without hangers, face-nailing and toenailing are also options, but hangers are best for beginners.
- Cut to Length: You’ll cut your joists to the correct length based on your deck’s dimensions.
- Install Rim Joists: Once all the floor joists are in place, install the rim joists to cap off the ends. This ties everything together.
Step 6: Installing the Decking
This is where your deck really starts to look like a deck!
- Starting Point: Begin laying your deck boards from the house or the outer edge, depending on your preference. Ensure the first board is perfectly straight and square.
- Spacing: Leave a small gap (about 1/8 to 1/4 inch) between deck boards to allow for expansion and drainage. Spacers can help with this.
- Fastening: Secure each deck board to every joist with two screws. Use exterior-grade screws designed for decking. Predrilling pilot holes, especially near the ends of boards, can prevent splitting.
- Overhang: Let the deck boards overhang the edges slightly, and you can trim them all flush later with a circular saw for a clean finish.
Step 7: Building Railings and Stairs (Optional but Recommended for Safety)
If your deck is more than a few feet off the ground, railings and stairs are essential for safety and accessibility.
Railings:
- Install sturdy railing posts, typically every 4-6 feet. These should be securely bolted to the deck frame, not just the decking. Building codes will specify post size and spacing requirements.
- Attach top and bottom rails between the posts.
- Add balusters (vertical spindles) spaced no more than 4 inches apart to prevent falls.
Stairs:
- Stairs require careful calculation of rise and run. Many online calculators can help you determine the correct stringer cuts.
- Cut stair stringers from sturdy lumber.
- Attach stringers securely to the deck frame and a foundation at the bottom (concrete pad is ideal).
- Install treads (the steps themselves) and risers (if desired).
A fantastic resource for stair and railing design and construction is found through the Wood Magazine website, which offers detailed plans and techniques.
Step 8: Finishing Touches
The final steps to protect your deck and make it look its best.
- Trim Edges: Trim any overhanging deck boards flush with the rim joists for a clean, professional look.
- Sand: Lightly sand any rough edges or surfaces.
- Stain or Seal: Apply a good quality exterior wood stain or sealant. This protects the wood from UV rays and moisture, extending its life and maintaining its appearance. Follow the product’s instructions for application and drying times.
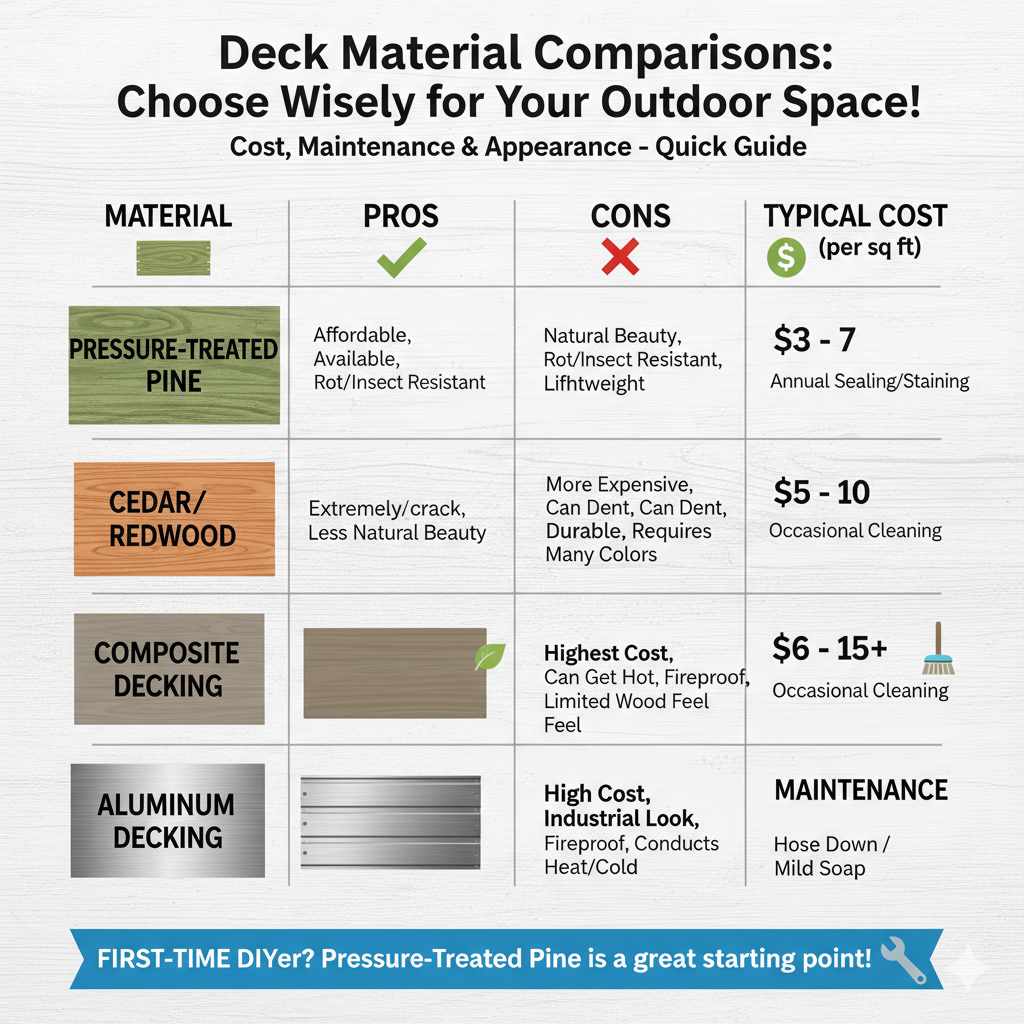
Deck Material Comparisons
Choosing the right material impacts cost, maintenance, and appearance. Here’s a quick look:
| Material Type | Pros | Cons | Typical Cost (per sq ft) | Maintenance |
|---|---|---|---|---|
| Pressure-Treated Pine | Affordable, readily available, rot/insect resistant | Can warp/crack if not sealed, less natural beauty | $3 – $7 | Annual sealing/staining recommended |
| Cedar/Redwood | Natural beauty, good rot/insect resistance, lightweight | More expensive, can dent, requires sealing | $5 – $10 | Annual sealing/staining recommended |
| Composite Decking | Low maintenance, very durable, many colors | Highest cost, can get hot, limited wood feel | $6 – $15+ | Occasional cleaning |
For a first-time do it yourself wood deck, pressure-treated pine offers the best balance of affordability, ease of use, and durability. Understanding these options helps you make an informed decision for your project.
Frequently Asked Questions About DIY Deck Building
Q1: Do I really need a building permit for my deck?
A1: In most cases, yes. Adding a structure like a deck, especially one attached to your house or over a certain height, usually requires a permit. It ensures your deck meets safety standards. Always check with your local building department.
Q2: How do I ensure my deck is level and square?
A2: Use a good quality level on all your framing components. For squaring, measure the diagonals of your rectangular deck frame. If the measurements are equal, your frame is square.
Q3: What’s the easiest type of wood for a beginner to use for a deck?
A3: Pressure-treated lumber is generally the easiest for beginners. It’s readily available, forgiving to work with, and cost-effective. Cedar and redwood are also manageable but more expensive.
Q4: How far apart should deck boards be spaced?
A4: A common spacing is about 1/8 to 1/4 inch between boards. This gap allows for expansion and contraction of the wood due to moisture and temperature changes, and also lets water drain through, preventing rot.
Q5: Do I need to pre-drill holes for deck screws?
A5: It’s highly recommended, especially when driving screws near the ends of deck boards or in hardwood. Pre-drilling a pilot hole slightly smaller than the screw diameter prevents the wood from splitting.
Q6: How often should I seal or stain my wooden deck?
A6: Typically, you should reseal or restain your deck every 1-3 years, depending on the climate, the type of wood, and the quality of the product used. A good indicator that it’s time is when water no longer beads up on the surface.
Q7: What are the most common mistakes beginners make when building a deck?
A7: Common mistakes include insufficient footing depth, improper ledger board attachment, not squaring the frame, poor spacing of deck boards, and skipping railings or incorrect post bracing on steps. Planning and double-checking measurements are key to avoiding these.
Conclusion: Enjoy Your New Outdoor Haven!
You’ve done it! Building your own do it yourself wood deck is a significant accomplishment, and with these clear steps, you’ve seen that it’s entirely achievable. From careful planning and material selection to the final coat of stain, each stage builds upon the last. Remember the safety precautions, take your time with measurements, and don’t hesitate to consult local resources if you’re ever unsure. Your new deck is more than just a structure; it’s a space for memories, relaxation, and enjoyment for years to come. So, step outside, take a deep breath, and be proud of the beautiful, functional addition you’ve created for your home.