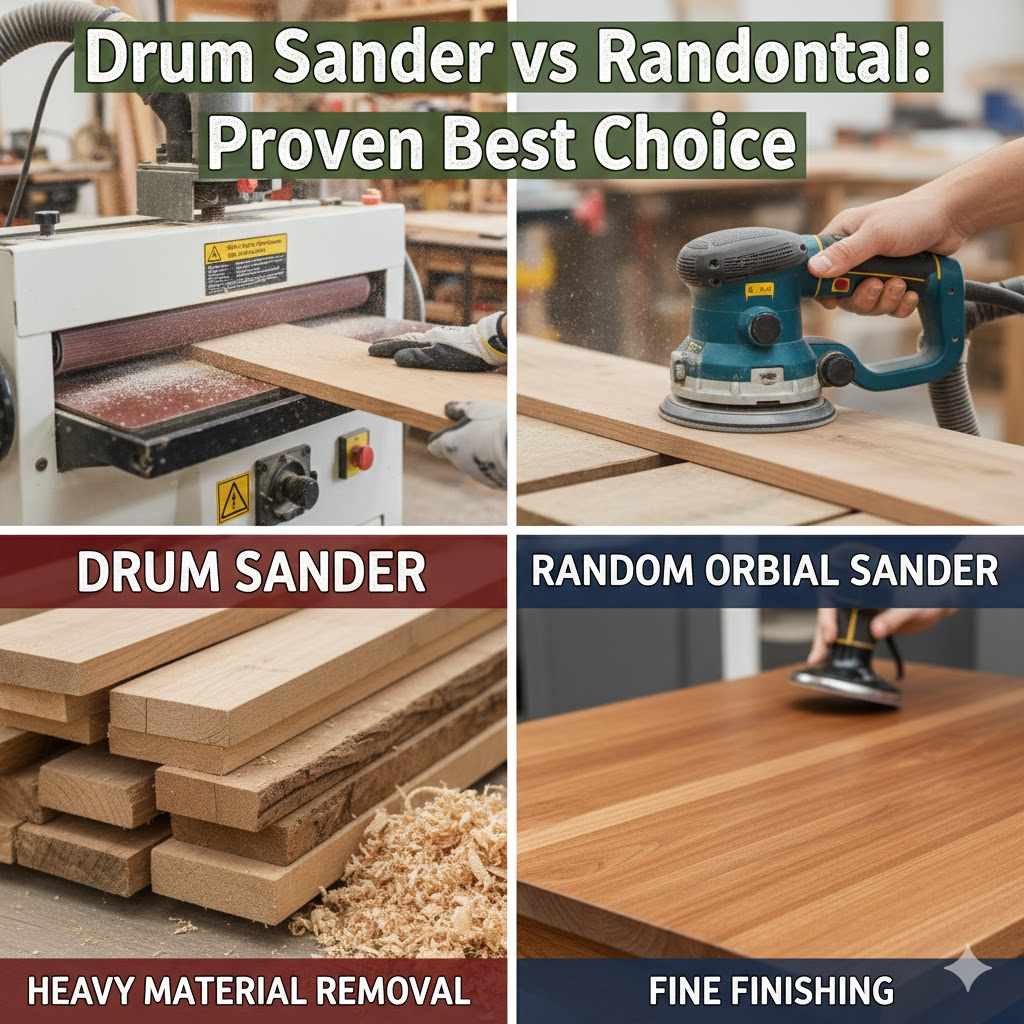
Drum Sander Vs Random Orbital: Proven Best Choice
For flattening large wood slabs and aggressive stock removal, a drum sander is the proven best choice. For achieving a smooth, swirl-free final finish on most DIY and furniture projects, a random orbital sander is the undisputed winner. The best tool depends entirely on whether your job needs power and leveling or finesse and polish.
Walking into the tool aisle can feel overwhelming, can’t it? You see rows of sanders, all promising a perfect finish. Two of the most common—yet confusing—tools are the drum sander and the random orbital sander. They both smooth wood, but they work in completely different ways. Picking the wrong one can turn a fun project into a frustrating mess.
But don’t worry, I’m here to clear things up. As your woodworking guide, I’ll walk you through exactly what each sander does, when to use it, and how to choose the right one for your workshop. We’ll break it all down into simple, easy-to-understand terms. By the end of this guide, you’ll feel confident picking the perfect tool to get that beautiful, glass-smooth finish you’ve been dreaming of.
Understanding the Drum Sander: The Heavy-Duty Workhorse
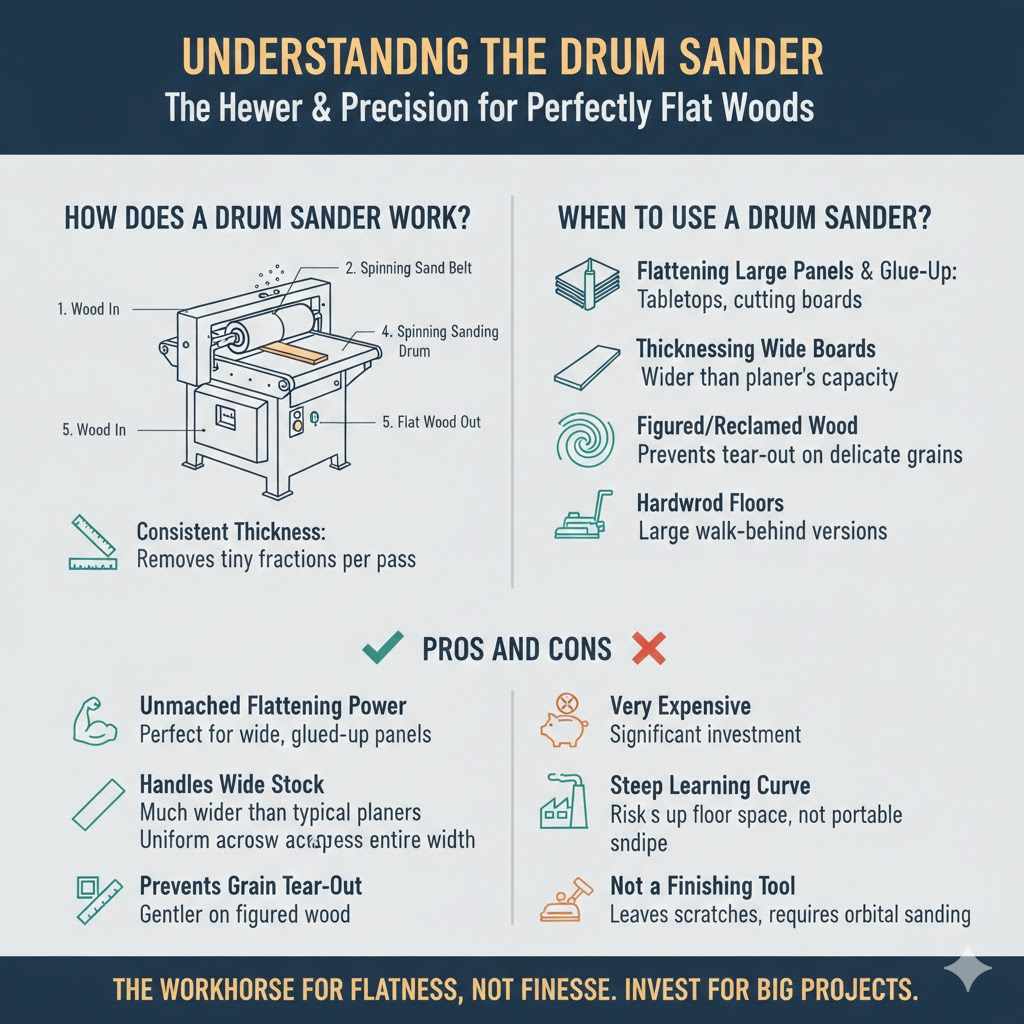
Think of a drum sander as the powerhouse of your sanding arsenal. It’s a big, stationary machine designed for one main job: removing a lot of wood quickly and making large, flat surfaces perfectly uniform. If you’ve ever glued up several boards to make a tabletop, you know the surface can be a little uneven. The drum sander is the tool that flattens it perfectly from edge to edge.
It’s not a finishing tool. Its purpose is aggression and precision flattening, not creating a final, delicate surface. It’s the muscle that does the heavy lifting before the finer tools take over.
How Does a Drum Sander Work?
A stationary drum sander works a bit like a wood planer, but with sandpaper instead of cutting blades. Here’s the simple breakdown:
- A large, spinning cylinder (the “drum”) is wrapped with a long strip of sandpaper.
- Below the drum is a conveyor belt that slowly feeds a piece of wood through the machine.
- You set the height of the drum, and as the wood passes underneath, the sandpaper sands the surface down to a consistent thickness.
You take very shallow passes, removing just a tiny fraction of an inch at a time. This process lets you flatten wide boards, panels, and large glue-ups with incredible precision.
When Should You Use a Drum Sander?
A drum sander shines in specific situations where power and flatness are key. You wouldn’t use it to sand a delicate picture frame, but you’d absolutely reach for it when:
- Flattening Large Panels and Glue-Ups: This is its number one job. If you’ve glued boards together for a tabletop, cutting board, or cabinet door, a drum sander will make the surface perfectly flat and smooth out any uneven joints.
- Thicknessing Wide Boards: While a planer is great for thicknessing, most hobbyist planers have a width limit of 12-13 inches. A drum sander can handle much wider boards, allowing you to bring a 20-inch wide panel down to a precise thickness.
- Working with Figured or Reclaimed Wood: Woods with wild grain patterns (like curly maple) can get torn up by a planer’s blades. A drum sander is much gentler on these delicate grains, preventing tear-out while still flattening the board.
- Sanding Hardwood Floors: There are also large, walk-behind versions of drum sanders designed specifically for refinishing hardwood floors. These are typically rented for big flooring jobs.
Pros and Cons of a Drum Sander
Like any specialized tool, the drum sander has its strengths and weaknesses. It’s important to know both before deciding if it’s right for your workshop.
| Pros (The Good Stuff) | Cons (The Trade-Offs) |
|---|---|
| ✅ Unmatched Flattening Power: Nothing flattens a wide, glued-up panel as effectively and precisely as a drum sander. | ❌ Very Expensive: These are a significant investment, often costing a thousand dollars or more. |
| ✅ Handles Wide Stock: It can sand boards wider than most consumer-grade planers can handle. | ❌ Large and Heavy: A drum sander takes up a lot of valuable floor space in a small workshop and is not portable. |
| ✅ Consistent Thickness: It creates a perfectly uniform thickness across the entire width of a board. | ❌ Steep Learning Curve: It’s easy to make mistakes like creating burn marks or “snipe” (gouging the ends of the board). |
| ✅ Prevents Grain Tear-Out: It’s much gentler on figured wood than a planer, preserving beautiful grain patterns. | ❌ Not a Finishing Tool: It leaves behind linear scratches that must be removed with a random orbital sander. |
Meet the Random Orbital Sander: Your Go-To Finishing Tool
If the drum sander is the heavy-lifter, the random orbital sander is the artist. This handheld tool is likely the first sander most woodworkers buy, and for good reason. It’s incredibly versatile, easy to use, and affordable. Its magic lies in its ability to produce a super-smooth finish with no swirl marks.
This is your everyday sander, perfect for taking a project from “pretty good” to “professionally smooth.” Whether you’re building furniture, refinishing a thrift store find, or just smoothing a small craft project, the random orbital sander is almost always the right tool for the final stages of sanding.
How Does a Random Orbital Sander Work?
The name “random orbital” perfectly describes its unique motion. It does two things at once:
- It spins in a circle: Like a regular disc sander.
- It moves in an elliptical orbit: The whole spinning pad also wobbles around in a small, random pattern.
This combined action ensures that the same abrasive particles on the sandpaper never follow the same path twice. This is the secret to its swirl-free finish. A simple orbital sander (also called a quarter-sheet sander) only wobbles, and a disc sander only spins, both of which can leave noticeable swirl marks in the wood. The random orbital motion is the key to a flawless surface, ready for paint, stain, or oil.
When Should You Use a Random Orbital Sander?
The random orbital sander is your most versatile sanding companion. You’ll find yourself reaching for it constantly. It’s the perfect choice for:
- Finish Sanding: This is its main purpose. After leveling a surface (perhaps with a drum sander or planer), you’ll use a random orbital sander to smooth the wood for finishing. You’ll typically work your way up through different grits of sandpaper (e.g., 120, then 180, then 220) to get a perfect surface.
- Removing Old Finishes: It’s fantastic for stripping old paint, varnish, or lacquer from furniture without being overly aggressive and damaging the wood underneath.
- Smoothing Edges and Curves: Its handheld nature makes it easy to sand the edges of a tabletop or even gently contoured surfaces on a chair leg.
- General-Purpose Sanding: For almost any small-to-medium project, from building a bookshelf to making a set of coasters, this is the sander you’ll use from start to finish.
Pros and Cons of a Random Orbital Sander
This tool is a favorite for a reason, but it’s not designed for heavy-duty leveling. Here’s a look at where it excels and where it falls short.
| Pros (The Good Stuff) | Cons (The Trade-Offs) |
|---|---|
| ✅ Extremely Affordable: You can get a high-quality random orbital sander for a fraction of the cost of a drum sander. | ❌ Slow Material Removal: It is not designed to flatten warped boards or remove significant amounts of wood quickly. |
| ✅ Beginner-Friendly: It’s very easy to learn and use. It’s difficult to seriously damage your project with one. | ❌ Not for Leveling: It follows the contours of the wood, so it won’t flatten an uneven panel. It will just make an uneven panel smoother. |
| ✅ Produces a Swirl-Free Finish: Its random motion is key to creating a beautiful surface ready for stain or topcoat. | ❌ Relies on Technique: You must keep the sander flat on the surface to avoid accidentally rounding over edges. |
| ✅ Versatile and Portable: You can use it on almost any project, size, or shape, and easily carry it wherever you need it. | ❌ Requires Multiple Grits: Achieving a perfect finish requires stepping through several different sandpaper grits. |
Drum Sander vs. Random Orbital Sander: A Side-by-Side Showdown
So, how do these two tools stack up when you put them head-to-head? It’s not about one being better, but about them being built for completely different stages of a project. One does the heavy lifting, the other does the fine-tuning.
This table gives you a clear, at-a-glance comparison to help you understand their distinct roles in the workshop.
| Feature | Drum Sander | Random Orbital Sander |
|---|---|---|
| Primary Job | Aggressive stock removal and flattening wide panels to a uniform thickness. | Fine finishing, removing old paint, and general-purpose smoothing. |
| Tool Type | Large, stationary machine (or large walk-behind floor model). | Small, handheld power tool. |
| Speed of Removal | Extremely fast. Removes wood quickly in controlled passes. | Slow to moderate. Designed for gradual smoothing, not rapid removal. |
| Final Finish Quality | Leaves linear sanding scratches that require further sanding. | Leaves a smooth, swirl-free finish ready for stain, paint, or oil. |
| Ease of Use | High learning curve. Mistakes can happen quickly and be hard to fix. | Very beginner-friendly. Forgiving and easy to control. |
| Cost | High ($1,000+). A major workshop investment. | Low ($50 – $150). An essential and affordable starter tool. |
| Ideal Project Size | Large surfaces like tabletops, cabinet panels, and hardwood floors. | Small to medium-sized projects like furniture, boxes, and cutting boards. |
| Versatility | Highly specialized for one task: precision flattening. | Extremely versatile. Can be used on flat surfaces, edges, and gentle curves. |
Which Sander is Right for Your Project?
Let’s move from theory to practice. Imagine you’re in your workshop. Which sander should you grab? Here are a few common scenarios to guide you.
Scenario 1: You’re building a large oak dining table from several glued-up boards.
The Proven Choice: Use both!
- Start with the Drum Sander: After the glue dries, the panel will have slight variations in height at the seams. A drum sander is the perfect tool to feed the entire tabletop through, making it perfectly flat and uniform in thickness.
- Finish with the Random Orbital Sander: The drum sander will leave fine linear scratches. Now, grab your random orbital sander. Start with 120-grit sandpaper to remove those scratches, then move to 180-grit, and finally 220-grit for a silky-smooth surface ready for staining.
Scenario 2: You bought an old wooden chair from a flea market and want to refinish it.
The Proven Choice: Random Orbital Sander, hands down.
A drum sander would be impossible to use on the complex shapes of a chair and would destroy it. The random orbital sander is perfect here. Its small size allows you to get into most areas to strip the old paint or varnish. For the tight spots like spindles, you’ll want to switch to hand sanding, but the random orbital sander will do 90% of the work beautifully.
Scenario 3: You want to make end-grain cutting boards to sell.
The Proven Choice: Drum Sander is a huge time-saver.
End-grain cutting boards are notoriously difficult to flatten. The grain direction makes them unsafe to run through a planer. A drum sander is the professional’s choice for this job. It can safely and easily flatten the end grain, saving you hours of tedious sanding by hand. You will still need a random orbital sander for the final smoothing, but the drum sander does the critical flattening work.
Safety First: Essential Tips for Using Your Sander
No matter which tool you choose, safety should always be your top priority. Sanding creates fine dust that’s bad to breathe and can be an eye irritant. Here’s how to stay safe.
General Sanding Safety
- Wear a Mask: Always wear a high-quality dust mask or a respirator. Wood dust can be harmful to your lungs over time. The CDC provides guidance on the risks of wood dust exposure.
- Protect Your Eyes: Safety glasses are a must to protect your eyes from flying dust and debris.
- Use Dust Collection: If your sander has a dust port, connect it to a shop vacuum. This dramatically reduces the amount of airborne dust, keeping your lungs and your workshop cleaner.
Drum Sander Specific Safety
- Read the Manual: These are powerful machines. Understand all the controls and safety features before you turn it on.
- Take Shallow Passes: Never try to remove too much material at once. This can overload the motor, burn the wood, or cause the board to kick back. A good rule of thumb is to turn the height adjustment wheel no more than a quarter turn per pass.
- Keep Hands Clear: Never put your hands near the sanding drum while it’s in motion. Let the conveyor belt do all the work of feeding the wood.
Random Orbital Sander Specific Safety
- Let the Tool Work: Don’t press down hard on the sander. Applying too much pressure can slow the pad’s rotation, reducing its effectiveness and potentially creating swirls or gouges. Let the weight of the tool do the work.
- Keep the Pad Flat: Try to keep the sanding pad flat against the wood surface. Tilting the sander on its edge can dig into the wood and create ugly divots that are hard to remove.

Frequently Asked Questions (FAQ)
It’s natural to still have a few questions. Here are answers to some of the most common ones I hear from fellow woodworkers.
- 1. Do I need both a drum sander and a random orbital sander?
- For most beginners and hobbyists, the answer is no. A random orbital sander is the essential first purchase. You can accomplish a huge range of projects with it. You only need to consider a drum sander if you regularly plan to make large tabletops or work with wide, rough-sawn lumber that needs flattening.
- 2. Can I use a drum sander on small furniture projects?
- Generally, no. A drum sander is designed for large, flat panels. It’s too big and aggressive for the smaller, more delicate parts of a typical furniture piece like a chair or a small side table. You risk destroying the piece.
- 3. What’s the difference between an orbital sander and a random orbital sander?
- A standard orbital sander (often called a sheet sander) has a square pad and only vibrates in a small circular pattern (it doesn’t spin). This motion can leave tiny swirl marks. A random orbital sander both spins and oscillates, which creates that scratch-free finish and makes it the superior tool for finishing.
- 4. Can a random orbital sander flatten a board?
- No. A random orbital sander follows the existing surface of the wood. If you have a warped or cupped board, a random orbital sander will simply make that warped board smoother—it won’t make it flat. Flattening requires tools like a jointer, planer, or a drum sander.
- 5. What grit sandpaper should I start with?
- For a drum sander, you might start with a coarse 80-grit paper for aggressive flattening. For a random orbital sander on a relatively smooth board, starting with 120-grit is common for general smoothing. If you’re removing an old finish, you might start with a coarser 80-grit.
- 6. Is a drum sander the same as a thickness planer?
- No, but they do similar jobs. A planer uses sharp blades to cut wood away, which is very fast but can cause tear-out on figured grain. A drum sander uses abrasion (sandpaper) to remove wood, which is slower but much gentler. A sander is for fine-tuning thickness and flattening, while a planer is for rapidly dimensioning rough lumber.
- 7. How do I avoid leaving marks with my sander?
- With a drum sander, take very light passes and keep the conveyor belt speed consistent to avoid burns. With a random orbital sander, let the tool do the work (don’t press down), keep the pad flat, and progress steadily through the grits (don’t skip from 80-grit straight to 220-grit). According to the experts at the The Wood Database, proper grit progression is key to a flawless finish.
The Final Verdict: Choosing Your Sanding Champion
So, drum sander vs random orbital sander: which is the proven best choice? The truth is, they are both champions in their own right. They aren’t competitors; they are teammates. One is the strong, silent type that does the heavy lifting, and the other is the detailed artist that perfects the final surface.
For 99% of beginners, hobbyists, and DIYers, the random orbital sander is the clear and undeniable best first choice. It’s affordable, versatile, and essential for achieving that smooth-to-the-touch finish on furniture and home projects. It’s a tool you will use on almost every project you ever make.
The drum sander is a specialized, professional-level tool. It’s the right choice only when you’re ready to scale up your woodworking to include large-scale glue-ups, wide panels, and serious production work. It’s an amazing machine, but it solves a problem that many woodworkers don’t have yet.
Now you have the knowledge to look at your next project and choose your sanding tools with confidence. Don’t be intimidated by the options. Start with the basics, master your random orbital sander, and you’ll be creating beautiful, professional-looking projects in no time. Happy building!