Wood Floor Repair: DIY Fixes for Scratches, Gouges, and Damaged Planks
Most wood floor damage falls into one of three repair categories: surface scratches (fix with a matching wood crayon or light sanding), gouges and dents (fill with wood filler or epoxy wood patch), and damaged planks (cut out and replace the board entirely). Picking the wrong method for the damage you actually have is the most common reason a DIY floor repair looks worse than the original scratch. Here’s how to tell which repair a specific piece of damage actually needs.
Identifying the Type of Damage First
Best for Gouges and Deep Cracks
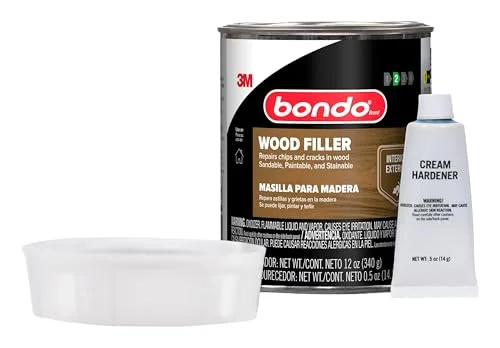 |
Bondo Wood Filler with Hardener, 12 oz A two-part epoxy filler that sets rock-hard, unlike standard wood putty that stays soft and can shrink out of a deep gouge.
|
Run a fingernail across the damage: if it doesn’t catch, it’s a surface scratch in the finish only. If your nail catches but the wood grain underneath is intact, it’s a gouge or dent that needs filler. If the board itself is cracked, split, cupped, or the finish has failed down to bare, water-stained wood, you’re likely looking at a plank replacement rather than a surface repair.
Fixing Surface Scratches
- Clean the area with a dry or barely damp cloth – no soap, which can interfere with the repair product bonding.
- For light scratches in the finish only, rub a wood repair crayon or marker matched to your floor’s color directly into the scratch.
- Buff gently with a soft cloth to blend the repair into the surrounding sheen.
- For a scratch that’s still visible after coloring, a small amount of matching touch-up finish (available at any flooring retailer) applied with a fine artist’s brush closes the gap in the protective coat.
Repairing Gouges and Deep Cracks
- Clean out any loose debris or splinters from the damaged area.
- Mix the wood filler and hardener per the product’s instructions – only mix what you’ll use in the working window, typically 15-30 minutes.
- Press the filler into the gouge with a putty knife, slightly overfilling since it will need sanding flush.
- Let it cure fully per the label (usually a few hours), then sand flush with 150-220 grit sandpaper.
- Apply a matching stain to the filled area, then a clear finish coat to blend it with the surrounding floor.
Replacing a Damaged Plank
- Mark the full boundary of the damaged plank, and drill relief holes at the corners to make cutting easier and safer.
- Using a circular saw set to the exact depth of the flooring (not deeper, to avoid cutting the subfloor), cut along the length of the board within the marked boundaries, then finish the ends with a chisel.
- Pry out the damaged sections carefully, working from the cut lines outward to avoid damaging neighboring boards.
- Cut a replacement plank to size from matching material, dry-fit it, and trim as needed for a snug fit.
- Glue and/or face-nail the new plank into place, set any nail heads below the surface, and fill the holes with matching wood filler.
- Sand, stain, and finish the new plank to match – expect some visible color difference until the finish ages and evens out over the following months, particularly with oil-based finishes that continue to amber slightly as they cure.
Sanding and Refinishing a Larger Area
When damage is spread across a larger area rather than isolated spots, a full sand-and-refinish is usually more efficient than patching each mark individually. Clear the room completely, check for and set any protruding nails, then sand with progressively finer grits starting around 36-40 grit for old finish removal and finishing around 120-150 grit before staining. Vacuum thoroughly between grits, since leftover dust from a coarser pass shows up as scratches under the next finer grit. Apply your chosen finish in thin, even coats, allowing full dry time between coats per the product label – rushing this step is the single biggest cause of a tacky, uneven refinish.
Common Mistakes
- Using standard wood putty on a floor gouge. Standard putty stays soft and shrinks over time under foot traffic; a two-part epoxy filler holds up far better in a high-wear floor location.
- Wet-mopping to clean before a repair or refinish. Standing water swells wood fibers and can telegraph through a fresh finish.
- Skipping the dust vacuum between sanding grits. Leftover coarse-grit dust scratches the surface under the next finer pass.
- Cutting a plank replacement too deep. Cutting into the subfloor creates a new repair problem on top of the original one – set the saw depth to match the flooring thickness exactly.
Matching Stain Color on a Repair
Getting a filled or replaced area to match the surrounding floor is usually the hardest part of any repair, since wood color shifts with age, sunlight exposure, and the specific finish originally used. Always test your stain choice on an inconspicuous area first, like inside a closet or under a removable appliance, rather than committing directly on the visible repair. Mixing two adjacent stain shades slightly off from each other often gets closer to an aged floor’s actual color than any single can straight from the shelf. Apply stain in thin layers and check the color after each one dries – it’s much easier to deepen a too-light match than to lighten one that went on too dark, and a heat gun or additional solvent can sometimes lift an overly dark test spot before it fully cures.
Preventing Future Damage
- Use felt pads under all furniture legs, and check them periodically since they wear thin and lose their protective cushioning over time.
- Place rugs or mats at entry points to catch grit that would otherwise get tracked across the floor and act like sandpaper under foot traffic.
- Keep pet nails trimmed – long nails are a common, ongoing source of fine surface scratches that accumulate gradually rather than from one obvious event.
- Maintain consistent indoor humidity (usually 35-55%) where practical – wide humidity swings drive the expansion and contraction that leads to cupping, gapping, and cracking over time, especially in homes without central humidity control across seasons.
- Clean spills immediately rather than letting them sit, even briefly, since standing liquid is the single fastest path to water damage requiring plank replacement.
DIY Repair vs. Calling a Professional
Isolated scratches, small gouges, and even a handful of plank replacements are realistic DIY projects for someone comfortable with basic tools and a little patience for color-matching. A full room refinish, engineered flooring with a thin wear layer that can’t tolerate aggressive sanding, or any damage affecting more than a few adjacent boards are better candidates for a professional. Engineered floors in particular are worth a second look before DIY sanding – many have a veneer layer thin enough that a single aggressive sanding pass can sand straight through to the substrate below, turning a repairable scratch into a section that needs full replacement. If you’re not sure which type of flooring you have, check the manufacturer’s documentation or a sample from a closet or leftover box before starting any sanding, since the wear-layer thickness is usually listed in millimeters on the original installation paperwork.
Frequently Asked Questions
How do you repair scratched wood floors?
Clean the area, then use a wood repair crayon or marker matched to your floor’s color for light scratches in the finish only. Buff to blend. Deeper scratches that catch a fingernail need filler, not just color.
Can you fix water damage on wood floors?
Minor water staining can sometimes be sanded out and refinished. Warped, cupped, or rotted boards from prolonged water exposure typically need full plank replacement rather than surface repair.
What tools are needed for wood floor repair?
A putty knife, wood filler or epoxy patch, sandpaper in multiple grits, a matching stain, and a fine brush for touch-up finish cover most scratch and gouge repairs. Plank replacement adds a circular saw, chisel, and drill to that list.
How much does wood floor repair cost?
DIY materials for a scratch or gouge repair typically run under $30. Professional repair of isolated damage often runs $100-300 depending on the area, while a full sand-and-refinish job runs several dollars per square foot – get a local quote for an accurate number, since regional labor rates and wood species availability both affect pricing significantly.
Conclusion
Match the repair to the actual damage – a fingernail test tells you in seconds whether you’re dealing with a surface scratch, a gouge, or damage deep enough to need plank replacement. Getting that call right the first time is what separates an invisible repair from one that stands out more than the original damage did. When genuinely unsure, test on a small, hidden area first – the extra ten minutes costs far less than redoing a visible repair.
Sponsored / affiliate links. As an Amazon Associate I earn from qualifying purchases. I may earn additional commission from eligible campaigns.